Transferring photos from an Android device to an iPhone can seem daunting, but it’s actually a straightforward process. This guide from dfphoto.net will walk you through several methods to seamlessly transfer your precious memories, ensuring you don’t lose any of your favorite pictures. Learn how to keep your photos safe and accessible when switching between these popular platforms with simple photo transfer techniques and image migration methods.
1. Why Transfer Photos From Android to iPhone?
Switching from Android to iPhone is a big decision, and your photos are likely a key consideration. Let’s explore the common reasons people transfer their photos.
- Switching Devices: Many users switch from Android to iPhone for various reasons, including the iOS ecosystem, better security, or simply a change of preference.
- Backup and Storage: iPhones offer excellent integration with iCloud, providing a convenient way to back up and store photos.
- Improved Camera Features: Some users may switch to iPhone for its advanced camera features and image processing capabilities.
- Sharing with iOS Users: Being in the iOS ecosystem makes it easier to share photos and videos with friends and family who use iPhones.
- Consolidating Devices: Some people might want to consolidate their digital life onto a single, preferred device.
2. Understanding Your Transfer Options
There are several ways to transfer photos from your Android device to your iPhone. Each method has its advantages and disadvantages, so choosing the right one depends on your specific needs and preferences.
2.1 Using the Move to iOS App
Apple’s “Move to iOS” app is designed specifically for this purpose. It’s a free app available on the Google Play Store that helps you transfer various types of data, including photos, contacts, messages, and more.
Pros:
- Easy to use: The app provides a step-by-step guide, making the process simple even for non-technical users.
- Comprehensive transfer: It transfers not just photos but also other important data.
- Free: The app is available for free on the Google Play Store.
Cons:
- Requires a new iPhone: You need to be setting up a new iPhone or have erased your existing one to use this method.
- Wi-Fi dependent: The transfer relies on a stable Wi-Fi connection.
2.2 Using Google Photos
Google Photos is a popular cloud-based photo storage service that works seamlessly on both Android and iOS devices.
Pros:
- Cross-platform: Works on any device with the Google Photos app.
- Backup and sync: Automatically backs up your photos from your Android device.
- Free storage: Offers free storage up to a certain limit (15 GB shared across Google services).
Cons:
- Storage limits: You may need to pay for additional storage if you have a large photo library.
- Internet dependent: Requires a stable internet connection to upload and download photos.
2.3 Using Cloud Storage Services (Dropbox, OneDrive, etc.)
Cloud storage services like Dropbox and OneDrive are another option for transferring photos.
Pros:
- Versatile: Works on various devices and operating systems.
- File management: Allows you to organize and manage your files in the cloud.
Cons:
- Storage limits: Similar to Google Photos, you may need to pay for additional storage.
- Internet dependent: Requires a stable internet connection for uploading and downloading.
2.4 Using a Computer
You can also transfer photos using a computer as an intermediary.
Pros:
- No internet required: The transfer is done locally, without relying on an internet connection.
- Large file transfers: Suitable for transferring large amounts of data.
Cons:
- More steps: Involves connecting both devices to a computer.
- Requires a computer: You need access to a computer with the necessary software.
2.5 Using a USB Drive or External Storage
This method involves copying photos to a USB drive or external storage device and then transferring them to your iPhone.
Pros:
- No internet required: The transfer is done locally.
- Large file transfers: Suitable for transferring large amounts of data.
Cons:
- Requires adapters: You may need adapters to connect the USB drive to your iPhone.
- More steps: Involves multiple steps and devices.
3. Step-by-Step Guides for Each Method
Let’s dive into detailed instructions for each method.
3.1 Using the Move to iOS App: A Detailed Guide
This is Apple’s recommended method, especially when setting up a new iPhone.
Step 1: Prepare Your Devices
- Make sure both your Android and iPhone are charged or plugged into power.
- Ensure your Android device has Wi-Fi turned on.
- Check that the content you’re moving will fit on your new iPhone.
Step 2: Download and Install the Move to iOS App
- On your Android device, go to the Google Play Store and download the “Move to iOS” app.
Step 3: Start the Setup Process on Your iPhone
- Turn on your new iPhone and follow the onscreen setup instructions.
- On the Quick Start screen, tap “Set Up Without Another [Apple] Device”.
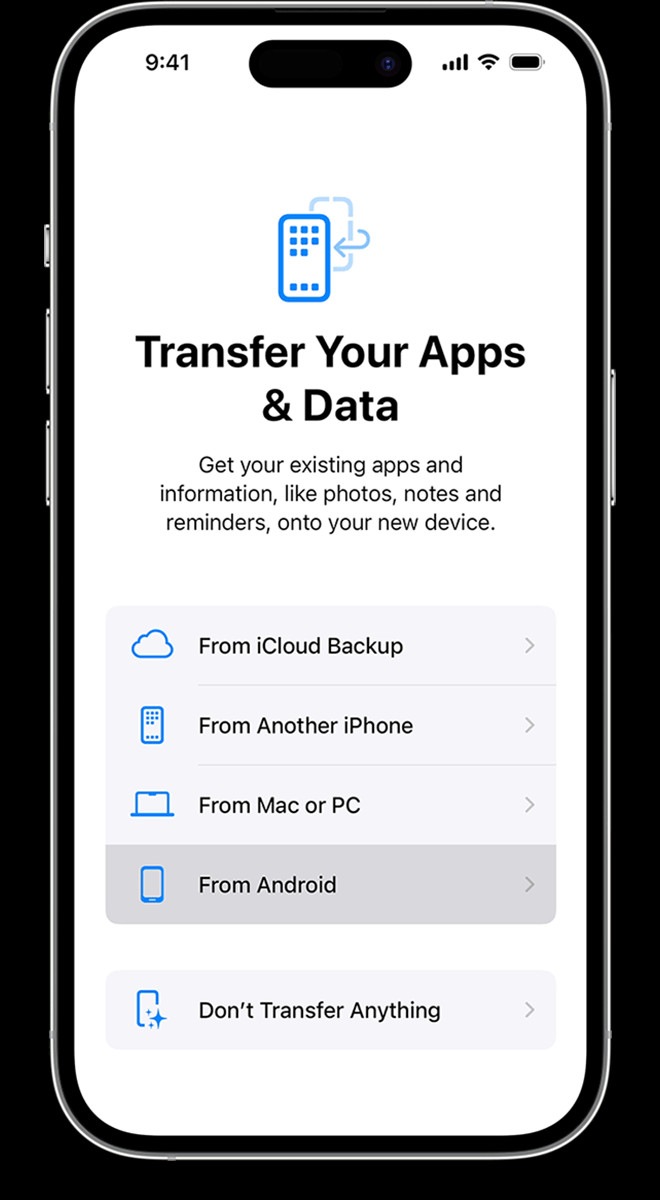
- Continue following the instructions until you reach the “Apps & Data” screen.
Step 4: Select “Move Data from Android”
- On the “Apps & Data” screen, tap “Move Data from Android”.
Step 5: Open the Move to iOS App on Your Android Device
- Open the “Move to iOS” app on your Android device.
- Tap “Continue”, read the terms and conditions, and tap “Agree”.
- Tap “Automatically Send” or “Don’t Send” to choose how to share app data with Apple.
- Tap “Continue” and enable Location and Notification permissions if necessary.
Step 6: Get the Code from Your iPhone
- On your iPhone, tap “Continue” when you see the “Move from Android” screen.
- Wait for a ten-digit or six-digit code to appear.
Step 7: Enter the Code on Your Android Device
- Enter the code on your Android device.
Step 8: Connect to the Temporary Wi-Fi Network
- Your iPhone will create a temporary Wi-Fi network. When asked, tap “Connect” to join that network on your Android device.
- Wait for the “Transfer Data” screen to appear.
Step 9: Choose Your Content and Wait
- On your Android device, select the content you want to transfer, including photos, and tap “Continue”.
- Leave both devices alone until the loading bar on your iPhone finishes.
- Keep your devices near each other and plugged in until the transfer completes.
Step 10: Finish Setup on Your iPhone
- After the loading bar finishes on your iPhone, tap “Done” on your Android device.
- Tap “Continue” on your iPhone and follow the onscreen steps to finish setup.
 Move to iOS app displaying options for transferring data
3.2 Using Google Photos: A Detailed Guide
Google Photos is an excellent option for ongoing photo management and syncing.
Step 1: Install Google Photos on Both Devices
- If you don’t already have it, download and install the Google Photos app on both your Android and iPhone.
Step 2: Back Up Photos from Your Android Device
- Open the Google Photos app on your Android device.
- Sign in with your Google account.
- Tap your profile picture or initial in the top right corner.
- Select “Photo settings” and then “Backup & sync”.
- Make sure “Backup & sync” is turned on.
- Choose the folders you want to back up.
Step 3: Wait for the Backup to Complete
- Allow Google Photos to back up all your photos and videos. This may take some time depending on the size of your library and your internet connection speed.
Step 4: Access Photos on Your iPhone
- Open the Google Photos app on your iPhone.
- Sign in with the same Google account you used on your Android device.
- Your photos and videos should now be visible in the app.
Step 5: Download Photos to Your iPhone (Optional)
- If you want to have the photos stored locally on your iPhone, you can download them.
- Open a photo in the Google Photos app.
- Tap the three dots in the top right corner.
- Select “Download”.
- Repeat for each photo you want to download, or select multiple photos and download them in bulk.
3.3 Using Cloud Storage Services: A Detailed Guide
Services like Dropbox and OneDrive offer a similar process to Google Photos.
Step 1: Install the Cloud Storage App on Both Devices
- Download and install your preferred cloud storage app (e.g., Dropbox, OneDrive) on both your Android and iPhone.
Step 2: Upload Photos from Your Android Device
- Open the cloud storage app on your Android device.
- Sign in to your account.
- Create a new folder (e.g., “Transfer to iPhone”).
- Upload your photos to this folder.
Step 3: Wait for the Upload to Complete
- Allow the app to upload all your photos.
Step 4: Access Photos on Your iPhone
- Open the cloud storage app on your iPhone.
- Sign in with the same account you used on your Android device.
- Navigate to the folder you created.
- Your photos should now be visible.
Step 5: Download Photos to Your iPhone (Optional)
- If you want to store the photos locally, download them to your iPhone.
- Open a photo in the app.
- Tap the download icon.
- Repeat for each photo you want to download.
3.4 Using a Computer: A Detailed Guide
This method involves connecting both devices to a computer.
Step 1: Connect Your Android Device to Your Computer
- Use a USB cable to connect your Android device to your computer.
- On your Android device, select “File Transfer” or “MTP” mode if prompted.
Step 2: Locate Your Photos on Your Android Device
- Open File Explorer (Windows) or Finder (Mac) on your computer.
- Find your Android device in the list of connected devices.
- Navigate to the folder where your photos are stored (usually “DCIM” or “Pictures”).
Step 3: Copy Photos to Your Computer
- Create a new folder on your computer (e.g., “Photos from Android”).
- Copy the photos from your Android device to this folder.
Step 4: Disconnect Your Android Device
- Safely eject your Android device from your computer.
Step 5: Connect Your iPhone to Your Computer
- Use a Lightning cable to connect your iPhone to your computer.
- If prompted, trust the computer on your iPhone.
Step 6: Import Photos to Your iPhone
- On Windows:
- Open the Photos app.
- Click “Import” and select “From a folder”.
- Choose the folder where you saved the photos from your Android device.
- Select the photos you want to import and click “Import”.
- On Mac:
- Open the Photos app.
- Click “File” and select “Import”.
- Choose the folder where you saved the photos from your Android device.
- Select the photos you want to import and click “Review for Import”.
- Click “Import All New Photos” or select specific photos and click “Import [number] Photos”.
3.5 Using a USB Drive or External Storage: A Detailed Guide
This method requires a USB drive and potentially some adapters.
Step 1: Connect Your Android Device to Your Computer
- Use a USB cable to connect your Android device to your computer.
- On your Android device, select “File Transfer” or “MTP” mode if prompted.
Step 2: Locate Your Photos on Your Android Device
- Open File Explorer (Windows) or Finder (Mac) on your computer.
- Find your Android device in the list of connected devices.
- Navigate to the folder where your photos are stored (usually “DCIM” or “Pictures”).
Step 3: Copy Photos to the USB Drive
- Connect the USB drive to your computer.
- Copy the photos from your Android device to the USB drive.
Step 4: Disconnect Your Android Device and Connect the USB Drive to Your iPhone
- Safely eject your Android device from your computer.
- You may need a Lightning to USB adapter to connect the USB drive to your iPhone.
Step 5: Import Photos to Your iPhone
- Open the “Files” app on your iPhone.
- Locate the USB drive in the “Browse” tab.
- Navigate to the folder where your photos are stored.
- Select the photos you want to import.
- Tap the “Share” icon and select “Save Images”.
4. Troubleshooting Common Issues
Sometimes, things don’t go as planned. Here are some common issues and how to resolve them.
- Move to iOS App Not Working:
- Make sure both devices are connected to power.
- Turn off any apps or settings that might affect your Wi-Fi connection on your Android device.
- Restart both devices and try again.
- Turn off cellular data on your Android device.
- Photos Not Backing Up to Google Photos:
- Check your internet connection.
- Make sure “Backup & sync” is turned on in the Google Photos app.
- Check your Google account storage.
- Photos Not Transferring via Computer:
- Make sure your devices are properly connected to the computer.
- Ensure you have the latest version of iTunes installed (for Windows users).
- Try a different USB cable.
5. Tips for a Smooth Transfer
Here are some additional tips to ensure a smooth and successful photo transfer.
- Clean Up Your Photo Library: Before transferring, delete any unnecessary or duplicate photos.
- Check Storage Space: Make sure your iPhone has enough storage space for all your photos.
- Use a Stable Wi-Fi Connection: If using a cloud-based method, ensure you have a stable and fast Wi-Fi connection.
- Be Patient: Transferring a large photo library can take time, so be patient and allow the process to complete.
- Verify the Transfer: After the transfer, verify that all your photos have been successfully transferred to your iPhone.
6. Maintaining Photo Quality During Transfer
It’s important to ensure that your photos retain their original quality during the transfer process. Here’s how to do it:
- Avoid Compression: Some transfer methods may compress photos to save storage space or bandwidth. Choose methods that preserve the original quality, such as using a computer or USB drive.
- Use Original Files: When transferring photos, use the original files rather than compressed versions or thumbnails.
- Check File Formats: Ensure that the file formats are compatible with iOS. Common formats like JPEG and PNG are widely supported.
7. Managing Your Photos on Your iPhone
Once your photos are on your iPhone, here are some tips for managing them effectively:
- Use iCloud Photos: Enable iCloud Photos to automatically back up your photos to the cloud and sync them across your Apple devices.
- Organize Albums: Create albums to organize your photos by date, event, or category.
- Use the Photos App: Familiarize yourself with the features of the Photos app, such as editing tools, search functionality, and sharing options.
8. Exploring dfphoto.net for Photography Inspiration and Education
Now that your photos are safely transferred, it’s time to enhance your photography skills and find inspiration. Visit dfphoto.net to discover a wealth of resources:
- Photography Tutorials: Learn new techniques and improve your skills with our detailed tutorials.
- Stunning Photo Galleries: Get inspired by breathtaking images from talented photographers around the world.
- Community Forum: Connect with fellow photography enthusiasts, share your work, and get feedback.
dfphoto.net is your go-to resource for all things photography. Whether you’re a beginner or a seasoned pro, you’ll find valuable information and inspiration to fuel your passion.
9. The Future of Photo Transfer Technology
As technology evolves, so do the methods for transferring photos. Here are some emerging trends to watch:
- Wireless Transfer Technologies: Advancements in Wi-Fi and Bluetooth technologies are making wireless transfers faster and more reliable.
- AI-Powered Transfer Tools: Artificial intelligence is being used to optimize the transfer process, automatically organizing and tagging photos.
- Improved Cloud Integration: Cloud storage services are becoming more tightly integrated with mobile devices, making photo transfer seamless and automatic.
10. FAQs About Transferring Photos From Android to iPhone
Here are some frequently asked questions to further clarify the process.
- Q1: Will the Move to iOS app transfer all my photos?
- A: Yes, the Move to iOS app is designed to transfer all your photos, videos, contacts, messages, and other data.
- Q2: Can I transfer photos from Android to iPhone without Wi-Fi?
- A: Yes, you can use a computer or a USB drive to transfer photos without Wi-Fi.
- Q3: Is Google Photos free to use?
- A: Yes, Google Photos offers free storage up to 15 GB, shared across your Google account.
- Q4: How long does it take to transfer photos from Android to iPhone?
- A: The transfer time depends on the amount of data and the transfer method used. It can take anywhere from a few minutes to several hours.
- Q5: Will my photos lose quality during the transfer?
- A: To maintain photo quality, use methods that preserve the original quality, such as using a computer or USB drive.
- Q6: What if the Move to iOS app gets interrupted?
- A: If the transfer is interrupted, restart both devices and try again.
- Q7: Can I transfer photos directly from my Android SD card to my iPhone?
- A: Yes, you can use a computer or a USB drive with an SD card reader to transfer photos from your Android SD card to your iPhone.
- Q8: How do I ensure all my photos are backed up after the transfer?
- A: Enable iCloud Photos on your iPhone to automatically back up your photos to the cloud.
- Q9: What do I do if some photos are missing after the transfer?
- A: Check the original source (Android device) to ensure the photos are still there. Try transferring the missing photos again using a different method.
- Q10: Is it safe to use third-party apps to transfer photos?
- A: While some third-party apps can be helpful, it’s generally safer to use official methods like the Move to iOS app, Google Photos, or a computer. Always read reviews and check the app’s permissions before using it.
Conclusion: Making the Switch Seamlessly
Transferring photos from Android to iPhone doesn’t have to be a headache. With the right method and a little patience, you can seamlessly move your memories to your new device. Whether you choose the Move to iOS app, Google Photos, cloud storage, a computer, or a USB drive, following these steps will ensure a smooth and successful transfer.
And don’t forget to visit dfphoto.net for all your photography needs. From tutorials and inspiration to community support, we’re here to help you on your photography journey.
Ready to take your photography skills to the next level? Explore dfphoto.net today and discover a world of inspiration and education. Join our community of passionate photographers and start creating stunning images that capture the beauty of the world around you. Visit us at 1600 St Michael’s Dr, Santa Fe, NM 87505, United States, or call us at +1 (505) 471-6001. We can’t wait to see what you create!