Are you struggling to make your Etsy listing photos stand out? At dfphoto.net, we understand that the right image size is essential for attracting customers and boosting sales. Optimize your Etsy shop today.
This comprehensive guide will cover everything you need to know about Etsy listing photo sizes, ensuring your products look their best and drive conversions. We’ll explore optimal dimensions, aspect ratios, and essential tips to help your images shine, using visual storytelling and marketplace optimization to your advantage.
Table of Contents
- What is the Best Size for My Etsy Listing Photo?
- Etsy Sizes
- Resizing Your Images for Etsy
- How to Take a Perfect Etsy Listing Image Photo
- Common Mistakes to Avoid When Creating Images for Etsy
- Create the Best Etsy Listing Photo Size with Photoroom
- FAQs on Etsy Listing Photo Size
1. What is the Best Size for My Etsy Listing Photo?
The best size for your Etsy listing photos ensures your products look sharp, professional, and appealing to potential buyers. According to Etsy’s image best practices and recent updates, aim for an image dimension of 2,000 pixels on the shorter side. This helps prevent awkward cropping or distorted details that could deter customers.
Here’s a detailed breakdown:
- Image Dimension: 2,000 pixels for the shorter side.
- File Size: Below 1MB.
- Orientation: Square or horizontal.
- Aspect Ratio: 1:1 for desktop thumbnails and 4:3 for general display.
- Resolution: 72PPI (pixels per inch).
- File Format: JPG, PNG, and GIF (transparent PNGs and animated GIFs are not allowed for listing photos).
- Color Mode: sRGB.
- Number of Images Per Listing: A maximum of 10 and a minimum of 5.
- Product Shot: Centered to avoid cropping.
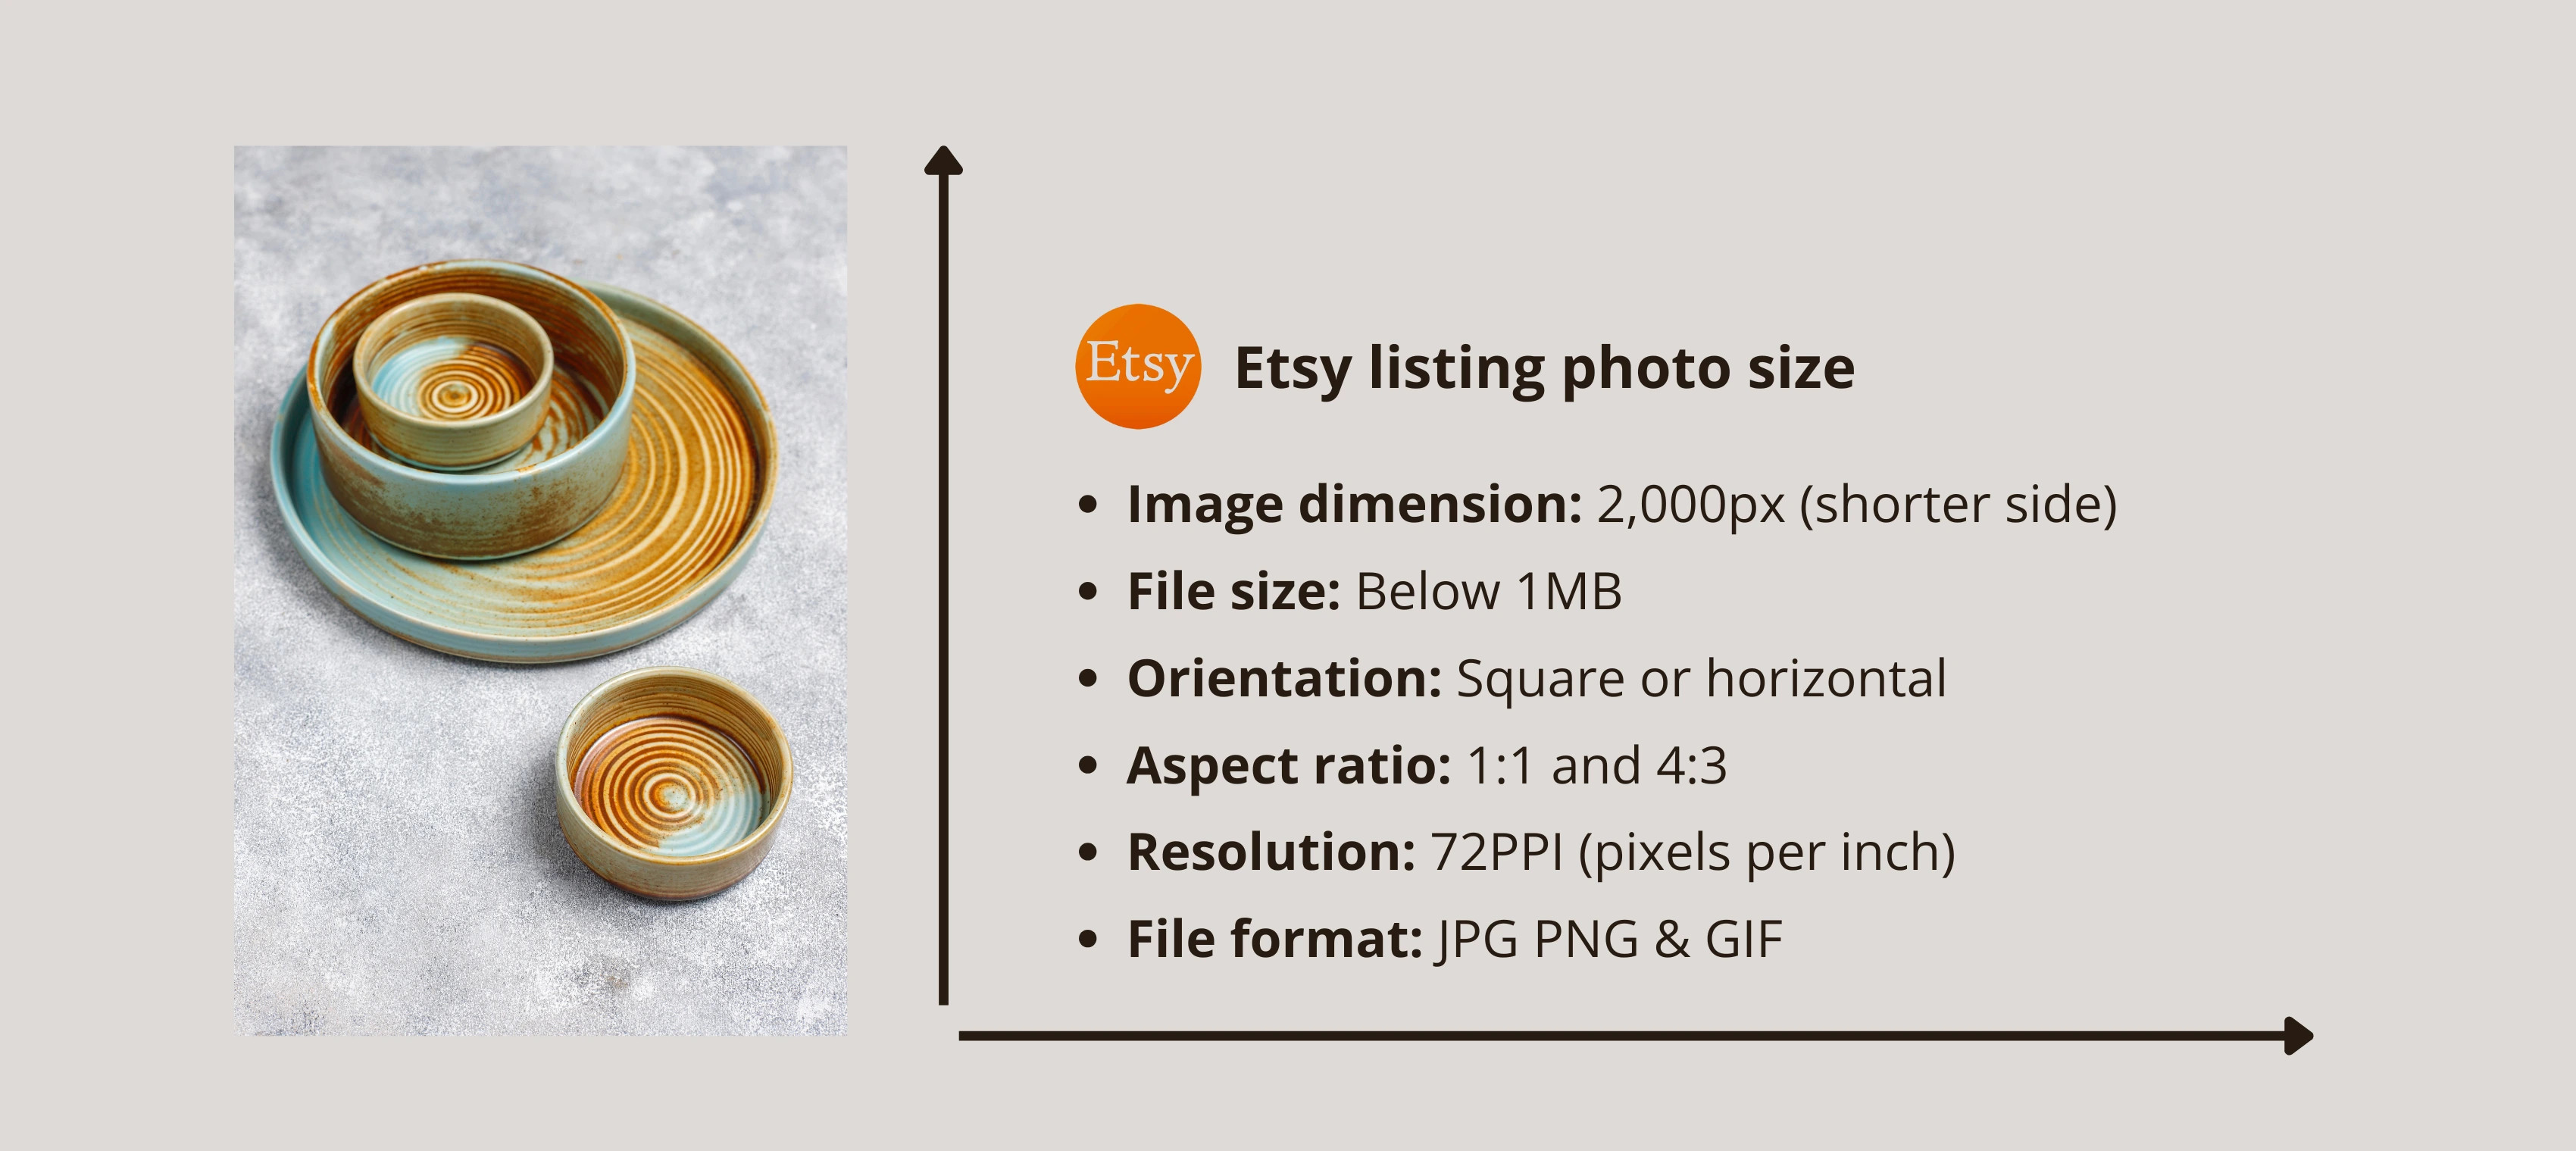 Etsy listing photo size guide with a ceramic dish set.
Alt text: Optimal Etsy listing photo dimensions guide showcasing image size, file size, orientation, and resolution for professional product presentation.
When uploading your listing photo, remember that the thumbnail image is crucial. It’s the first impression shoppers have of your product on your shop’s and Etsy’s category pages. To optimize this initial view, keep enough border around your image and center your product in the shot to avoid automatic cropping by Etsy.
Consistency is key, so use the same image shape for all your photos in a single listing to maintain a cohesive and professional look. Image resizers can be a great help here, particularly if you need to resize multiple images quickly.
2. Etsy Sizes
What other image sizes does Etsy require, besides listing photos? While listing photos are central to your Etsy shop, Etsy also specifies image sizes for banners, thumbnails, and other visual elements that contribute to a cohesive and professional storefront. Each size plays a unique role in enhancing your shop’s overall appeal.
Here’s a comprehensive guide to all Etsy image sizes:
| Image Type | Recommended Dimensions |
|---|---|
| Listing Photos | 2,000px (short side) x 2,000–3,000px (long side) |
| Shop Icon | 500 x 500px |
| Profile Picture | 400 x 400px |
| Team Logo | 170 x 100px |
| Order Receipt Banner | 760 x 100px |
| Mini Shop Banner | 1600 x 213px |
| Big Shop Banner | 1600 x 400px |
| Carousel Banner | 1200 x 300px |
| Collage Banner (2 Images) | 600 x 300px minimum |
| Collage Banner (3 Images) | 400 x 300px minimum |
| Collage Banner (4 Images) | 300 x 300px minimum |
Using these dimensions ensures that all visual elements in your Etsy shop are displayed correctly, contributing to a polished and trustworthy brand image. Remember, consistent branding across your shop can significantly impact customer perception and sales.
3. Resizing Your Images for Etsy
Why is resizing images so important for your Etsy shop? Resizing is essential for maintaining a professional appearance and smooth operation. Without the correct image dimensions, your photos can appear cropped or distorted, which can frustrate potential buyers and negatively impact your sales.
According to an Etsy seller handbook, 90% of Etsy shoppers say high-quality photos influence their purchase decisions. E-commerce brands that use good pictures often see up to 45% higher conversions. Resizing ensures that your images meet Etsy’s size requirements, preventing display issues across various devices.
There are several ways to resize your images, including using a simple image resizer or the image editing tools available on your computer. Let’s explore some effective methods.
3.1. How to Resize Your Etsy Listing Photos with Photoroom
What is the easiest way to resize photos for Etsy? The simplest method is to use an AI-powered image resizer. With the free Resize tool in Photoroom, you can quickly adjust your images to fit Etsy’s specific requirements. The platform also allows you to resize multiple images simultaneously, saving valuable time.
Here’s a step-by-step guide on how to resize your image for free using the Photoroom mobile app. The process is similar on the Web version:
- Open the Photoroom app, select the Resize tool, and upload your image.
- Type “Etsy” in the search bar and select “Etsy Square” or enter a custom dimension. The tool will automatically resize your image accordingly.
- Click Done once the resizing is complete.
- Click Export to download your resized image.
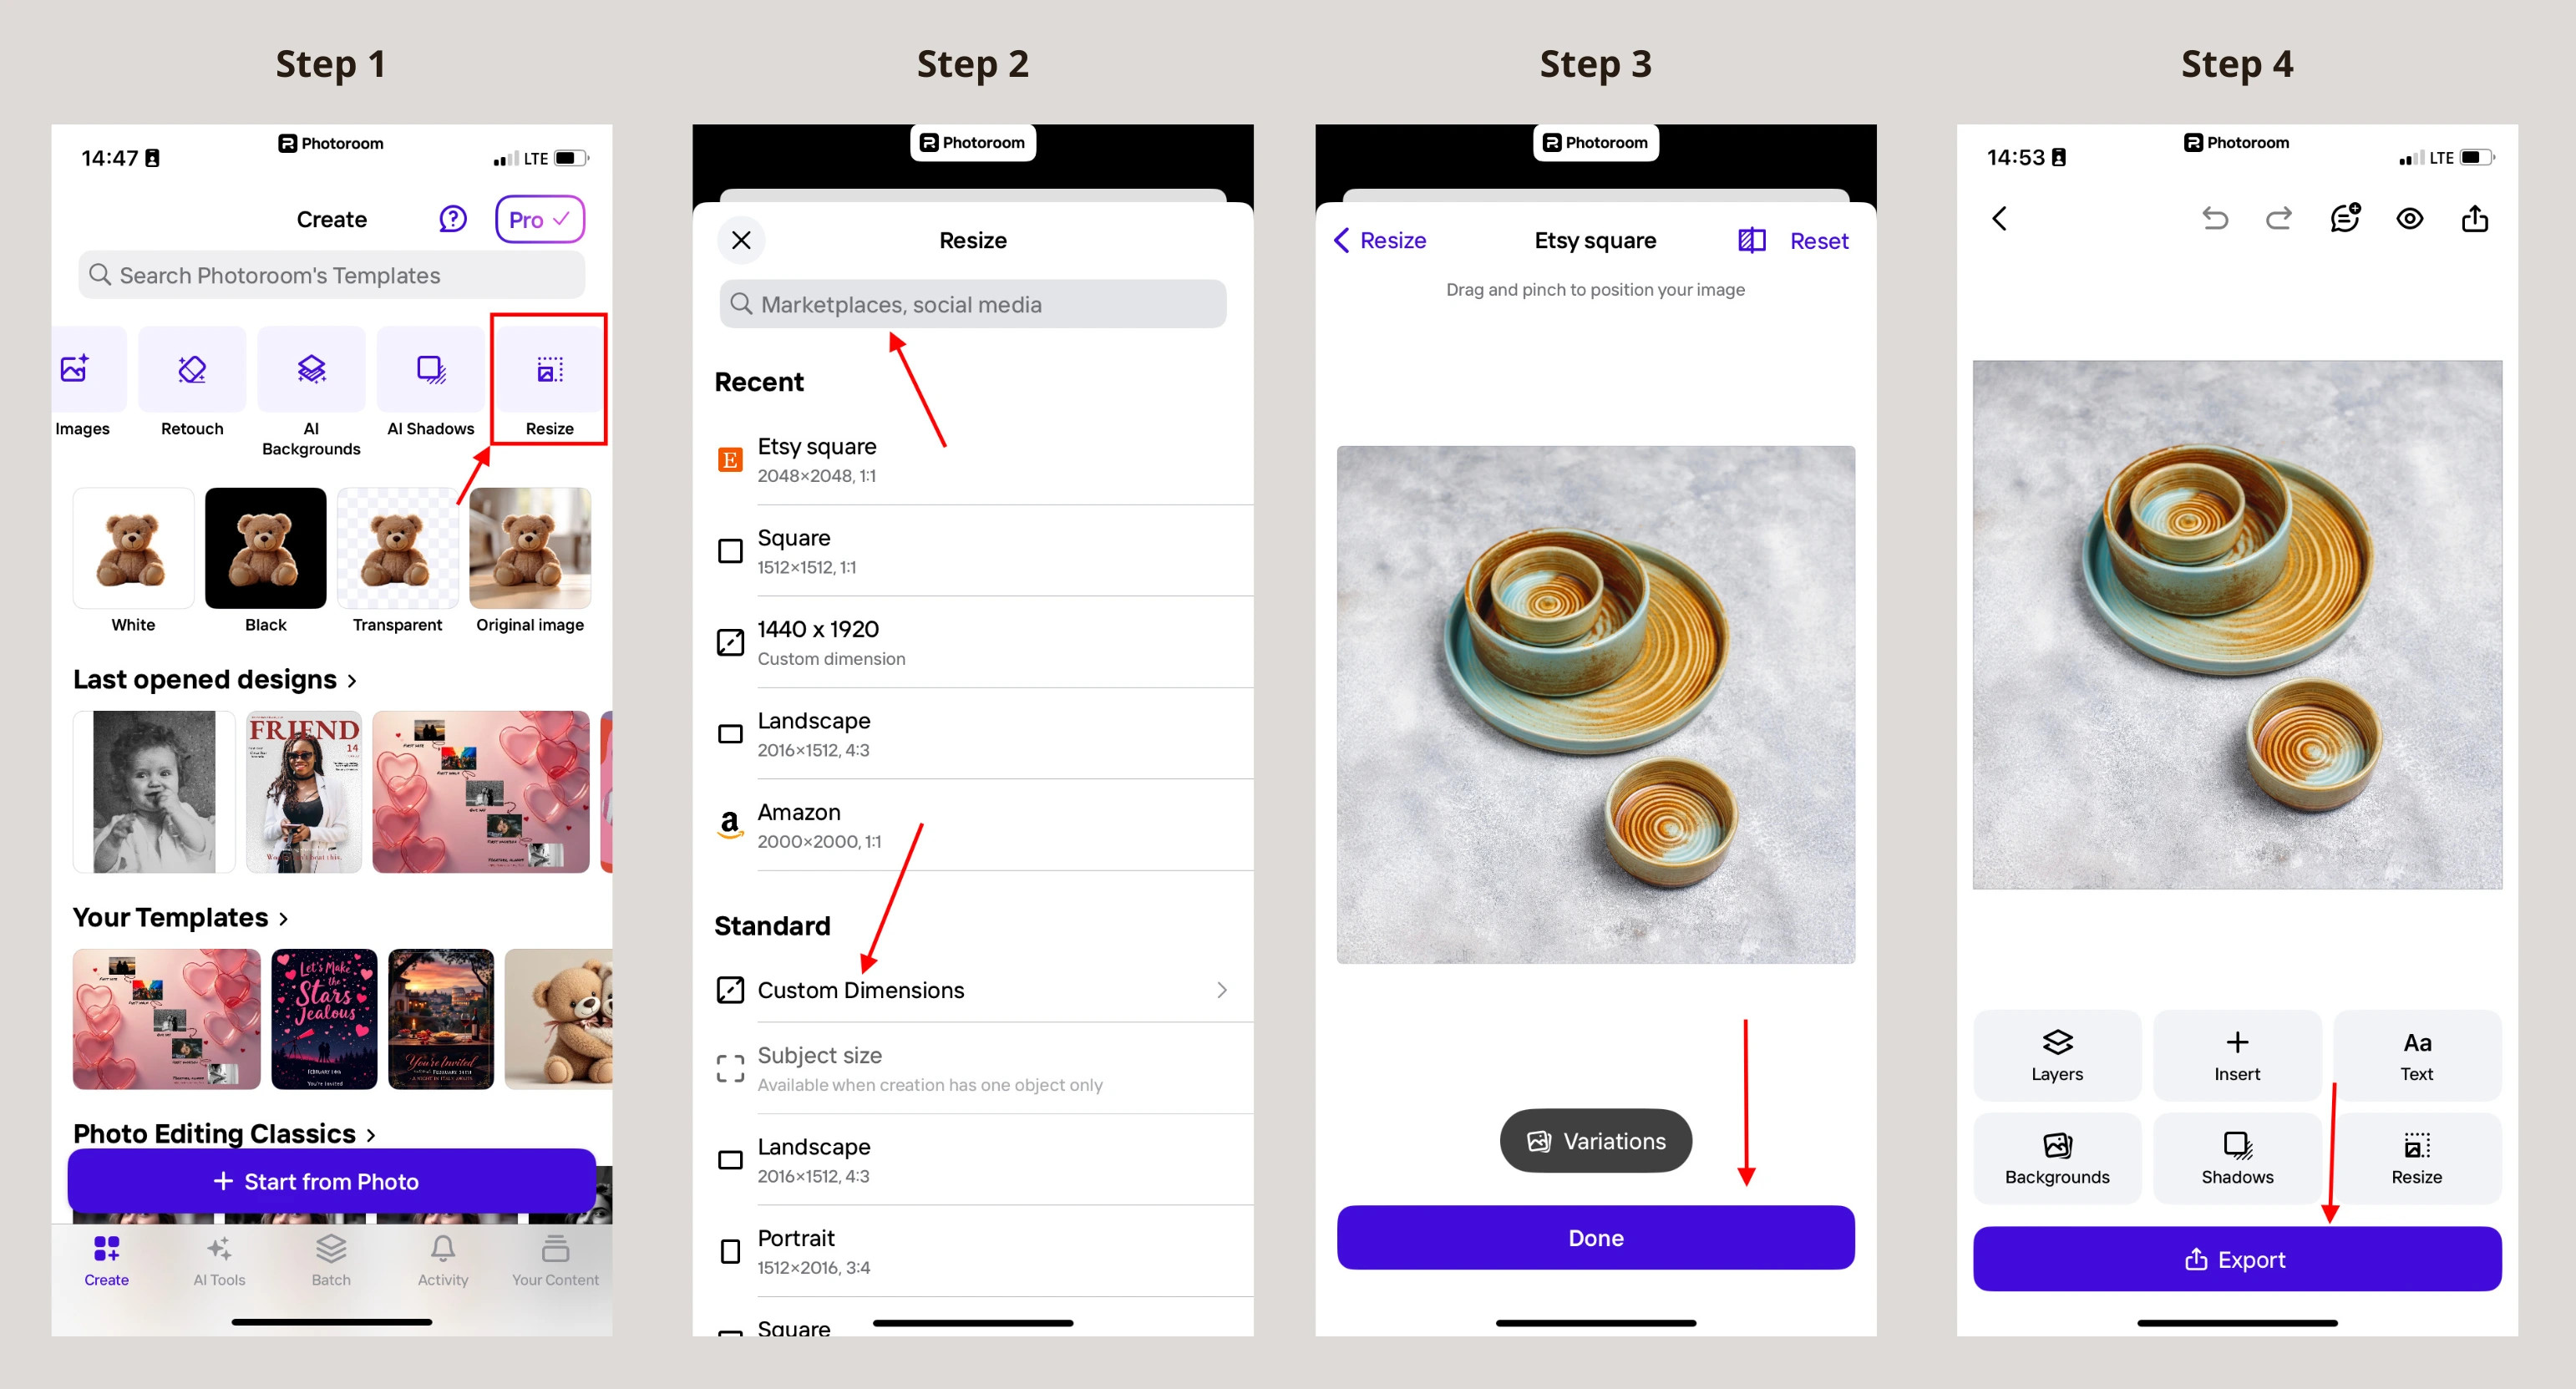 Resizing an image in Photoroom for Etsy: select resize, choose Etsy square, adjust, and export.
Alt text: Resizing an Etsy image using Photoroom’s mobile app with steps to select resize, choose Etsy square, adjust dimensions, and export.
If you need to resize multiple product photos at once, use the Batch Mode feature in the app to save time and maintain consistency across your listings.
For users with Photoroom’s pro plan, the Resize tool automatically expands your background using the AI Expand feature, filling any white space around your resized images. If you don’t have the pro plan, you can select the “Zoom fill” option before completing the resizing process. However, be aware that this may result in losing parts of your product if they are located near the edge of the frame.
3.2. How to Resize Your Etsy Listing Photos on a Mac
How can Mac users resize images for Etsy? Mac users can easily resize images using the built-in Preview tool. Follow these steps:
- Open your Finder and double-tap the picture you want to edit to open it in Preview.
- Select Tools in the menu bar at the top of your screen.
- Click on “Adjust Size.” A pop-up box will appear.
- Uncheck the “Scale proportionally” field so you can enter your desired measurements.
- Fill in the width, height, and pixel/inch (PPI).
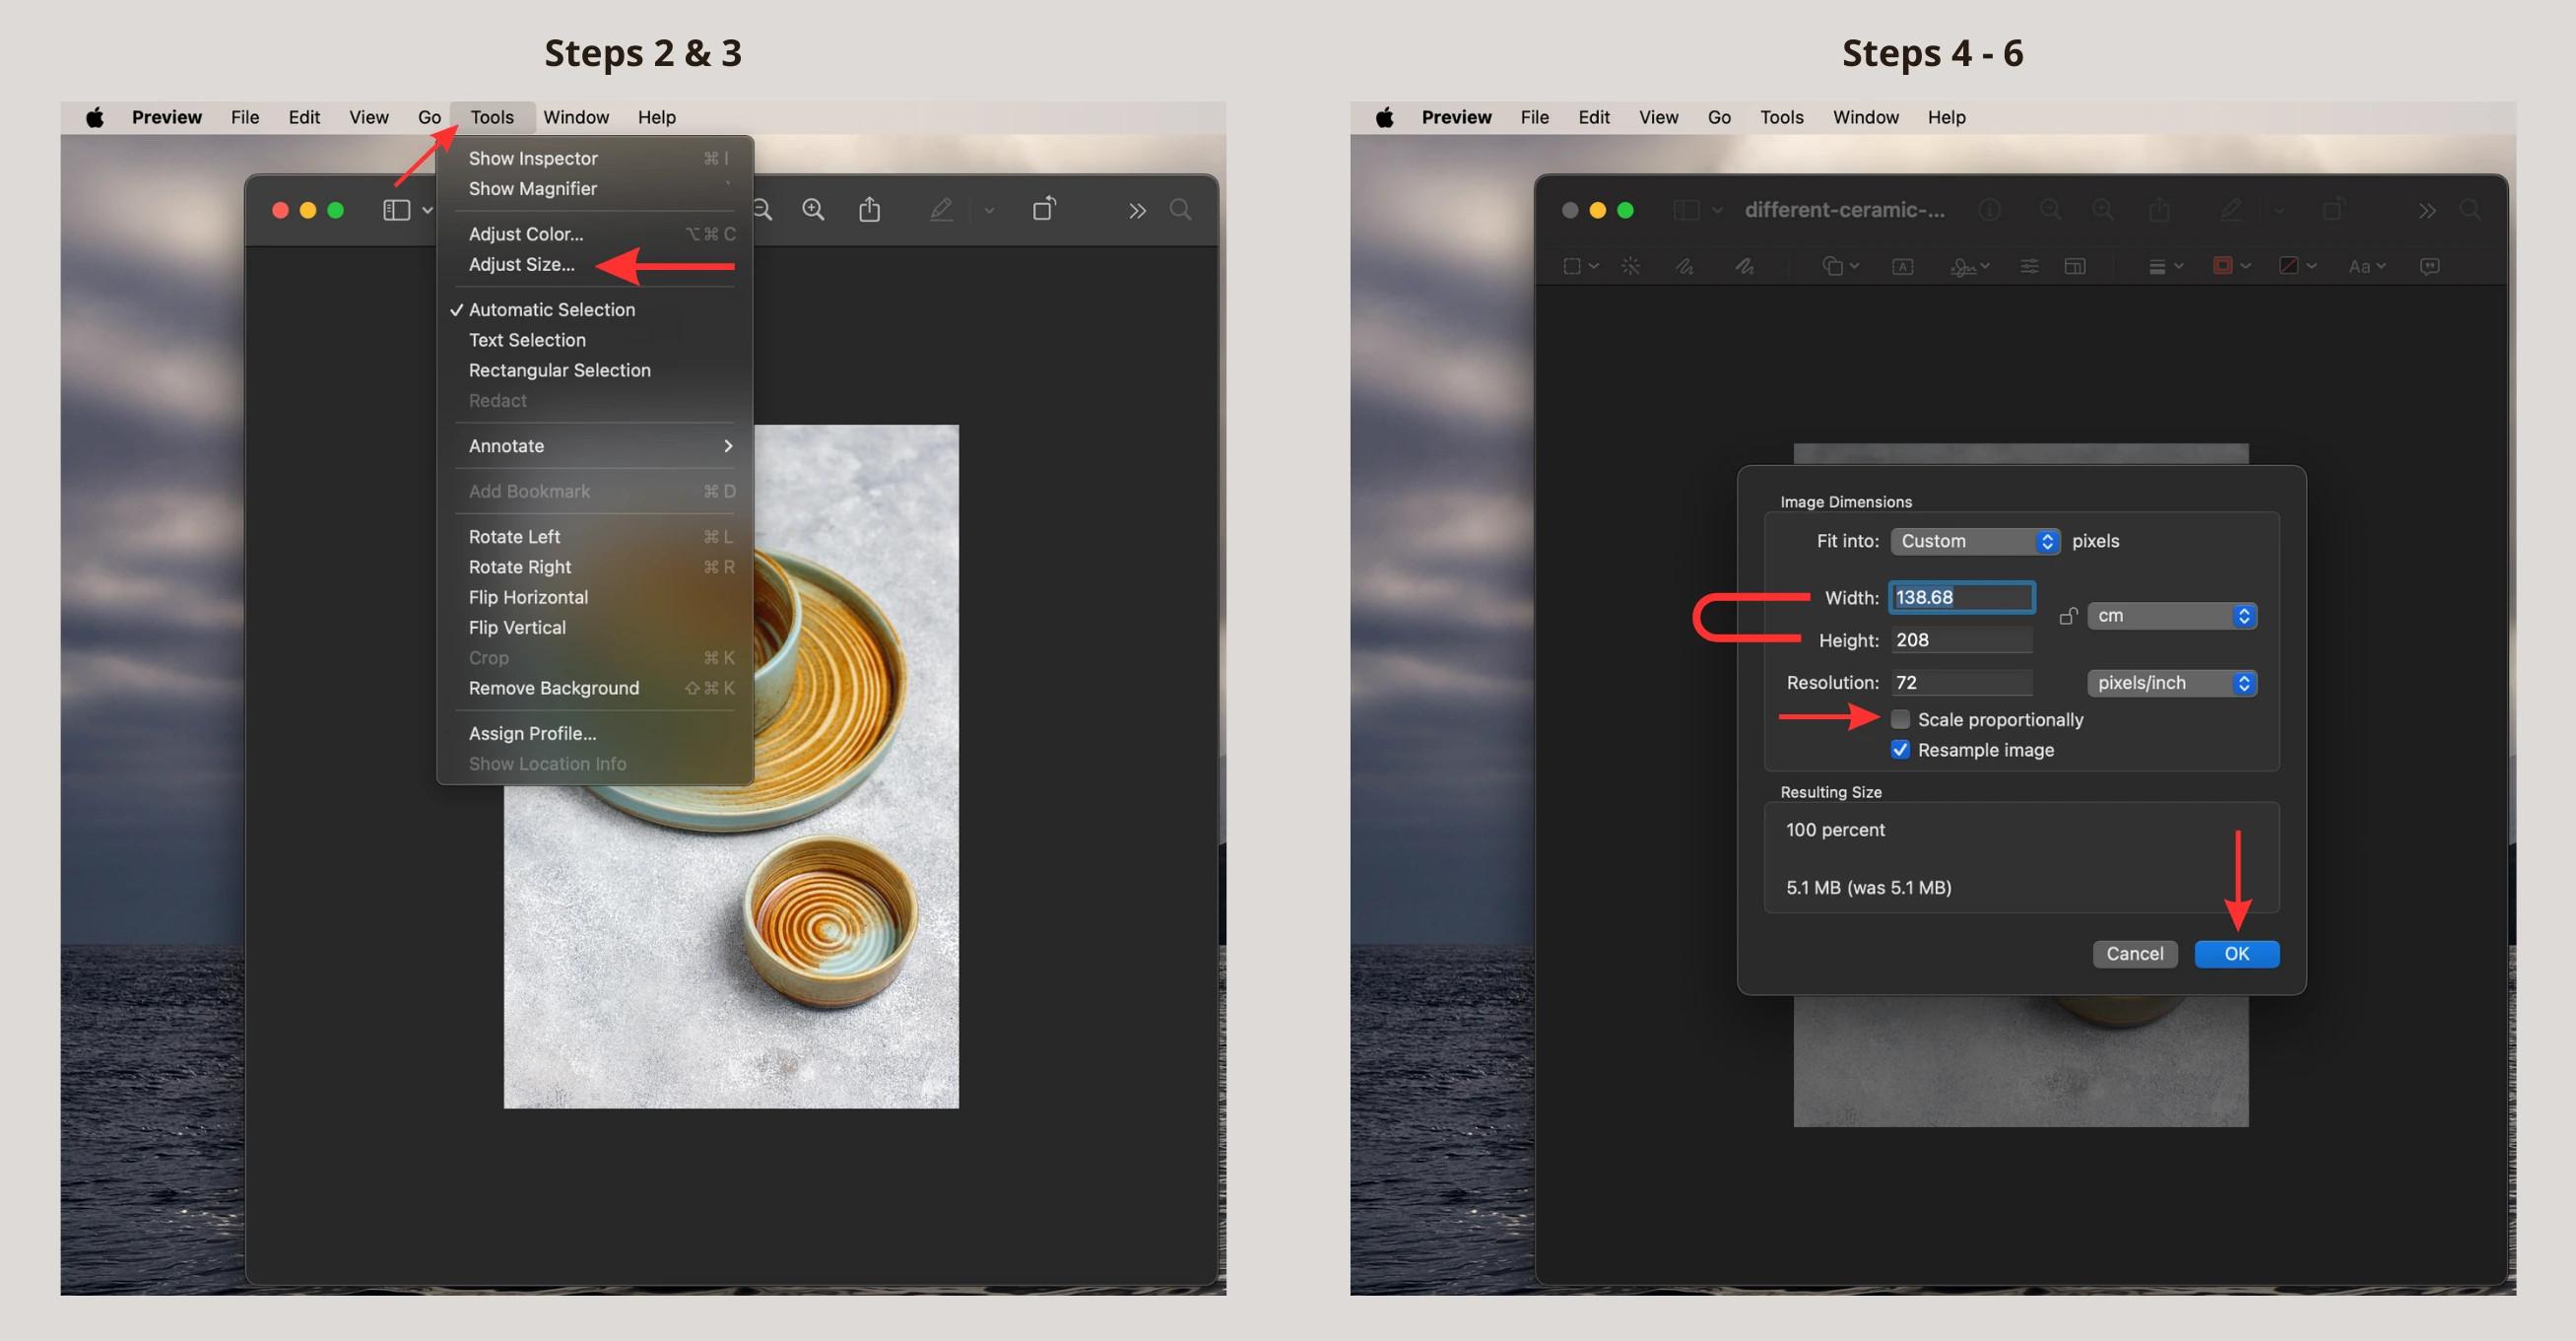 Resizing an image on Mac Preview: go to Tools, select Adjust Size, set dimensions, then click OK.
Alt text: Steps to resize an image on Mac Preview, including selecting Tools, Adjust Size, setting dimensions, and clicking OK to save.
3.3. How to Resize Your Etsy Listing Photos on Windows
How do you resize images for Etsy on a Windows PC? If you are using a Windows PC, follow these steps to resize your image using the Photos app (using Windows 10 as an example):
- Go to your file folder and double-tap your image to open it with the Photos app.
- Click on the three dots at the top to open a list of options and select Resize image.
- Click on Pixels and enter your required width and height.
- Save the resized image in a folder of your choice.
Note that Windows might not always resize the image to your preferred dimensions. If this occurs, use a dedicated photo editor to ensure accurate resizing.
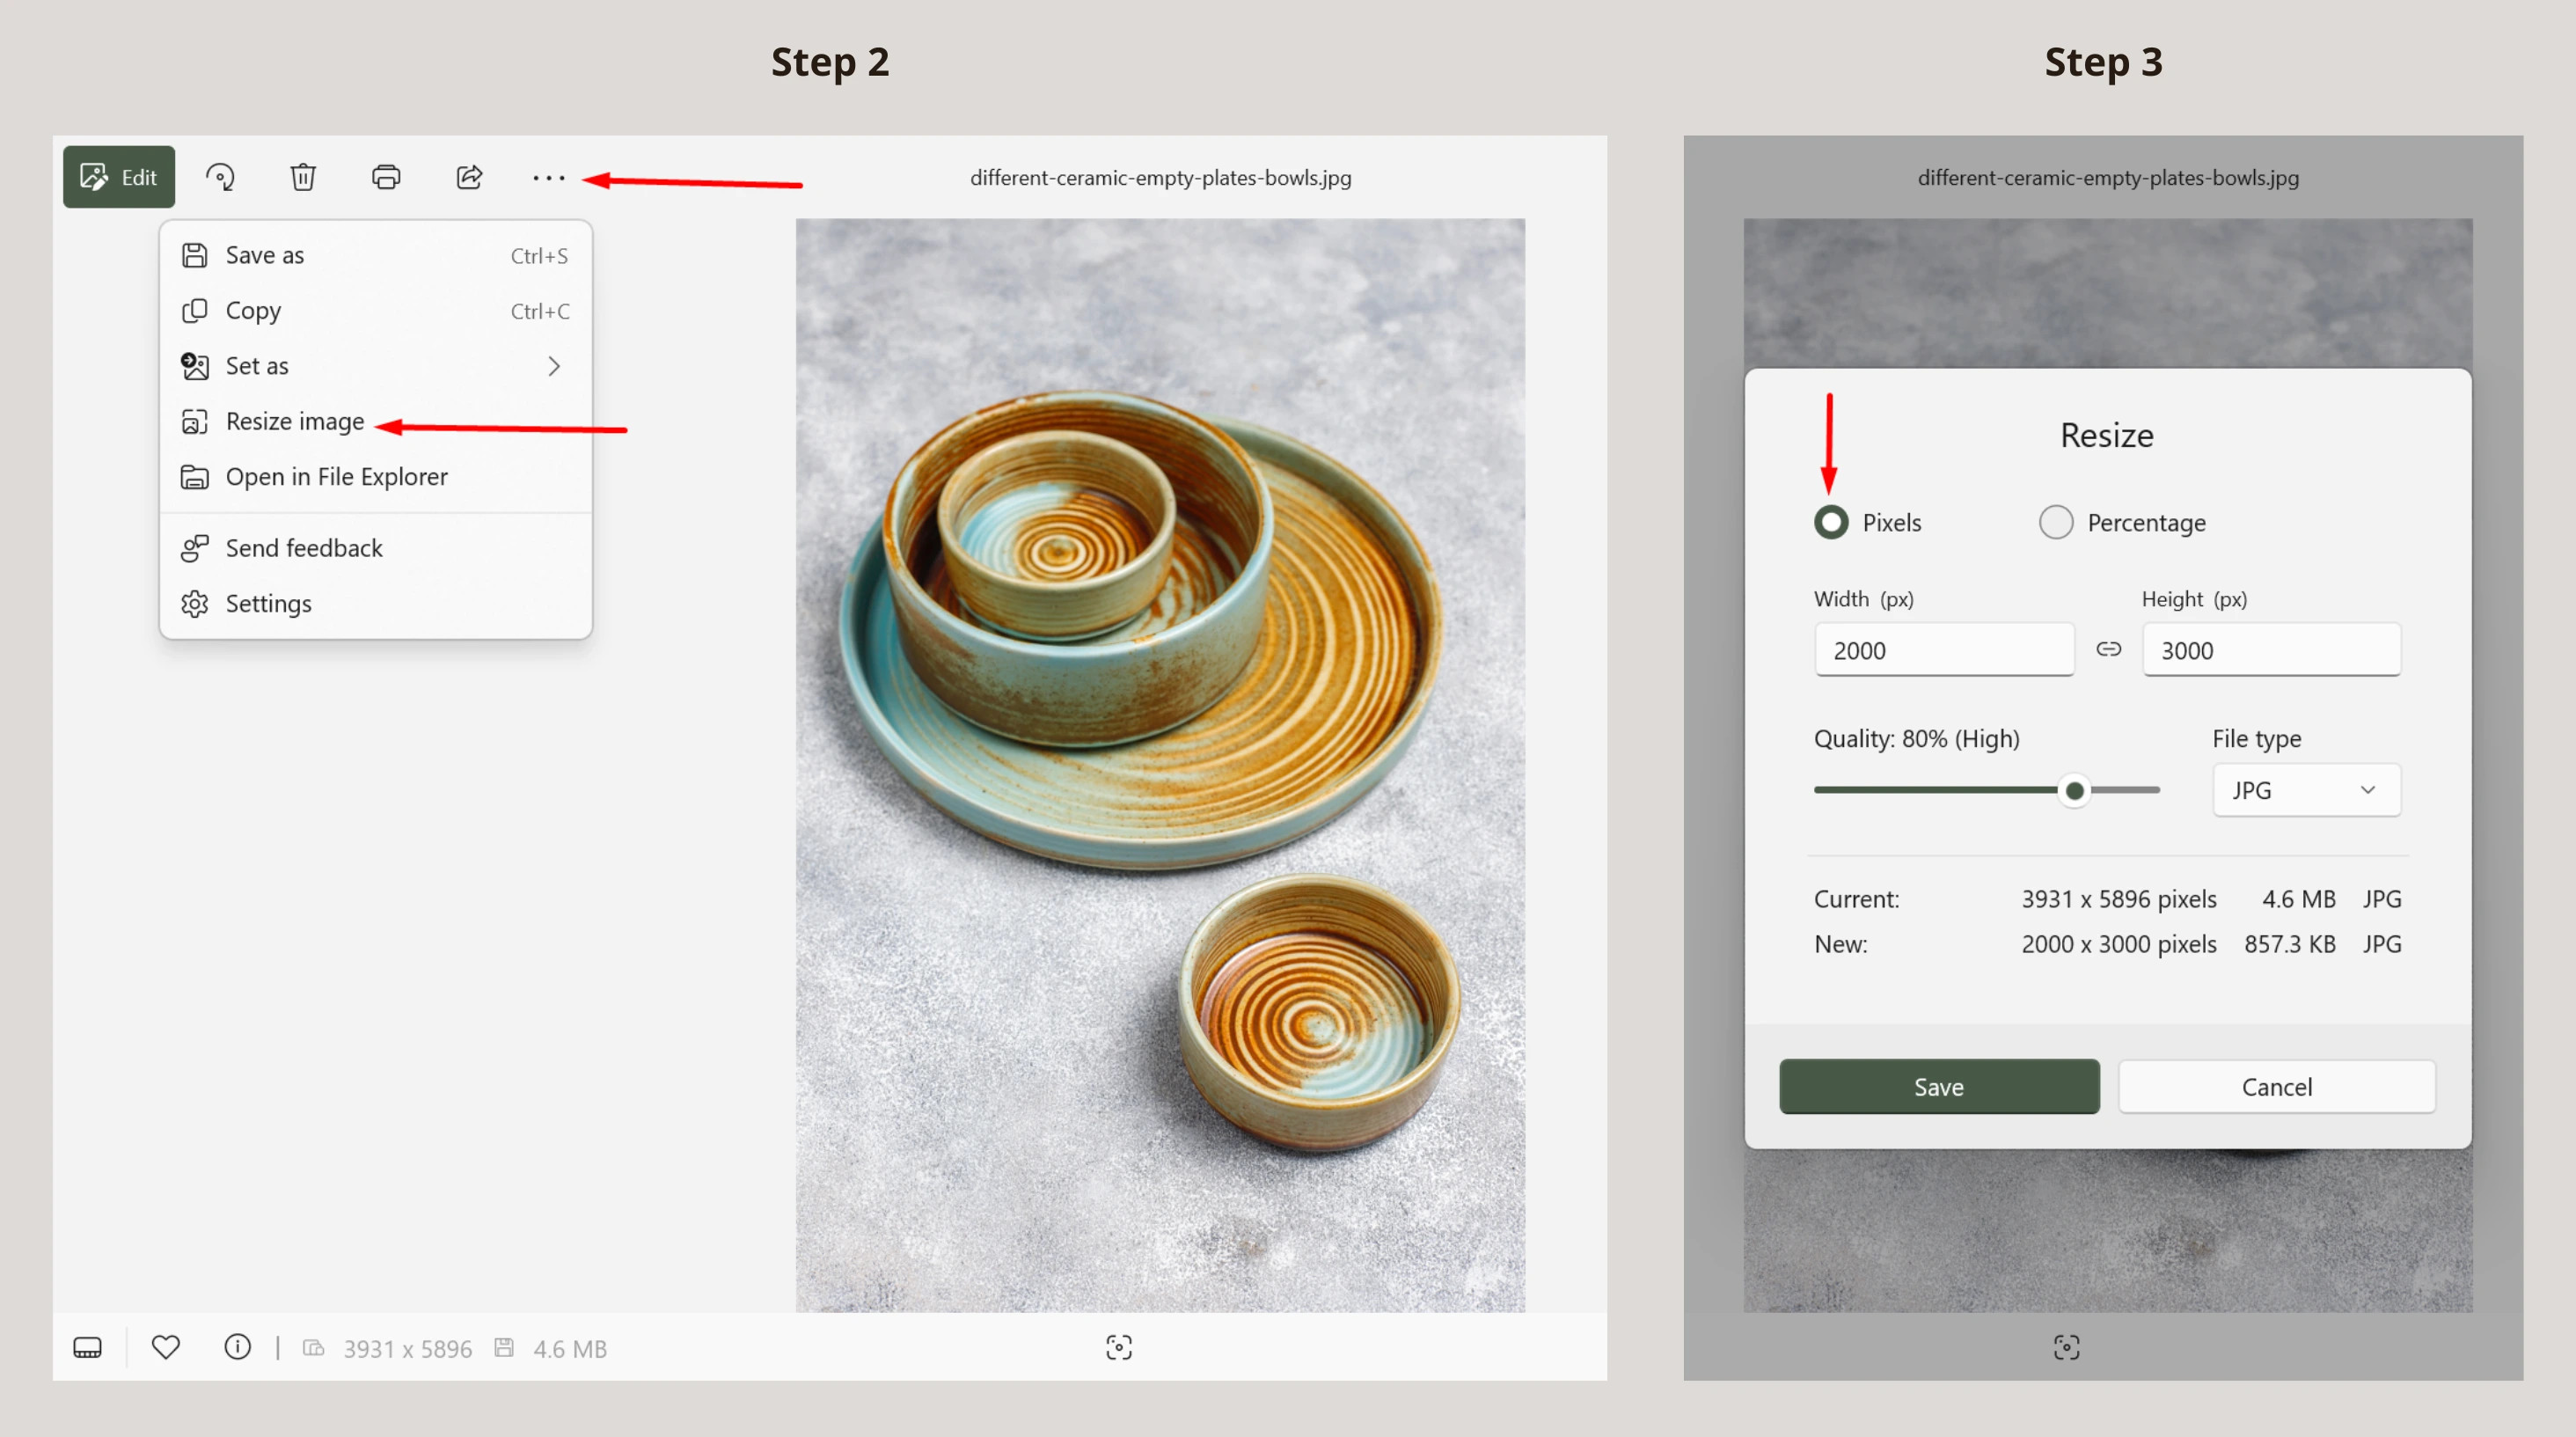 Resizing an image in Windows Photos: open menu, select resize, set pixels, adjust quality, save.
Alt text: Instructions on resizing an image in Windows Photos, including opening the menu, selecting resize, setting pixels, adjusting quality, and saving the resized image.
4. How to Take a Perfect Etsy Listing Image Photo
What are the key elements of a perfect Etsy listing photo? Capturing the perfect Etsy photo involves presenting your product in its best light, both literally and figuratively, to help potential buyers appreciate its value and uniqueness. Here are some tips:
4.1. Use Natural Lighting
Why is natural lighting ideal for product photos? Natural light is often the best choice for shooting product photos because it brings out the true colors of your product and minimizes harsh shadows. Photograph your products near a window or outdoors, but avoid direct sunlight. If natural light is unavailable, use soft artificial lighting.
Enhance your photos further by using editing tools to increase brightness and create professional-looking product images.
Here’s what artificial lighting looks like:
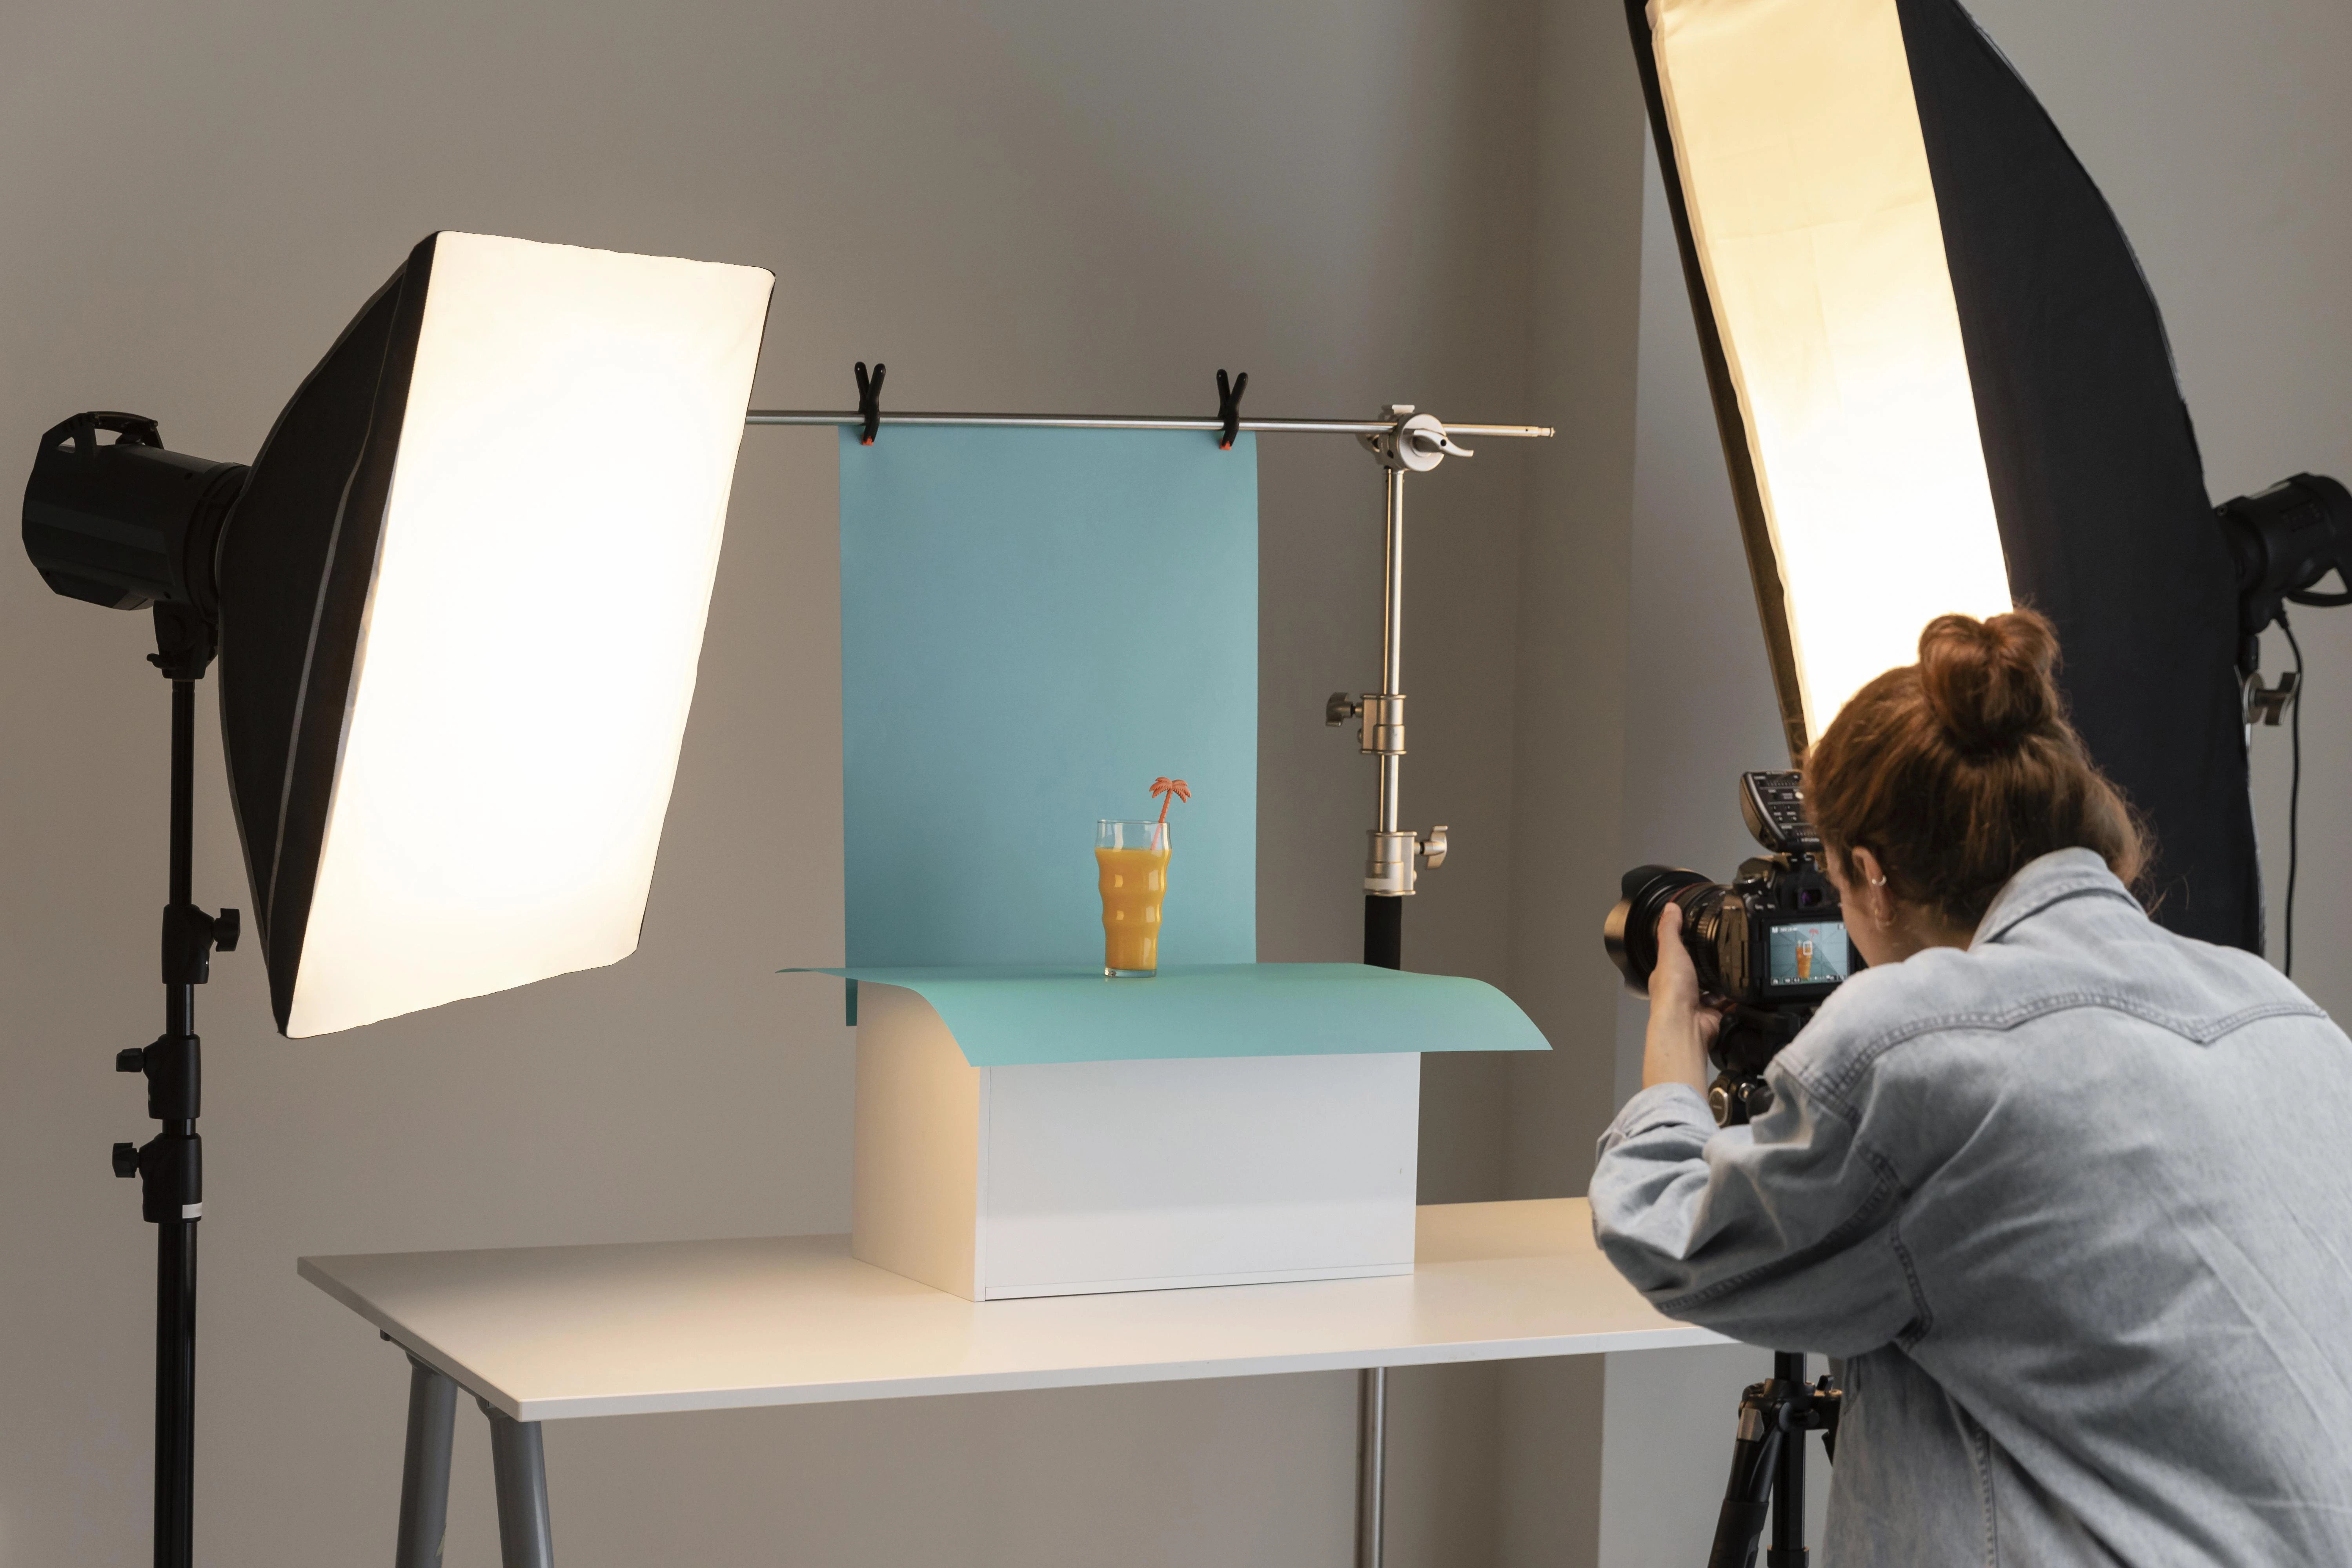 Photographer in a studio captures a drink setup with soft-box lighting and a blue backdrop.
Alt text: Professional product photographer using soft-box lighting to capture a drink setup in a studio with a blue backdrop.
4.2. Use a Neutral Background
Why is a neutral background effective for Etsy photos? A simple, neutral background ensures that your product remains the focal point. Common choices include white, light grays, or beiges. The background should complement your product without overshadowing it.
Change your picture’s background to a neutral one by first removing the current background, then adding a background color of your choice. Adding shadows to the image can also make it look more realistic.
Here’s how different backgrounds can transform your photos:
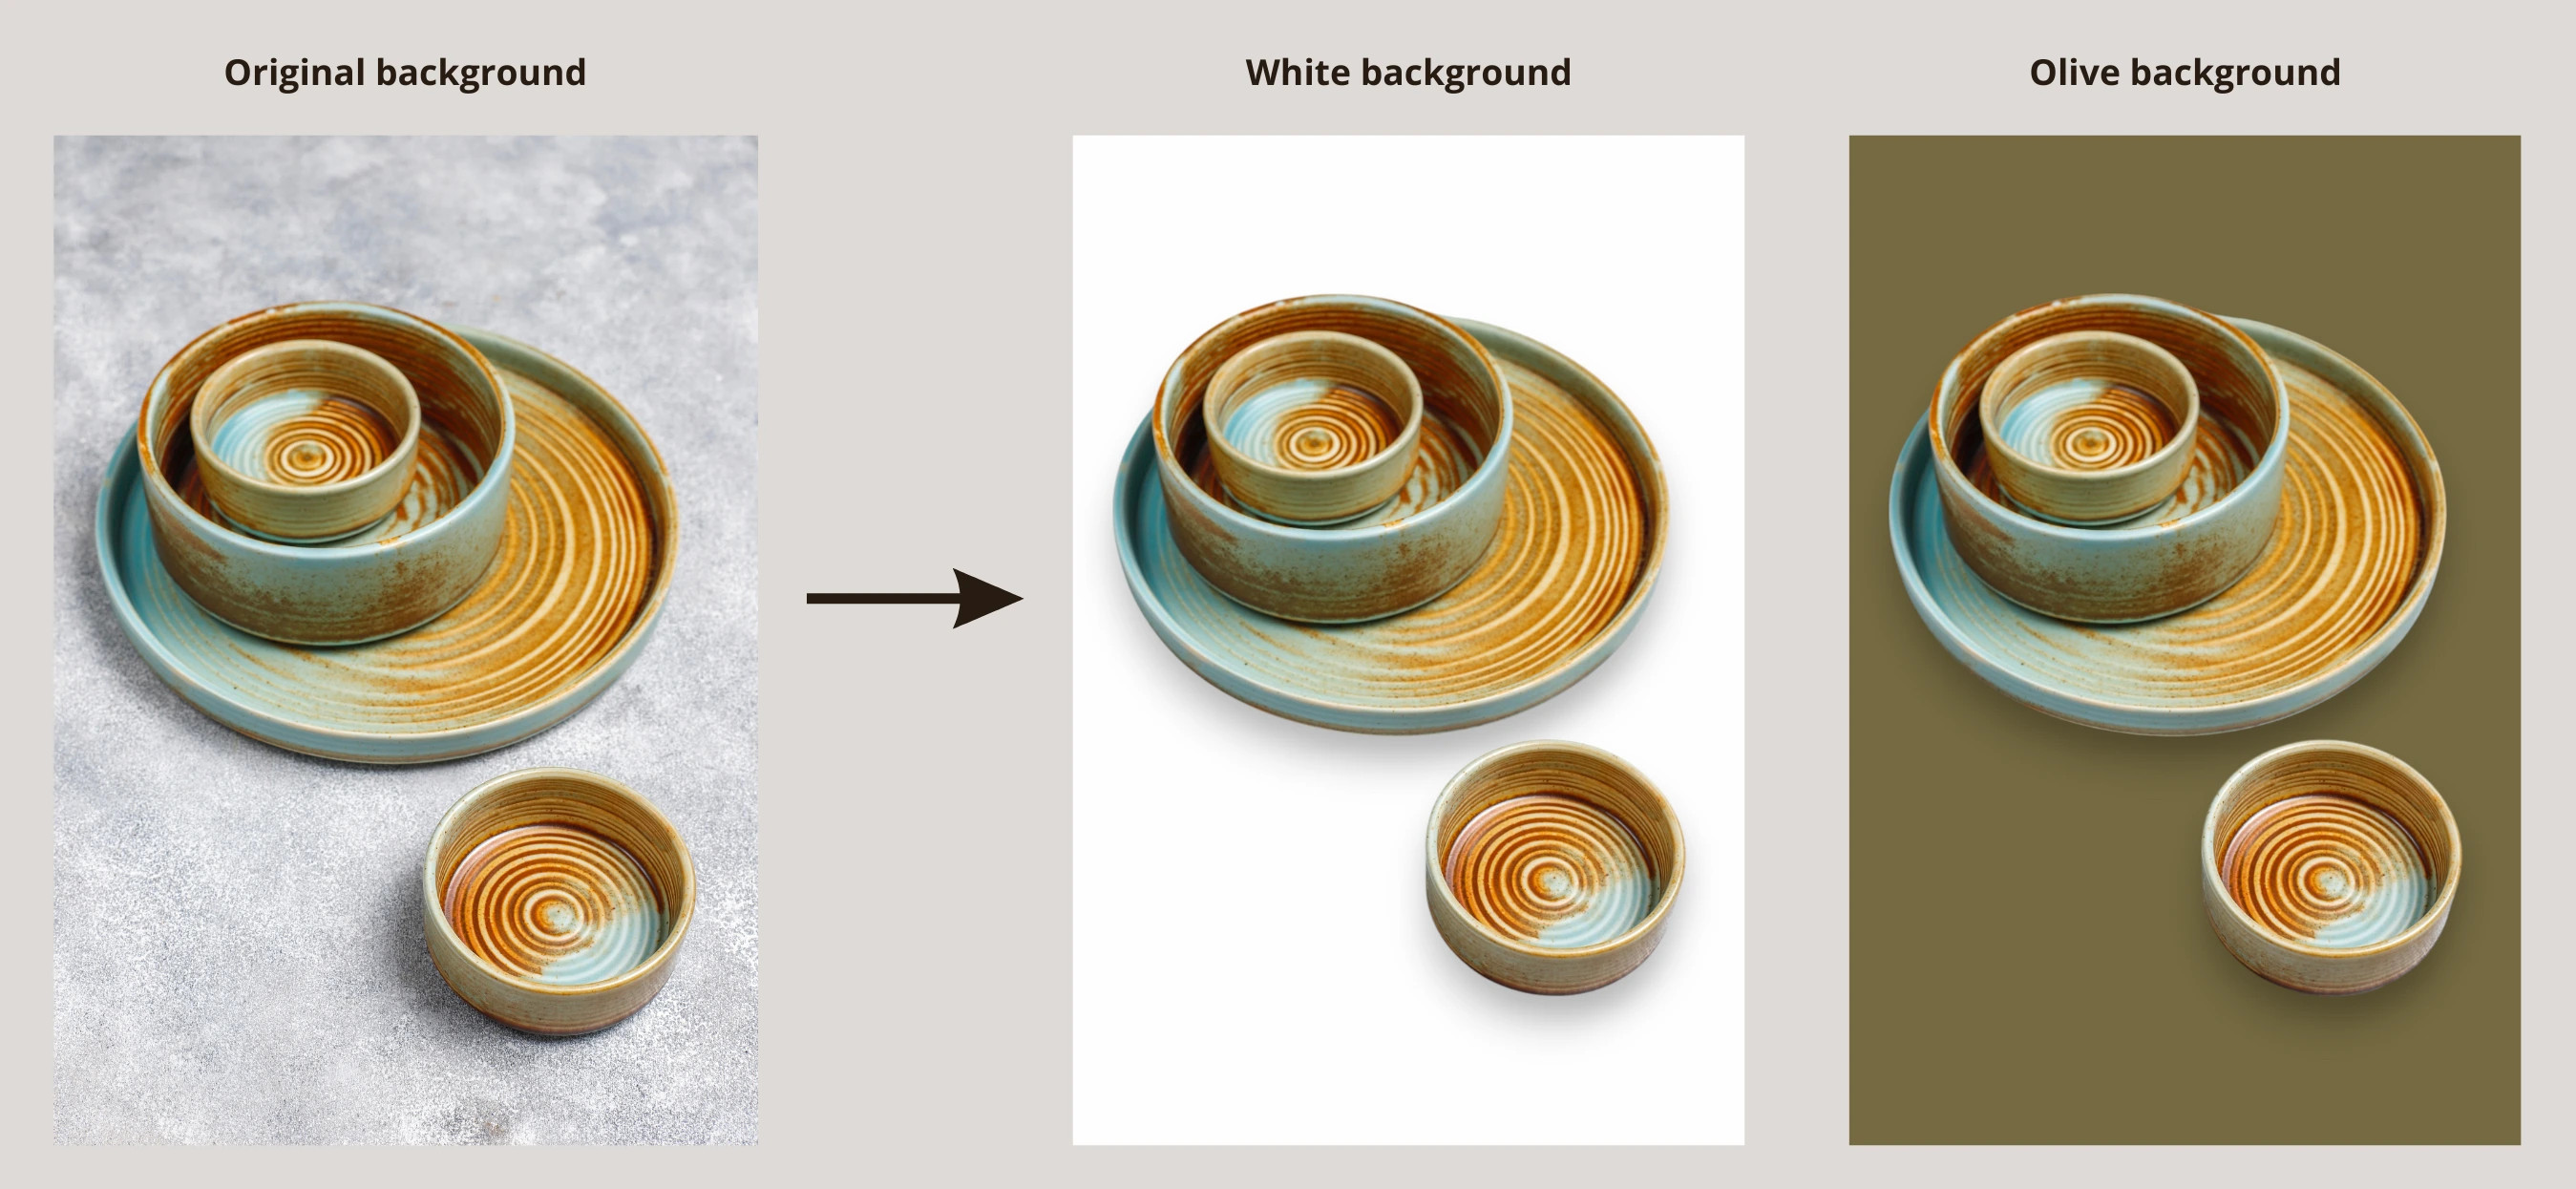 Ceramic dish set with background changes: original, white, and olive, showing editing variations.
Alt text: Ceramic dish set showcasing variations with different background colors: original, white, and olive, illustrating editing options.
4.3. Showcase Different Angles
Why should you capture your product from multiple angles? Buyers can’t physically interact with your product, so providing a comprehensive view is crucial. The Rule of Thirds, where you place the product at the intersections of an imaginary grid, is a great starting point. Capture your product from various angles and include close-ups of intricate details.
Chai, the owner of Chai Creations, captures her products from multiple angles to help customers visualize her products fully.
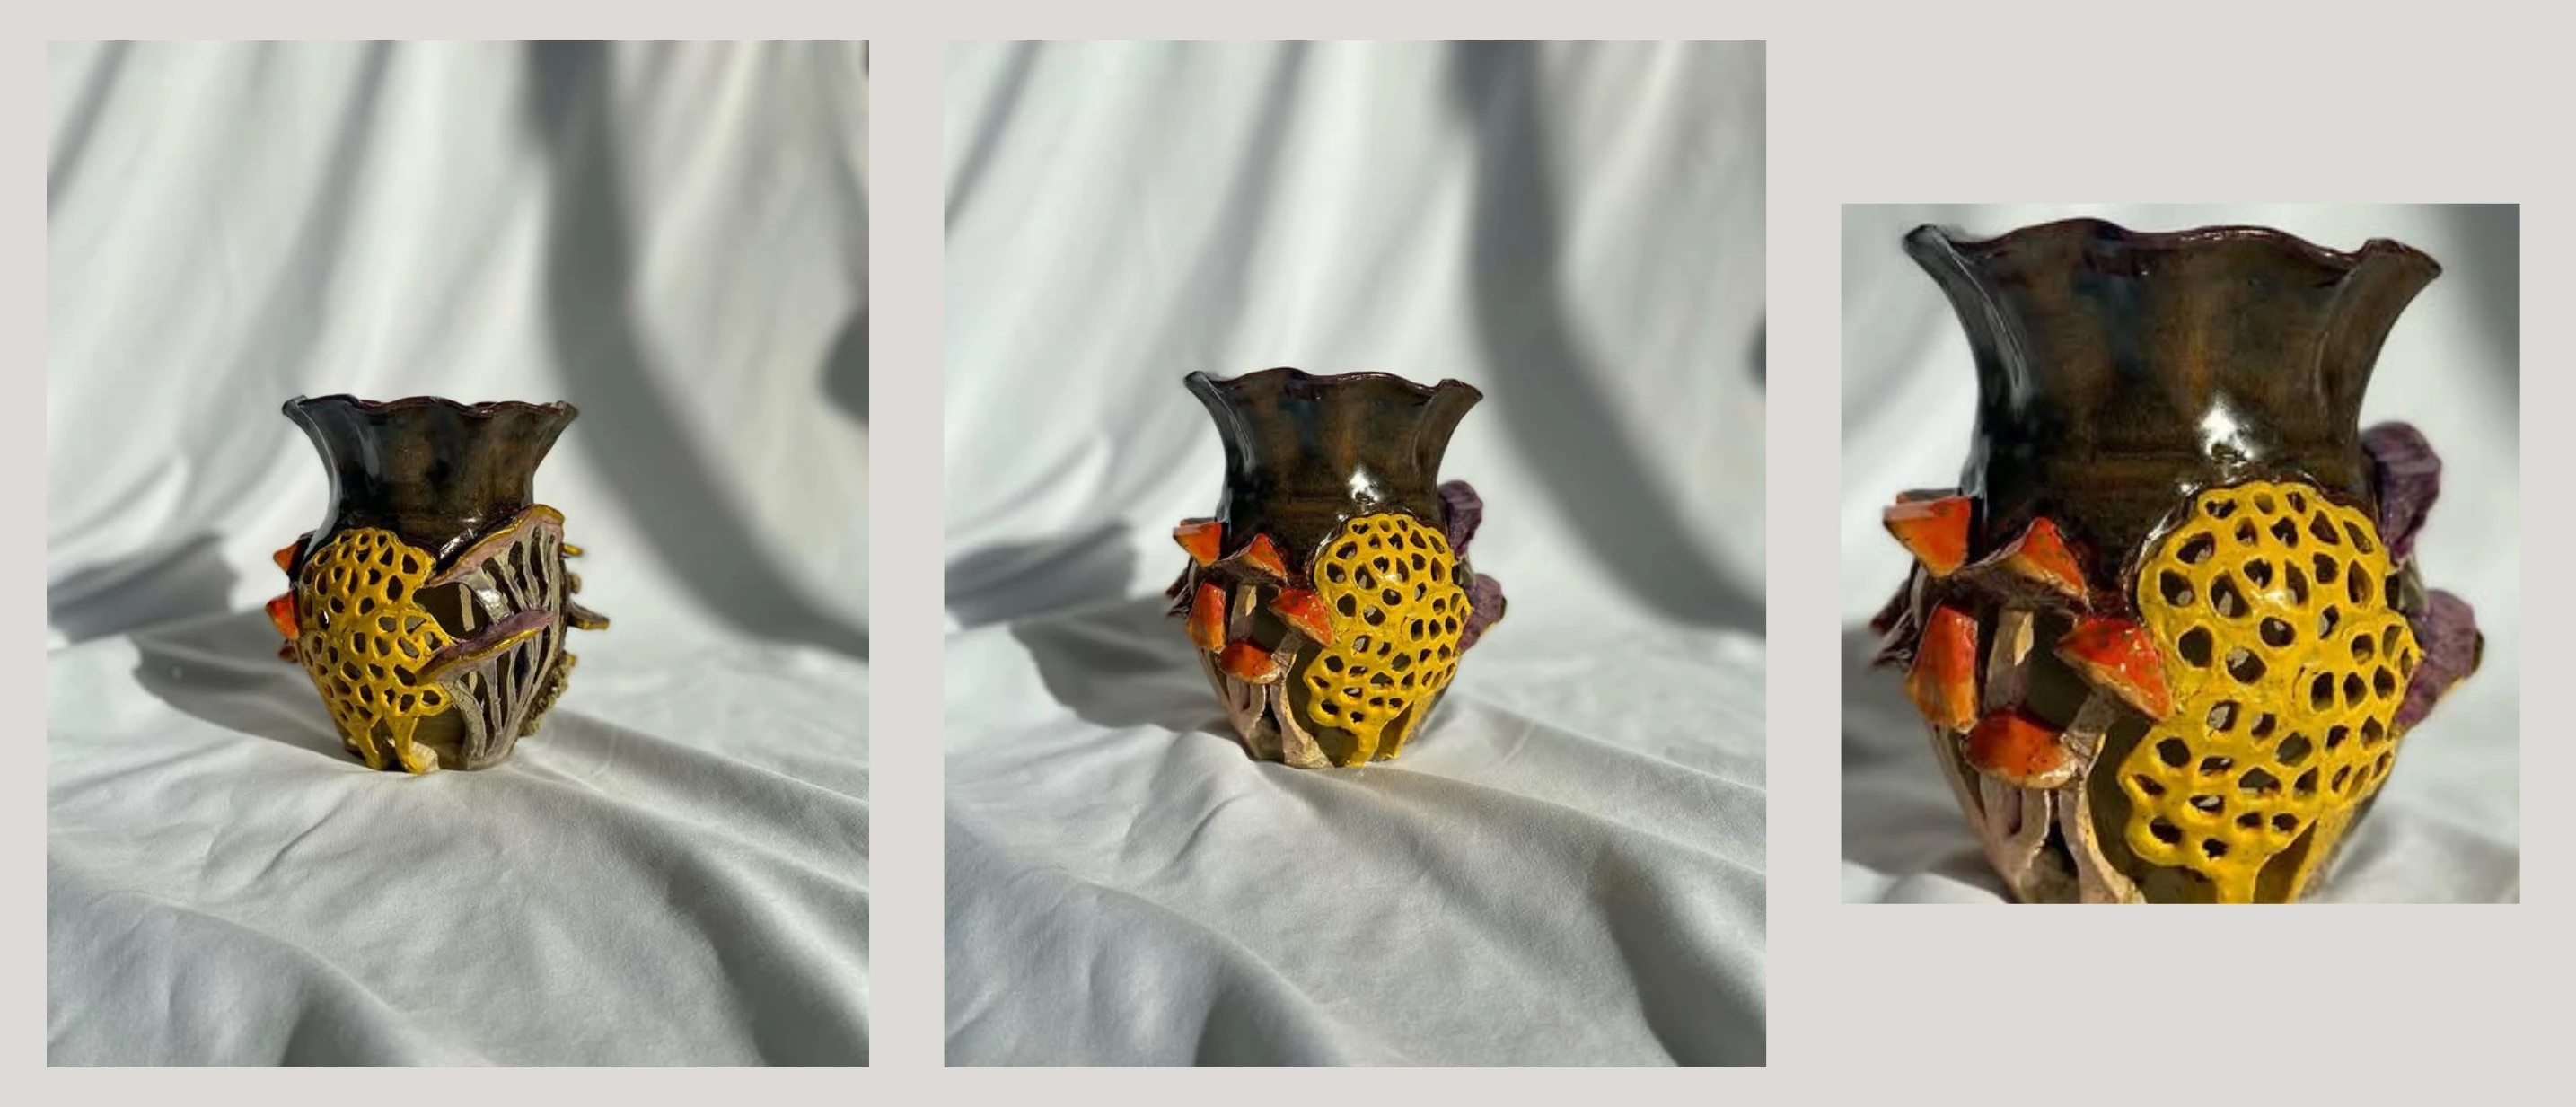 Handcrafted ceramic vase with detailed textures and colors, displayed from three different angles.
Alt text: Handcrafted ceramic vase displayed from three different angles, showcasing textures and colors to provide a comprehensive view for potential buyers.
4.4. Use Props Sparingly
How do props enhance product photos? Props can add context to your product, helping potential buyers visualize its use. However, too many props can distract from the main product, so keep it simple. For instance, if you’re selling a handmade mug, adding a gentle steam or a spoon can enhance the image by suggesting warmth and use.
Use tools that can generate image backgrounds to add props easily. These tools automatically create backgrounds with elements that fit the nature of your product.
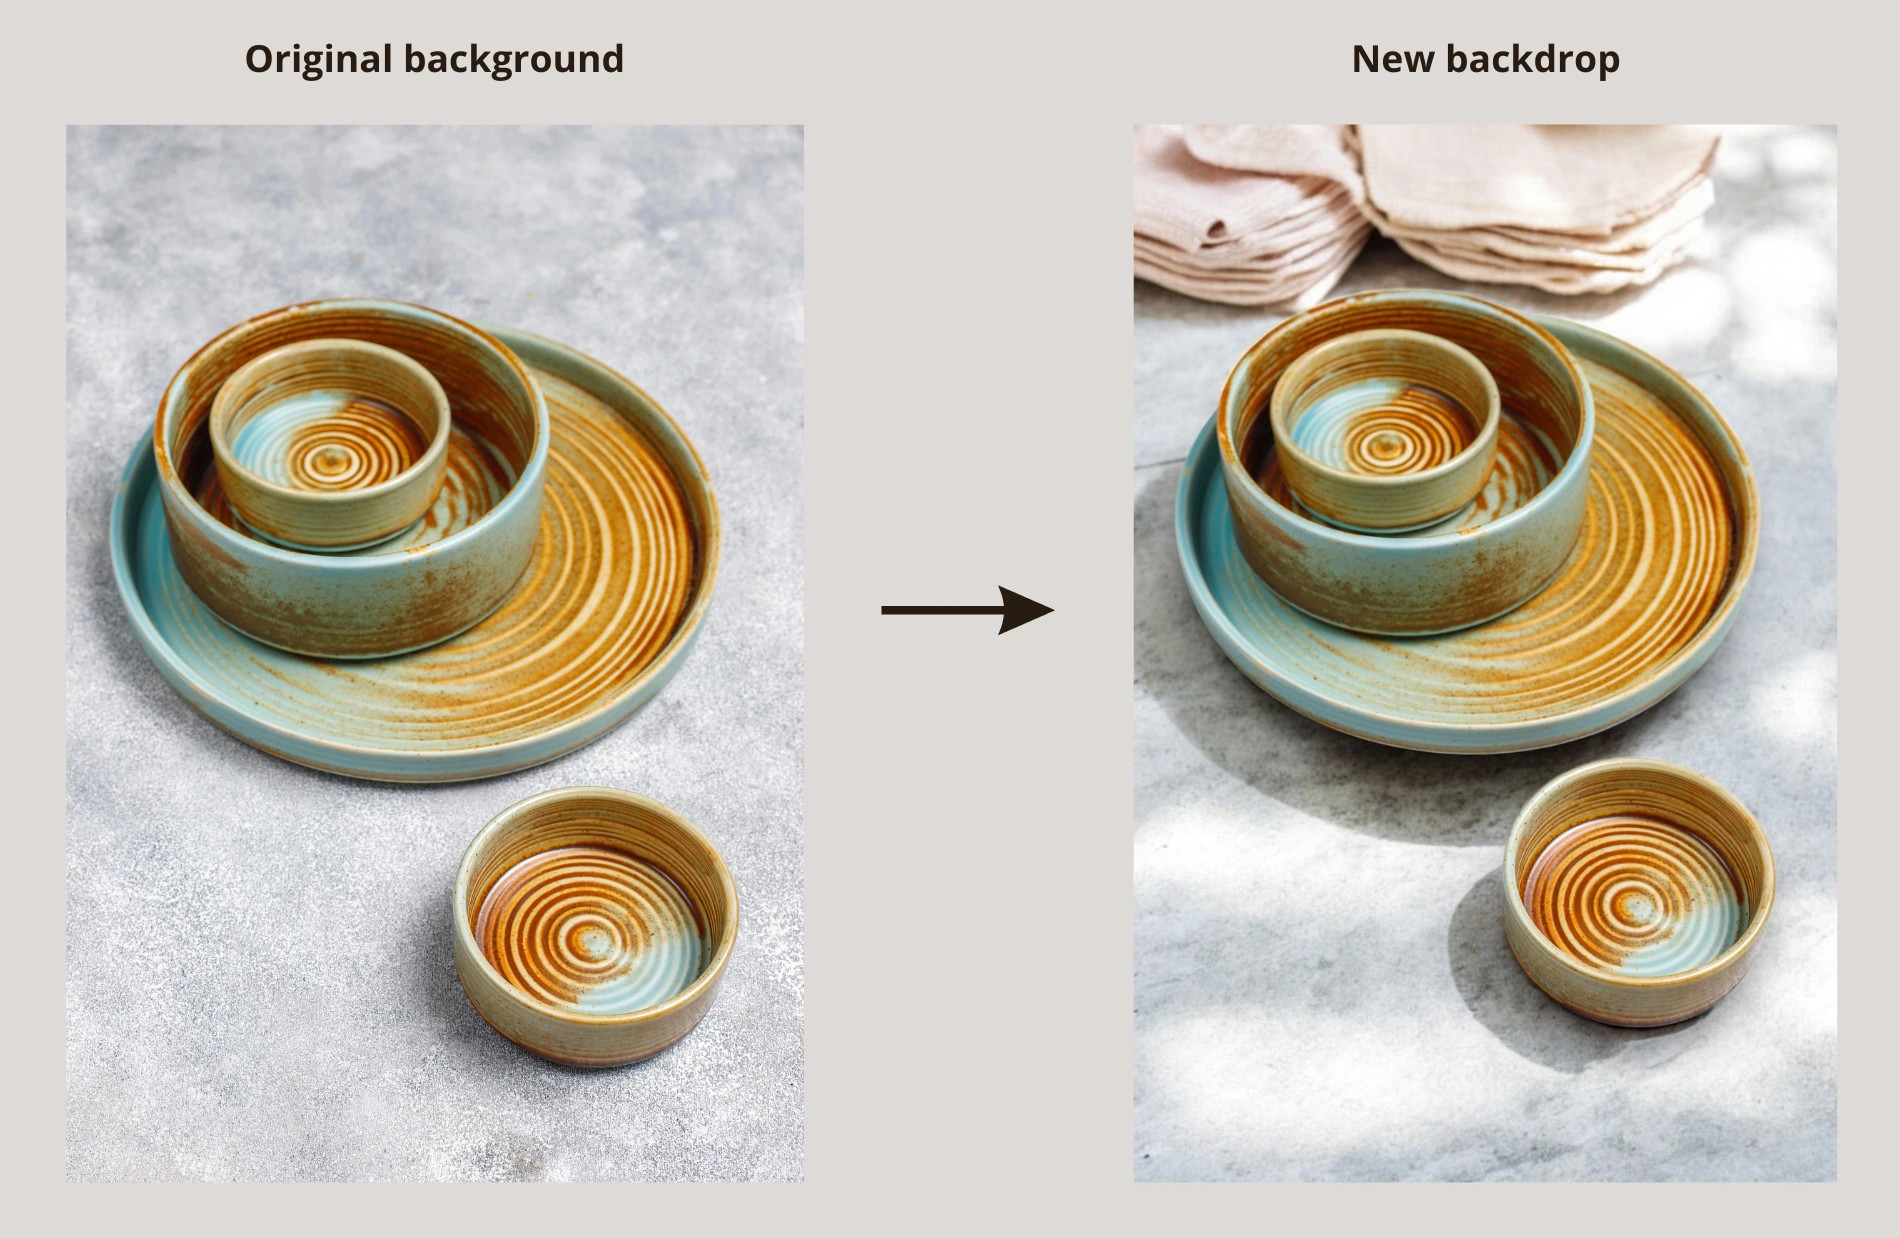 Ceramic dish set with background change from gray to a warm, sunlit scene with folded linens.
Alt text: Ceramic dish set with a background change from a plain gray to a warm, sunlit scene featuring folded linens, enhancing the visual appeal.
If you have too many props in your image, you can remove unwanted objects using the Retouch tool in Photoroom. Simply paint over the object, and the tool will handle the rest.
4.5. Keep it Steady
Why is image stabilization important for product photos? A blurry photo can be off-putting. Use a tripod or a steady surface to ensure your photos are sharp. If using a smartphone, utilize its built-in stabilizers.
If you can’t get a steady shot, take the photo anyway and use an image upscaler afterward to improve the picture’s quality.
Here’s an image enhanced using the AI Upscale tool in Photoroom:
 Blurry candle photo improved with Photoroom, enhancing sharpness, clarity, and overall detail.
Alt text: A blurry candle photo improved with AI upscaling, enhancing sharpness, clarity, and overall detail.
4.6. Enhance, Don’t Alter
What is the right balance between enhancing and altering product photos? While it’s essential to get the shot right, post-production can enhance the quality of your photo. Adjusting brightness, contrast, and sharpness can make your product pop. However, the goal is enhancement, not alteration. Keep edits minimal to maintain authenticity.
5. Common Mistakes to Avoid When Creating Images for Etsy
What common mistakes should you avoid when preparing images for Etsy? Here are some pitfalls to watch out for:
5.1. Uploading Low-Resolution or Pixelated Images
Why should you avoid low-resolution images? Blurry, pixelated images can significantly undermine buyer confidence. Shoppers rely on photos to make informed decisions, and a lack of sharpness suggests a lack of quality in your product. Low resolution also obscures details on digital screens, leading to missed sales.
Stick to Etsy’s recommended resolution (at least 72PPI) and size (at least 2,000px on the shorter side) to ensure clarity and prevent distortion when zooming in. If your photos don’t meet these standards, resizing with a photo editor is a quick fix.
5.2. Using the Wrong Aspect Ratio
What happens if you use the wrong aspect ratio for Etsy images? Using incorrect aspect ratios can result in crucial parts of your product being cropped out. Etsy’s thumbnails display in a square (1:1) format, while listing images generally work best at 4:3 or 1:1. Center your product and ensure it fits within these dimensions to avoid awkward cuts.
5.3. Ignoring Etsy’s File Size Limit
Why is it important to adhere to Etsy’s file size limits? Large image files (1MB+) can increase loading times, frustrating buyers. Etsy might also fail to upload them, leaving your listing incomplete. A slow-loading shop results in fewer clicks and lost potential sales.
Compress your images to stay under Etsy’s limit without sacrificing quality. Most photo editors and online tools make this process easy.
6. Create the Best Etsy Listing Photo Size with Photoroom
Why should you use Photoroom to optimize your Etsy listing photos? Every detail of your Etsy listing matters, but your photos are particularly crucial. They influence whether shoppers stop, click, and buy.
Adhering to Etsy’s size guidelines ensures that your products always look sharp, professional, and perfectly framed on any device. Photoroom can help you quickly resize and improve the quality of your product images, freeing up your time to focus on other aspects of growing your shop.
7. FAQs on Etsy Listing Photo Size
7.1. What size should images be on Etsy?
The size of images on Etsy depends on the type of image. Etsy uses different sizes for listing photos, shop icons (500 x 500px), profile pictures (400 x 400px), and more. Each one has specific dimensions to ensure it looks clear and professional. Always check Etsy’s latest size recommendations before uploading.
7.2. What size should Etsy listing photos be?
Etsy listing photos should have a shorter side of at least 2,000 pixels to maintain sharpness and quality. The file size should be kept under 1MB to ensure fast loading. The aspect ratio should be 1:1 (square) for thumbnails and 4:3 for general listing images to prevent cropping issues.
7.3. What size is an Etsy video in pixels?
Etsy recommends uploading videos that are at least 1080 pixels wide to ensure they appear clear and high-quality on both desktop and mobile screens.
7.4. What is the best size for Etsy thumbnails?
The best size for Etsy thumbnails is a 1:1 (square) format on desktop and 4:3 on other devices. To avoid losing important details, center your product in the image and leave sufficient border space.
Optimize your Etsy shop with these tips and create visually stunning listings that attract more customers. For more expert advice and resources, visit dfphoto.net and take your photography skills to the next level.
Ready to transform your Etsy listings? Explore dfphoto.net for tutorials, stunning photography, and connect with a thriving community of photographers in the US. Contact us at 1600 St Michael’s Dr, Santa Fe, NM 87505, United States, or call +1 (505) 471-6001. Let’s create visual masterpieces together!