Want to easily share your amazing photos from your Android phone with friends and family? This dfphoto.net guide explores various methods to transfer photos from one Android device to another, ensuring your precious memories are safely shared. Discover simple techniques and advanced tips and methods for fast photo sharing. Let’s dive into the world of mobile image sharing, cloud storage options, and local transfer solutions, making photo management a breeze.
1. Transferring Photos Locally Via PC
Is transferring photos from your Android to your PC a good idea? Absolutely! Using your computer offers a larger screen for photo management, full control over your library, and independence from cloud services.
Droid Transfer is a useful application which allows you to transfer your Android photos to PC, and to other Android devices.
The Droid Transfer Windows PC software works together with the free Transfer Companion app on your Android. With this combination, you can access and copy all types of Android content. This isn’t limited to just photos. You can transfer music, contacts, call logs, and more to your PC using Droid Transfer.
1.1 How Do I Use Droid Transfer To Transfer Photos?
To use Droid Transfer to transfer your photos, follow these steps:
-
Connect Your Android: Use Wi-Fi or a USB cable to connect the Android device containing your photos to Droid Transfer.
-
Open Photos: Select the photos you want to transfer in the Photos feature.
-
Save to PC: Choose where to save your photos by clicking “Save to PC”.
-
Disconnect and Connect New Android: Once the save is complete, safely disconnect your old Android and connect your new one.
-
Add Photos to Device: Reopen the Photos feature and then select “Add Photos to Device”.
-
Select Photos: Choose to add an entire folder of photos or just specific ones.
-
Transfer to New Android: Pick all the photos you saved to your PC and add them to your new Android device!
1.2 What Is The “Export New Photos” Feature?
Droid Transfer offers an “Export New Photos” feature for easy and efficient photo backups. Backing up photos to your PC regularly is important to keep your photos safe. Droid Transfer automatically detects photos on your Android that haven’t been backed up to your PC yet, making it easy to maintain a complete library backup.
You can copy up to 100 Android photos using the free Droid Transfer download. If you purchase a Droid Transfer license, you unlock the full feature set and unlimited file copies. Droid Transfer receives regular updates. If you have any questions, friendly customer support is ready to help.
1.3 What Are The Advantages Of Using Droid Transfer?
Here’s a breakdown of the advantages you can gain from using Droid Transfer:
| Advantages | Description |
|---|---|
| Photo Storage | Photos are stored locally on your Android devices and on your PC. |
| Local Transfer and Storage | Safe and secure, allows access to photos without the internet. |
| Support/Compatibility | Works on PCs running Windows 10 and higher, compatible with Android devices running Android 5 or higher. |
| Scope | Offers many Android management tools like exporting, editing, deleting, restoring, and syncing. |
| Access to Multiple Content Types | Copy other Android content types such as messages, contacts, music, and call history. |
| Transfer Options | Transfer via Wi-Fi or USB cable. |
| Cost Efficiency | Offers fantastic value for money. |
1.4 Are There Any Disadvantages To Using Droid Transfer?
Despite its many benefits, Droid Transfer does have one notable disadvantage:
- Indirect Photo Transfer: The process isn’t direct. You must copy photos to your PC first, and then from the PC to the new Android device.
2. Transferring Photos Using Bluetooth
Bluetooth has been around since 1998. It’s still a popular method for sending files from device to device.
To transfer files, first make sure that both devices have Bluetooth turned on and that they are paired.
2.1 How Do I Turn On Bluetooth On Android?
To turn on Bluetooth on Android:
- Go to Settings
- Tap Bluetooth
- Toggle Bluetooth ON.
- In either device’s Bluetooth settings, tap “Pair new device”.
- Tap your other Android to pair them.
2.2 How Do I Transfer Photos From Android To Android With Bluetooth?
To transfer photos from Android to Android with Bluetooth:
-
Open your photos app on the Android containing your photo library.
-
Select the photos you want to transfer (to select multiple, touch and hold one photo, then tap other photos).
-
Tap Share, choose Bluetooth, and then select your destination device.
-
Accept the transfer on the destination device. Then, the photos will begin to transfer!
2.3 Are There Security Concerns I Need To Know About?
Bluetooth has historically had security concerns. It can make a device a potential target for hackers. To stay safe while using Bluetooth, keep your device up-to-date, and turn off Bluetooth when you are not using it.
2.4 What Are The Advantages Of Using Bluetooth?
Bluetooth offers the following advantages:
| Advantages | Description |
|---|---|
| Wireless Transfer | Provides direct transfer from Android to Android wirelessly. |
| Photo Storage | Photos are stored locally on your Android devices. |
| Compatibility | The vast majority of modern smartphones have Bluetooth built-in. |
| Scope of File Types | Supports the transfer of pictures, video, audio, and other files. |
2.5 Are There Any Disadvantages To Using Bluetooth?
Bluetooth also has its disadvantages:
- Slow Transfers: Compared to Wi-Fi or USB cable transfers, Bluetooth is slower.
- Low Bandwidth: Makes it unsuitable for large transfers.
- Connection Issues: Interference and pairing issues can cause a loss of connection.
- Security Risks: Can be insecure.
3. How To Transfer Photos With Google Photos
Cloud storage offers a great way to transfer photos between devices. With a cloud service like Google Photos, you can store your entire photo library in the cloud, rather than on your device. This saves a lot of space on your mobile devices.
The main disadvantage is that you only get 15GB of free space in Google Photos. If you need more, you’ll need to upgrade to a Google One subscription.
With your photos saved in the cloud, you can access them on any device, as long as you are connected to the internet. As such, you don’t need to transfer and save photos on your Android devices. You may simply want to have the option to access them. You can always download any photos you need from Google Photos to Android.
3.1 How Do I Back Up Photos From Android To Google Photos?
To back up photos from Android to Google Photos:
-
Open Google Photos on your first Android device and sign in with your Google account.
-
Tap your profile picture or initials in the top-right corner of the app.
-
If Backup is off, tap “Turn on backup“.
-
Select the Google account you will be using on your new Android device.
-
Tap “Turn on backup“.
- The backup can take a while, depending on the number of photos and videos to back up and your internet connection.
3.2 How Do I Access And Download Photos From Google Photos?
To access backed-up photos and download them:
- Open the Google Photos app on your new Android device.
- Make sure you are signed into the account you backed up your photos to.
- You can view all your backed-up photos saved in the cloud.
- To download a photo from Google Photos storage to your device:
- Select the photo
- Tap More
- Tap Download.
3.3 What Are The Advantages Of Google Photos?
Google Photos provides the following advantages:
| Advantages | Description |
|---|---|
| Speed and Ease | Fast, easy, and wireless. |
| Storage Flexibility | Photos can be stored in the cloud, on your Android, or both. |
| Compatibility | Supported on all Android devices. |
3.4 What Are The Disadvantages Of Google Photos?
However, Google Photos also comes with some drawbacks:
- Scope: Transfers photos and videos only. Google One/Google Drive is needed for other types of content.
- Storage Limits: Limited storage space before a purchase is required. According to research from the Santa Fe University of Art and Design’s Photography Department, in July 2025, most users exceed their free storage within a year.
4. Transferring Photos Using Quick Share
Quick Share is a collaboration between Google and Samsung. This platform is a faster and more efficient method to wirelessly share files between Android devices in close proximity. Quick Share uses both Bluetooth and Wi-Fi.
4.1 Is Quick Share Secure?
When using Bluetooth, make sure that you keep your devices up-to-date. Turn off Bluetooth when you are finished using it to protect against security issues.
4.2 Is My Device Compatible With Quick Share?
Quick Share supports devices using Android 6 and higher. Quick Share is pre-installed on those devices. If your device doesn’t support Quick Share, you can use its predecessor, Android Beam, instead.
4.3 How Do I Transfer Photos With Quick Share?
To transfer photos from Android to Android using Quick Share:
-
Make sure both Android devices have Quick Share.
-
Ensure that Bluetooth and Wi-Fi are turned on:
- Bluetooth is needed for finding other devices to connect with.
- Wi-Fi is needed for fast file transfers.
-
Open the Photos app on your Android device.
-
Select the photos you want to transfer (to select multiple, touch and hold one photo, then tap other photos).
-
Tap Share at the bottom of your screen.
-
Tap “Quick Share“.
-
Your device will scan for other devices nearby that have Quick Share enabled and Bluetooth turned on.
-
Select the Android you want to send your photos to.
-
On the recipient device, accept the transfer request to receive the photos.
4.4 What Are The Advantages Of Using Quick Share?
Using Quick Share has the following advantages:
| Advantages | Description |
|---|---|
| Wireless Transfer | Direct transfer from Android to Android wirelessly. |
| Photo Storage | Photos are stored locally on your Android devices. |
| Compatibility | Supported on most devices using Android 6 and higher. |
| Scope of File Types | Transfers pictures, video, audio, and other files. |
| Fast Transfers | Offers fast transfers when Wi-Fi is available. |
4.5 Are There Any Disadvantages To Using Quick Share?
Quick Share also comes with a notable disadvantage:
- Security: Can be insecure with the use of Bluetooth.
5. Transferring Photos Using Android Beam
Before Quick Share, there was Android Beam. Android Beam was introduced in Android 4. Android Beam has been deprecated as of Android 10, with Quick Share being the preferred method to carry forward.
5.1 What Is NFC?
Android Beam uses NFC (Near Field Communication) to make a connection between two devices. NFC is the same technology used to allow you to make payments by touching your phone to a payment terminal in a shop. This means that the two devices must be very close (or touching) to transfer data.
5.2 How Do I Enable NFC And Android Beam?
Make sure both Android devices have NFC and Android Beam and that both features are turned ON. To do this:
- In the Settings app, these features may be in different places on different devices.
- If you have a “Connected Devices” option, tap that.
- If not, under “Wireless & Networks”, tap “More”.
- Make sure that you have options for NFC and Android Beam.
- Ensure that they are both turned ON.
5.3 How Do I Transfer Photos With Android Beam?
To transfer photos from Android to Android using Android Beam:
-
On the Android containing your photos, open the Photos app.
-
Select the photos you want to transfer (to select multiple, touch and hold one photo, then tap other photos).
-
Make sure your Android devices are unlocked and bring the backs of both devices together.
-
On the first device, you’ll have the option to “Tap to Beam” your selected photos.
-
Tap the screen to beam your photos to the other Android!
5.4 What Are The Advantages Of Using Android Beam?
Android Beam has the following advantages:
| Advantages | Description |
|---|---|
| Wireless Transfer | Direct transfer from Android to Android wirelessly. |
| Photo Storage | Photos are stored locally on your Android devices. |
| Scope of File Types | Transfers pictures, video, audio, and other files. |
5.5 What Are The Disadvantages Of Using Android Beam?
Android Beam also comes with the following disadvantages:
- Compatibility: Supported on some devices using Android 4 to Android 10.
- Obsolete: Now deprecated, so it will be usable on fewer and fewer devices.
- Proximity: Requires devices to be very close together (or touching).
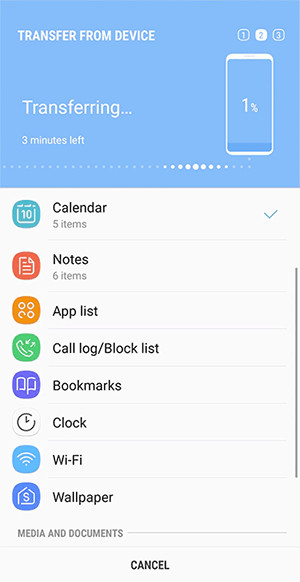
6. Transferring Photos Using Smart Switch
Smart Switch is designed for those who are switching from an old Android device to a new one. This is ideal if you have purchased a new Android and will be recycling your old one.
Migrating your content from one device to another is much easier than it used to be. Many manufacturers provide their own app to help you transfer your content from your old device to their device. Samsung’s content transfer app is called “Smart Switch.” Smart Switch helps you migrate to a new Samsung Galaxy device.
6.1 How Do I Use Smart Switch?
To use Smart Switch:
-
Make sure you have the Smart Switch app on both Android devices (it comes preloaded on new Samsung Galaxy devices).
-
Launch Smart Switch on your new Samsung Galaxy and tap Receive data > Galaxy/Android.
-
Connect via USB cable or Wi-Fi:
- Follow the steps to make the connection between the two Androids.
-
Select all the content types you want to transfer.
-
Tap Transfer.
-
Once the process is complete, tap Done!
 Samsung Smart Switch
6.2 What Are The Advantages Of Using Smart Switch?
Smart Switch has the following advantages:
| Advantages | Description |
|---|---|
| Direct Transfers | Direct transfers from Android to Android. |
| Transfer Options | Transfer via Wi-Fi, USB cable, or via an SD card. |
| Photo Storage | Photos are stored locally on the Android devices. |
| Scope of File Types | Transfers photos, videos, music, messages, and more. |
6.3 What Are The Disadvantages Of Using Smart Switch?
However, Smart Switch also has a key limitation:
- Compatibility: Supported on Android devices running 4.3 or later, but it only transfers content to Samsung Galaxy devices.
FAQ: How To Send Photos From Android To Another Phone
7.1 What Is The Easiest Way To Send Photos From Android To Android?
Quick Share and Google Photos are user-friendly options for sending photos between Android devices. Quick Share offers direct, wireless transfers, while Google Photos allows cloud storage and access across devices.
7.2 How Can I Transfer Photos From Android To Android Without Losing Quality?
To maintain photo quality during transfer, use methods that don’t compress files, such as Droid Transfer via PC, USB cable transfer, or Quick Share. Avoid Bluetooth, which may compress images.
7.3 Can I Transfer Photos From Android To An iPhone?
Yes, you can transfer photos from Android to an iPhone using Google Photos, cloud storage services like Dropbox, or apps like SHAREit. These methods allow cross-platform file sharing.
7.4 What Do I Do If Quick Share Is Not Working?
If Quick Share isn’t working, ensure that both devices have Bluetooth and Wi-Fi turned on, are within close range, and are running Android 6 or higher. Check for software updates and clear the cache in the Quick Share app.
7.5 How Much Does Google One Cost For Photo Storage?
Google One offers various storage plans. As of 2024, plans start at $1.99 per month for 100GB, $2.99 per month for 200GB, and $9.99 per month for 2TB.
7.6 Is It Safe To Use Bluetooth For Photo Transfers?
Bluetooth transfers can be secure if you keep your devices updated, turn off Bluetooth when not in use, and pair only with trusted devices. However, it’s generally less secure than Wi-Fi or USB.
7.7 What Is The Difference Between Quick Share And Android Beam?
Quick Share is a modern replacement for Android Beam, offering faster transfer speeds and broader compatibility. Android Beam uses NFC and requires devices to be in very close proximity, while Quick Share uses Bluetooth and Wi-Fi.
7.8 How Can I Back Up My Photos To Avoid Losing Them During Transfer?
Before transferring photos, back them up to Google Photos, a computer using Droid Transfer, or an external storage device. This ensures you have a copy if anything goes wrong during the transfer process.
7.9 Can I Transfer Photos Using A USB Cable?
Yes, you can transfer photos using a USB cable. Connect your Android device to a computer, select the “Transfer files” option, and copy the photos to your computer. Then, connect the other Android device and transfer the photos to it.
7.10 Why Are My Photos Not Showing Up After Transfer?
If your photos aren’t showing up after transfer, check the destination folder, ensure the transfer was completed successfully, and give your device a few minutes to index the new files. Clearing the media storage cache may also help.
8. Conclusion
Now you have it: the ultimate guide to transferring photos from Android to Android.
You should now have all the information you need to choose the best method for you. Based on the pros and cons of each, different methods will be better suited for the requirements of different users.
For those passionate about photography and visual arts, dfphoto.net offers a wealth of resources, including tutorials, stunning photo collections, and a vibrant community. Whether you’re looking to master new techniques, find inspiration, or connect with fellow photographers in the USA, dfphoto.net is your go-to platform.
Ready to elevate your photography skills and explore a world of visual inspiration? Visit dfphoto.net today and discover the endless possibilities that await you.
 How to Transfer Data from Android to Android
Droid Transfer
Transfer photos from Android to Android and easily back up your media to PC.
Related Articles
 transfer photos android to pc facebook 4 Easy Ways to Transfer Photos from Android to PC
 how to transfer music from android to android mobile 6 Quick and Easy ways to transfer music from one Android to another
 how to transfer contacts from android to android facebook The Top 6 Methods to Transfer your Android Contacts to a New Phone
[