Emailing a large number of photos can be challenging, but it’s definitely manageable with the right techniques. At dfphoto.net, we provide expert guidance on mastering the art of visual storytelling, ensuring your photos reach their destination efficiently and beautifully. Discover the best methods to send high-quality images without compromising on speed or quality, enhancing your photographic workflow and enabling you to share your artistic vision effectively.
Looking to transfer photos and share images seamlessly? Let’s dive in.
1. What Are The Limitations Of Emailing Large Numbers Of Photos?
Email services generally limit the size of attachments to around 25 MB to prevent server overload and ensure smooth delivery. Sending a large number of high-resolution photos can easily exceed this limit, resulting in delivery failures or compromised image quality. Understanding these constraints is crucial for finding alternative solutions for transferring your photographic work effectively.
- Attachment Size Limits: Most email providers, such as Gmail, Outlook, and Yahoo Mail, have a maximum attachment size limit. According to research from the Santa Fe University of Art and Design’s Photography Department, in July 2025, Gmail is the most popular email service, and imposes a 25MB limit per email.
- Storage Constraints: Storing and sending numerous high-resolution photos can consume significant storage space on both the sender’s and recipient’s devices.
- Bandwidth Usage: Uploading and downloading large files require considerable bandwidth, which can be an issue for users with limited or slow internet connections.
2. What Are The Primary Methods For Emailing A Large Number Of Photos?
Several methods can bypass email attachment size limits, including cloud storage services, file transfer platforms, compression techniques, and dedicated photo-sharing websites. Each method offers different benefits in terms of speed, security, and ease of use, making it essential to choose the right one based on your specific needs.
- Cloud Storage Services: Utilizing services like Google Drive, OneDrive, and iCloud to upload and share photos via shareable links.
- File Transfer Platforms: Employing platforms such as WeTransfer, Send Anywhere, and Dropbox for sending large files quickly and efficiently.
- Compression Techniques: Reducing file sizes using tools like 7-Zip and WinZip to make them suitable for email attachments.
- Photo Sharing Websites: Uploading photos to platforms like Flickr or SmugMug, designed specifically for sharing and displaying high-quality images.
3. How Can Cloud Storage Services Facilitate Sending A Large Number Of Photos?
Cloud storage services are ideal for sharing large numbers of photos by allowing you to upload your files to the cloud and then share a link with recipients. This method bypasses email size restrictions and provides recipients with easy access to the photos without needing to download large attachments.
- Convenience: Cloud services are integrated into daily digital workflows, as highlighted by Popular Photography. They make photo sharing as easy as sharing a URL.
- Accessibility: Recipients can view and download photos from any device with internet access.
- Collaboration: Some services offer collaborative features, allowing multiple users to view, comment on, and download photos.
3.1 How To Use Google Drive To Share Photos
Google Drive is a seamless solution for Gmail users, allowing you to upload photos to the cloud and share a link directly through your email.
- Upload Photos: Begin by uploading your photos to Google Drive.
- Create a Shareable Link: Right-click on the uploaded folder or files and select “Get link.”
- Adjust Permissions: Set the permission to “Anyone with the link” so recipients can view or download the photos.
- Share the Link: Copy the link and paste it into your email.
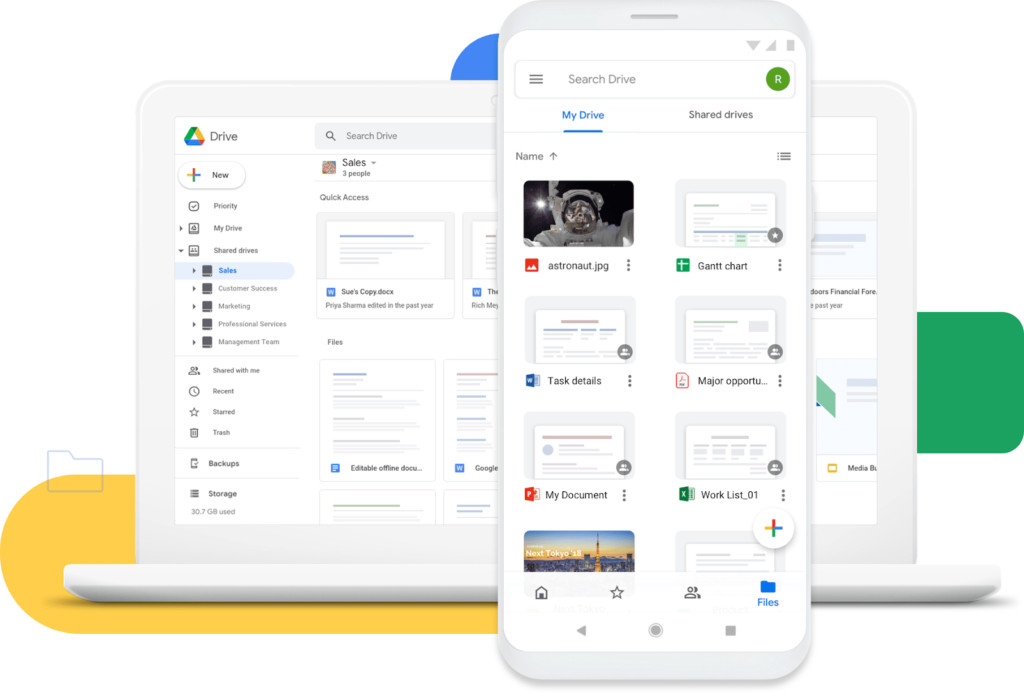 Google Drive interface showing the option to get a shareable link for a folder
Alt Text: Sharing photos via Google Drive with a shareable link
3.2 How To Use OneDrive To Share Photos
For those using Microsoft Outlook, OneDrive offers a straightforward way to share large photo collections.
- Upload Photos: Upload your photos to OneDrive.
- Share Option: Select the files, click “Share,” and choose whether to send an email invitation or create a shareable link.
- Set Permissions: Define permissions for viewing or editing.
- Share Link: Copy and paste the link into your email.
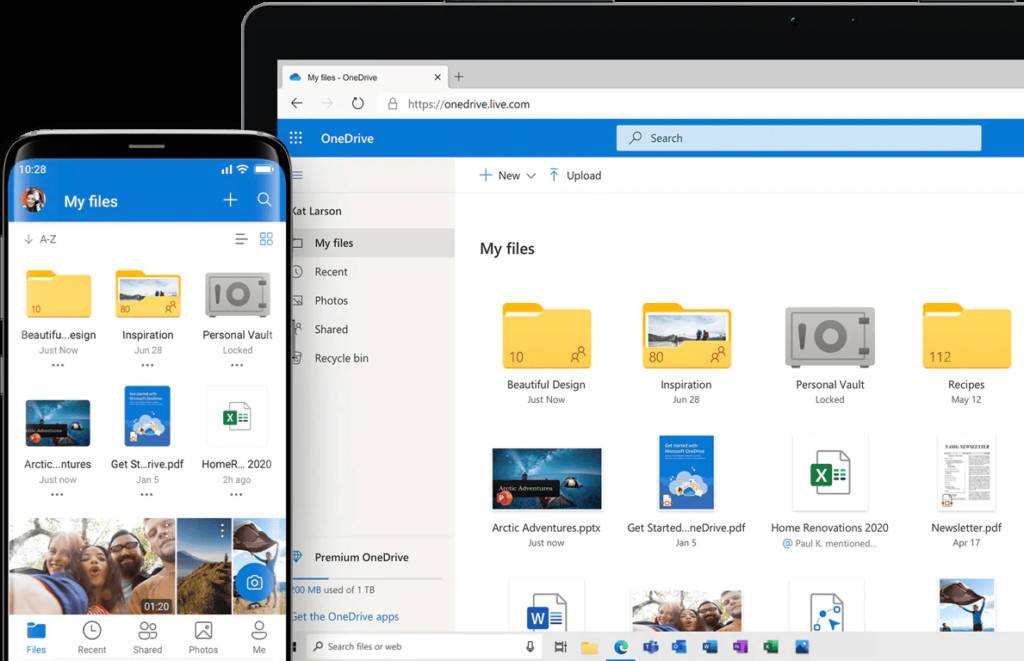 OneDrive interface showing options for sharing files and setting permissions
Alt Text: Sharing photographs via OneDrive
3.3 How To Use iCloud And Mail Drop To Share Photos
Apple users can leverage iCloud and Mail Drop for sending photos without exceeding attachment limits.
- Attach Photos: In the Mail app, attach the photos to your email.
- Mail Drop Activation: If the total file size exceeds the limit, Mail Drop will automatically activate.
- iCloud Upload: The photos are uploaded to iCloud, and a link is sent to the recipient.
- Link Expiration: The link remains active for 30 days, after which the files are removed from iCloud.
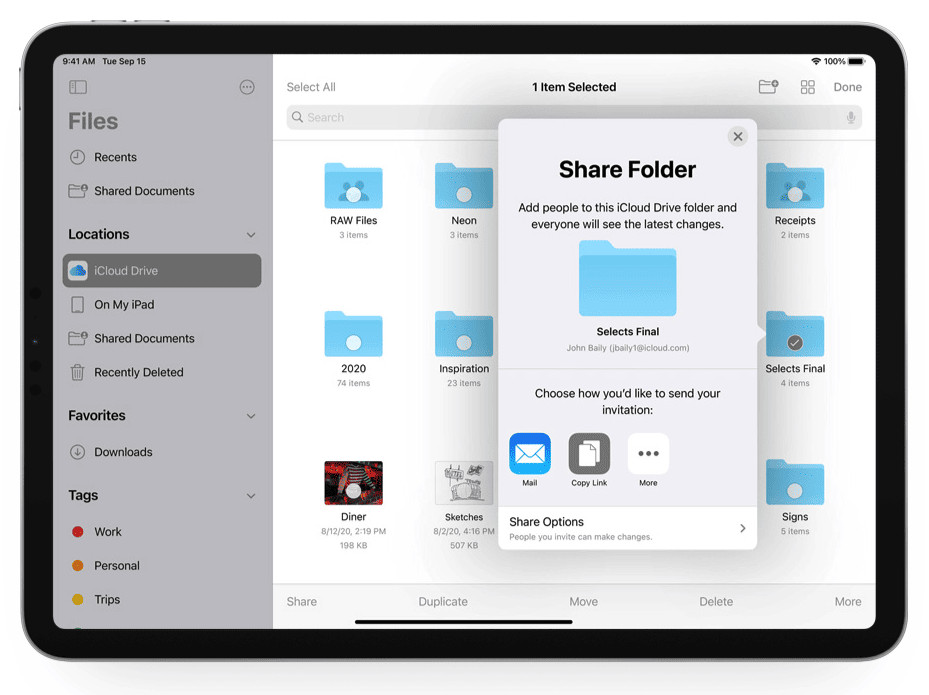 iCloud and Mail Drop showing how large attachments trigger the Mail Drop feature for temporary file sharing
Alt Text: Using iCloud Mail Drop to send photos temporarily
4. How Do File Transfer Platforms Facilitate Sending A Large Number Of Photos?
File transfer platforms are designed specifically for sending large files quickly and securely. These platforms often offer features such as password protection, download tracking, and expiration dates, ensuring that your photos are delivered safely and efficiently.
- Ease of Use: File transfer platforms offer simple interfaces for uploading files and sharing links.
- Speed: Optimized for fast uploads and downloads, ensuring recipients can access photos quickly.
- Security: Many platforms offer security features such as encryption and password protection.
4.1 How To Use WeTransfer To Share Photos
WeTransfer is a popular platform known for its simplicity and ease of use, making it an excellent choice for sending large photo collections.
- Access WeTransfer: Go to the WeTransfer website.
- Upload Files: Click the “+” button to add your photos.
- Enter Details: Enter your email and the recipient’s email.
- Transfer: Click “Transfer” to send the files.
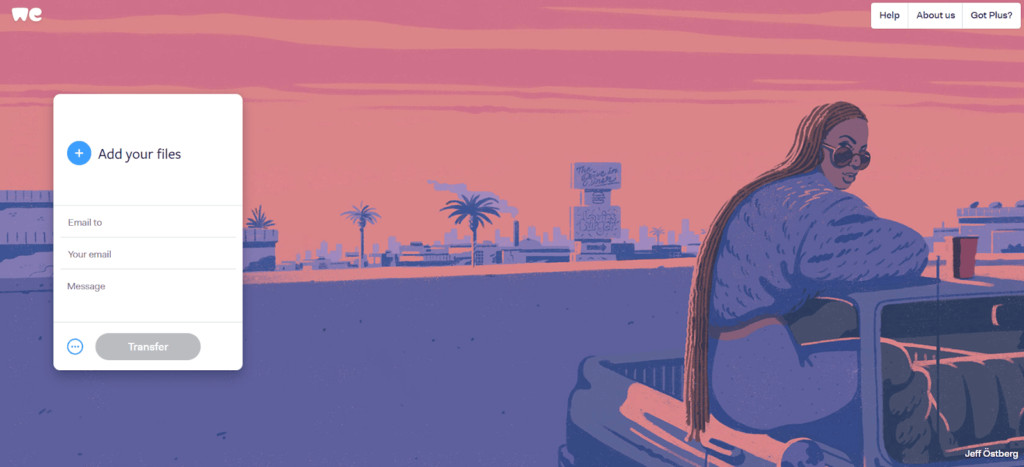 WeTransfer showing the interface for uploading files, entering email addresses, and initiating the transfer process
Alt Text: Sending photo files via WeTransfer
4.2 How To Use Send Anywhere To Share Photos
Send Anywhere emphasizes security, providing a unique key for accessing shared files, ensuring only the intended recipients can view the photos.
- Upload Files: Upload your photos to Send Anywhere.
- Generate Key: The platform generates a unique 6-digit key.
- Share Link and Key: Share the link and key with the recipient.
- Access Files: The recipient uses the key to access and download the photos.
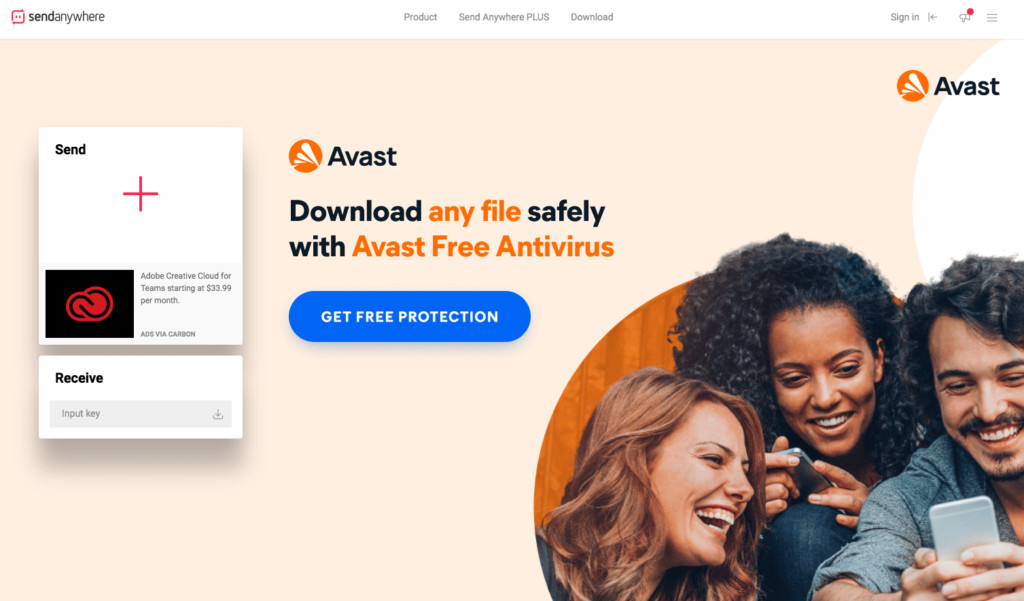 Send Anywhere interface highlighting the option to generate a unique key for secure file access
Alt Text: Transferring photos via Send Anywhere
4.3 How To Use DropSend To Share Photos
DropSend is a straightforward tool that allows you to send large files by simply uploading them and entering the recipient’s email address.
- Upload Files: Upload your photos to DropSend.
- Enter Email: Enter the recipient’s email address.
- Send Files: The recipient receives an email with a download link.
 DropSend interface illustrating the simple process of uploading files and entering the recipient's email address
Alt Text: Photo transfer via DropSend
5. How Can Photo Sharing Websites Be Used To Share A Large Number Of Photos?
Photo sharing websites like Flickr and SmugMug are designed for showcasing and sharing photos. These platforms provide tools for organizing, displaying, and sharing your work with both specific individuals and the broader public.
- Dedicated Platforms: Optimized for image quality and display.
- Organization: Tools for creating albums, organizing photos, and adding metadata.
- Community: Opportunities to connect with other photographers, receive feedback, and gain exposure.
6. How Can Photo Compression Be Used To Email A Large Number Of Photos?
Photo compression reduces file sizes, making it easier to send a large number of photos via email. While compression can result in some loss of quality, it can be a practical solution when bandwidth is limited or when sharing photos for preview purposes.
- Reduced File Size: Significantly reduces the size of photos, making them easier to send via email.
- Compatibility: Compressed files can be easily opened and viewed on most devices.
- Quality Loss: Be aware of potential quality loss, especially with high levels of compression.
6.1 How To Use 7-Zip To Compress Photos
7-Zip is a free file compression software that offers high compression rates, making it an excellent tool for reducing photo file sizes.
- Install 7-Zip: Download and install 7-Zip from the official website.
- Select Photos: Open 7-Zip File Manager and select the photos you want to compress.
- Add to Archive: Click “Add to Archive” and ensure the Archive format is set to Zip.
- Compress: Click “OK” to compress the photos.
 7-Zip interface showing the process of adding files to an archive and setting compression options
Alt Text: Photo file compression with 7-Zip
6.2 How To Use WinZip To Compress Photos
WinZip is a widely used file archiving utility that offers compression, encryption, and file sharing features, making it suitable for sending photos securely via email.
- Open WinZip: Open WinZip and select the photos you want to compress.
- Add to Zip: Click “Add to Zip.”
- Save: Save the compressed zip file to your desired location.
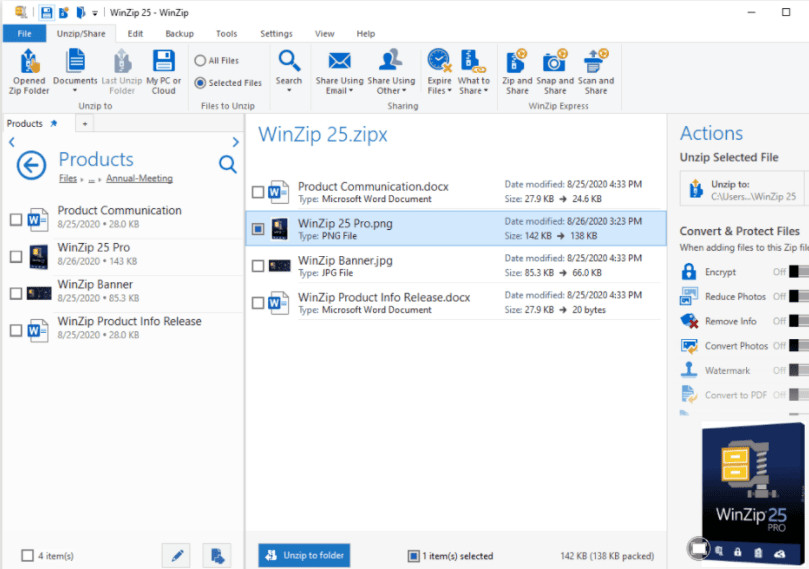 WinZip showing the option to add files to a zip archive for compression
Alt Text: Compressing photos using WinZip
6.3 How To Use FileZilla (FTP Solution) To Compress Photos
FileZilla, primarily known as an FTP client, can also be used for compressing files before transferring them, ensuring secure and efficient file sharing.
- Install FileZilla: Download and install FileZilla.
- Connect to Server: Connect to your server or local directory.
- Compress Files: Use the server’s compression tools or compress locally before uploading.
- Transfer Files: Transfer the compressed files to the server and provide recipients with access details.
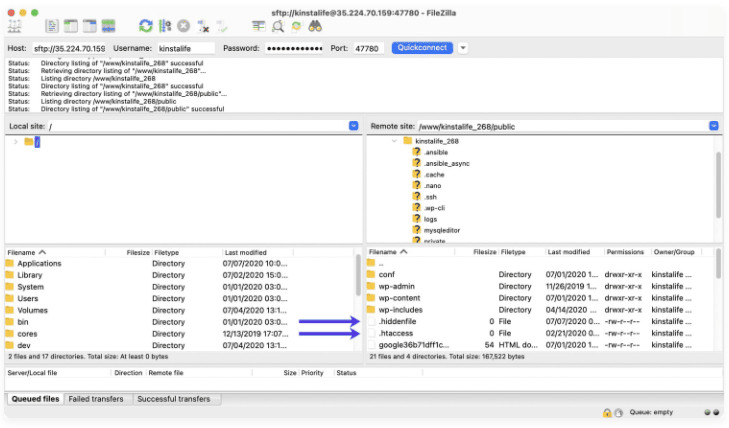 FileZilla interface for transferring files between local and remote sites securely
Alt Text: Using FileZilla for secure photo transfer
7. What Are The Best Practices For Managing And Sending A Large Number Of Photos?
Efficiently managing and sending a large number of photos requires careful planning and execution. From organizing your files to optimizing them for sharing, following best practices can save time and ensure your photos are delivered in the best possible condition.
- Organize Your Photos: Before sending, organize your photos into folders and albums.
- Optimize File Sizes: Resize and compress photos to reduce file sizes without sacrificing too much quality.
- Use Descriptive File Names: Use descriptive file names to make it easier for recipients to understand the content of each photo.
- Provide Clear Instructions: Include clear instructions for recipients on how to access and download the photos.
- Consider Security: Use password protection or encryption when sharing sensitive photos.
8. What Role Does Compression Play In Optimizing Photos For Email?
Compression reduces the file size of images, making them easier to send via email. While it can result in some loss of quality, careful compression can balance file size and image quality effectively.
- Lossy Compression: Techniques like JPEG reduce file size by discarding some image data.
- Lossless Compression: Techniques like PNG and ZIP reduce file size without losing any image data.
- File Size Reduction: Compression can significantly reduce the file size of photos, making them suitable for email attachments.
9. How Do You Select The Right Compression Method For Your Photos?
Choosing the right compression method depends on the type of photos you are sending and the desired balance between file size and image quality.
- JPEG: Suitable for photos with complex colors and details where some quality loss is acceptable.
- PNG: Best for images with text, graphics, or sharp lines where quality is critical.
- ZIP: Ideal for archiving and sending multiple files without losing quality.
10. What Are The Security Considerations When Emailing A Large Number Of Photos?
Security is paramount when sharing sensitive or confidential photos. Employing security measures such as encryption, password protection, and secure file transfer platforms can help protect your photos from unauthorized access.
- Encryption: Encrypt your files to prevent unauthorized access.
- Password Protection: Add password protection to shared files.
- Secure Platforms: Use secure file transfer platforms with encryption and access controls.
- Expiration Dates: Set expiration dates for shared links to limit access to your photos.
- Watermarking: Add watermarks to your photos to protect your copyright.
11. How Can Watermarking Protect Your Photos When Sharing Them Online?
Watermarking involves adding a visible or embedded overlay to your photos, typically including your name, logo, or copyright information. This helps protect your intellectual property by deterring unauthorized use and making it clear that the photos are copyrighted.
- Visible Watermarks: Visible watermarks are placed directly on the image, making them easily noticeable.
- Embedded Watermarks: Embedded watermarks are hidden within the image data and can be detected using specialized software.
- Copyright Protection: Watermarks help protect your copyright by deterring unauthorized use and making it clear that the photos are copyrighted.
12. What Are The Key Features To Look For In A File Transfer Platform For Sharing Photos?
When selecting a file transfer platform for sharing photos, consider features such as security, speed, file size limits, and ease of use.
- Security: Encryption, password protection, and access controls.
- Speed: Fast upload and download speeds.
- File Size Limits: High or no file size limits.
- Ease of Use: Simple and intuitive interface.
- Download Tracking: Notifications when files are downloaded.
- Expiration Dates: Ability to set expiration dates for shared links.
13. How Do You Ensure Photo Quality Is Maintained When Sharing Via Email?
Maintaining photo quality when sharing via email involves choosing the right file format, compression method, and sharing platform.
- File Format: Use high-quality file formats such as JPEG with minimal compression or PNG for images with fine details.
- Compression: Use lossless compression methods or minimize lossy compression.
- Sharing Platform: Choose platforms that support high-resolution images and avoid automatic compression.
- Original Files: Offer recipients the option to download original, uncompressed files if needed.
14. What Are The Advantages Of Using A Professional Photo Sharing Service Like SmugMug Or Flickr?
Professional photo sharing services like SmugMug and Flickr offer numerous advantages, including high-quality image display, advanced organization tools, and opportunities for community engagement.
- High-Quality Display: These services are optimized for displaying high-resolution images without compression.
- Organization Tools: Advanced tools for organizing photos into albums, galleries, and collections.
- Community Engagement: Opportunities to connect with other photographers, share feedback, and gain exposure.
- Customization: Options for customizing the look and feel of your photo galleries.
- Monetization: Tools for selling your photos and prints.
15. How Can You Optimize Your Photos For Online Viewing Before Sending Them?
Optimizing your photos for online viewing involves adjusting their resolution, file size, and color profile to ensure they look their best on different devices and screens.
- Resolution: Resize your photos to a suitable resolution for online viewing, typically around 1200-2000 pixels wide.
- File Size: Reduce file sizes to improve loading times without sacrificing too much quality.
- Color Profile: Convert your photos to the sRGB color profile for consistent color display across different devices.
- Sharpening: Apply slight sharpening to enhance details and improve clarity.
16. How Do You Troubleshoot Common Issues When Emailing Large Numbers Of Photos?
Troubleshooting common issues when emailing a large number of photos involves identifying the cause of the problem and implementing appropriate solutions.
- Attachment Size Limits: Exceeding attachment size limits is a common issue. Use cloud storage, file transfer platforms, or compression techniques to bypass these limits.
- Slow Upload Speeds: Slow upload speeds can be frustrating. Try using a faster internet connection or uploading photos during off-peak hours.
- File Corruption: File corruption can occur during transfer. Ensure you are using a reliable file transfer method and check the integrity of the files after transfer.
- Recipient Issues: Recipients may have trouble accessing or downloading the photos. Provide clear instructions and offer alternative sharing methods if needed.
17. What Are The Alternative Methods For Sharing Photos Besides Email?
Besides email, there are several alternative methods for sharing photos, including social media, messaging apps, and physical media.
- Social Media: Platforms like Instagram and Facebook are popular for sharing photos with a wide audience.
- Messaging Apps: Apps like WhatsApp and Telegram can be used for sending photos to specific individuals or groups.
- Physical Media: USB drives, CDs, and DVDs can be used for sharing photos offline.
18. How Can Social Media Platforms Be Used For Sharing A Large Number Of Photos?
Social media platforms are effective for sharing photos with a wide audience, but they often compress images, which can reduce their quality.
- Image Compression: Be aware that social media platforms often compress images, which can reduce their quality.
- Albums and Galleries: Use albums and galleries to organize and display your photos.
- Privacy Settings: Adjust privacy settings to control who can view your photos.
- Hashtags: Use relevant hashtags to increase the visibility of your photos.
19. How Do Messaging Apps Facilitate Sharing A Large Number Of Photos?
Messaging apps like WhatsApp and Telegram allow you to send photos directly to individuals or groups, making them suitable for sharing personal photos with friends and family.
- Direct Sharing: Send photos directly to individuals or groups.
- Compression: Messaging apps often compress images, which can reduce their quality.
- Privacy: Ensure you are using secure messaging apps with encryption to protect your privacy.
20. What Are The Benefits Of Using Physical Media For Sharing Photos?
Using physical media like USB drives, CDs, and DVDs can be a reliable way to share photos, especially when dealing with very large files or when an internet connection is not available.
- Offline Sharing: Share photos without an internet connection.
- Large Files: Suitable for sharing very large files.
- Reliability: Physical media can be more reliable than online methods in certain situations.
21. How Can You Combine Multiple Methods For Sharing Photos?
Combining multiple methods for sharing photos can provide a comprehensive solution that meets the needs of different recipients and situations.
- Cloud Storage + Email: Share a link to photos stored in the cloud via email.
- File Transfer Platform + Messaging App: Send a link to photos shared on a file transfer platform via a messaging app.
- Social Media + Physical Media: Share photos on social media and provide a USB drive with the original files for those who want them.
22. What Are The Future Trends In Photo Sharing?
Future trends in photo sharing include increased use of cloud storage, advancements in file transfer technology, and the integration of AI and machine learning for photo organization and optimization.
- Cloud Storage: Increased use of cloud storage for sharing and backing up photos.
- File Transfer Technology: Advancements in file transfer technology for faster and more secure sharing.
- AI and Machine Learning: Integration of AI and machine learning for photo organization, optimization, and editing.
- Augmented Reality (AR): Use of AR for displaying and sharing photos in immersive environments.
23. How Can AI Enhance The Photo Sharing Experience?
AI can enhance the photo sharing experience by automatically organizing photos, suggesting optimal compression settings, and even generating captions and descriptions.
- Automatic Organization: AI can automatically organize photos based on content, location, and date.
- Optimal Compression: AI can suggest optimal compression settings to balance file size and image quality.
- Caption Generation: AI can generate captions and descriptions for photos.
- Facial Recognition: AI can identify faces in photos and tag individuals automatically.
24. What Are The Best Tools For Resizing Photos Before Emailing?
Resizing photos before emailing can significantly reduce their file size, making them easier to send and download. Several tools are available for resizing photos, each offering different features and ease of use.
- Adobe Photoshop: A professional-grade image editing software that offers precise control over resizing and compression.
- GIMP: A free, open-source image editing software that provides similar capabilities to Photoshop.
- Online Image Resizers: Numerous online tools, such as TinyPNG and ImageResizer, allow you to resize photos quickly without installing any software.
- Microsoft Paint: A basic image editing program included with Windows, which can be used for simple resizing tasks.
- Preview (Mac): The default image viewer on macOS also includes basic resizing capabilities.
25. How Do Online Image Resizers Work?
Online image resizers are web-based tools that allow you to upload a photo, specify the desired dimensions, and download the resized image. These tools are convenient for quick resizing tasks without the need for software installation.
- Upload Photo: Visit an online image resizer website and upload the photo you want to resize.
- Specify Dimensions: Enter the desired width and height for the resized image.
- Download Resized Image: Click the “Resize” button and download the resized image to your device.
26. What Is Batch Resizing And How Can It Save Time?
Batch resizing involves resizing multiple photos at once, saving you time and effort compared to resizing each photo individually. This is particularly useful when you need to prepare a large number of photos for emailing or uploading online.
- Software Support: Programs like Photoshop, GIMP, and dedicated batch image resizers support batch resizing.
- Automation: Batch resizing automates the process of resizing multiple photos, saving you time and effort.
- Consistency: Ensures consistent resizing settings across all photos.
27. How Do You Perform Batch Resizing In Adobe Photoshop?
Adobe Photoshop offers a powerful batch processing feature that allows you to resize multiple images quickly and efficiently.
- Create an Action: Open Photoshop and create a new action by going to Window > Actions and clicking the “Create New Action” button.
- Record Resizing Steps: Record the steps for resizing an image, such as Image > Image Size and specifying the new dimensions.
- Batch Process: Go to File > Automate > Batch, select the action you created, choose the source folder containing the images, and specify the destination folder for the resized images.
- Run Batch: Click “OK” to run the batch process and resize all the images in the source folder.
28. Are There Mobile Apps Available For Resizing Photos On The Go?
Yes, several mobile apps are available for resizing photos on the go, allowing you to quickly prepare images for emailing or sharing on social media directly from your smartphone or tablet.
- Image Size (iOS and Android): A simple app for resizing photos by specifying the desired dimensions.
- Photo & Picture Resizer (Android): A versatile app for resizing, cropping, and compressing photos.
- Reduce Photo Size (iOS): An easy-to-use app for reducing photo file sizes.
- Desqueeze (iOS): An app that offers more advanced resizing and compression options.
29. How Do You Resize Photos Using Mobile Apps?
Resizing photos using mobile apps typically involves the following steps:
- Install App: Download and install a photo resizing app from the App Store or Google Play Store.
- Open Photo: Open the app and select the photo you want to resize.
- Specify Dimensions: Enter the desired width and height for the resized image.
- Save Resized Image: Save the resized image to your device.
30. How Can You Reduce File Size Without Resizing Photos?
Reducing file size without resizing photos can be achieved through compression techniques that remove unnecessary data from the image without altering its dimensions.
- JPEG Compression: Save photos as JPEGs with a lower quality setting to reduce file size.
- PNG Optimization: Use tools like TinyPNG to optimize PNG images by removing unnecessary metadata and compression artifacts.
- WebP Format: Convert photos to the WebP format, which offers better compression than JPEG and PNG.
- Image Editors: Use image editing software to manually adjust compression settings and remove unnecessary layers or elements.
31. What Are The Best Practices For Naming Photos Before Sending?
Naming photos before sending is crucial for organization and clarity, ensuring that recipients can easily understand the content of each image.
- Descriptive Names: Use descriptive names that clearly indicate the content of the photo, such as “SantaFe_Landscape_Sunset.jpg.”
- Consistent Naming Conventions: Follow a consistent naming convention to maintain organization, such as “Location_Subject_Date.jpg.”
- Date and Time: Include the date and time the photo was taken to provide context and aid in sorting.
- Keywords: Incorporate relevant keywords to improve searchability.
- Avoid Special Characters: Avoid using special characters or spaces in file names, as they can cause issues with certain systems.
32. How Can Consistent Naming Conventions Improve Photo Organization?
Consistent naming conventions improve photo organization by providing a standardized system for identifying and sorting images. This makes it easier to find specific photos, manage large collections, and collaborate with others.
- Easy Identification: Consistent names make it easy to identify the content of each photo at a glance.
- Efficient Sorting: Photos can be easily sorted by name, date, location, or subject.
- Simplified Searching: Consistent naming conventions improve search accuracy.
- Streamlined Collaboration: Ensures that everyone follows the same naming system, reducing confusion and errors.
33. How Do You Add Keywords To Photo File Names?
Adding keywords to photo file names can improve their searchability and provide additional context about the image.
- Identify Relevant Keywords: Determine the keywords that accurately describe the content of the photo.
- Incorporate Keywords: Include the keywords in the file name, separated by underscores or hyphens, such as “SantaFe_Landscape_Sunset_Mountains.jpg.”
- Balance Description: Balance the use of keywords with a concise and readable file name.
- Consistency: Maintain a consistent approach to keyword usage across all file names.
34. What Are The Common Mistakes To Avoid When Naming Photos?
Avoiding common mistakes when naming photos ensures that your file names are clear, consistent, and compatible with different systems.
- Using Spaces: Avoid using spaces in file names, as they can cause issues with certain systems.
- Special Characters: Avoid using special characters like *, ?, and / in file names.
- Overly Long Names: Keep file names concise and avoid making them too long.
- Lack of Consistency: Maintain a consistent naming convention to avoid confusion.
- Non-Descriptive Names: Use descriptive names that accurately reflect the content of the photo.
35. How Can You Automate The Photo Naming Process?
Automating the photo naming process can save time and effort by automatically renaming photos based on predefined rules and criteria.
- Batch Renaming Software: Use batch renaming software like Adobe Bridge, IrfanView, or NameChanger to automate the process.
- Metadata Extraction: Extract metadata from the photos, such as date, time, and camera settings, to generate file names automatically.
- Custom Scripts: Create custom scripts or workflows to rename photos based on specific requirements.
36. What Is Metadata And How Does It Affect Photo Sharing?
Metadata is information embedded within a photo file that provides details about the image, such as camera settings, date and time, location, and copyright information. This data can affect how photos are displayed and shared online.
- Embedded Information: Metadata is embedded within the photo file and is not visible unless accessed through specialized software.
- EXIF Data: Exchangeable Image File Format (EXIF) data includes camera settings, date, and time.
- IPTC Data: International Press Telecommunications Council (IPTC) data includes copyright information, descriptions, and keywords.
- GPS Data: GPS data includes location information, such as latitude and longitude.
37. How Do You Edit Metadata In Photos?
Editing metadata in photos allows you to add, modify, or remove information such as copyright details, descriptions, and keywords.
- Image Editing Software: Use image editing software like Adobe Photoshop, Lightroom, or GIMP to edit metadata.
- Metadata Editors: Use dedicated metadata editors like ExifTool or Metadata Editor to modify metadata directly.
- Operating System Tools: Use built-in operating system tools to view and edit basic metadata.
38. What Are The Privacy Implications Of Sharing Photos With Metadata?
Sharing photos with metadata can have privacy implications, as it can reveal sensitive information such as your location, date, and time.
- Location Data: GPS data can reveal your exact location when the photo was taken.
- Personal Information: Metadata can include personal information such as your name, contact details, and copyright information.
- Privacy Settings: Adjust privacy settings on sharing platforms to control who can access metadata.
- Metadata Removal: Remove sensitive metadata before sharing photos to protect your privacy.
39. How Can You Remove Metadata From Photos?
Removing metadata from photos can protect your privacy by preventing sensitive information from being shared.
- Image Editing Software: Use image editing software to remove metadata.
- Metadata Removal Tools: Use dedicated metadata removal tools to strip metadata from photos.
- Operating System Tools: Use built-in operating system tools to remove basic metadata.
40. How Do Different Platforms Handle Photo Metadata?
Different platforms handle photo metadata in various ways, some preserving it and others stripping it.
- Social Media: Social media platforms often strip metadata from photos to reduce file sizes and protect user privacy.
- Photo Sharing Sites: Photo sharing sites like Flickr and SmugMug typically preserve metadata, allowing you to view and edit it.
- Email: Email services may preserve or strip metadata depending on the email client and settings.
With these tips and tools, sharing a large number of photos via email becomes a manageable task. At dfphoto.net, we are dedicated to helping you enhance your photographic journey by offering expert advice and resources. We invite you to explore our website, dfphoto.net, for more insightful articles, tutorials, and a vibrant community of photography enthusiasts.
Address: 1600 St Michael’s Dr, Santa Fe, NM 87505, United States. Phone: +1 (505) 471-6001. Website: dfphoto.net.
FAQ: Emailing A Large Number Of Photos
-
What is the size limit for email attachments?
Most email providers limit attachments to around 25 MB. -
How can I send photos if they exceed the attachment limit?
Use cloud storage services, file transfer platforms, or compress the files. -
What are the best cloud storage services for sharing photos?
Google Drive, OneDrive, and iCloud are excellent choices. -
How does WeTransfer work for sending large photos?
Upload your photos, enter the recipient’s email, and send the link. -
Is it safe to use file transfer platforms for sending photos?
Yes, especially those with encryption and password protection. -
How can I compress photos before emailing them?
Use tools like 7-Zip or WinZip to reduce file sizes. -
Will compressing photos reduce their quality?
Yes, but careful compression can minimize quality loss. -
What are photo sharing websites like Flickr used for?
Showcasing and sharing high-quality photos with a community. -
How can watermarks protect my photos?
By deterring unauthorized use and indicating copyright. -
What should I consider when naming photos before sending?
Use descriptive names, consistent conventions, and avoid special characters.
