Are you preparing to apply for a passport and wondering, “How Big Do Passport Photos Need To Be?” This is a crucial question, as incorrect photo dimensions can lead to delays or rejection of your application. At dfphoto.net, we understand the importance of getting it right. This guide will provide you with all the necessary information about passport photo sizes, requirements, and tips to ensure your application process is smooth and successful. Learn about photo resolution and image guidelines for perfect passport photos.
1. What is the Correct Size for a U.S. Passport Photo?
Yes, the standard U.S. passport photo size is 2×2 inches (51×51 mm). This requirement is strictly enforced to ensure consistency and compatibility with passport processing systems.
Understanding the exact dimensions is the first step in ensuring your passport photo meets the necessary standards. The 2×2 inch requirement applies whether you’re submitting a physical photo or a digital image for online applications. Knowing this core requirement allows you to focus on other crucial aspects, such as image quality, background, and facial expression, which we’ll cover in detail below. Remember, accuracy is key.
2. What Are the Key Dimensions for Passport Photos?
The dimensions of a U.S. passport photo are critical. The photo must be:
- Size: 2×2 inches (51×51 mm).
- Head Size: The height of your head, measured from the bottom of your chin to the top of your head (including hair), should be between 1 inch and 1 1/3 inches (25 mm and 35 mm).
- Eye Height: The eye level should be between 1 1/8 inches and 1 3/8 inches (28 mm and 35 mm) from the bottom of the photo.
These measurements ensure that your face is properly positioned within the photo, making it easier for facial recognition systems to process your application. Deviations from these dimensions can cause delays, so precision is essential.
3. Can I Use a Photo That Isn’t Exactly 2×2 Inches?
No, you cannot use a photo that isn’t exactly 2×2 inches for your U.S. passport. The U.S. Department of State is very strict about this requirement. A photo that deviates from this size will likely be rejected.
Think of the 2×2 inch requirement as a non-negotiable standard. It’s not just about the overall size; the internal dimensions, such as head and eye placement, are equally crucial. Using a photo that doesn’t meet these specifications will almost certainly lead to a rejected application, costing you time and potentially disrupting your travel plans. Always double-check these measurements.
4. What Happens If My Passport Photo Is the Wrong Size?
If your passport photo is the wrong size, your passport application will be delayed or rejected. It’s a common reason for application rejections, so it’s essential to get the size right the first time.
Submitting an incorrectly sized photo can throw a wrench into your travel plans. Not only will your application be put on hold, but you’ll also need to resubmit a new photo that meets all the requirements. This can add weeks to the processing time. To avoid this hassle, take the time to ensure your photo adheres to the precise 2×2 inch standard.
5. Where Can I Get Passport Photos Taken in the Correct Size?
You have several options for getting passport photos taken:
- Professional Photo Studios: These studios specialize in passport photos and know the exact requirements.
- Pharmacies and Retail Stores: Many pharmacies like CVS and Walgreens, as well as retail stores like Walmart and Target, offer passport photo services.
- Online Passport Photo Services: Several websites and apps allow you to upload a photo and have it resized and printed to the correct dimensions.
- Do It Yourself: You can take the photo yourself at home, but you need to ensure it meets all the requirements and is printed to the correct size.
Each option has its pros and cons. Professional studios offer expertise but can be more expensive. Pharmacies and retail stores are convenient and affordable, but the quality may vary. Online services are easy to use, but you need to ensure they meet all the specifications. Taking the photo yourself can save money, but it requires careful attention to detail.
6. How Do I Ensure My DIY Passport Photo Meets the Size Requirements?
If you’re taking your passport photo at home, follow these steps to ensure it meets the size requirements:
- Use a Digital Camera: Use a high-resolution digital camera or smartphone.
- Proper Lighting: Ensure even lighting to avoid shadows. Natural light is best.
- Measure Carefully: Use a ruler to measure the printed photo to ensure it’s exactly 2×2 inches.
- Head Size: Make sure the head size is between 1 inch and 1 1/3 inches.
- Print Quality: Print the photo on high-quality photo paper.
- Use a Template: Use online tools that have templates for passport photos.
Taking a DIY passport photo can be cost-effective, but it requires meticulous attention to detail. Before printing, double-check all the dimensions and requirements. Consider using online tools or templates specifically designed for passport photos. These can help you resize and position your photo accurately, ensuring it meets all the necessary standards.
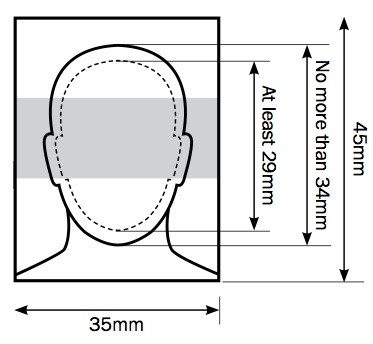 Passport photo dimensions showing head size and eye height
7. What Are the U.S. Passport Photo Requirements Beyond Size?
Beyond size, several other requirements must be met for your U.S. passport photo:
- Color: The photo must be in color.
- Background: The background must be plain white or off-white.
- Expression: You must have a neutral expression with both eyes open.
- Attire: You should wear normal street attire. No uniforms or clothing that resembles a uniform.
- Accessories: You cannot wear hats or head coverings unless for religious or medical reasons.
- Glasses: Glasses are generally not allowed unless you have a medical reason. If you must wear them, ensure they do not obscure your eyes.
- Quality: The photo must be clear, in focus, and free of any blemishes or pixelation.
- Recent: The photo must be taken within the last six months.
These requirements are in place to ensure that your photo accurately represents your current appearance and can be easily processed by facial recognition systems. Failing to adhere to these guidelines can result in your application being rejected.
8. How Does the Background Color Affect My Passport Photo?
The background color of your passport photo is crucial. It must be plain white or off-white. Any other color or patterns can cause your photo to be rejected.
A clean, neutral background helps to ensure that your face is the primary focus of the photo. This makes it easier for passport officials to verify your identity and for facial recognition systems to accurately process your image. Avoid backgrounds with shadows, patterns, or any other distractions.
9. Can I Wear Glasses in My Passport Photo?
Generally, you cannot wear glasses in your passport photo. The U.S. Department of State has strict guidelines regarding glasses.
- Medical Reasons: If you must wear glasses for medical reasons, you need to provide a signed statement from your doctor.
- No Glare: Ensure there is no glare on the lenses.
- Eyes Visible: Your eyes must be fully visible, and the frames should not cover any part of your eyes.
The primary concern with glasses is that they can obscure your eyes, making it difficult for facial recognition systems to accurately identify you. If you can remove your glasses without significant difficulty, it’s best to do so.
10. What If I Wear a Head Covering for Religious Reasons?
If you wear a head covering for religious reasons, it is generally allowed in your passport photo, but with certain conditions:
- Everyday Wear: The head covering must be worn daily.
- Facial Visibility: The head covering must not obscure any part of your face. Your full face must be visible.
- Statement: You may need to provide a signed statement affirming that the head covering is part of your religious practice.
The key is to ensure that the head covering does not hide any facial features that are essential for identification. Your forehead, eyes, nose, mouth, and chin must be clearly visible.
11. How Do I Take a Passport Photo of a Baby or Young Child?
Taking a passport photo of a baby or young child can be challenging, but it’s important to follow the guidelines:
- No Other People: The child must be alone in the photo. No other person should be visible, including hands supporting the child.
- White Background: Place the child on a plain white or off-white background.
- Neutral Expression: While a neutral expression is preferred, it’s not always possible with infants.
- Eyes Open: Try to ensure the child’s eyes are open.
- Photo Editing: You can’t digitally alter the photo to remove hands or adjust the child’s features.
Patience is key when photographing babies and young children. Try taking the photo when the child is well-rested and in a good mood. Using a white sheet or blanket as a background can help create the necessary plain backdrop.
12. What Clothing Should I Wear for My Passport Photo?
When it comes to clothing for your passport photo, keep it simple and professional:
- Normal Attire: Wear your normal, everyday clothing.
- No Uniforms: Do not wear uniforms or clothing that resembles a uniform.
- Color: While there are no specific color requirements, avoid wearing white, as it can blend into the background.
- Neckline: Ensure your neckline is visible. Avoid wearing clothing that covers your neck, such as turtlenecks.
The goal is to present yourself as you typically would. Avoid anything too distracting or unusual that could raise questions during the passport application process.
13. How Important Is the Quality of the Photo?
The quality of your passport photo is extremely important. A poor-quality photo can lead to rejection.
- Clarity: The photo must be clear and in focus.
- Resolution: Ensure the photo has a high enough resolution to show details clearly.
- No Pixelation: Avoid photos that are pixelated or blurry.
- Lighting: Proper lighting is essential. Avoid shadows and glare.
- No Alterations: Do not digitally alter the photo in any way.
A high-quality photo ensures that your facial features are accurately represented, making it easier for passport officials to verify your identity. If you’re unsure about the quality of your photo, it’s best to have it taken by a professional.
14. Can I Smile in My Passport Photo?
The U.S. Department of State requires a neutral facial expression for passport photos.
- Neutral Expression: You must have a neutral expression with both eyes open.
- Mouth Closed: Your mouth should be closed.
- No Smiling: Avoid smiling or showing your teeth.
The reason for this requirement is to ensure that your facial features are in a consistent state, making it easier for facial recognition systems to accurately identify you.
15. How Do Digital Passport Photos Differ from Printed Photos?
Digital passport photos are used for online passport applications, while printed photos are submitted with paper applications. The requirements are similar, but there are some key differences:
- Size: Digital photos must meet the same 2×2 inch size requirement.
- Resolution: Digital photos must have a minimum resolution of 600×600 pixels.
- File Format: The digital photo must be in JPEG format.
- File Size: The file size must be less than 240KB.
- Submission: Digital photos are uploaded directly to the online application portal.
Ensure your digital photo meets these technical specifications to avoid issues during the online application process.
16. What Are the Most Common Reasons for Passport Photo Rejection?
Several common mistakes can lead to passport photo rejection:
- Incorrect Size: The photo is not 2×2 inches.
- Poor Quality: The photo is blurry, pixelated, or too dark.
- Wrong Background: The background is not plain white or off-white.
- Non-Neutral Expression: The applicant is smiling or has their mouth open.
- Wearing Glasses: The applicant is wearing glasses that obscure their eyes.
- Head Covering: The applicant is wearing a head covering that obscures their face.
- Shadows: There are shadows on the face or in the background.
- Red Eye: The photo has red eye.
Being aware of these common pitfalls can help you avoid them and ensure your passport photo is accepted.
17. How Do I Avoid Shadows in My Passport Photo?
Shadows can cause your passport photo to be rejected. Here’s how to avoid them:
- Proper Lighting: Use even lighting. Natural light is best.
- Avoid Direct Sunlight: Do not take the photo in direct sunlight, as this can create harsh shadows.
- Use a Diffuser: If using artificial light, use a diffuser to soften the light.
- Positioning: Position yourself so that the light is evenly distributed across your face.
Consistent, even lighting is crucial for a successful passport photo. Take the time to set up your lighting properly to avoid any unwanted shadows.
18. Can I Edit My Passport Photo?
No, you cannot digitally alter or edit your passport photo. The U.S. Department of State is very strict about this requirement.
- No Retouching: Do not retouch the photo to remove blemishes or alter your appearance.
- No Filters: Do not use filters or effects.
- No Adjustments: Do not adjust the color or contrast.
The goal is to present an accurate representation of your current appearance. Any alterations can raise questions and lead to rejection.
19. What If My Appearance Has Changed Since My Last Passport Photo?
If your appearance has significantly changed since your last passport photo, you should get a new photo.
- Significant Changes: Changes such as major weight loss or gain, significant facial surgery, or adding or removing prominent tattoos or piercings warrant a new photo.
- Disguises: Do not attempt to disguise your appearance in your passport photo.
The key is to ensure that your passport photo accurately reflects your current appearance so that you can be easily identified.
20. How Often Do I Need to Renew My Passport Photo?
You need to renew your passport photo every time you renew your passport.
- Passport Renewal: Passports are typically valid for 10 years for adults and 5 years for children.
- New Photo: Each time you renew, you must submit a new passport photo that meets all the current requirements.
Even if your appearance hasn’t changed significantly, you still need to provide a new photo with each renewal.
21. Where Can I Find Official U.S. Passport Photo Guidelines?
You can find official U.S. passport photo guidelines on the U.S. Department of State’s website.
- U.S. Department of State Website: The official website provides detailed information about all passport photo requirements, including size, background, expression, and quality.
- Travel.State.Gov: Look for the “Photos” section under the “Passports” tab.
Always refer to the official guidelines to ensure that your passport photo meets all the necessary requirements.
22. What Are the Rules for Digital Photos for Online Passport Renewal?
If you’re renewing your passport online, you’ll need to submit a digital photo. Here are the rules:
- Size and Dimensions: The digital image must be 2×2 inches (51×51 mm).
- Resolution: The image must have a resolution of at least 300 pixels per inch.
- File Format: The image must be a JPEG file.
- File Size: The file size must be 240KB or less.
- Color: The image must be in color.
- Background: The background must be plain white or off-white.
- No Alterations: The image cannot be digitally altered or enhanced.
Ensure your digital photo meets these specifications before uploading it to the online passport renewal portal.
23. What is the Best Way to Print My Digital Passport Photo?
If you’re submitting a printed passport photo, here’s how to ensure it’s printed correctly:
- Use Photo Paper: Print the photo on high-quality photo paper.
- Professional Printing: Consider using a professional printing service for best results.
- Correct Size: Ensure the printed photo is exactly 2×2 inches.
- No Borders: The photo should not have any borders.
- Color Accuracy: Ensure the colors are accurate and not distorted.
Proper printing is essential to ensure that your passport photo meets the quality requirements.
24. What Should I Do If My Passport Photo Is Rejected?
If your passport photo is rejected, don’t panic. Here’s what to do:
- Review the Rejection Notice: Carefully read the rejection notice to understand why the photo was rejected.
- Take a New Photo: Take a new photo, addressing the issues identified in the rejection notice.
- Double-Check Requirements: Ensure the new photo meets all the requirements.
- Resubmit: Resubmit your application with the new photo.
Addressing the issues promptly and resubmitting your application can help minimize delays.
25. Are There Any Mobile Apps That Help with Passport Photos?
Yes, there are several mobile apps designed to help you take passport photos:
- Passport Photo Booth: This app helps you align your face and ensures the photo meets size and background requirements.
- ID Photo: This app provides templates and guidelines for various ID photos, including passport photos.
- EPassport Photo: This app offers features like background removal and automatic resizing.
These apps can be helpful tools, but always double-check the final photo to ensure it meets all official requirements.
26. What Are the Specific Rules for Passport Photos for Children Under 16?
Passport photos for children under 16 have the same requirements as those for adults, with a few additional considerations:
- Child Alone: The child must be alone in the photo.
- Eyes Open: The child’s eyes should be open, although this is more lenient for infants.
- Neutral Expression: A neutral expression is preferred, but not always possible.
- No Toys or Objects: The child should not be holding any toys or objects.
Patience and persistence are key when taking passport photos of young children.
27. How Can I Avoid Glare on My Glasses in My Passport Photo?
If you must wear glasses in your passport photo, avoiding glare is crucial:
- Tilt Your Head: Try tilting your head slightly to reduce glare.
- Adjust Lighting: Adjust the lighting to minimize reflections on the lenses.
- Clean Lenses: Ensure your lenses are clean and free of smudges.
- Remove Glasses: If possible, remove your glasses to avoid any potential issues.
Glare can obscure your eyes, leading to rejection. Take the time to adjust your position and lighting to minimize reflections.
28. What Kind of Paper Should I Use for Printing My Passport Photo?
When printing your passport photo, use high-quality photo paper:
- Glossy or Semi-Glossy: Use glossy or semi-glossy photo paper for best results.
- Plain White: The paper should be plain white with no texture or patterns.
- Proper Weight: Use photo paper with a weight of at least 200 gsm for durability.
Using the right type of paper can enhance the quality and longevity of your passport photo.
29. Can I Wear Jewelry in My Passport Photo?
You can wear jewelry in your passport photo, but it should be minimal and not obscure any part of your face.
- Small Earrings: Small earrings are generally acceptable.
- Necklaces: Avoid wearing large or distracting necklaces.
- Facial Piercings: Facial piercings should be discreet and not cover any facial features.
The key is to ensure that your jewelry does not detract from your overall appearance or interfere with facial recognition.
30. What If I Have a Scar or Other Identifying Mark on My Face?
If you have a scar or other identifying mark on your face, it should be visible in your passport photo.
- No Concealing: Do not attempt to conceal or remove the mark in your photo.
- Accurate Representation: Your passport photo should accurately represent your current appearance, including any identifying marks.
These marks can help with identification and should be clearly visible in your photo.
31. How Do I Ensure My Online Passport Photo Is the Correct File Size?
To ensure your online passport photo is the correct file size (240KB or less):
- Compress the Image: Use online image compression tools to reduce the file size without sacrificing quality.
- Adjust Resolution: If necessary, reduce the resolution of the image while maintaining the required dimensions.
- Check File Size: After compressing, check the file size to ensure it meets the requirement.
Managing file size is crucial for online submissions. There are many free online tools available to help you compress your image.
32. What Should I Do If I Don’t Have a Plain White Background at Home?
If you don’t have a plain white background at home, you can create one:
- Use a White Sheet: Hang a plain white sheet or blanket behind you.
- Use a White Wall: Stand in front of a white or off-white wall.
- Ensure No Shadows: Make sure the background is evenly lit and free of shadows.
A simple white backdrop can easily be created with household items.
33. What If My Hair Covers Part of My Face in the Photo?
Your hair should not cover any part of your face in your passport photo:
- Keep Hair Back: Keep your hair back from your face so that your forehead, eyes, nose, and mouth are clearly visible.
- Avoid Shadows: Ensure your hair does not cast shadows on your face.
- Tuck Hair Behind Ears: If necessary, tuck your hair behind your ears to keep it out of your face.
Full facial visibility is essential for identification purposes.
34. Can I Wear Contact Lenses in My Passport Photo?
Yes, you can wear contact lenses in your passport photo, as long as they do not alter your appearance.
- Clear Lenses: Wear clear contact lenses that do not change your eye color.
- No Tinted Lenses: Avoid wearing tinted or colored contact lenses.
- Comfortable Wear: Ensure your lenses are comfortable and do not cause redness or irritation.
As long as your contact lenses do not affect your natural appearance, they are acceptable.
35. What Are the Best Lighting Conditions for Taking a Passport Photo?
The best lighting conditions for taking a passport photo are:
- Natural Light: Use natural light whenever possible.
- Even Lighting: Ensure the lighting is even and consistent.
- Avoid Direct Sunlight: Avoid direct sunlight, which can create harsh shadows.
- Use a Diffuser: If using artificial light, use a diffuser to soften the light.
Proper lighting is crucial for a clear and accurate passport photo.
36. How Can I Get a Passport Photo if I’m Bedridden or Have Limited Mobility?
If you’re bedridden or have limited mobility, consider these options for getting a passport photo:
- Mobile Passport Photo Services: Some companies offer mobile passport photo services that come to your home.
- Ask a Friend or Family Member: Have a friend or family member take the photo, ensuring they follow all the guidelines.
- Home Setup: Set up a temporary photo area in your home with proper lighting and background.
There are accommodations available to help those with limited mobility obtain a passport photo.
37. What If I Have a Medical Condition That Affects My Appearance?
If you have a medical condition that affects your appearance, your passport photo should still accurately represent your current appearance.
- No Concealing: Do not attempt to conceal or alter your appearance.
- Medical Documentation: If necessary, provide medical documentation explaining your condition.
- Accurate Representation: The goal is to provide an accurate representation of your current appearance, regardless of your medical condition.
Be honest and upfront about any medical conditions that affect your appearance.
38. How Long Is a Passport Photo Valid For?
A passport photo is generally valid for six months from the date it was taken.
- Recent Photo: Ensure your passport photo is recent and accurately reflects your current appearance.
- Renewal Requirements: When renewing your passport, you must submit a new photo, even if your appearance hasn’t changed significantly.
Using a recent photo helps ensure accurate identification.
39. What If My Passport Photo Is Too Dark or Too Light?
If your passport photo is too dark or too light, it may be rejected. Here’s how to correct it:
- Adjust Lighting: Retake the photo with better lighting.
- Use Photo Editing Software: Use photo editing software to adjust the brightness and contrast, but be careful not to alter your appearance.
- Professional Assistance: Seek professional assistance to correct the lighting issues.
Proper lighting is crucial for a clear and accurate passport photo.
40. What Should I Do If I Have Mismatched Eyes or Other Facial Asymmetries?
If you have mismatched eyes or other facial asymmetries, your passport photo should still accurately represent your natural appearance.
- No Alterations: Do not attempt to correct or alter your facial features in the photo.
- Natural Appearance: The goal is to provide an accurate representation of your natural appearance, including any asymmetries.
Be honest and upfront about any facial asymmetries.
41. Can I Wear Makeup in My Passport Photo?
You can wear makeup in your passport photo, but it should be natural and not alter your appearance significantly.
- Natural Look: Aim for a natural look that enhances your features without being too dramatic.
- Avoid Heavy Makeup: Avoid heavy makeup that could change your appearance.
- Accurate Representation: The goal is to provide an accurate representation of your everyday appearance.
As long as your makeup is natural and doesn’t alter your appearance significantly, it is acceptable.
42. What Are the Requirements for Passport Photos Taken Outside the U.S.?
Passport photos taken outside the U.S. must still meet the same requirements as those taken in the U.S.:
- Size: 2×2 inches (51×51 mm).
- Background: Plain white or off-white.
- Quality: Clear and in focus.
- Expression: Neutral expression.
- No Alterations: No digital alterations.
Ensure the photo meets all the U.S. Department of State’s requirements, regardless of where it is taken.
43. How Do I Know If My Passport Photo Meets All the Requirements Before Submitting It?
To ensure your passport photo meets all the requirements before submitting it:
- Review Official Guidelines: Carefully review the official U.S. Department of State guidelines.
- Use Online Tools: Use online passport photo checkers to verify your photo.
- Seek Professional Advice: Consult with a professional photographer or passport service for assistance.
Taking these steps can help you avoid rejection and ensure a smooth application process.
44. Where Can I Find a Checklist of Passport Photo Requirements?
You can find a checklist of passport photo requirements on the U.S. Department of State’s website or through various online resources.
- U.S. Department of State Website: The official website provides a comprehensive list of requirements.
- Passport Service Websites: Many passport service websites offer checklists for your convenience.
Using a checklist can help you ensure that you haven’t overlooked any important details.
45. What If I Accidentally Damage My Passport Photo After It’s Been Taken?
If you accidentally damage your passport photo after it’s been taken, you should get a new photo.
- No Creases or Tears: Passport photos should be free of creases, tears, or other damage.
- Undamaged Photo: Submit an undamaged photo to avoid rejection.
Even minor damage can lead to rejection, so it’s best to get a new photo.
46. What Are the Most Common Myths About Passport Photos?
Some common myths about passport photos include:
- Smiling Is Okay: Smiling is not allowed; you must have a neutral expression.
- Glasses Are Always Allowed: Glasses are generally not allowed unless medically necessary.
- Background Color Doesn’t Matter: The background must be plain white or off-white.
- Editing Is Okay: You cannot digitally alter or edit your passport photo.
Being aware of these myths can help you avoid common mistakes.
47. How Do I Deal With Red Eye in My Passport Photo?
If your passport photo has red eye, you should retake the photo.
- Avoid Flash: Avoid using the flash on your camera, as this can cause red eye.
- Adjust Lighting: Adjust the lighting to minimize red eye.
- Photo Editing: Use photo editing software to remove red eye, but be careful not to alter your appearance.
Red eye can be distracting and may lead to rejection, so it’s best to avoid it altogether.
48. What Are Some Tips for Taking a Good Passport Photo?
Here are some tips for taking a good passport photo:
- Follow Guidelines: Carefully follow all the official guidelines.
- Use Proper Lighting: Use even, natural lighting.
- Neutral Expression: Maintain a neutral expression.
- Quality Matters: Ensure the photo is clear and in focus.
- Double-Check: Double-check all the requirements before submitting.
Following these tips can help you take a passport photo that is both compliant and flattering.
49. How Can dfphoto.net Help Me with My Passport Photo Needs?
At dfphoto.net, we understand the importance of a perfect passport photo. While we don’t directly offer passport photo services, we provide valuable resources and information to help you navigate the process successfully.
- Comprehensive Guides: We offer detailed guides on passport photo requirements, tips, and best practices.
- Expert Advice: Our team of photography experts provides advice and guidance to help you take a compliant photo.
- Community Support: Connect with our community of photographers and travelers to share tips and experiences.
We aim to empower you with the knowledge and resources you need to ensure your passport photo meets all the necessary requirements.
50. Where Can I Find More Information About Passport Services?
For more information about passport services, you can visit the U.S. Department of State’s website or contact a local passport agency.
- U.S. Department of State Website: The official website provides detailed information about passport applications, renewals, and requirements.
- Local Passport Agency: Contact a local passport agency for personalized assistance and guidance.
These resources can provide you with the information you need to navigate the passport application process successfully.
Address: 1600 St Michael’s Dr, Santa Fe, NM 87505, United States.
Phone: +1 (505) 471-6001
Website: dfphoto.net
Mastering the art of passport photography is about more than just snapping a picture; it’s about ensuring compliance with stringent guidelines while capturing an accurate representation of yourself. At dfphoto.net, we’re dedicated to providing you with the knowledge and inspiration you need to excel in photography, whether you’re capturing memories or meeting official requirements. Dive into our rich collection of tutorials, stunning photo galleries, and connect with a vibrant community of photographers. Visit dfphoto.net today to elevate your skills, find your muse, and share your unique vision with the world.