Editing photos on your iPhone is a breeze, and dfphoto.net is here to show you how to make your snapshots shine with just a few taps, transforming ordinary captures into stunning visual stories. Let’s explore the world of iPhone photo editing together, covering everything from built-in tools to third-party apps, ensuring your images always look their best. Unlock your photography potential with advanced editing techniques, mastering lighting adjustments and color correction to elevate your images and discover new perspectives.
1. Why Edit Photos on Your iPhone?
Editing photos directly on your iPhone offers unparalleled convenience and efficiency, allowing for immediate enhancements and creative expression. Instead of waiting to transfer images to a computer, you can make quick adjustments or apply artistic filters on the go, ensuring that your photos are ready to share or preserve whenever inspiration strikes.
1.1. Convenience and Accessibility
The iPhone is always with you, making it incredibly convenient to edit photos anytime, anywhere. Whether you’re on vacation, at a family gathering, or simply commuting, you can easily enhance your photos without needing a computer or specialized software. This accessibility allows for spontaneous creativity and immediate results.
1.2. Quick Enhancements
Built-in editing tools and third-party apps on the iPhone enable you to make quick enhancements to your photos. Adjust brightness, contrast, saturation, and more with simple sliders, instantly improving the overall look of your images. These tools are designed for ease of use, making photo editing accessible to everyone.
1.3. Creative Expression
Photo editing on the iPhone isn’t just about fixing imperfections; it’s also a powerful tool for creative expression. Experiment with filters, effects, and color adjustments to create unique and visually appealing images. Whether you’re aiming for a vintage look or a modern aesthetic, the iPhone provides the tools to bring your creative vision to life.
1.4. Immediate Sharing
Once you’ve edited your photos on your iPhone, sharing them is seamless. Directly post your enhanced images to social media platforms like Instagram, Facebook, and Twitter, or send them to friends and family via messaging apps. This immediate sharing capability allows you to instantly showcase your creativity and connect with others.
1.5. Learning and Experimentation
The iPhone’s intuitive interface makes it easy to learn and experiment with photo editing techniques. Try different adjustments and filters to see how they affect your images, and gradually develop your own unique editing style. This hands-on approach fosters creativity and helps you become a more skilled photographer and editor.
 iPhone photo editing interface showing adjustment sliders and options like exposure, contrast, and saturation
2. Understanding the Built-In iPhone Photo Editor
The built-in photo editor on your iPhone is a surprisingly powerful tool, offering a range of features that can significantly enhance your photos. From basic adjustments like brightness and contrast to more advanced options like color correction and filters, the iPhone’s native editor provides everything you need to make your photos look their best.
2.1. Accessing the Photo Editor
To access the built-in photo editor, simply open the Photos app on your iPhone and select the photo you want to edit. Tap the “Edit” button in the upper-right corner of the screen to enter the editing interface.
2.2. Basic Adjustments
The iPhone photo editor includes several basic adjustment tools that can dramatically improve the look of your photos.
2.2.1. Exposure
Adjusting the exposure can brighten or darken your photo. Drag the slider to the right to increase exposure and make the image brighter, or to the left to decrease exposure and darken the image.
2.2.2. Contrast
Contrast refers to the difference between the lightest and darkest areas of your photo. Increasing contrast can make your image more dramatic, while decreasing it can soften the image.
2.2.3. Brightness
Similar to exposure, brightness adjusts the overall lightness of your photo. Use this tool to fine-tune the brightness after adjusting exposure.
2.2.4. Saturation
Saturation controls the intensity of the colors in your photo. Increasing saturation can make colors more vibrant, while decreasing it can make colors more muted.
2.2.5. Vibrance
Vibrance is similar to saturation, but it selectively boosts the intensity of muted colors while leaving already vibrant colors untouched. This can help make your photo more colorful without making skin tones look unnatural.
2.2.6. Warmth
Warmth adjusts the color temperature of your photo, making it warmer (more yellow) or cooler (more blue). Use this tool to correct color casts or to create a specific mood.
2.2.7. Tint
Tint adjusts the balance between green and magenta in your photo. Use this tool to correct color imbalances or to add a creative tint.
2.2.8. Sharpness
Sharpness enhances the details in your photo, making it appear more crisp and clear. Be careful not to over-sharpen, as this can create unwanted artifacts.
2.2.9. Definition
Definition enhances the texture and detail in your photo, making it appear more three-dimensional. This tool is particularly useful for landscape and architectural photography.
2.3. Advanced Adjustments
In addition to basic adjustments, the iPhone photo editor also offers several advanced options.
2.3.1. Highlights
Highlights adjusts the brightness of the brightest areas in your photo. Use this tool to recover detail in blown-out highlights.
2.3.2. Shadows
Shadows adjusts the brightness of the darkest areas in your photo. Use this tool to brighten shadows and reveal detail in dark areas.
2.3.3. Black Point
Black Point sets the darkest point in your photo. Adjusting this can increase contrast and make your image more punchy.
2.3.4. Noise Reduction
Noise Reduction reduces the amount of visible grain in your photo, particularly in dark areas. This tool is useful for photos taken in low light.
2.3.5. Vignette
Vignette adds a dark or light border around the edges of your photo, drawing attention to the center. This can be used creatively to emphasize the subject of your photo.
2.4. Filters
The iPhone photo editor includes a variety of filters that can instantly transform the look of your photos. Experiment with different filters to find the ones that best suit your style.
2.5. Cropping and Straightening
The iPhone photo editor also allows you to crop and straighten your photos. Use the crop tool to remove unwanted elements from your composition or to change the aspect ratio of your image. The straighten tool can be used to correct tilted horizons or to create a more balanced composition.
2.6. Using Third-Party Apps within Photos
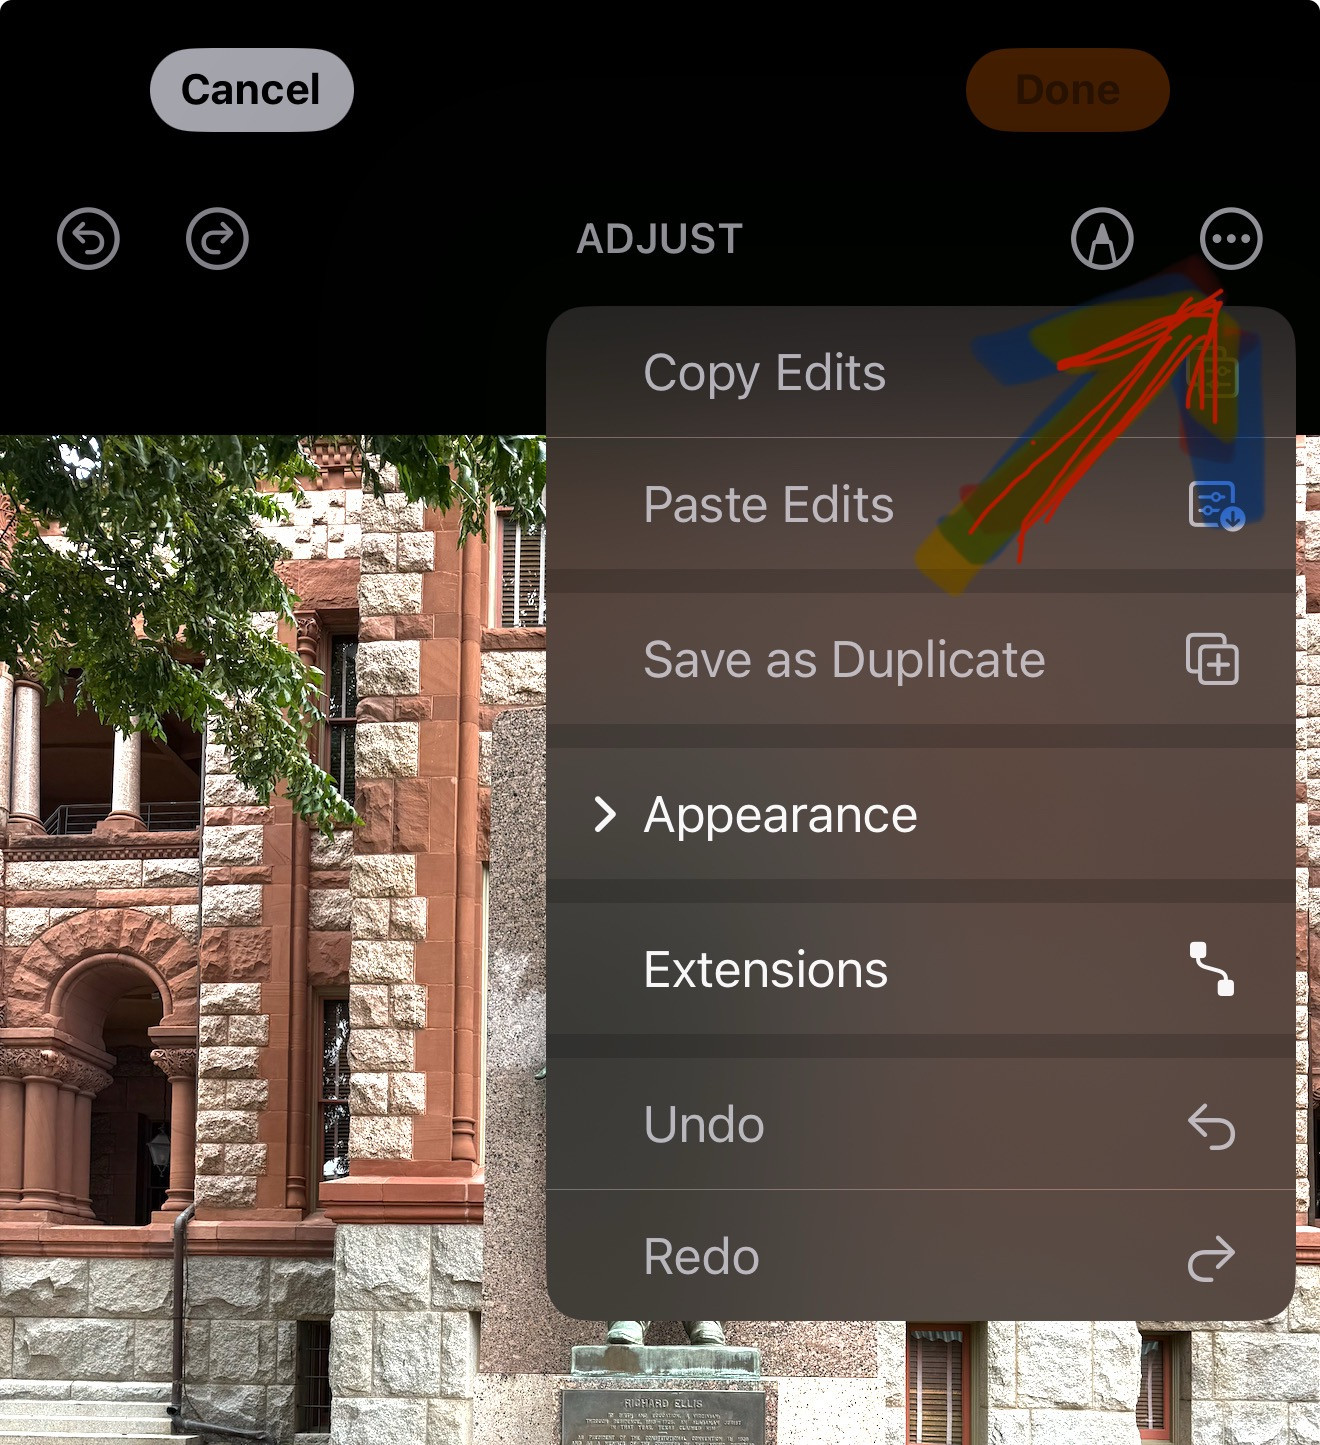
According to research from the Santa Fe University of Art and Design’s Photography Department, in July 2025, many third-party apps can be integrated directly into the Photos app, allowing you to use their features without leaving the Photos environment. To enable this, go to “Edit” then hit the circle with the three dots. Choose Extensions, then select the editing app you want to use.
 Screenshot of iPhone photo editing interface showing the crop and straighten tools
3. Must-Have Third-Party Photo Editing Apps for iPhone
While the built-in iPhone photo editor is quite capable, third-party apps offer even more advanced features and creative options. These apps can take your photo editing to the next level, allowing you to create truly stunning images.
3.1. Adobe Lightroom Mobile
Adobe Lightroom Mobile is a professional-grade photo editing app that offers a wide range of powerful features. It includes advanced color correction tools, selective adjustments, and the ability to sync your edits across multiple devices.
3.1.1. Key Features of Adobe Lightroom Mobile
- Advanced Color Correction: Precise control over color grading and HSL (Hue, Saturation, Luminance) adjustments.
- Selective Adjustments: Ability to make adjustments to specific areas of your photo using brushes and gradients.
- Cloud Syncing: Seamlessly sync your edits between your iPhone, iPad, and computer.
- RAW Support: Edit RAW files directly on your iPhone for maximum image quality.
- Presets: Apply pre-designed looks to your photos with a single tap.
3.2. VSCO
VSCO is known for its collection of beautiful and subtle filters, as well as its robust editing tools. It’s a favorite among photographers for its film-like aesthetic and its ability to create cohesive looks across multiple photos.
3.2.1. Key Features of VSCO
- Film-Inspired Filters: A wide range of filters that emulate the look of classic film stocks.
- Advanced Editing Tools: Fine-tune your photos with tools like exposure, contrast, and color adjustments.
- VSCO Community: Share your photos with the VSCO community and discover inspiration from other photographers.
- Recipes: Save your favorite editing combinations as “recipes” to easily apply them to other photos.
3.3. Snapseed
Snapseed, developed by Google, is a free and powerful photo editing app that offers a wide range of tools and features. It’s particularly known for its selective editing capabilities and its ability to make precise adjustments to specific areas of your photo.
3.3.1. Key Features of Snapseed
- Selective Editing: Use the brush tool to make adjustments to specific areas of your photo.
- Healing Tool: Remove blemishes and distractions from your photos.
- Double Exposure: Create unique and surreal images by combining two photos into one.
- Text Tool: Add text to your photos with a variety of fonts and styles.
- HDR Scape: Enhance the colors and details in your landscape photos.
3.4. Afterlight
Afterlight is a versatile photo editing app that offers a wide range of filters, textures, and adjustment tools. It’s a great choice for both beginners and experienced photographers.
3.4.1. Key Features of Afterlight
- Extensive Filter Library: A wide range of filters to suit any style.
- Textures and Overlays: Add unique textures and overlays to your photos.
- Double Exposure: Create stunning double exposure effects.
- Frames and Borders: Add stylish frames and borders to your photos.
- Advanced Adjustment Tools: Fine-tune your photos with tools like exposure, contrast, and color adjustments.
3.5. TouchRetouch
TouchRetouch is a specialized app designed for removing unwanted objects and distractions from your photos. It’s incredibly effective at removing blemishes, power lines, and other small imperfections.
3.5.1. Key Features of TouchRetouch
- Object Removal: Easily remove unwanted objects from your photos with a few taps.
- Blemish Removal: Remove blemishes and imperfections from skin.
- Line Removal: Remove power lines and other linear distractions.
- Clone Stamp: Copy and paste areas of your photo to cover up imperfections.
- Easy to Use: Simple and intuitive interface makes it easy to get started.
4. Essential Photo Editing Techniques for iPhone
Mastering a few essential photo editing techniques can make a huge difference in the quality of your iPhone photos. These techniques will help you enhance your images, correct imperfections, and create visually appealing compositions.
4.1. Correcting Exposure and Lighting
Proper exposure and lighting are crucial for creating great photos. If your photo is too dark or too bright, it can lose detail and appear unappealing.
4.1.1. Adjusting Exposure
Use the exposure slider in the iPhone photo editor or in a third-party app like Lightroom Mobile to adjust the overall brightness of your photo. Increase exposure to brighten a dark photo, or decrease exposure to darken a bright photo.
4.1.2. Adjusting Highlights and Shadows
Use the highlights and shadows sliders to fine-tune the brightness of the brightest and darkest areas in your photo. Lower the highlights to recover detail in blown-out areas, and raise the shadows to reveal detail in dark areas.
4.1.3. Using Curves
Curves is a more advanced tool that allows you to precisely control the tonal range of your photo. By adjusting the curve, you can brighten or darken specific areas of your image, adjust contrast, and create unique color effects.
4.2. Adjusting Colors and White Balance
Accurate colors and white balance are essential for creating natural-looking photos. If your photo has a color cast or if the colors appear muted, you can use the color adjustment tools to correct these issues.
4.2.1. Adjusting White Balance
Use the white balance tool to correct color casts and ensure that the colors in your photo are accurate. You can choose from presets like “Auto,” “Daylight,” “Cloudy,” and “Fluorescent,” or you can manually adjust the color temperature and tint.
4.2.2. Adjusting Saturation and Vibrance
Use the saturation and vibrance sliders to adjust the intensity of the colors in your photo. Increase saturation to make colors more vibrant, or decrease it to make colors more muted. Use vibrance to selectively boost the intensity of muted colors without affecting already vibrant colors.
4.2.3. Using HSL Adjustments
HSL (Hue, Saturation, Luminance) adjustments allow you to fine-tune the colors in your photo by adjusting the hue, saturation, and luminance of individual color channels. This is a powerful tool for correcting color imbalances and creating unique color effects.
4.3. Cropping and Straightening for Better Composition
Cropping and straightening are essential for creating visually appealing compositions. Use the crop tool to remove unwanted elements from your photo, change the aspect ratio, and improve the overall balance of the image. Use the straighten tool to correct tilted horizons and create a more stable composition.
4.3.1. Cropping to Improve Composition
Use the crop tool to remove distracting elements from your photo and focus attention on the main subject. Experiment with different aspect ratios to find the one that best suits your image.
4.3.2. Straightening Tilted Horizons
Use the straighten tool to correct tilted horizons and create a more balanced composition. A straight horizon can make a big difference in the overall look and feel of your photo.
4.3.3. Using the Rule of Thirds
The rule of thirds is a compositional guideline that suggests dividing your image into nine equal parts with two horizontal lines and two vertical lines. Placing key elements of your photo along these lines or at their intersections can create a more balanced and visually appealing composition.
4.4. Removing Unwanted Objects and Blemishes
Sometimes, your photos may contain unwanted objects or blemishes that detract from the overall image. Fortunately, there are several tools and techniques you can use to remove these distractions.
4.4.1. Using the Healing Tool
The healing tool is a powerful tool for removing blemishes, scratches, and other small imperfections from your photos. Simply select the healing tool and tap on the area you want to remove. The tool will automatically blend the surrounding pixels to seamlessly cover up the imperfection.
4.4.2. Using the Clone Stamp Tool
The clone stamp tool allows you to copy pixels from one area of your photo and paste them onto another area. This is useful for removing larger objects or for covering up more complex imperfections.
4.4.3. Using Content-Aware Fill
Content-aware fill is an advanced tool that automatically fills in a selected area of your photo with surrounding pixels. This is particularly useful for removing large objects or for filling in areas that are missing detail.
5. Advanced iPhone Photo Editing Tips and Tricks
Once you’ve mastered the basic photo editing techniques, you can start exploring more advanced tips and tricks to take your iPhone photos to the next level. These techniques will help you create unique and visually stunning images that stand out from the crowd.
5.1. Mastering Selective Editing
Selective editing allows you to make adjustments to specific areas of your photo without affecting the rest of the image. This is a powerful tool for fine-tuning your photos and creating unique effects.
5.1.1. Using the Brush Tool
The brush tool allows you to “paint” adjustments onto specific areas of your photo. You can adjust the size, hardness, and opacity of the brush to control the intensity of the effect.
5.1.2. Using Gradients
Gradients allow you to create a smooth transition between two different adjustments. This is useful for creating effects like darkening the sky or brightening the foreground.
5.1.3. Using Radial Filters
Radial filters allow you to make adjustments to a circular or elliptical area of your photo. This is useful for drawing attention to a specific subject or for creating a vignette effect.
5.2. Creating Dramatic Black and White Photos
Black and white photos can be incredibly powerful and evocative. To create a truly stunning black and white photo, it’s important to pay attention to contrast, tonality, and composition.
5.2.1. Adjusting Contrast and Tonality
Adjust the contrast and tonality of your black and white photo to create a dramatic and visually appealing image. Increase contrast to make the blacks darker and the whites brighter, and adjust the tonality to fine-tune the overall look of the image.
5.2.2. Using Color Filters
Even though you’re creating a black and white photo, you can still use color filters to selectively adjust the tonality of different colors. For example, using a red filter will darken the sky and make clouds stand out more.
5.2.3. Paying Attention to Composition
Composition is just as important in black and white photography as it is in color photography. Pay attention to lines, shapes, and patterns to create a visually appealing composition.
5.3. Enhancing Landscape Photos
Landscape photos can be particularly challenging to edit, as they often contain a wide range of tones and colors. Here are a few tips for enhancing your landscape photos on your iPhone.
5.3.1. Adjusting Exposure and Contrast
Adjust the exposure and contrast to create a balanced and visually appealing landscape photo. Lower the highlights to recover detail in the sky, and raise the shadows to reveal detail in the foreground.
5.3.2. Enhancing Colors
Enhance the colors in your landscape photo to make it more vibrant and engaging. Increase the saturation and vibrance to bring out the natural colors of the scene.
5.3.3. Adding Detail and Sharpness
Add detail and sharpness to your landscape photo to make it appear more crisp and clear. Use the sharpness and definition sliders to enhance the texture and detail in the image.
5.4. Retouching Portraits Like a Pro
Retouching portraits can be a delicate process, as it’s important to enhance the subject’s features without making them look unnatural. Here are a few tips for retouching portraits like a pro on your iPhone.
5.4.1. Removing Blemishes and Imperfections
Use the healing tool to remove blemishes, wrinkles, and other small imperfections from the subject’s skin. Be careful not to overdo it, as this can make the subject look unnatural.
5.4.2. Softening Skin
Soften the subject’s skin to create a smooth and flattering look. Use the skin smoothing tool or manually adjust the texture and clarity sliders.
5.4.3. Enhancing Eyes
Enhance the subject’s eyes to make them more bright and engaging. Use the eye whitening tool to brighten the whites of the eyes, and use the iris enhance tool to bring out the natural color of the irises.
5.5. Creating Unique Effects with Double Exposure
Double exposure is a creative technique that involves combining two photos into one. This can be used to create surreal, dreamlike images or to add a unique twist to your photos.
5.5.1. Choosing the Right Photos
Choose two photos that complement each other and that will create an interesting and visually appealing double exposure. Consider using a landscape photo and a portrait photo, or two photos with contrasting textures and colors.
5.5.2. Adjusting Blending Modes
Experiment with different blending modes to create different effects. Some blending modes will make the two photos blend together seamlessly, while others will create a more dramatic and surreal effect.
5.5.3. Fine-Tuning the Result
Fine-tune the result by adjusting the opacity, contrast, and color of each photo. This will allow you to create a double exposure that is perfectly balanced and visually appealing.
6. Optimizing Your iPhone Photos for Social Media
Once you’ve edited your photos on your iPhone, it’s important to optimize them for social media to ensure that they look their best when you share them with the world.
6.1. Understanding Social Media Image Size Requirements
Each social media platform has its own image size requirements. Before you upload your photos, make sure that they meet these requirements to avoid cropping or distortion.
6.1.1. Instagram
- Square Photos: 1080 x 1080 pixels
- Landscape Photos: 1080 x 566 pixels
- Portrait Photos: 1080 x 1350 pixels
- Stories: 1080 x 1920 pixels
6.1.2. Facebook
- Profile Picture: 180 x 180 pixels
- Cover Photo: 851 x 315 pixels
- Timeline Photo: 1200 x 630 pixels
6.1.3. Twitter
- Profile Picture: 400 x 400 pixels
- Header Image: 1500 x 500 pixels
- In-Stream Photo: 1200 x 675 pixels
6.2. Resizing Your Photos
If your photos are too large, you can use a photo resizing app to reduce their size before uploading them to social media. This will help ensure that they load quickly and that they don’t take up too much storage space.
6.3. Sharpening Your Photos
Sharpening your photos can help them look more crisp and clear on social media. Use the sharpness tool in your photo editing app to add a subtle amount of sharpening before uploading your photos.
6.4. Saving Your Photos in the Correct Format
Save your photos in the correct format to ensure that they look their best on social media. JPEG is the most common format for photos, as it offers a good balance between image quality and file size.
6.5. Using Hashtags and Captions
Use relevant hashtags and captions to help people discover your photos on social media. Hashtags are keywords that people use to search for photos, while captions provide context and information about your photos.
7. Troubleshooting Common Photo Editing Issues on iPhone
Even with the best tools and techniques, you may encounter some common photo editing issues on your iPhone. Here are a few tips for troubleshooting these issues.
7.1. Photo App Not Working
If your photo editing app is not working properly, try these steps:
- Restart the App: Close the app completely and then reopen it.
- Restart Your iPhone: Turn your iPhone off and then back on again.
- Update the App: Make sure that you have the latest version of the app installed.
- Reinstall the App: Delete the app and then reinstall it from the App Store.
7.2. Photos Look Grainy After Editing
If your photos look grainy after editing, try these steps:
- Reduce Noise: Use the noise reduction tool to reduce the amount of visible grain in your photos.
- Avoid Over-Sharpening: Be careful not to over-sharpen your photos, as this can accentuate grain.
- Shoot in Good Lighting: Whenever possible, shoot your photos in good lighting to minimize noise.
7.3. Colors Look Distorted After Editing
If the colors in your photos look distorted after editing, try these steps:
- Adjust White Balance: Use the white balance tool to correct color casts and ensure that the colors in your photos are accurate.
- Avoid Extreme Adjustments: Be careful not to make extreme adjustments to the saturation, vibrance, or HSL sliders, as this can distort the colors in your photos.
- Use Color Calibration Tools: Use color calibration tools to ensure that your iPhone’s display is accurately displaying colors.
7.4. Photos Appear Blurry After Editing
If your photos appear blurry after editing, try these steps:
- Sharpen Your Photos: Use the sharpness tool to add a subtle amount of sharpening to your photos.
- Avoid Over-Resizing: Be careful not to over-resize your photos, as this can make them appear blurry.
- Shoot in Focus: Make sure that your photos are in focus when you shoot them.
7.5. Edits Not Saving
If your edits are not saving, try these steps:
- Make Sure You’re Saving: Ensure that you are tapping the “Done” or “Save” button after making your edits.
- Check Storage Space: Make sure that you have enough storage space on your iPhone to save your edits.
- Restart Your iPhone: Turn your iPhone off and then back on again.
8. Inspiration and Learning Resources
To further enhance your photo editing skills and find inspiration, here are some excellent resources:
8.1. Online Tutorials and Courses
- Adobe Lightroom Mobile Tutorials: Adobe offers a wealth of tutorials and courses on using Lightroom Mobile.
- VSCO Learn: VSCO provides in-depth guides and tutorials on using their app and mastering photo editing techniques.
- YouTube Channels: Numerous YouTube channels offer free tutorials on iPhone photo editing, such as Peter McKinnon and Sean Dalton.
8.2. Photography Blogs and Websites
- dfphoto.net: Explore dfphoto.net for articles, tutorials, and inspiration related to iPhone photography and editing. Address: 1600 St Michael’s Dr, Santa Fe, NM 87505, United States. Phone: +1 (505) 471-6001.
- Petapixel: A leading photography blog with articles on a wide range of topics, including iPhone photography.
- Digital Photography School: Offers practical tips and tutorials for photographers of all levels.
8.3. Photography Communities and Forums
- VSCO Community: Share your photos and connect with other photographers on the VSCO platform.
- Instagram: Follow photographers and hashtags related to iPhone photography for daily inspiration.
- Reddit: Join photography-related subreddits like r/iPhoneography and r/photography to ask questions, share your work, and learn from others.
8.4. Books on iPhone Photography and Editing
- “The iPhone Photography Book” by Scott Kelby: A comprehensive guide to taking and editing photos with your iPhone.
- “iPhone Photography for Dummies” by Mark Hemmings: A beginner-friendly guide to iPhone photography and editing.
9. Frequently Asked Questions (FAQs)
9.1. Can I edit RAW photos on my iPhone?
Yes, you can edit RAW photos on your iPhone using apps like Adobe Lightroom Mobile and Snapseed. Editing RAW files gives you more flexibility and control over the final image quality.
9.2. What is the best photo editing app for iPhone?
The best photo editing app for iPhone depends on your needs and preferences. Adobe Lightroom Mobile is a great choice for professional-grade editing, while VSCO is known for its beautiful filters. Snapseed is a free and powerful option for selective editing.
9.3. How do I improve the quality of my iPhone photos?
To improve the quality of your iPhone photos, shoot in good lighting, use the built-in camera settings to adjust exposure and focus, and edit your photos using a photo editing app.
9.4. How do I remove unwanted objects from my iPhone photos?
You can remove unwanted objects from your iPhone photos using apps like TouchRetouch and Snapseed. These apps offer tools like the healing tool and clone stamp tool to seamlessly remove distractions from your images.
9.5. How do I adjust the colors in my iPhone photos?
You can adjust the colors in your iPhone photos using the built-in photo editor or a third-party app like Lightroom Mobile. Use the white balance, saturation, vibrance, and HSL sliders to fine-tune the colors in your images.
9.6. How do I straighten a tilted horizon in my iPhone photos?
You can straighten a tilted horizon in your iPhone photos using the straighten tool in the built-in photo editor or in a third-party app. Simply drag the slider until the horizon is level.
9.7. How do I crop my iPhone photos?
You can crop your iPhone photos using the crop tool in the built-in photo editor or in a third-party app. Use the crop tool to remove unwanted elements from your photo, change the aspect ratio, and improve the overall balance of the image.
9.8. How do I create a black and white photo on my iPhone?
You can create a black and white photo on your iPhone using the built-in photo editor or a third-party app. Simply apply a black and white filter or manually adjust the saturation and contrast to create a monochrome image.
9.9. How do I add text to my iPhone photos?
You can add text to your iPhone photos using apps like Snapseed and Afterlight. These apps offer a variety of fonts and styles to choose from, allowing you to create unique and eye-catching images.
9.10. How do I share my iPhone photos on social media?
You can share your iPhone photos on social media directly from the Photos app or from a photo editing app. Simply tap the share button and select the social media platform you want to share your photo on.
10. Conclusion: Unleash Your Inner Photographer with iPhone Photo Editing
Editing photos on your iPhone is a powerful way to enhance your images, express your creativity, and share your unique perspective with the world. Whether you’re using the built-in photo editor or a third-party app, mastering a few essential techniques can make a huge difference in the quality of your photos.
Remember to experiment with different tools and settings, find your own unique style, and never stop learning. With practice and dedication, you can unleash your inner photographer and create stunning images that capture the beauty of the world around you.
Visit dfphoto.net today to discover more tips, tutorials, and inspiration for iPhone photography and editing. Join our community of passionate photographers and start sharing your amazing creations!