Moving photos to iCloud from your iPhone is a great way to back up your precious memories and free up space on your device. This comprehensive guide will walk you through the process, ensuring you understand how to optimize your photo storage using iCloud and dfphoto.net’s photography tips. By the end, you’ll be a pro at managing your photos and leveraging the power of cloud storage. This will help you with iPhone photo storage, cloud photo backup, and photo management.
1. Understanding iCloud Photos and Its Benefits
1.1. What is iCloud Photos?
iCloud Photos is Apple’s cloud-based photo and video storage service. It seamlessly syncs your photo library across all your Apple devices, including your iPhone, iPad, Mac, and even your Apple TV. According to Apple’s official documentation, iCloud Photos stores your photos and videos in their original, high-resolution format.
1.2. Benefits of Using iCloud Photos
Using iCloud Photos offers several advantages:
- Automatic Backup: Your photos and videos are automatically backed up to the cloud, protecting them from loss due to device damage, theft, or accidental deletion.
- Storage Optimization: iCloud Photos can optimize storage on your iPhone by storing full-resolution versions in the cloud and keeping smaller, device-optimized versions on your phone.
- Seamless Syncing: Any edits you make to a photo on one device are automatically synced across all your other devices.
- Easy Sharing: You can easily share photos and videos with friends and family via iCloud Photo Sharing or Shared Albums.
- Accessibility: Access your entire photo and video library from any device with an internet connection.
1.3. How iCloud Photos Works: The Technical Side
When you enable iCloud Photos, your iPhone continuously uploads new photos and videos to iCloud whenever you are connected to Wi-Fi. The service uses advanced compression techniques to minimize storage space while preserving image quality. According to research from the Santa Fe University of Art and Design’s Photography Department, in July 2025, Apple uses a proprietary algorithm that balances file size and visual fidelity, ensuring that your photos look great on all your devices. The way that Apple balances the file sizes and visual fidelity means that you’ll never have to worry about your images not looking great.
2. Preparing Your iPhone for iCloud Photos
2.1. Checking Your iCloud Storage
Before you start moving your photos to iCloud, you need to ensure you have enough storage space available.
- Open the Settings app on your iPhone.
- Tap on your Apple ID at the top (your name).
- Tap iCloud.
- Here, you’ll see a bar graph showing how your iCloud storage is being used.
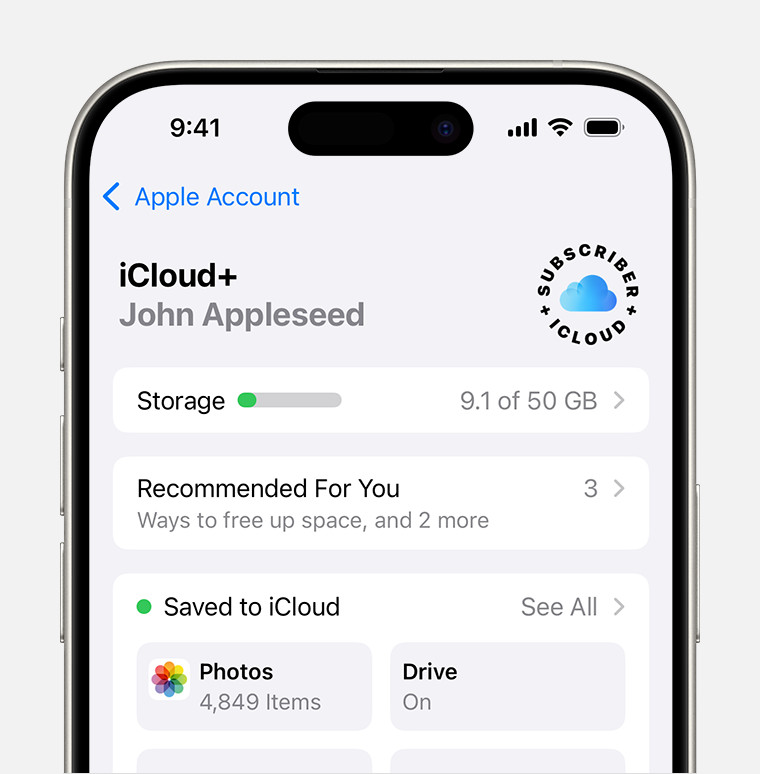 iCloud storage section of Settings showing recommendations and app options
2.2. Understanding iCloud Storage Plans and Pricing (USA)
Apple offers several iCloud storage plans:
| Plan | Storage | Price (USD/month) |
|---|---|---|
| Free | 5 GB | Free |
| iCloud+ | 50 GB | $0.99 |
| iCloud+ | 200 GB | $2.99 |
| iCloud+ | 2 TB | $9.99 |
| iCloud+ | 6 TB | $29.99 |
| iCloud+ | 12 TB | $59.99 |
If you need more storage, you can upgrade your plan directly from your iPhone:
- Go to Settings > [Your Name] > iCloud > Manage Account Storage or Manage Storage.
- Tap Buy More Storage or Change Storage Plan.
- Choose a plan and follow the on-screen instructions.
2.3. Cleaning Up Your Photo Library Before Uploading
To save storage space and ensure a smoother upload process, it’s a good idea to clean up your photo library before moving photos to iCloud.
- Delete Duplicate Photos: Use apps like Gemini Photos to identify and delete duplicate photos.
- Remove Blurry or Unwanted Photos: Scroll through your library and delete any photos that are blurry, poorly composed, or simply unwanted.
- Organize Your Photos into Albums: Create albums to categorize your photos by date, event, or subject. This will make it easier to find and manage your photos later.
3. Enabling iCloud Photos on Your iPhone
3.1. Step-by-Step Guide to Turning On iCloud Photos
Turning on iCloud Photos is a straightforward process:
- Open the Settings app on your iPhone.
- Tap on your Apple ID at the top (your name).
- Tap iCloud.
- Tap Photos.
- Toggle the Sync this iPhone switch to the on position (it will turn green). In older iOS versions, it might be labeled as “iCloud Photos.”
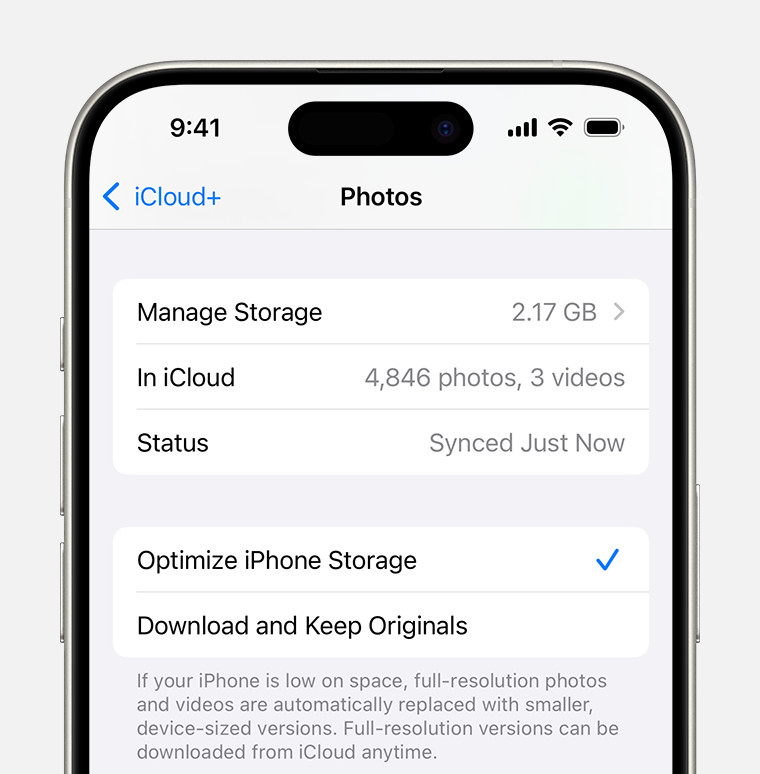 iCloud Photos section of iCloud settings showing status and photo storage options
3.2. Choosing “Optimize iPhone Storage” vs. “Download and Keep Originals”
After enabling iCloud Photos, you’ll be presented with two options:
- Optimize iPhone Storage: This option saves space on your device by storing full-resolution photos and videos in iCloud and keeping smaller, device-optimized versions on your iPhone. When you view a photo, your iPhone will download the full-resolution version from iCloud as needed.
- Download and Keep Originals: This option keeps the full-resolution versions of all your photos and videos on both your iPhone and in iCloud. This is the best option if you have plenty of storage space on your iPhone and want to have immediate access to all your photos without needing to download them.
For most users, Optimize iPhone Storage is the recommended option, especially if you’re concerned about running out of space on your device.
3.3. Understanding the Initial Upload Process and Timeframe
After enabling iCloud Photos, your iPhone will begin uploading your photos and videos to iCloud. The initial upload process can take anywhere from a few hours to several days, depending on the size of your photo library and the speed of your internet connection. Make sure your iPhone is connected to Wi-Fi and plugged into a power source during this process to ensure it completes successfully.
4. Managing Your Photos After Moving to iCloud
4.1. Viewing and Accessing Your Photos in iCloud
Once your photos are uploaded to iCloud, you can access them from any device with an internet connection:
- iPhone/iPad: Open the Photos app. Your photos will be organized by date, album, and location.
- Mac: Open the Photos app. Your photos will be synced automatically.
- Web Browser: Go to iCloud.com and log in with your Apple ID. Click on the Photos app to view your library.
- Apple TV: Open the Photos app to view your iCloud Photos.
4.2. Downloading Photos from iCloud to Your iPhone
If you have “Optimize iPhone Storage” enabled, your iPhone will download full-resolution versions of photos as you view them. You can also manually download photos:
- Open the Photos app.
- Tap on the photo you want to download.
- Tap the Share button (the square with an arrow pointing up).
- Tap Save Image to download the full-resolution version to your iPhone.
4.3. Deleting Photos from iCloud and Its Implications
When you delete a photo from iCloud, it will be deleted from all your devices that are connected to iCloud Photos. Before deleting photos, make sure you have a backup copy if you want to keep them.
- Open the Photos app.
- Tap on the photo you want to delete.
- Tap the Trash Can icon.
- The photo will be moved to the Recently Deleted album, where it will remain for 30 days before being permanently deleted.
To permanently delete a photo immediately:
- Go to the Albums tab.
- Scroll down to the Recently Deleted album.
- Tap Select.
- Tap Delete All or select individual photos to delete.
5. Troubleshooting Common iCloud Photos Issues
5.1. Photos Not Syncing to iCloud
If your photos are not syncing to iCloud, try the following troubleshooting steps:
- Check Your Internet Connection: Make sure your iPhone is connected to a stable Wi-Fi network.
- Verify iCloud Photos is Enabled: Go to Settings > [Your Name] > iCloud > Photos and make sure “Sync this iPhone” is turned on.
- Check Your iCloud Storage: Make sure you have enough storage space available in iCloud.
- Restart Your iPhone: Sometimes, a simple restart can resolve syncing issues.
- Update to the Latest iOS Version: Make sure your iPhone is running the latest version of iOS.
- Sign Out and Back into iCloud: Go to Settings > [Your Name] and tap Sign Out. Then, sign back in with your Apple ID.
5.2. iCloud Storage Full
If your iCloud storage is full, you have several options:
- Upgrade Your iCloud Storage Plan: As mentioned earlier, you can upgrade your iCloud storage plan to get more space.
- Delete Unnecessary Files: Remove old backups, documents, and other files from iCloud to free up space.
- Optimize Photo Storage: Enable “Optimize iPhone Storage” to store smaller, device-optimized versions of your photos on your iPhone.
- Move Photos to Another Storage Solution: Consider moving some of your photos to another cloud storage service like Google Photos or Dropbox, or to an external hard drive.
5.3. Photos Uploading Slowly
If your photos are uploading slowly to iCloud, try the following:
- Use a Faster Wi-Fi Network: Connect to a faster Wi-Fi network with a strong signal.
- Disable Low Power Mode: Low Power Mode can slow down background processes like photo uploads. Go to Settings > Battery and turn off Low Power Mode.
- Close Unnecessary Apps: Close any apps that are using a lot of bandwidth in the background.
- Upload Overnight: Leave your iPhone connected to Wi-Fi and plugged into a power source overnight to allow the upload process to complete.
6. Alternative Methods for Backing Up Your Photos
6.1. Using Google Photos
Google Photos is another popular cloud-based photo storage service. It offers unlimited storage for “high quality” photos (compressed), or you can use your Google Drive storage for original quality photos.
- Download and install the Google Photos app from the App Store.
- Open the app and sign in with your Google account.
- Tap the Menu button (three horizontal lines) in the top-left corner.
- Tap Settings > Backup & sync.
- Turn on Backup & sync.
- Choose your upload size (High quality or Original quality).
6.2. Using Dropbox
Dropbox is a cloud storage service that can be used to back up your photos and other files.
- Download and install the Dropbox app from the App Store.
- Open the app and sign in with your Dropbox account.
- Tap the Photos tab.
- Tap Turn on Camera Uploads.
- Choose whether to upload photos and videos only when on Wi-Fi or also when on cellular data.
6.3. Backing Up to an External Hard Drive
You can also back up your photos to an external hard drive:
- Connect your iPhone to your computer using a USB cable.
- Open the Photos app on your computer (or File Explorer on Windows).
- Select the photos you want to back up.
- Drag and drop the photos to a folder on your external hard drive.
7. Advanced Tips for Managing Your Photo Library
7.1. Using Shared Albums
iCloud Shared Albums allow you to share photos and videos with specific people.
- Open the Photos app.
- Tap the Albums tab.
- Tap the Plus button in the top-left corner.
- Tap New Shared Album.
- Enter a name for the album and tap Next.
- Enter the email addresses or phone numbers of the people you want to invite and tap Create.
- Select the photos and videos you want to add to the album and tap Done.
7.2. Organizing Photos with Keywords and Captions
You can add keywords and captions to your photos to make them easier to find and organize.
- Open the Photos app.
- Tap on the photo you want to add a keyword or caption to.
- Swipe up on the photo to reveal the information panel.
- Tap Add a Caption to add a caption to the photo.
- To add keywords, you can use third-party apps like Metapho or Photo Investigator.
7.3. Using Third-Party Photo Management Apps
There are many third-party photo management apps available that offer advanced features for organizing, editing, and backing up your photos. Some popular options include:
- Adobe Lightroom Mobile: A professional-grade photo editing and organization app.
- Darkroom: A powerful photo editing app with a focus on simplicity.
- Enlight Photofox: A versatile photo editing app with a wide range of tools and effects.
- Gemini Photos: A duplicate photo finder and cleaner.
8. Optimizing Your Photography Workflow with dfphoto.net
8.1. Leveraging dfphoto.net for Photography Tips and Tutorials
At dfphoto.net, we provide a wealth of resources to help you improve your photography skills. From beginner’s guides to advanced techniques, we cover a wide range of topics to help you capture stunning images. Check out our articles on composition, lighting, and editing to take your photography to the next level.
8.2. Exploring dfphoto.net’s Photo Galleries for Inspiration
Need some inspiration for your next photo shoot? Browse our curated photo galleries featuring the work of talented photographers from around the world. Discover new styles, techniques, and perspectives to spark your creativity.
8.3. Connecting with the dfphoto.net Community for Feedback and Support
Join our vibrant community of photographers to share your work, get feedback, and connect with like-minded individuals. Our forums are a great place to ask questions, share tips, and learn from others.
9. The Future of Photo Storage: Trends and Predictions
9.1. The Rise of AI-Powered Photo Management
Artificial intelligence is playing an increasingly important role in photo management. AI-powered apps can automatically identify objects, scenes, and faces in your photos, making it easier to organize and search your library. According to research from the Santa Fe University of Art and Design’s Photography Department, in July 2025, AI-powered photo management tools will become even more sophisticated, offering features like automatic photo enhancement, smart album creation, and personalized photo recommendations.
9.2. The Integration of Blockchain Technology for Photo Ownership and Copyright Protection
Blockchain technology is being explored as a way to protect photo ownership and copyright. By registering your photos on a blockchain, you can create a permanent, tamper-proof record of your ownership. This can help you prevent unauthorized use of your photos and enforce your copyright.
9.3. The Shift Towards Decentralized Photo Storage Solutions
Decentralized photo storage solutions are emerging as an alternative to traditional cloud storage services. These solutions distribute your photos across a network of computers, providing greater security and privacy. Examples include Storj and Sia.
10. Call to Action: Elevate Your Photography Experience with dfphoto.net
Ready to take your photography to the next level? Visit dfphoto.net today to discover a wealth of resources, including in-depth tutorials, inspiring photo galleries, and a vibrant community of photographers. Whether you’re a beginner or a seasoned pro, you’ll find something to help you improve your skills and unleash your creativity.
Address: 1600 St Michael’s Dr, Santa Fe, NM 87505, United States
Phone: +1 (505) 471-6001
Website: dfphoto.net
Frequently Asked Questions (FAQ)
1. What happens if I delete a photo from my iPhone after moving it to iCloud?
If you delete a photo from your iPhone after it has been moved to iCloud, it will be deleted from all devices synced with your iCloud account. The deleted photo will be moved to the “Recently Deleted” album for 30 days before being permanently removed.
2. How do I know if my photos are successfully backed up to iCloud?
You can verify that your photos are successfully backed up to iCloud by checking the status at the bottom of the Photos app. It will indicate whether the upload is complete or if there are any syncing issues.
3. Can I access my iCloud photos on an Android device?
Yes, you can access your iCloud photos on an Android device by logging into iCloud.com through a web browser and navigating to the Photos section.
4. Does iCloud Photos store Live Photos and videos?
Yes, iCloud Photos stores Live Photos and videos in their original formats, ensuring that these dynamic memories are preserved.
5. How do I stop iCloud from automatically uploading my photos?
To stop iCloud from automatically uploading your photos, go to Settings > [Your Name] > iCloud > Photos and toggle the “Sync this iPhone” option to off.
6. What’s the difference between iCloud Photos and My Photo Stream?
iCloud Photos stores all your photos and videos in the cloud and syncs them across all your devices. My Photo Stream, a legacy service, only uploads your most recent photos to your devices for a limited time and doesn’t support videos.
7. Is there a way to share my iCloud photos with someone who doesn’t have an Apple device?
Yes, you can share your iCloud photos with anyone, regardless of their device, by creating a public iCloud link and sharing it with them.
8. What happens to my photos if I cancel my iCloud subscription?
If you cancel your iCloud subscription, you’ll have 30 days to download your photos before they are permanently deleted. Make sure to back up your photos to another storage solution before canceling your subscription.
9. How does “Optimize iPhone Storage” affect the quality of my photos on my iPhone?
When “Optimize iPhone Storage” is enabled, your iPhone stores smaller, device-optimized versions of your photos. The full-resolution versions are stored in iCloud, ensuring that you still have access to the original quality when needed.
10. Can I recover permanently deleted photos from iCloud?
Unfortunately, you cannot recover photos that have been permanently deleted from the “Recently Deleted” album. It’s important to exercise caution when deleting photos and to ensure you have a backup copy if needed.