Adding one photo to another on your iPhone is now easier than ever, thanks to the iOS Shortcuts app and the power of dfphoto.net, your ultimate resource for photography tips and visual arts inspiration. Discover how to seamlessly superimpose images, create stunning visual effects, and unleash your creative potential with this simple guide. We’ll explore the step-by-step process, highlight the benefits, and introduce you to dfphoto.net, where you can find even more advanced techniques and inspiration for your photographic journey.
1. What Is The Easiest Way To Overlay Photos On My iPhone?
The easiest way to overlay photos on your iPhone involves using the Shortcuts app to create a custom shortcut. This allows you to quickly superimpose images directly from your photo library. This method eliminates the need for third-party photo editing applications for basic overlay tasks, streamlining your editing process.
Here’s a simplified overview, and we will go into detail later:
- Create a New Shortcut: Open the Shortcuts app and start a new shortcut.
- Share Sheet Setting: Enable the “Show in Share Sheet” option for easy access from your photos.
- Select Photos Actions: Add two “Select Photos” actions to choose the images you want to overlay.
- Overlay Photos Action: Include an “Overlay Photos” action to combine the selected images.
- Save to Camera Roll Action: Finish with a “Save to Photo Album” action to store the result in your photo library.
2. What Tools Do I Need To Add One Photo To Another On My iPhone?
To add one photo to another on your iPhone, you will need an iPhone with iOS 13 or above installed, along with the Shortcuts app. The Shortcuts app comes preinstalled on iPhones running iOS 13 or later and can be reinstalled from the App Store if it has been deleted.
Detailed Tool Requirements
| Tool | Description |
|---|---|
| iPhone | Any iPhone model running iOS 13 or above. Ensure your device is updated to the latest iOS version for optimal performance and access to the most recent features. |
| Shortcuts App | A preinstalled iOS app that allows you to create custom workflows and automate tasks. If it’s not on your phone, download it from the App Store. |
| Photo Editing Apps (Optional) | While the Shortcuts app method is effective, you might want additional photo editing apps for more complex adjustments or creative effects. Apps like Adobe Photoshop Express or PicsArt offer a wider range of editing options. |
3. How Do I Create A Shortcut To Overlay Photos?
Creating a shortcut to overlay photos involves several steps within the Shortcuts app. Follow these detailed instructions to set up your custom shortcut:
Step-by-Step Guide
3. 1. Open the Shortcuts App
*   Locate the Shortcuts app on your iPhone. If you can’t find it, use the search function or check the App Store to ensure it’s installed.
*   Open the app to begin creating your new shortcut.
3. 2. Create a New Shortcut
*   In the Shortcuts app, look for the "+" icon, usually located in the top right corner of the screen.
*   Tap the "+" icon to create a new shortcut. This will open a new workflow where you can add actions.
3. 3. Turn on Show in Share Sheet
*   Tap the "…" icon (three dots) in the top right corner of the new shortcut page. This will open the shortcut settings.
*   In the settings, find the option labeled "Show in Share Sheet" and toggle it on. This allows you to access the shortcut directly from the Photos app.
*   Tap "Done" to save this setting.
3. 4. Select File Formats
*   After enabling the Share Sheet, return to the main shortcut workflow.
*   Tap on the section that says "Any" or "Images and more." This specifies the types of media the shortcut will accept.
*   Deselect all media formats except for "Images." This ensures the shortcut only processes image files.
*   Tap "Done" to confirm the selected file formats.
3. 5. Add Two Select Photos Actions
*   Tap the "Add Action" button or use the search bar at the bottom of the screen.
*   Type "Select Photos" into the search bar and select the "Select Photos" action. This will add the action to your workflow.
*   Repeat the process to add a second "Select Photos" action. You should now have two "Select Photos" actions in your shortcut.
3. 6. Add the Overlay Image Action
*   Tap the "Add Action" button again or use the search bar.
*   Type "Overlay Image" into the search bar and select the "Overlay Image" action. This action will combine the two selected photos.
3. 7. Select Image Variables for the Overlay
*   In the "Overlay Image" action, tap the first "Images" variable. A menu will appear.
*   Choose "Select Variable" from the menu. A blue bar will appear at the top of the screen indicating you are selecting a magic variable.
*   Tap on the first "Photos" label located after your first "Select Photos" action. This links the first selected image to the overlay action.
*   Repeat the process for the second "Images" variable in the "Overlay Image" action. This time, tap the second "Photos" label after your second "Select Photos" action.
3. 8. Add the Save to Photo Album Action
*   Tap the "Add Action" button one last time or use the search bar.
*   Type "Save to Photo Album" into the search bar and select the corresponding action. This will save the overlaid image to your photo library.
3. 9. Rename Your Shortcut
*   Tap the name of your shortcut at the top of the screen. The default name is usually something generic like "New Shortcut."
*   Rename the shortcut to something descriptive like "Overlay Photos" or "Superimpose." This name will appear in your Share Sheet, so choose something easy to recognize.
4. 10. Test It Out
*   Open your Photos app and select two photos you want to overlay.
*   Tap the Share Sheet button (the box with an arrow pointing up).
*   Find and tap the shortcut you just created (e.g., "Overlay Photos").
*   The shortcut will run, and you may be prompted to reposition and resize the overlay.
*   Once you’re satisfied, tap "Done," and the overlaid image will be saved to your Camera Roll.
By following these detailed steps, you can create an efficient shortcut to overlay photos directly on your iPhone, enhancing your mobile photography capabilities.
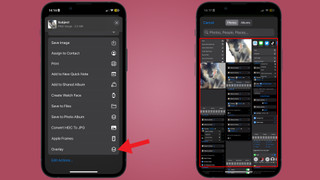
4. How Do I Use The Share Sheet To Access The Overlay Tool?
Using the Share Sheet to access the overlay tool involves a few simple steps once you have created the shortcut as outlined above. The Share Sheet provides quick access to the overlay tool directly from your Photos app, streamlining the process of superimposing images.
Step-by-Step Guide
- Open the Photos App: Navigate to your Photos app and select the two images you wish to overlay.
- Access the Share Sheet: Tap the Share Sheet button, which is the icon that looks like a box with an arrow pointing upward. This will open a menu with various options for sharing and editing your selected photos.
- Run the Shortcut: Scroll through the options in the Share Sheet until you find the name of the shortcut you created (e.g., “Overlay Photos”). Tap the shortcut to run it.
- Select Photos: The shortcut will prompt you to select the photos you want to overlay. The first photo you select will be the image that appears on top, and the second will be the base image.
- Reposition and Resize (If Necessary): After selecting the images, you may be taken to an image editor where you can reposition and resize the overlay. Adjust the position and size to achieve the desired effect.
- Save the Overlaid Image: Once you are satisfied with the overlay, tap “Done” or the save button. The overlaid image will be saved to your Camera Roll.
5. How Can I Reposition And Resize The Overlay?
Repositioning and resizing the overlay is a crucial step in achieving the desired effect when superimposing images on your iPhone. The image editor allows you to adjust the size and placement of the overlay to create a seamless and visually appealing result.
Step-by-Step Guide
- Access the Image Editor: After running the shortcut from the Share Sheet and selecting your images, the shortcut should automatically direct you to an image editor interface.
- Reposition the Overlay: In the image editor, tap and drag the overlay image to reposition it. Experiment with different placements to find the most visually appealing position.
- Resize the Overlay: Use the pinch-to-zoom gesture to resize the overlay image. Pinch inwards to make the overlay smaller or pinch outwards to make it larger. Adjust the size to fit your desired composition.
- Fine-Tune Adjustments: Some image editors may offer additional tools for fine-tuning the overlay, such as rotation or opacity adjustments. Use these tools to further refine the appearance of the overlaid image.
- Preview the Result: Take a moment to preview the final result and ensure that the overlay is positioned and sized correctly. Make any necessary adjustments until you are satisfied with the outcome.
- Save the Changes: Once you are happy with the overlay, tap “Done” or the save button to save the changes. The overlaid image will be saved to your Camera Roll with the new positioning and size.
6. How Do I Overlay A Selection From A Photo?
To overlay a selection from a photo, you can use the “Lift Subject from Background” feature available on iOS 16 and later versions. This allows you to isolate a specific subject from an image and use it as an overlay on another photo.
Step-by-Step Guide
- Open the Photo: Open the photo containing the subject you want to isolate in the Photos app.
- Lift Subject from Background: Press and hold on the subject you want to extract. After a moment, the subject will be highlighted, indicating it has been lifted from the background.
- Share the Lifted Subject: Tap “Share” when the share options appear.
- Save as Separate Image: Choose “Save Image” to save the lifted subject as a separate image with a transparent background.
- Overlay Using Shortcuts: Use the Shortcuts app as described earlier to overlay this new image onto another photo.
7. What Are The Benefits Of Using Shortcuts For Photo Overlays?
Using the Shortcuts app for photo overlays offers several benefits, making it a convenient and efficient method for superimposing images directly on your iPhone. The simplicity of using Shortcuts enhances your overall photo editing experience.
Benefits
- Efficiency: The Shortcuts app streamlines the process of overlaying photos, allowing you to quickly superimpose images without the need for external apps.
- Convenience: With the “Show in Share Sheet” option enabled, you can access the overlay tool directly from the Photos app, making it easy to overlay images on the go.
- Customization: The Shortcuts app allows you to customize the overlay process, adjusting settings such as the position and size of the overlay to achieve the desired effect.
- Integration: The Shortcuts app integrates seamlessly with other iOS features, such as the “Lift Subject from Background” feature, allowing you to create more complex and creative photo overlays.
- Cost-Effective: The Shortcuts app is a free tool that comes preinstalled on iPhones running iOS 13 or later, making it a cost-effective solution for photo overlays.
8. Are There Any Limitations To Using The Shortcuts App For Photo Overlays?
While the Shortcuts app offers a convenient way to overlay photos on your iPhone, there are some limitations to consider.
Limitations
- Complexity: Setting up the shortcut can be a bit fiddly, especially for users who are new to the Shortcuts app. The initial setup may require some time and effort to configure correctly.
- Limited Editing Options: The Shortcuts app primarily focuses on basic overlay functionality and may lack the advanced editing options available in dedicated photo editing apps.
- Potential for Malfunctions: Shortcuts can sometimes malfunction inexplicably, leading to a less smooth user experience compared to built-in operating system features.
- Lack of Precision: The image editor within the Shortcuts app may not offer the same level of precision as professional photo editing software, making it challenging to achieve highly detailed overlays.
- iOS Dependence: The functionality of the shortcut is dependent on the iOS operating system and may be affected by updates or changes to the system.
9. What Are Some Alternative Photo Editing Apps For More Advanced Overlays?
For more advanced photo overlays and editing options, several alternative photo editing apps are available on the App Store. These apps offer a wider range of features and tools, allowing you to create complex and visually stunning overlays.
Alternative Apps
| App | Description |
|---|---|
| Adobe Photoshop Express | A mobile version of the popular desktop software, offering a variety of editing tools, including layering, blending, and masking. Ideal for users who want more control over the overlay process and the ability to create intricate effects. |
| PicsArt | A versatile photo editing app with a wide range of features, including collage making, sticker overlays, and text additions. Great for creating fun and creative overlays with a variety of customizable elements. |
| Pixelmator | A powerful image editing app that offers advanced features such as layers, masks, and blending modes. Suitable for users who want to create professional-quality overlays with precise control over every aspect of the editing process. |
| Over | Designed specifically for adding text and graphics to photos, Over offers a wide selection of fonts, graphics, and templates to create eye-catching overlays. Perfect for creating social media posts, marketing materials, and other visual content with custom text and branding. |
| Snapseed | A free photo editing app developed by Google, offering a range of editing tools, including layering, blending, and masking. A great option for users who want a powerful and free photo editing app with advanced overlay capabilities. |
10. How Can dfphoto.net Help Me Improve My Photo Editing Skills?
dfphoto.net is your ultimate resource for enhancing your photo editing skills and discovering new techniques. Whether you’re a beginner or an experienced photographer, dfphoto.net offers a wealth of resources to help you improve your skills and unleash your creativity.
Benefits of dfphoto.net
- Tutorials: dfphoto.net provides detailed tutorials on various photo editing techniques, including overlaying images, using blending modes, and creating special effects.
- Inspiration: Explore a vast collection of stunning photographs and creative projects to inspire your own photo editing endeavors.
- Community: Connect with a community of photographers and photo editors to share your work, exchange feedback, and learn from others.
- Reviews: Get expert reviews and recommendations on the latest photo editing apps and software to help you choose the right tools for your needs.
- Tips and Tricks: Discover hidden tips and tricks to enhance your photo editing skills and achieve professional-quality results.
- Address: 1600 St Michael’s Dr, Santa Fe, NM 87505, United States.
- Phone: +1 (505) 471-6001.
- Website: dfphoto.net.
 Overlaying Images on iPhone with Shortcuts App
11. How Do I Turn On Show In Share Sheet?
Turning on the “Show in Share Sheet” option is an essential step in setting up your photo overlay shortcut. This setting allows you to access the shortcut directly from your Photos app, making it quick and easy to overlay images on the go.
Step-by-Step Guide
- Open the Shortcuts App: Locate and open the Shortcuts app on your iPhone.
- Select Your Shortcut: Find the photo overlay shortcut you created earlier and tap the “…” icon (three dots) in the top right corner of the shortcut to open the settings.
- Access Settings: In the shortcut settings, look for the option labeled “Show in Share Sheet.”
- Toggle the Switch: Tap the toggle switch next to “Show in Share Sheet” to turn it on. The switch should turn green, indicating that the option is enabled.
- Confirm: Tap “Done” to save the changes.
12. What Are Select Photo Actions?
“Select Photos” actions are a crucial component of the photo overlay shortcut in the Shortcuts app. These actions allow you to choose the images you want to overlay, specifying which images will be combined to create the desired effect.
Understanding Select Photo Actions
- Function: The “Select Photos” actions prompt you to select images from your photo library. These images are then passed on to the next action in the shortcut for further processing.
- Order: The order in which you add the “Select Photos” actions is important. The first “Select Photos” action typically corresponds to the image that will be placed on top, while the second corresponds to the base image.
- Customization: You can customize the “Select Photos” actions to allow multiple selections, filter by specific albums, or limit the number of images that can be selected.
13. How Can I Add Action?
Adding actions in the Shortcuts app is a fundamental part of creating custom workflows and automating tasks on your iPhone. Actions are the building blocks of shortcuts, each performing a specific function to achieve the desired outcome.
Step-by-Step Guide
- Open the Shortcuts App: Launch the Shortcuts app on your iPhone.
- Create a New Shortcut or Edit an Existing One: Tap the “+” icon to create a new shortcut or select an existing shortcut to edit.
- Tap the “Add Action” Button: In the shortcut editor, tap the “Add Action” button at the bottom of the screen or use the search bar to find specific actions.
- Search for Actions: Use the search bar to find actions by name or category. Alternatively, browse the available actions by category.
- Select an Action: Tap the action you want to add to your shortcut. The action will be added to the workflow in the shortcut editor.
- Configure the Action: Some actions may require additional configuration, such as specifying input parameters or setting specific options. Follow the prompts to configure the action as needed.
- Repeat as Necessary: Repeat the process to add additional actions to your shortcut, arranging them in the desired order to create a custom workflow.
14. How Do I Select Image Variables?
Selecting image variables is an essential step in configuring the photo overlay shortcut in the Shortcuts app. Image variables allow you to link the images selected in the “Select Photos” actions to the “Overlay Image” action, specifying which images will be combined to create the overlay.
Step-by-Step Guide
- Access the “Overlay Image” Action: In the shortcut editor, locate the “Overlay Image” action in your photo overlay shortcut.
- Tap the First “Images” Variable: Tap the first “Images” variable in the “Overlay Image” action. A menu will appear.
- Choose “Select Variable”: Select “Select Variable” from the menu. A blue bar will appear at the top of the screen, indicating you are selecting a magic variable.
- Tap the First “Photos” Label: Tap the first “Photos” label located after your first “Select Photos” action. This links the first selected image to the overlay action.
- Repeat for the Second “Images” Variable: Repeat the process for the second “Images” variable in the “Overlay Image” action. This time, tap the second “Photos” label after your second “Select Photos” action.
 Shortcuts app showing Select Photos action
15. How Do I Add Save To Photo Album Action?
Adding the “Save to Photo Album” action is the final step in the photo overlay shortcut, ensuring that the overlaid image is saved to your photo library for future use. This action automatically saves the combined image to your chosen album, allowing you to easily access and share your creations.
Step-by-Step Guide
- Open the Shortcuts App: Launch the Shortcuts app on your iPhone.
- Select Your Shortcut: Find the photo overlay shortcut you created earlier and tap it to open the shortcut editor.
- Add the “Save to Photo Album” Action: Tap the “Add Action” button at the bottom of the screen or use the search bar to find the action. Type “Save to Photo Album” and select the corresponding action.
- Configure the Action (Optional): Some users are prompted to select specific photo albums. The default setting saves to your general photo library.
- Test the Shortcut: Run the shortcut to ensure that the overlaid image is saved correctly to your photo library.
16. How Do I Rename My Shortcut?
Renaming your shortcut is a simple but important step in organizing and managing your shortcuts in the Shortcuts app. A descriptive name makes it easy to identify and access your shortcut when you need it, especially if you have multiple shortcuts for different tasks.
Step-by-Step Guide
- Open the Shortcuts App: Launch the Shortcuts app on your iPhone.
- Select Your Shortcut: Find the photo overlay shortcut you created earlier.
- Access Settings: Tap the “…” icon (three dots) in the top right corner of the shortcut to open the settings.
- Tap the Name: Tap the name of the shortcut at the top of the settings page.
- Enter a New Name: A text field will appear, allowing you to enter a new name for the shortcut. Type a descriptive name that accurately reflects the function of the shortcut (e.g., “Overlay Photos,” “Superimpose Images”).
- Confirm: Tap “Done” to save the new name.
17. How Do I Run The Shortcut In The Photo Reel?
Running the photo overlay shortcut directly from your photo reel is a convenient way to quickly superimpose images without having to switch between apps. By utilizing the “Show in Share Sheet” option, you can access the shortcut directly from the Photos app and streamline your workflow.
Step-by-Step Guide
- Open the Photos App: Launch the Photos app on your iPhone and navigate to the photo reel.
- Select Your Photos: Select the two photos you want to overlay. Tap the first photo, then tap the second photo.
- Access the Share Sheet: Tap the Share Sheet button, which is the icon that looks like a box with an arrow pointing upward.
- Run the Shortcut: Scroll through the options in the Share Sheet until you find the name of the photo overlay shortcut you created earlier (e.g., “Overlay Photos”). Tap the shortcut to run it.
- Follow the Prompts: The shortcut will guide you through the overlay process, prompting you to select the images you want to combine and adjust the overlay settings.
- Save the Result: Once you are satisfied with the overlay, tap “Done” or the save button to save the overlaid image to your photo library.
18. Can You Provide Some Final Thoughts On Overlaying Images?
Overlaying images on your iPhone is a creative and fun way to enhance your photos and create unique visual effects. While the Shortcuts app offers a convenient method for basic overlays, it’s essential to understand its limitations and explore alternative options for more advanced editing. By mastering the techniques and tools discussed in this guide, you can unleash your creativity and transform your photos into stunning works of art.
Encouragement and Next Steps
- Experiment: Don’t be afraid to experiment with different overlay techniques and settings to discover your own unique style.
- Explore: Explore the wide range of photo editing apps available on the App Store to find the tools that best suit your needs.
- Share: Share your creations with friends, family, and the online community to get feedback and inspiration.
- Learn: Continue to learn and explore new photo editing techniques to expand your skills and knowledge.
- Visit dfphoto.net: For more tips, tutorials, and inspiration, visit dfphoto.net and join our community of photographers and photo editors.
19. What If The Shortcuts App Is Too Complex?
If you find the Shortcuts app too complex for overlaying images, there are several user-friendly photo editing apps available that offer simpler and more intuitive interfaces. These apps provide a range of overlay tools and features without requiring you to create custom shortcuts or navigate complex workflows.
Recommended Apps
- PicsArt: Offers a simple and intuitive interface for creating overlays, along with a wide range of editing tools and effects.
- Over: Designed specifically for adding text and graphics to photos, Over provides a user-friendly interface and a variety of customizable elements.
- Phonto: A straightforward app for adding text to photos, with a wide selection of fonts and customization options.
20. Are There Any Tips And Tricks For Making Better Photo Overlays?
Yes, there are several tips and tricks you can use to create better photo overlays and achieve professional-quality results. These techniques involve careful planning, attention to detail, and a creative approach to combining images.
Tips and Tricks
- Choose Complementary Images: Select images that complement each other in terms of color, composition, and subject matter.
- Use Blending Modes: Experiment with different blending modes to create unique and visually interesting effects.
- Adjust Opacity: Adjust the opacity of the overlay to control the visibility of the underlying image.
- Use Masks: Use masks to selectively reveal or hide portions of the overlay, allowing you to create complex and layered effects.
- Pay Attention to Detail: Pay attention to detail when positioning and resizing the overlay, ensuring that it aligns properly with the underlying image.
- Experiment with Color: Experiment with color adjustments to create a cohesive and visually appealing final image.
- Use High-Quality Images: Start with high-quality images to ensure that the overlay looks sharp and detailed.
- Be Creative: Don’t be afraid to experiment with different techniques and approaches to create unique and original photo overlays.
By following these tips and tricks, you can create stunning photo overlays that showcase your creativity and artistic vision.
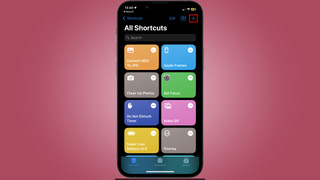 Image showing Open shortcuts and add a new shortcut
FAQ About Adding One Photo To Another On An iPhone
1. Can I add multiple photos to one photo on my iPhone?
Yes, using the Shortcuts app or other photo editing apps, you can layer multiple images onto a single base photo.
2. Is the Shortcuts app free to use on my iPhone?
Yes, the Shortcuts app comes pre-installed on iPhones with iOS 13 or later and is free to use.
3. What if I don’t have iOS 13 or later?
If you have an older iOS version, you can use third-party photo editing apps like PicsArt or Adobe Photoshop Express to overlay photos.
4. Can I change the opacity of the overlay image?
Yes, many photo editing apps, including those mentioned above, allow you to adjust the opacity of the overlay image for a more blended effect.
5. Can I reposition and resize the overlay image?
Yes, you can typically reposition and resize the overlay image to achieve the desired composition.
6. How do I remove the background from an image to use as an overlay?
Use the “Lift Subject from Background” feature (iOS 16 and later) or dedicated background eraser apps to create a transparent overlay.
7. Are there any apps specifically designed for creating photo collages?
Yes, apps like Layout by Instagram and Pic Collage are designed for creating photo collages with various layouts and customization options.
8. Can I add text or stickers to my overlaid images?
Yes, many photo editing apps allow you to add text, stickers, and other graphics to your overlaid images for added creativity.
9. How do I save the overlaid image to my iPhone?
After editing, tap the “Done” or “Save” button to save the overlaid image to your Camera Roll.
10. Where can I find more advanced tutorials on photo editing techniques?
Visit dfphoto.net for advanced tutorials, tips, and inspiration to improve your photo editing skills.
Now that you’ve learned how to add one photo to another on your iPhone, why not take your skills to the next level? Visit dfphoto.net today to discover a wealth of tutorials, tips, and inspiration for all your photo editing needs. Connect with a community of passionate photographers and unlock your creative potential. Don’t wait – start exploring dfphoto.net now and transform your photos into stunning works of art!