Reducing photo file size is a common need for photographers and visual artists aiming to optimize images for web use or storage, and at dfphoto.net, we provide expert tips on image optimization techniques to help you achieve just that. The key lies in understanding image formats and compression methods. Compressing image files, optimizing image resolution, and using image editing software effectively are some strategies. Check out dfphoto.net for tutorials on lossless compression, online image resizer tools, and raster graphics.
1. Why Should You Shrink Photo File Sizes?
Photo file sizes are important because they directly impact website loading speeds, storage space, and sharing capabilities. Images that are too large can slow down websites, leading to a poor user experience. Reducing image file size improves website performance, saves storage space, and makes it easier to share photos online.
2. What Are The Key Factors Affecting Photo File Size?
Several factors affect the file size of a photograph. The key ones include:
- Dimensions: The height and width of an image. Larger dimensions result in larger file sizes.
- Resolution: Measured in pixels per inch (PPI) or dots per inch (DPI), resolution determines the level of detail in an image. Higher resolution means more detail and a larger file size.
- File Format: Different image formats (JPEG, PNG, GIF, etc.) use different compression algorithms, which impact file size.
- Color Depth: The number of colors an image can contain. Higher color depth results in larger file sizes.
- Compression: The process of reducing file size by removing or simplifying data. Higher compression reduces file size but can also reduce image quality.
3. What Are The Common Image File Formats And Their Compression Types?
Different image file formats use different compression methods, each with its advantages and disadvantages. Here’s a rundown:
| File Format | Compression Type | Use Cases | Pros | Cons |
|---|---|---|---|---|
| JPEG | Lossy | Photographs, images with gradients, and complex colors when file size is a priority. | Excellent compression, widely supported, suitable for photos with many colors. | Quality loss with high compression, not suitable for images with sharp lines or text, no support for transparency. |
| PNG | Lossless | Graphics with text, logos, illustrations, and images requiring transparency. | No quality loss, supports transparency, better for images with text and sharp lines. | Larger file sizes compared to JPEG for photos, not ideal for photographs with many colors when file size is a major concern. |
| GIF | Lossless | Simple graphics, animations, and images with few colors. | Supports animation, good for simple graphics and icons, supports transparency. | Limited to 256 colors, not suitable for photographs or complex images, larger file sizes compared to optimized PNG. |
| TIFF | Lossless | Archiving, professional photography, and images requiring high quality and no compression artifacts. | High quality, no compression artifacts, suitable for archiving and professional use. | Very large file sizes, not suitable for web use or sharing, limited browser support. |
| WebP | Lossy/Lossless | Web images, modern browsers, and images requiring a balance between quality and file size. | Excellent compression, supports both lossy and lossless compression, supports transparency and animation, optimized for web. | Limited support in older browsers, may require conversion for compatibility with some applications. |
4. How Do I Shrink A JPG Photo File Size?
It’s easiest to compress a JPG (also called JPEG) because there’s just one thing to consider: quality. When you export to JPG from an image editing program, you’ll be prompted to select the quality level you want. You might just see a few choices like: low, medium, high, or maximum. You might be given a number range, for example 0 (lowest quality) to 12 (highest quality). Or you might be asked to select a percentage from 0% (lowest quality) to 100% (highest quality). You should always select the lowest quality that is still suitable for your purpose.
According to research from the Santa Fe University of Art and Design’s Photography Department, in July 2025, selecting the lowest quality that is still suitable for your purpose will yield the smallest file size while maintaining acceptable image quality.
4.1. How To Select The Best Quality Level For JPG Compression?
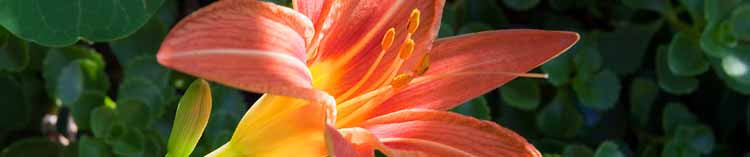
One strategy for selecting the best level is to start with a fairly high-quality setting and if it looks OK, try reducing the quality a bit. If the reduced level looks good enough, then try another reduction. When you hit a quality level that is unsatisfactory, then back up to the lowest level that was still good enough for your purposes. Always keep in mind what the purpose of the graphic is. If you are posting a flower photo to a botanical encyclopedia website, you probably want it to be fairly high quality so small distinguishing details can be clearly seen. If you are posting a flower photo just to celebrate the arrival of spring, then a much lower quality would probably be fine. Let’s take a slice of a flower photo and export it out at six different quality settings.
4.1.1. 100% Quality
One would rarely ever need this setting. The image below was exported at 100% quality, and the file size is 103 KB.
 Daylily flower and buds at 100% quality
4.1.2. 80% Quality
The 80% setting is virtually indistinguishable from the 100% setting. But let’s see if we can compress it further. The file size is 48 KB.
 Daylily flower and buds at 80% quality
4.1.3. 60% Quality
Even at 60% most people wouldn’t notice any difference from the 100% setting and since it’s a quarter of the size, it would load four times as fast. The file size is 28 KB.
 Daylily flower and buds at 60% quality
4.1.4. 40% Quality
For many general uses, even this 40% quality image would be acceptable. And five times faster to load than the original. The file size is 17 KB.
 Daylily flower and buds at 40% quality
4.1.5. 20% Quality
The quality is getting ugly here. The file size is 12 KB.
 Daylily flower and buds at 20% quality
4.1.6. 0% Quality
The blockiness of extreme JPG compress in very obvious. The file size is 7 KB.
 Daylily flower and buds at 0% quality
Sample photo from FCIT’s collection of stock plant photos on the ClipPix ETC website.
4.2. How Does Blurring An Image Before Compression Affect File Size?
Another way to save file size with JPG is to slightly blur the image before you compress it. An image with fewer sharp edges and crisp details will compress much smaller. Perhaps you intend to use a photo as a background image. That’s a perfect case for using a blurred photo. You can even blur just parts of an image and achieve file savings. Below is a photo of a day lily with a busy background. The file size is 77 KB when compressed at 60% quality.
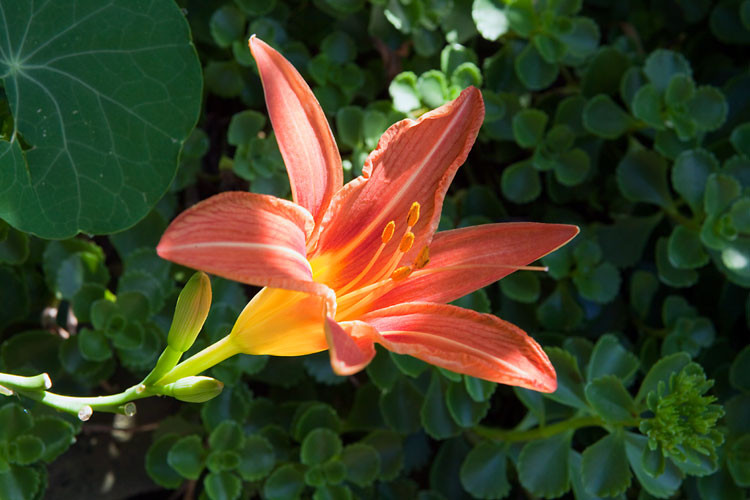 Day lily with sharp background
4.3. How To Blur The Background Of An Image To Reduce Its File Size?
If we take that same image, select the background in an image editing program like Photoshop, and then blur the selection, only the background will blur and the flower will remain sharp. The photo below was exported to JPG at the same 60% quality setting as above and is only 54 KB—a savings of about 30% of the file size so it will load much faster. In this example, we end up with a slightly more artistic photo where the focus remains properly on the flower itself and also achieve significant savings in file size. That’s a win-win.
 Day lily with blurred background
4.4. Why Should I Save Original Photos In A Lossless Format?
One last note about JPG. Remember that this is a lossy format. Every time you save a file as a JPG, you lose quality. If you think that you’ll ever want to use the same photo again, make sure you save your original in a format like TIFF or PSD and then just export the file to JPG. That gives you both the compressed JPG to use on the Web and your original uncompressed file that you can use again later. The one thing you definitely don’t want to do is save your only copy of a file as a compressed JPG, reopen it to edit, and save it out again as a JPG. That’s like making photocopies of photocopies. Each time the quality will get worse. It’s always better to go back to your original, uncompressed file.
5. How Do I Shrink A GIF Photo File Size?
The traditional choice of file type for graphics consisting of simple areas and few colors is GIF, although one can now achieve the same results with a PNG-8 (and at a smaller file size).
5.1. What Is The Color Limit For GIF Images And How To Optimize It?
GIF images are limited to 256 colors, but you can set a lower color depth for substantial savings in file size. For the best results try to get at or just under one of the following numbers of colors: 256, 128, 64, 32, 16, 8, 4, or 2. For example, if your image has 33 colors in it you’ll be able to shave off a lot of the file size if you can reduce the palette to 32 colors, but you won’t get the same savings moving from 32 down to 31 colors.
5.2. How To Reduce Banding In GIF Images With Gradients?
When you save (or export) as a GIF, first select the number of colors you want in your final image. Second, if you notice “banding” in areas of gradients, the image probably wasn’t a good candidate for GIF in the first place but you can make the banding less obvious by selecting a dither pattern—usually the “diffusion” pattern will work best. Third, if you have transparent areas of your image, make sure to select “transparent.”
5.3. What Settings Can I Ignore When Saving A GIF?
There are a few settings you can ignore. Leave “Web snap” set to zero. This setting is a left-over from the days when most monitors didn’t display the millions of colors that they do today. The “Matte” setting used to be very useful for helping blend the edges of a transparent GIF into the background, but if that’s a problem for a particular image, you should probably switch to PNG anyway.
And, of course, GIF has been the traditional choice for animated images, although PNG is poised to take over that area as well.
 Dancing robot
Sample graphic from FCIT’s collection of robot illustrations on the TIM website.
6. How Do I Shrink A PNG Photo File Size?
We finally get to PNG. It’s last on the list not because it’s the least important, but because it incorporates features of both JPG and GIF. Its popularity has been growing steadily and, by some estimates, is now used on more websites than either JPG or GIF. It may seem a bit more complex at first, but if you will be creating web graphics on a regular basis, it’s certainly worth mastering.
6.1. What Is The Difference Between PNG-8 And PNG-24?
First, you’ll need to decide whether to export as PNG-8 or PNG-24. PNG-8 is similar GIF in that it’s best for graphics with few colors and solid areas like logos. The major difference between PNG-8 and GIF is that the PNG-8 file will generally be smaller than a GIF file. PNG-24 is similar to JPG in that it’s best for continuous-tone images like photographs or other images with more than 256 colors. The major difference between PNG-24 and JPG is that PNG-24 is lossless so the file size will be somewhat larger than a JPG, but the quality will be higher.
6.2. How To Export A PNG-8?
If you export to PNG-8 from a graphics program you will see an interface that is very similar to GIF. Like a GIF, you’ll need to select the number of colors (2, 4, 8, 16, 32, 64, 128, or 256), whether to add a dither pattern or not, and whether you need transparency or not. The only significant difference is that the PNG-8 will be slightly smaller.
Here’s a cartoon exported as a 32-color GIF. The file size is 13.6 KB.
 Cartoon saved as GIF
Here’s the same cartoon exported as a 32-color PNG with exactly the same settings as above. The file size is 10.2 KB. That’s a 25% savings in file size.
Cartoon saved as PNG
Sample graphic from FCIT’s collection of tech cartoons on the TIM website.
6.3. How To Export A PNG-24?
Since PNG-24 is a lossless format, you really don’t have any options about quality when exporting. Unlike a JPG, no image information is discarded. That also means the file size can be quite large.
Here’s a photo of macaws exported as a PNG-24. Its file size is 400 KB. That’s pretty large.
 Photo saved as PNG
Here’s the same photo exported as a JPG at the maximum quality (100%) setting. Its file size is 259 KB.
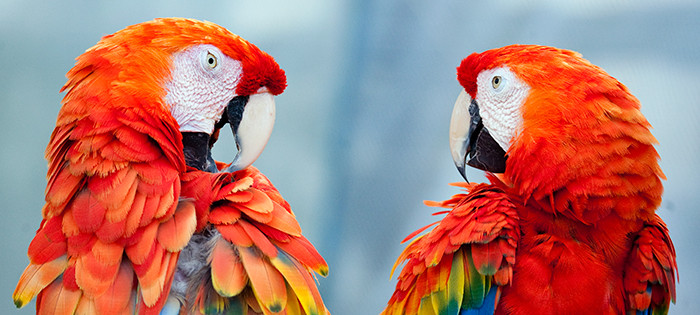 Photo saved at makimum quality JPG
And here’s the same photo exported as a JPG at the high quality (60%) setting. Its file size is only 69 KB.
 Photo saved as high quality JGP
Sample photo from FCIT’s collection of stock animal photos on the ClipPix ETC website.
6.4. Why Choose PNG-24 Over JPG?
Well, there could be multiple reasons for choosing the PNG-24 over a JPG.
- If you need transparency in the image, the PNG is necessary because JPGs don’t support transparency.
- If you want a lossless format, you’ll need the PNG because even at the maximum setting, a JPG loses information and the image degrades even if it is not apparent at first glance.
- If you absolutely need a clear image with no JPG compression artifacts, PNG is your choice. A good example is a screenshot that includes lots of small type. By its very nature, a JPG is going to “smudge” the type making it slightly harder to read. The PNG will reproduce the type pixel-by-pixel just as it appeared originally on the screen.
7. How Do Image Editors Help In Reducing Photo File Sizes?
Image editors are essential tools for reducing photo file sizes, offering a range of features to optimize images for various purposes. These tools provide control over dimensions, resolution, file format, and compression levels, allowing users to strike the right balance between file size and image quality.
7.1. What Are The Popular Image Editing Software Options?
| Software | Description |
|---|---|
| Adobe Photoshop | Industry-standard software offering advanced editing capabilities, including resizing, cropping, color correction, and compression settings. It supports various file formats and provides precise control over image quality and file size. |
| Adobe Lightroom | Primarily used for photo editing and management, Lightroom allows users to adjust image settings such as exposure, contrast, and white balance. It also includes features for resizing and exporting images with different compression levels, making it suitable for optimizing large batches of photos. |
| GIMP | A free and open-source image editor that offers many of the same features as Photoshop. GIMP supports resizing, cropping, color correction, and various file formats. It provides options for adjusting compression levels and optimizing images for web use. |
| Affinity Photo | A professional image editing software that offers similar capabilities to Photoshop at a lower price point. Affinity Photo supports resizing, cropping, color correction, and advanced editing techniques. It also includes features for optimizing images for different platforms and devices. |
| Online Image Resizers | Web-based tools that allow users to quickly resize and compress images without the need to download or install any software. These tools typically offer basic editing features and options for adjusting compression levels, making them suitable for quick optimization tasks. |
7.2. What Features Should I Look For In An Image Editor For File Size Reduction?
- Resizing: Reducing the dimensions of an image can significantly decrease its file size.
- Cropping: Removing unnecessary parts of an image can help reduce its file size.
- Compression Settings: Adjusting the compression level allows you to balance file size and image quality.
- File Format Conversion: Converting an image to a more efficient format (e.g., JPEG to WebP) can reduce its file size without significant quality loss.
- Color Depth Reduction: Reducing the number of colors in an image can help decrease its file size, especially for graphics and illustrations.
- Metadata Removal: Removing unnecessary metadata (e.g., camera settings, location data) can slightly reduce file size.
- Batch Processing: Optimizing multiple images at once can save time and effort.
7.3. How To Resize Images In Image Editors?
Resizing images in image editors involves adjusting the dimensions (width and height) of the image. Here’s how to do it in some popular image editors:
7.3.1. Adobe Photoshop
- Open Image: Open your image in Photoshop.
- Image Size: Go to
Image > Image Size. - Enter Dimensions: Enter the desired width and height in the respective fields. Make sure the “Resample” option is checked and choose an appropriate resampling method (e.g., Bicubic Smoother for enlargement, Bicubic Sharper for reduction).
- Save: Save the resized image with a new name to preserve the original.
7.3.2. GIMP
- Open Image: Open your image in GIMP.
- Scale Image: Go to
Image > Scale Image. - Enter Dimensions: Enter the desired width and height in the respective fields.
- Scale: Click the “Scale” button.
- Export: Export the resized image to a new file.
7.3.3. Online Image Resizers
- Upload Image: Go to an online image resizer website (e.g., TinyPNG, ImageResizer).
- Enter Dimensions: Enter the desired width and height.
- Resize: Click the “Resize” or “Apply” button.
- Download: Download the resized image.
7.4. How To Crop Images In Image Editors?
Cropping involves removing unnecessary parts of an image to focus on the subject and reduce file size. Here’s how to do it in some popular image editors:
7.4.1. Adobe Photoshop
- Open Image: Open your image in Photoshop.
- Select Crop Tool: Select the “Crop Tool” from the toolbar.
- Draw Crop Area: Drag the crop tool over the area you want to keep.
- Adjust Crop: Adjust the crop area by dragging the edges or corners.
- Apply Crop: Press Enter or click the checkmark in the options bar to apply the crop.
- Save: Save the cropped image with a new name to preserve the original.
7.4.2. GIMP
- Open Image: Open your image in GIMP.
- Select Crop Tool: Select the “Crop Tool” from the toolbar.
- Draw Crop Area: Drag the crop tool over the area you want to keep.
- Adjust Crop: Adjust the crop area by dragging the edges or corners.
- Apply Crop: Press Enter or double-click inside the crop area to apply the crop.
- Export: Export the cropped image to a new file.
7.4.3. Online Image Resizers
- Upload Image: Go to an online image resizer website (e.g., iLoveIMG, OnlineConvert).
- Select Crop Tool: Select the “Crop” tool.
- Draw Crop Area: Drag the crop tool over the area you want to keep.
- Adjust Crop: Adjust the crop area by dragging the edges or corners.
- Apply Crop: Click the “Crop” or “Apply” button.
- Download: Download the cropped image.
7.5. How To Adjust Compression Settings In Image Editors?
Adjusting compression settings involves choosing the right balance between file size and image quality. Here’s how to do it in some popular image editors:
7.5.1. Adobe Photoshop
- Open Image: Open your image in Photoshop.
- Save for Web: Go to
File > Export > Save for Web (Legacy). - Choose File Format: Choose the file format (e.g., JPEG, PNG, GIF).
- Adjust Quality: Adjust the quality slider to balance file size and image quality.
- Save: Click “Save” and choose a location to save the optimized image.
7.5.2. GIMP
- Open Image: Open your image in GIMP.
- Export: Go to
File > Export As. - Choose File Format: Choose the file format (e.g., JPEG, PNG, GIF).
- Adjust Quality: Adjust the quality settings in the export dialog.
- Export: Click “Export” to save the optimized image.
7.5.3. Online Image Compressors
- Upload Image: Go to an online image compressor website (e.g., TinyPNG, JPEG Optimizer).
- Upload Image: Upload your image.
- Adjust Settings: Adjust the compression settings if available.
- Download: Download the compressed image.
8. What Are Online Tools For Compressing Photo File Sizes?
Online tools offer a convenient way to compress photo file sizes without the need for software installation. These tools are particularly useful for quick optimization tasks, making them accessible to a wide range of users.
8.1. What Are Some Popular Online Image Compression Tools?
| Tool | Description | Key Features |
|---|---|---|
| TinyPNG | A popular online tool that uses smart lossy compression techniques to reduce the file size of PNG images. It also supports JPEG compression. | Supports both PNG and JPEG, simple and easy to use, batch compression, integrates with WordPress. |
| JPEG Optimizer | An online tool specifically designed for compressing JPEG images. It allows users to adjust the compression level and preview the results before downloading. | JPEG-specific compression, adjustable compression levels, preview option, supports various image formats. |
| Compress JPEG | A web-based tool that offers lossy compression for JPEG images. It allows users to compress multiple images at once and download them as a ZIP file. | Batch compression, easy to use, supports JPEG format, ZIP file download. |
| iLoveIMG | A comprehensive online image editing and compression tool. It offers various features, including resizing, cropping, converting, and optimizing images. | Multiple image editing tools, resizing, cropping, converting, compression, batch processing. |
| OnlineConvert | An online file conversion tool that supports a wide range of image formats. It allows users to convert and compress images with different settings and options. | Wide range of supported formats, conversion and compression, various settings and options, easy to use. |
| ImageResizer | A web-based tool that allows users to resize and compress images online. It offers options for adjusting the dimensions, quality, and file format of the images. | Resizing and compression, adjustable dimensions and quality, supports various file formats, simple interface. |
| Kraken.io | A premium online image optimization tool that offers both lossy and lossless compression options. It integrates with various platforms and provides advanced features for optimizing images for web use. | Lossy and lossless compression, integrates with various platforms, advanced optimization features, API access. |
| Optimizilla | An online image optimizer that uses a combination of lossy and lossless compression algorithms to reduce the file size of JPEG and PNG images. It allows users to adjust the compression level and preview the results. | Lossy and lossless compression, supports JPEG and PNG, adjustable compression levels, preview option. |
8.2. How To Use Online Tools For Image Compression?
- Choose a Tool: Select an online image compression tool from the list above.
- Upload Image: Go to the website and upload the image you want to compress.
- Adjust Settings: If available, adjust the compression settings to balance file size and image quality.
- Compress Image: Click the “Compress” or “Optimize” button.
- Download Image: Download the compressed image to your computer.
8.3. What Are The Limitations Of Using Online Tools?
- Internet Dependency: Online tools require an internet connection to function.
- File Size Limits: Some tools may have limitations on the maximum file size of the images you can upload.
- Privacy Concerns: Uploading images to online tools may raise privacy concerns, especially for sensitive or confidential images.
- Limited Features: Online tools typically offer fewer features and customization options compared to desktop software.
- Adware and Malware: Some online tools may contain adware or malware, so it’s important to choose reputable and trustworthy websites.
9. What Are Batch Processing Techniques For Multiple Photos?
Batch processing techniques allow you to optimize multiple photos at once, saving time and effort. These techniques are particularly useful when dealing with large batches of images for web use or archiving.
9.1. How To Use Batch Processing In Image Editing Software?
| Software | Description | Steps |
|---|---|---|
| Adobe Photoshop | Photoshop allows you to automate tasks using Actions, which can be applied to multiple images at once. | 1. Open Photoshop and go to Window > Actions. 2. Create a new Action set and a new Action. 3. Record the steps you want to apply to the images (e.g., resizing, compression). 4. Go to File > Automate > Batch. 5. Select the Action set and Action you created. 6. Choose the source folder and destination folder. 7. Click “OK” to start the batch process. |
| Adobe Lightroom | Lightroom offers batch processing capabilities through its Develop module, allowing you to apply the same settings to multiple images. | 1. Open Lightroom and import the images you want to process. 2. Select the first image and apply the desired settings in the Develop module. 3. Select all the images you want to process. 4. Click the “Sync” button and choose the settings you want to synchronize. 5. Click “Synchronize” to apply the settings to all selected images. |
| GIMP | GIMP provides batch processing capabilities through its Batch Image Manipulation Plugin (BIMP). | 1. Install the BIMP plugin. 2. Open GIMP and go to File > Batch Image Manipulation. 3. Add the images you want to process. 4. Add the operations you want to perform (e.g., resizing, compression). 5. Configure the settings for each operation. 6. Click “Apply” to start the batch process. |
| Online Image Tools | Some online image tools also offer batch processing capabilities, allowing you to upload and optimize multiple images at once. | 1. Choose an online image tool that supports batch processing (e.g., iLoveIMG, Compress JPEG). 2. Upload the images you want to process. 3. Configure the settings for the batch process (e.g., resizing, compression). 4. Click “Start” or “Process” to begin the batch process. 5. Download the optimized images as a ZIP file. |
9.2. What Are The Benefits Of Batch Processing?
- Time Savings: Batch processing saves time by automating repetitive tasks.
- Consistency: Applying the same settings to multiple images ensures consistency in file size and image quality.
- Efficiency: Batch processing improves efficiency by optimizing multiple images in a single operation.
- Organization: Batch processing helps keep your images organized by processing them in batches.
10. How Does Image Optimization Affect Website Loading Speed?
Image optimization plays a crucial role in improving website loading speed. Optimized images load faster, resulting in a better user experience and improved SEO rankings.
10.1. Why Is Website Loading Speed Important?
- User Experience: Faster loading speeds lead to a better user experience, reducing bounce rates and increasing engagement.
- SEO Rankings: Search engines like Google consider website loading speed as a ranking factor. Faster websites rank higher in search results.
- Conversion Rates: Faster loading speeds can improve conversion rates by reducing the likelihood of users abandoning the website before completing a purchase or filling out a form.
- Mobile Optimization: With the increasing use of mobile devices, optimizing images for faster loading speeds is essential for mobile users.
- Bandwidth Usage: Optimized images reduce bandwidth usage, saving on hosting costs and improving the overall performance of the website.
10.2. How To Test Website Loading Speed And Identify Image Optimization Opportunities?
- Google PageSpeed Insights: A tool that analyzes the content of a web page and provides suggestions for improving its loading speed, including image optimization opportunities.
- GTmetrix: A popular website speed testing tool that provides detailed insights into website performance, including image optimization recommendations.
- WebPageTest: A tool that allows you to test the loading speed of a website from different locations and browsers, providing detailed performance metrics and image optimization suggestions.
10.3. What Are The Best Practices For Optimizing Images For The Web?
- Choose the Right File Format: Use JPEG for photographs and PNG for graphics with text and transparency.
- Resize Images: Resize images to the appropriate dimensions for web use.
- Compress Images: Use lossy compression to reduce file size without significant quality loss.
- Optimize Images for Retina Displays: Provide high-resolution images for retina displays while optimizing them for faster loading speeds.
- Use Lazy Loading: Implement lazy loading to load images only when they are visible in the viewport.
- Use a Content Delivery Network (CDN): Use a CDN to serve images from servers located closer to your users, reducing latency and improving loading speeds.
- Specify Image Dimensions: Specify the width and height of images in the HTML code to prevent layout shifts and improve loading performance.
By following these best practices, you can optimize images for the web and improve website loading speed.
dfphoto.net offers a wealth of resources to help you master these techniques. Visit our website at 1600 St Michael’s Dr, Santa Fe, NM 87505, United States or call us at +1 (505) 471-6001 to learn more. Our tutorials, articles, and community forums provide the support you need to enhance your photography skills.
FAQ: Shrinking Photo File Size
1. How Do I Reduce The File Size Of A Photo Without Losing Quality?
Use lossless compression methods or save the image in a more efficient format like WebP.
2. What Is The Best Image Format For Reducing File Size?
JPEG for photos and PNG for graphics with text or transparency. WebP is also an excellent option for both.
3. How Can I Compress An Image On My Phone?
Use mobile apps like Adobe Lightroom Mobile or online tools via your phone’s browser.
4. Is It Better To Resize Or Compress An Image?
Both. Resize to the required dimensions and then compress to reduce the file size further.
5. How Do I Reduce The File Size Of A JPEG Without Losing Quality?
Adjust the compression settings in your image editor to find the optimal balance between file size and quality.
6. What Is The Ideal Resolution For Web Images?
72 DPI is generally sufficient for web images.
7. How Can I Reduce The Size Of Multiple Images At Once?
Use batch processing in image editing software like Photoshop or Lightroom.
8. What Are The Best Online Image Compression Tools?
TinyPNG, Compress JPEG, and iLoveIMG are popular choices.
9. How Does Image Optimization Affect SEO?
Optimized images improve website loading speed, which is a ranking factor for search engines.
10. Why Are My Photos Still Large After Compression?
Check if you’re using the right file format and compression settings