Are you wondering How To See Your Hidden Photos? It’s simpler than you think and dfphoto.net is here to guide you through every step of the process. Discovering your concealed images involves understanding the settings on your device and knowing where to look. Once found, explore enhanced methods for visual storytelling through unhidden, artfully curated albums using light and composition techniques.
1. Understanding Photo Hiding Techniques
Photo hiding is a common practice for maintaining privacy or organizing your photo library. Whether you’re using an iPhone, iPad, Mac, or Apple Vision Pro, each device offers ways to conceal photos. Understanding these methods is the first step in learning how to see your hidden photos.
1.1 Why Hide Photos?
People hide photos for various reasons, including:
- Privacy: Keeping sensitive or personal photos away from prying eyes.
- Organization: Decluttering the main photo library by moving less important images to a hidden album.
- Surprise: Concealing photos intended for a surprise reveal.
1.2 Common Photo Hiding Methods
The most common method involves using the built-in “Hide” feature in the Photos app on Apple devices. This moves selected photos to a “Hidden” album. Additionally, third-party apps offer more advanced hiding options, such as password protection and encryption.
1.3 Security Measures
In recent iOS, iPadOS, and macOS versions, the “Hidden” album is locked by default, requiring Face ID, Touch ID, or a password to access it. This adds an extra layer of security, ensuring that only authorized users can view the hidden photos.
2. How to See Your Hidden Photos on iPhone and iPad
Finding your hidden photos on an iPhone or iPad is straightforward. Here’s how:
2.1 Step-by-Step Guide
- Open Photos: Launch the Photos app on your iPhone or iPad.
- Navigate to Albums: On iPad, tap the sidebar icon in the upper-left corner if needed.
- Scroll to Utilities: Look for the “Utilities” section and tap “Hidden.”
- Unlock the Album: Use Face ID, Touch ID, or your passcode to unlock the “Hidden” album.
- View Your Photos: Browse the photos and videos in the album.
2.2 Turning Off Hidden Album Visibility
For added privacy, you can turn off the visibility of the “Hidden” album:
- Go to Settings: Open the Settings app.
- Select Photos: Scroll down and tap “Photos.”
- Toggle “Show Hidden Album”: Turn off the “Show Hidden Album” option.
When this setting is disabled, the “Hidden” album will not appear in the Photos app, making it even more difficult for others to find your hidden photos.
2.3 Unhiding Photos
If you want to move a photo from the “Hidden” album back to your main library:
- Open the Hidden Album: Follow the steps above to access the “Hidden” album.
- Select the Photo: Tap and hold the photo or video you want to unhide.
- Tap “Unhide”: Choose the “Unhide” option. The photo will be moved back to your main library and albums.
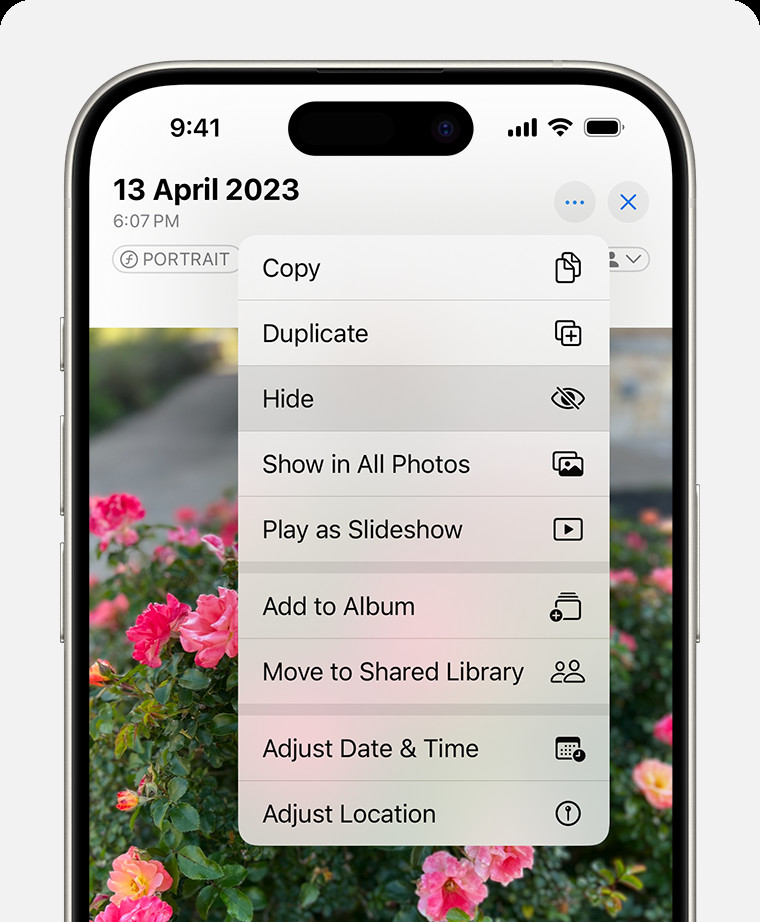 Dropdown menu highlighting the Hide feature feature for a photo
Alt text: Unhiding a photo on an iPhone using the Hide feature, selecting Unhide from the options.
3. How to See Your Hidden Photos on Mac
Accessing hidden photos on a Mac is slightly different but equally simple.
3.1 Step-by-Step Guide
- Open Photos: Launch the Photos app on your Mac.
- Show Hidden Photo Album: In the menu bar, click “View” and select “Show Hidden Photo Album.”
- Navigate to Hidden: In the sidebar, under “Photos,” you will see the “Hidden” album.
- Unlock the Album: Click “View Album” and use Touch ID or your login password to unlock it.
- View Your Photos: Browse the photos and videos in the album.
3.2 Turning Off Hidden Album Visibility
By default, the “Hidden” album is off on Mac. To turn it on or off:
- Open Photos: Launch the Photos app.
- Show/Hide Hidden Photo Album: In the menu bar, click “View” and select “Show Hidden Photo Album” to toggle its visibility.
When the “Hidden” album is off, it will not appear in the sidebar, providing an extra layer of privacy.
3.3 Unhiding Photos
To unhide a photo on your Mac:
- Open the Hidden Album: Follow the steps above to access the “Hidden” album.
- Select the Photo: Choose the photo or video you want to unhide.
- Unhide Photo: Control-click the photo, then choose “Unhide Photo.” Alternatively, you can select “Image” > “Unhide Photo” from the menu bar, or press Command-L. The photo will be moved back to your main library.
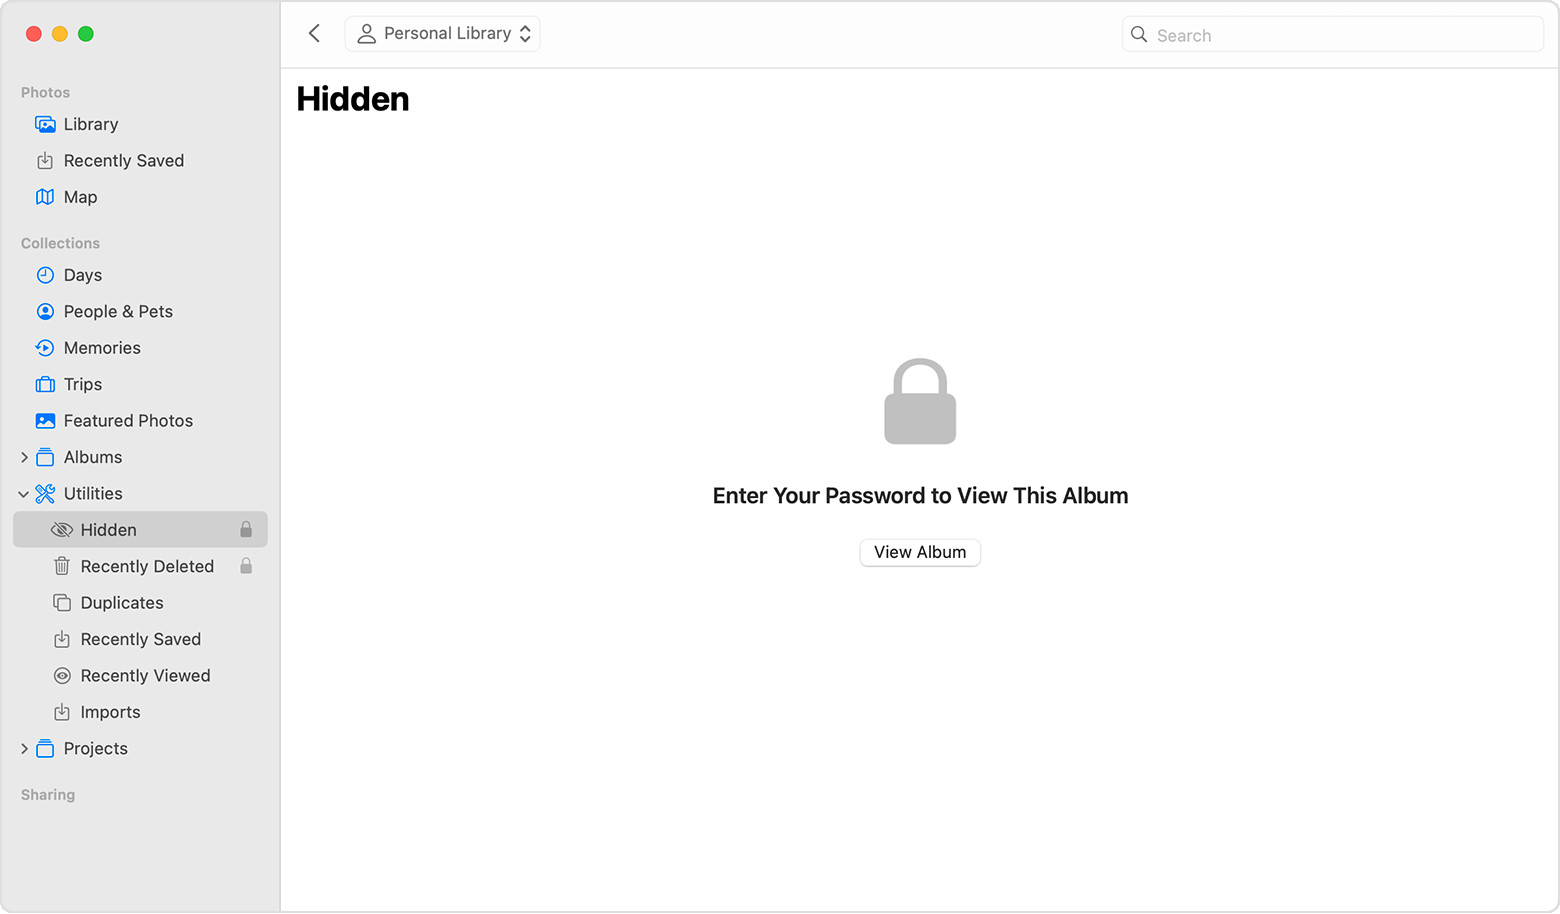 Hidden album highlighted in MacOS Photos app
Alt text: Locating the Hidden Album in the MacOS Photos app through the View menu.
4. How to See Your Hidden Photos on Apple Vision Pro
The process for accessing hidden photos on Apple Vision Pro is similar to that on iPhone and iPad.
4.1 Step-by-Step Guide
- Open Photos: Launch the Photos app on your Apple Vision Pro.
- Tap Collections: Tap the “Collections” tab in the sidebar.
- Scroll to Utilities: Scroll down and tap “Hidden” in the “Utilities” section.
- View Your Photos: Browse the photos and videos in the album.
4.2 Turning Off Hidden Album Visibility
To turn off the visibility of the “Hidden” album on Apple Vision Pro:
- Go to Settings: Open the Settings app.
- Select Apps: Tap “Apps,” then tap “Photos.”
- Toggle “Show Hidden Album”: Turn off the “Show Hidden Album” option.
4.3 Unhiding Photos
To unhide a photo on your Apple Vision Pro:
- Open the Hidden Album: Follow the steps above to access the “Hidden” album.
- Select the Photo: Tap and hold the photo or video you want to unhide.
- Tap “Unhide”: Tap the “Unhide” option. The photo will be moved back to your main library.
5. Advanced Photo Management Tips
Beyond just hiding and unhiding photos, there are several advanced techniques you can use to manage your photo library effectively.
5.1 Using Third-Party Apps
Several third-party apps offer enhanced photo management features, including:
- Password Protection: Apps like “Lock Photos” and “Keepsafe” allow you to password-protect your hidden photos.
- Encryption: Some apps encrypt your photos, making them unreadable without the correct decryption key.
- Cloud Storage: Apps like “Google Photos” and “Dropbox” offer secure cloud storage for your photos, with options to hide specific folders or albums.
5.2 Creating Custom Albums
Organizing your photos into custom albums can make it easier to find and manage them:
- Open Photos: Launch the Photos app.
- Create New Album: Tap the “+” icon and select “New Album.”
- Name the Album: Give your album a descriptive name.
- Add Photos: Select the photos you want to add to the album.
5.3 Utilizing Smart Albums
Smart Albums automatically organize photos based on criteria you set, such as date, location, or keywords. To create a Smart Album on Mac:
- Open Photos: Launch the Photos app.
- Create Smart Album: Select “File” > “New Smart Album.”
- Set Criteria: Define the criteria for the album, such as “Date is in the last 30 days” or “Keyword is ‘Vacation’.”
5.4 Metadata Management
Metadata includes information about your photos, such as date taken, location, and camera settings. Managing metadata can help you organize and search your photos more effectively:
- Adding Keywords: Assign keywords to your photos to make them easier to find.
- Editing Dates and Locations: Correct any errors in the date or location information.
- Using IPTC Metadata: IPTC metadata includes copyright information and descriptions, which can be useful for professional photographers.
6. Understanding User Search Intent
When users search for “how to see your hidden photos,” they typically have one of the following intents:
- Instructional: They need a step-by-step guide on how to access their hidden photos on their specific device (iPhone, iPad, Mac, Apple Vision Pro).
- Troubleshooting: They are having trouble finding the “Hidden” album or unlocking it.
- Privacy Concerns: They want to ensure that their hidden photos are secure and not accessible to others.
- Recovery: They have forgotten how to access their hidden photos and need a reminder.
- Information: They want to learn more about the photo hiding features available on their devices.
7. SEO Optimization for “How to See Your Hidden Photos”
To rank well for the keyword “how to see your hidden photos,” it’s important to optimize your content for search engines.
7.1 Keyword Placement
Use the keyword “how to see your hidden photos” naturally throughout your content, including:
- Title: Include the keyword in your title tag.
- Headings: Use the keyword in your headings and subheadings.
- Body Text: Incorporate the keyword into your body text, but avoid keyword stuffing.
- Image Alt Text: Use the keyword in the alt text of relevant images.
Santa Fe University of Art and Design’s Photography Department suggests optimizing your image alt text to improve your site’s visibility.
7.2 Semantic Keywords
In addition to the primary keyword, use semantic keywords to provide context and improve search engine understanding:
- “Hidden album”
- “iPhone photos”
- “iPad photos”
- “Mac photos”
- “Apple Vision Pro photos”
- “Photo privacy”
- “Photo management”
7.3 LSI Keywords
LSI (Latent Semantic Indexing) keywords are related terms that help search engines understand the topic of your content:
- “Unhide photos”
- “Access hidden photos”
- “Find hidden photos”
- “View hidden photos”
- “Photo security”
- “Protect photos”
7.4 On-Page Optimization
Optimize your content for on-page SEO by:
- Using Descriptive URLs: Create URLs that include your primary keyword.
- Writing a Compelling Meta Description: Entice users to click on your search result.
- Using Internal Links: Link to other relevant content on your website.
- Using External Links: Link to authoritative sources to improve credibility.
7.5 E-E-A-T Principles
Adhere to Google’s E-E-A-T (Experience, Expertise, Authoritativeness, and Trustworthiness) principles by:
- Demonstrating Experience: Share your own experiences with photo management and privacy.
- Showcasing Expertise: Provide accurate and detailed information about photo hiding techniques.
- Building Authoritativeness: Cite reputable sources and experts in the field.
- Establishing Trustworthiness: Ensure that your content is accurate, up-to-date, and unbiased.
8. The Benefits of DFphoto.net
dfphoto.net offers a wealth of resources for photographers and photo enthusiasts. By visiting our website, you can:
- Learn New Techniques: Access detailed tutorials on various photography techniques, including composition, lighting, and editing.
- Find Inspiration: Browse our gallery of stunning photos from talented photographers around the world.
- Connect with the Community: Join our forum to connect with other photographers, share your work, and get feedback.
- Stay Up-to-Date: Read our blog for the latest news and trends in the photography industry.
9. Call to Action
Ready to take your photography skills to the next level? Visit dfphoto.net today to discover a world of resources, inspiration, and community. Explore our tutorials, browse our gallery, and join our forum to connect with other photographers. Whether you’re a beginner or a seasoned pro, dfphoto.net has something for everyone.
Address: 1600 St Michael’s Dr, Santa Fe, NM 87505, United States.
Phone: +1 (505) 471-6001.
Website: dfphoto.net.
10. FAQ: How to See Your Hidden Photos
10.1 How do I find the Hidden album on my iPhone?
To find the Hidden album on your iPhone, open the Photos app, go to the Albums tab, scroll down to the Utilities section, and tap Hidden. You may need to use Face ID, Touch ID, or your passcode to unlock it.
10.2 Why can’t I see the Hidden album on my iPad?
If you can’t see the Hidden album on your iPad, make sure the “Show Hidden Album” option is enabled in Settings > Photos. Also, on iPad, you might need to tap the sidebar icon in the upper-left corner to see your albums.
10.3 How do I unhide photos on my Mac?
To unhide photos on your Mac, open the Photos app, go to View > Show Hidden Photo Album, select the Hidden album in the sidebar, unlock the album, select the photo you want to unhide, and then Control-click the photo and choose Unhide Photo.
10.4 Is the Hidden album secure?
Yes, the Hidden album is locked by default on recent iOS, iPadOS, and macOS versions, requiring Face ID, Touch ID, or your passcode to access it.
10.5 Can I hide photos in Google Photos?
Yes, Google Photos has a feature called “Locked Folder” where you can move sensitive photos and videos. These items are protected by your device’s screen lock methods, such as your fingerprint, PIN, or password.
10.6 How do I hide photos on Android?
On Android devices, you can use the built-in “Safe Folder” feature in Google Files or third-party apps like Keepsafe or Lock Photos to hide your photos.
10.7 What happens when I hide a photo?
When you hide a photo, it is moved from your main library to the Hidden album, so it doesn’t appear in your Library, in other albums, or in the Photos widget on your Home Screen.
10.8 How do I turn off the Hidden album?
To turn off the Hidden album, go to Settings > Photos and toggle off the “Show Hidden Album” option. When this setting is disabled, the Hidden album will not appear in the Photos app.
10.9 Will hiding photos on one device hide them on all my devices?
If you use iCloud Photos, the photos that you hide on one device are hidden on your other devices too.
10.10 Can I password protect my Hidden album?
Yes, the Hidden album is locked by default on recent iOS, iPadOS, and macOS versions, requiring Face ID, Touch ID, or your passcode to access it, adding an extra layer of security.
11. Visual Storytelling Through Unhidden Albums
11.1 The Art of Photo Curation
Curating your photos involves selecting and arranging them to tell a story or evoke a specific emotion. According to Popular Photography, an effective photo curation strategy can transform a collection of random images into a cohesive narrative.
11.2 Utilizing Light and Composition
When organizing your unhidden albums, pay close attention to light and composition. Photos with similar lighting conditions or compositional elements can be grouped together to create a visually appealing flow.
11.3 Experimenting with Themes
Consider organizing your photos around specific themes, such as travel, family, or nature. This can help you create albums that are both visually engaging and emotionally resonant.
