Losing precious memories stored on your Samsung phone can be distressing, but don’t worry! With various recovery methods available, you can often retrieve your lost photos. At dfphoto.net, we’re dedicated to helping you navigate the world of photography and data recovery, ensuring your cherished images aren’t lost forever. Whether you’ve accidentally deleted them, experienced a system crash, or encountered any other data loss scenario, we’ll guide you through the steps to recover your pictures and safeguard your visual stories using advanced recovery techniques, data backup strategies, and secure data management.
1. What Are The Common Causes Of Photo Loss On Samsung Phones?
Photo loss on Samsung phones can occur due to various reasons. Accidentally deleting photos is a common issue, but data loss can also result from formatting the device, software issues, or even physical damage. Understanding the cause can help determine the best recovery approach.
Here’s a breakdown of common causes:
- Accidental Deletion: The most frequent cause is unintentionally deleting photos while managing your gallery.
- Formatting the Device: Formatting the phone’s internal storage or SD card erases all data, including photos.
- Software Issues: Bugs, glitches, or failed updates can sometimes lead to data corruption and photo loss.
- Physical Damage: Water damage, a cracked screen, or other physical harm can render the phone’s storage inaccessible.
- Malware or Virus Attacks: Malicious software can corrupt or delete files, including photos.
- Factory Reset: Performing a factory reset without backing up data will erase all content on the phone.
- SD Card Corruption: If photos are stored on an SD card, corruption can lead to data loss.
- Failed Data Transfer: Interrupting the transfer of photos to a computer or other storage device can result in missing files.
2. What Are The First Steps To Take When You Realize Photos Are Missing?
Immediately stop using your Samsung phone to prevent overwriting the lost data. The longer you continue using the phone, the lower your chances of successful photo recovery. Next, check the Recycle Bin or Samsung Cloud for recently deleted items.
Here’s a more detailed approach:
- Stop Using Your Phone: Avoid taking new photos, downloading apps, or any activity that writes data to your phone’s storage. Overwriting the deleted photos makes recovery much harder.
- Check the Recycle Bin: Samsung Gallery usually has a Recycle Bin or Trash folder where deleted photos are temporarily stored (typically for 30 days).
- Check Samsung Cloud: If you have Samsung Cloud enabled, your photos might be backed up there.
- Check Google Photos: Similarly, if you use Google Photos, look for your photos in the app or on the Google Photos website.
- Do Not Install Recovery Apps on Your Phone: Avoid downloading and installing recovery apps directly onto your phone, as this can also overwrite data. Use a computer for recovery if possible.
- Note the Details: Remember when the photos were deleted or lost, and any actions you took before the loss. This information can be helpful for recovery tools.
3. How Can I Recover Photos From The Samsung Recycle Bin?
Samsung phones have a Recycle Bin in the Gallery app where deleted photos are temporarily stored. Open the Gallery app, navigate to the Recycle Bin, select the photos you want to restore, and tap the Restore option.
Here’s a step-by-step guide:
- Open the Gallery App: Launch the Gallery application on your Samsung phone.
- Access the Recycle Bin:
- Tap the Menu icon (usually three horizontal lines or dots) typically located at the bottom right corner of the screen.
- Look for an option like Recycle Bin, Trash, or Recently Deleted.
- Select Photos to Restore:
- In the Recycle Bin, you will see a list of recently deleted photos and videos.
- Tap and hold on a photo to select it.
- You can select multiple photos by tapping on each one.
- Restore the Photos:
- Once you have selected the photos you want to recover, look for a Restore option. This might be a button or an icon.
- Tap the Restore option to move the selected photos back to their original folders in the Gallery.
- Verify Recovery:
- Go back to the main Gallery view and check the folders where the photos were originally stored.
- Confirm that the restored photos are now visible and accessible.
Keep in mind:
- Time Limit: Photos in the Recycle Bin are typically stored for 30 days (this can vary). After this period, they are permanently deleted.
- Storage: Ensure your Gallery app has enough storage space to restore the photos.
- Visibility: If you don’t see the Recycle Bin, make sure the Gallery app is updated to the latest version.
4. How Do I Use Samsung Cloud To Restore Lost Photos?
If you have Samsung Cloud enabled, you can restore your photos from a recent backup. Go to Settings, tap Accounts and Backup, select Samsung Cloud, and choose Restore Data. Select Gallery and any other relevant data types, then tap Restore.
Here’s a more detailed explanation:
- Open Settings:
- Navigate to and open the Settings app on your Samsung phone.
- Go to Accounts and Backup:
- Scroll down and tap on Accounts and Backup. This option may also be labeled as Cloud and Accounts on some devices.
- Select Samsung Cloud:
- Under Accounts and Backup, tap on Samsung Cloud. You may need to log in with your Samsung account if you haven’t already.
- Choose Restore Data:
- In the Samsung Cloud settings, find and tap the Restore Data option.
- Select the Device Backup:
- You will see a list of available backups. Choose the most recent backup that contains the photos you want to restore.
- Choose Gallery and Other Relevant Data Types:
- You will see a list of data types that can be restored. Select Gallery to restore your photos. You can also select other data types like Videos, Settings, etc., if needed.
- Make sure only the Gallery option is selected to avoid restoring unnecessary data.
- Tap Restore:
- After selecting the data types, tap the Restore button.
- Wait for the Restore Process to Complete:
- The restore process may take some time, depending on the size of the backup. Make sure your phone is connected to Wi-Fi and has sufficient battery or is plugged into a charger.
- Do not interrupt the restore process.
- Verify Recovery:
- Once the restore is complete, open the Gallery app to check if your photos have been restored.
- Also, verify other restored data to ensure everything is in place.
 Samsung Cloud settings showing backup and restore options
5. How Does Google Photos Help In Recovering Deleted Photos?
Google Photos automatically backs up your photos if you have enabled the sync feature. Open the Google Photos app, check the Trash folder for recently deleted items, and restore them. Also, ensure your photos are backed up to the cloud by checking the Backup & Sync settings.
Here’s how to recover deleted photos from Google Photos:
- Open Google Photos:
- Launch the Google Photos app on your Samsung phone.
- Check the Trash/Bin:
- Tap the Library icon at the bottom right of the screen.
- Select Trash or Bin. This is where deleted photos and videos are temporarily stored.
- Select Photos to Restore:
- In the Trash/Bin, you will see a list of recently deleted photos and videos.
- Tap and hold on a photo to select it.
- You can select multiple photos by tapping on each one.
- Restore the Photos:
- Once you have selected the photos you want to recover, tap the Restore option at the bottom of the screen.
- This will move the selected photos back to their original folders in the Google Photos library.
- Verify Recovery:
- Go back to the Photos tab to check if your restored photos are now visible and accessible.
To ensure your photos are backed up automatically:
- Open Google Photos:
- Launch the Google Photos app on your Samsung phone.
- Access Settings:
- Tap on your Profile icon (or initial) at the top right of the screen.
- Select Photos settings.
- Check Backup & Sync:
- Tap on Backup & sync.
- Ensure that the Backup & sync toggle is turned on.
- Verify the Google Account being used for backup is correct.
- Configure Backup Settings:
- You can also configure settings like Upload size (choose between Original Quality and Storage Saver) and Back up over mobile data (enable or disable based on your data plan).
6. What Is The Role Of Data Recovery Software In Photo Recovery?
Data recovery software can scan your phone’s internal storage or SD card to find deleted or lost photos that are not recoverable through other methods. Connect your phone to a computer, run the software, and follow the instructions to scan and recover your files.
Here’s a more detailed explanation:
- Choose a Data Recovery Software:
- Select a reputable data recovery software that supports Android devices. Some popular options include:
- EaseUS MobiSaver for Android
- Dr.Fone – Data Recovery (Android)
- iMobie PhoneRescue for Android
- Recuva (if connecting the phone as a storage device)
- Select a reputable data recovery software that supports Android devices. Some popular options include:
- Download and Install the Software:
- Download the data recovery software on your computer from the official website.
- Install the software following the on-screen instructions.
- Enable USB Debugging on Your Samsung Phone:
- To allow the data recovery software to access your phone’s storage, you need to enable USB Debugging.
- Go to Settings on your Samsung phone.
- Scroll down and tap on About phone.
- Tap on Software information.
- Tap on Build number seven times until you see a message saying “Developer mode has been enabled.”
- Go back to Settings, and you will now see Developer options.
- Tap on Developer options and turn on USB debugging.
- When prompted, tap OK to allow USB debugging.
- Connect Your Samsung Phone to Your Computer:
- Use a USB cable to connect your Samsung phone to your computer.
- When prompted on your phone, select Transfer files or MTP (Media Transfer Protocol).
- Launch the Data Recovery Software:
- Open the data recovery software on your computer.
- Select Your Device:
- The software should detect your connected Samsung phone. Select your device from the list.
- Start Scanning:
- Click the Start or Scan button to begin scanning your phone for deleted or lost photos.
- The software will analyze the phone’s storage and look for recoverable files. This process may take some time, depending on the storage size and the extent of data loss.
- Preview and Recover Photos:
- Once the scan is complete, the software will display a list of recoverable files, including photos.
- Preview the photos to make sure they are the ones you want to recover.
- Select the photos you want to recover and click the Recover button.
- Choose a Recovery Location:
- Select a folder on your computer to save the recovered photos.
- It’s important to choose a different drive or location than the one you are recovering from to avoid overwriting data.
- Complete the Recovery:
- The software will recover the selected photos and save them to the specified location.
- Once the recovery is complete, verify that the photos are intact and accessible in the recovery folder.
7. Are There Free Data Recovery Software Options Available?
Yes, several free data recovery software options are available. However, they often have limitations on the amount of data you can recover. Recuva, TestDisk, and PhotoRec are a few popular free tools you can try.
Here’s a comparison of some free data recovery software options:
| Software | Pros | Cons |
|---|---|---|
| Recuva | User-friendly interface, deep scan mode, recovers from various storage devices. | Limited advanced features, can struggle with severely damaged files. |
| TestDisk | Powerful, open-source, recovers partitions and boot sectors, supports various file systems. | Command-line interface, steep learning curve for beginners. |
| PhotoRec | Excellent for photo recovery, bypasses file system for deeper scan, supports numerous file formats. | Command-line interface, recovers all files without specific file names. |
| Disk Drill | Simple interface, quick and deep scan options, preview before recovery. | Free version has a data recovery limit (typically 500MB), full version required for unlimited use. |
| Wise Data Recovery | Fast scanning speed, simple and clean interface, recovers from local drives and removable devices. | Limited advanced features compared to paid software, may not recover all file types effectively. |
8. How Can An SD Card Affect Photo Recovery On A Samsung Phone?
If your photos were stored on an SD card, removing the card and using a card reader with data recovery software on a computer can sometimes yield better results. SD cards can become corrupted, so it’s important to handle them carefully.
Here are some additional considerations regarding SD cards and photo recovery:
- SD Card Corruption: SD cards are prone to corruption due to various factors such as improper removal, power surges, or physical damage. If the SD card is corrupted, it might not be readable by your phone or computer, making photo recovery more challenging.
- Using a Card Reader: Using a card reader to connect the SD card directly to your computer can improve the chances of successful photo recovery. Card readers provide a stable connection and can sometimes bypass issues that occur when connecting the phone directly.
- Scanning with Data Recovery Software: When using data recovery software, make sure to select the correct drive corresponding to the SD card. Scanning the entire drive can take a significant amount of time, so it’s essential to be patient and let the software complete the process.
- Avoid Writing New Data: As with internal storage, avoid writing new data to the SD card after realizing that photos are lost. Adding new files can overwrite the deleted photos, making them unrecoverable.
- Check for Physical Damage: Inspect the SD card for any signs of physical damage, such as cracks or bends. If the card is physically damaged, it might not be possible to recover the photos.
- Professional Recovery Services: In severe cases of SD card corruption or physical damage, consider seeking professional data recovery services. These services have specialized tools and expertise to recover data from damaged storage devices.
9. What Is The Best Way To Prevent Future Photo Loss?
Regularly back up your photos to multiple locations, such as Samsung Cloud, Google Photos, or an external hard drive. Enabling automatic backup features can ensure that your photos are always safe. Also, be careful when deleting files and consider using an SD card from a reputable brand.
Here’s a more comprehensive strategy for preventing future photo loss:
- Enable Automatic Cloud Backups:
- Samsung Cloud:
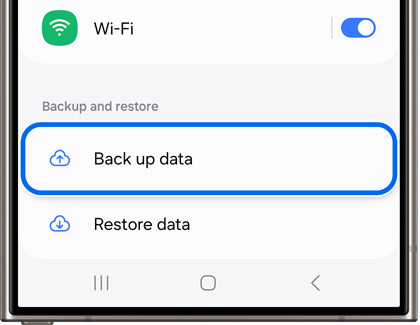
- Go to Settings > Accounts and Backup > Samsung Cloud > Back up data.
- Enable automatic backups and select the data types you want to back up, including Gallery (photos and videos).
- Google Photos:
- Open the Google Photos app.
- Tap on your Profile icon > Photos settings > Backup & sync.
- Ensure that Backup & sync is turned on.
- Samsung Cloud:
- Use Multiple Backup Locations:
- Cloud Storage: Use cloud services like Samsung Cloud, Google Photos, Dropbox, or OneDrive to automatically back up your photos.
- External Hard Drive: Regularly copy your photos to an external hard drive or SSD.
- Computer: Periodically transfer your photos to your computer and create backups on a separate drive or partition.
- Regularly Check Your Backups:
- Make sure your backups are running correctly and that your photos are being stored safely.
- Periodically verify that you can access and restore your photos from your backups.
- Be Careful When Deleting Photos:
- Double-check before deleting photos to ensure you are not accidentally deleting important files.
- Utilize the Recycle Bin feature in the Gallery app to temporarily store deleted photos in case you need to restore them.
- Use a Reputable SD Card:
- Choose SD cards from reputable brands like SanDisk, Samsung, or Lexar.
- Avoid using cheap or generic SD cards, as they are more prone to corruption and data loss.
- Safely Remove SD Cards:
- Always unmount the SD card before physically removing it from your phone to prevent data corruption.
- Go to Settings > Storage > Unmount or Eject.
- Protect Against Malware:
- Install a reputable antivirus app on your Samsung phone to protect against malware and viruses that can corrupt or delete your photos.
- Keep your antivirus app updated and regularly scan your phone for threats.
- Keep Your Phone Updated:
- Install the latest software updates for your Samsung phone to ensure you have the latest security patches and bug fixes.
- Software updates can improve the stability and performance of your phone, reducing the risk of data loss.
- Educate Yourself and Others:
- Stay informed about best practices for data protection and share this knowledge with family and friends.
- The more you know about preventing data loss, the better equipped you will be to protect your photos.
10. When Should I Consider Professional Data Recovery Services?
If you’ve tried all DIY methods and still can’t recover your photos, or if your phone has significant physical damage, consider professional data recovery services. These services have specialized tools and expertise to recover data from severely damaged devices.
Here are situations when professional data recovery is advisable:
- Physical Damage: If your phone has suffered severe physical damage (e.g., water damage, broken screen, crushed device), professional services are often necessary.
- Complex Data Loss Scenarios: If the data loss is due to complex issues like file system corruption, firmware problems, or failed software updates, professional data recovery experts can help.
- Unsuccessful DIY Attempts: If you have tried multiple DIY methods and none have worked, it’s best to seek professional help to avoid further damage or data loss.
- Valuable Data: If the photos are extremely valuable or irreplaceable (e.g., family memories, important documents), professional recovery services can provide a higher chance of successful recovery.
- Encrypted Data: If your phone’s storage is encrypted and you cannot access the data, professional services may have the tools to decrypt and recover the files.
- Storage Device Failure: If the internal storage or SD card has failed, professional data recovery experts can use specialized equipment to attempt data retrieval.
To find a reputable data recovery service, consider the following:
- Research and Reviews: Look for companies with positive reviews and a proven track record of successful data recovery.
- Expertise and Equipment: Ensure the service has the necessary expertise and specialized equipment to handle your specific data loss situation.
- Data Security: Confirm that the service has strict data security and confidentiality policies to protect your privacy.
- Cost and Estimates: Get a clear estimate of the cost and understand the payment terms before proceeding with the recovery process.
11. What Are Some Common Mistakes People Make When Trying To Recover Photos?
One common mistake is continuing to use the phone after realizing photos are missing, which can overwrite the data. Another mistake is installing recovery apps directly on the phone, which can also overwrite data. Always use a computer for recovery whenever possible.
Here are some other common mistakes to avoid:
- Continuing to Use the Device: As mentioned earlier, continuing to use your phone or SD card after realizing data is lost is a significant mistake. Any new data written to the storage can overwrite the deleted files, making them unrecoverable.
- Installing Recovery Apps on the Phone: Downloading and installing recovery apps directly on your phone can overwrite data. It’s better to use a computer to perform the recovery process.
- Using Untrustworthy Recovery Software: Using unreliable or pirated data recovery software can introduce malware or further damage your data. Always use reputable software from trusted sources.
- Not Backing Up Recovered Data Immediately: After successfully recovering your photos, make sure to back them up to multiple safe locations. This ensures that you won’t lose them again if something goes wrong.
- Ignoring Physical Damage: If your phone or SD card has physical damage, attempting DIY recovery without addressing the physical issues can cause further harm. Seek professional help in such cases.
- Improper SD Card Handling: Removing an SD card without properly unmounting it, or using excessive force when inserting or removing the card, can lead to data corruption.
- Not Understanding File Systems: Attempting advanced recovery techniques without understanding file systems and storage structures can lead to unintended consequences and data loss.
12. What Is The Role Of Forensic Data Recovery In Extreme Cases?
Forensic data recovery involves advanced techniques used by specialists to recover data from severely damaged or inaccessible devices. This can include physical reconstruction of storage media, advanced data carving, and bypassing security measures.
Here are some key aspects of forensic data recovery:
- Advanced Techniques: Forensic data recovery employs techniques such as chip-off recovery (removing memory chips and reading them directly), data carving (recovering files based on file structure), and physical reconstruction of damaged storage media.
- Specialized Equipment: Forensic experts use specialized tools and equipment, including cleanroom environments, electron microscopes, and advanced data imaging devices.
- Complex Scenarios: Forensic data recovery is typically used in cases where standard data recovery methods are insufficient, such as devices with severe physical damage, encrypted storage, or complex file system corruption.
- Legal and Investigative Contexts: Forensic data recovery is often used in legal and investigative contexts to retrieve evidence from digital devices.
- Expertise and Training: Forensic data recovery requires highly skilled professionals with extensive training in data storage technologies, file systems, and data recovery techniques.
- Cost: Forensic data recovery can be expensive due to the advanced techniques and specialized equipment involved.
13. How Can I Optimize My Samsung Phone’s Storage For Photo Recovery?
Optimize your Samsung phone’s storage by regularly clearing cache, removing unnecessary files, and defragmenting the storage (if using an SD card). This can improve performance and increase the chances of successful photo recovery.
Here are some steps to optimize your Samsung phone’s storage:
- Clear Cache:
- Clear App Cache:
- Go to Settings > Apps.
- Select an app.
- Tap Storage.
- Tap Clear cache.
- Clear System Cache:
- Boot your phone into recovery mode (usually by pressing the power, volume up, and home buttons simultaneously).
- Use the volume buttons to navigate to Wipe cache partition.
- Press the power button to select it.
- Reboot your phone.
- Clear App Cache:
- Remove Unnecessary Files:
- Delete Unused Apps: Uninstall apps you no longer use.
- Remove Downloaded Files: Delete files in your Downloads folder that you don’t need.
- Clear Old Photos and Videos: Transfer photos and videos to a computer or external storage and delete them from your phone.
- Use Samsung’s Storage Optimizer:
- Go to Settings > Battery and device care > Optimize now or Storage.
- Use the built-in storage analysis tools to identify and remove unnecessary files.
- Defragment SD Card (If Applicable):
- If you are using an SD card, regularly defragment it to improve performance. You can use file manager apps that have a defragmentation tool.
- Move Media to SD Card:
- If you have an SD card, move photos, videos, and other media files from your phone’s internal storage to the SD card.
- Use Cloud Storage Effectively:
- Enable automatic backups to cloud services like Samsung Cloud or Google Photos and remove the local copies of photos and videos from your phone to save space.
- Regularly Restart Your Phone:
- Restarting your phone can help clear temporary files and improve performance.
- Disable Unnecessary Background Processes:
- Limit the number of apps running in the background to free up memory and improve performance.
14. What Are The Legal And Ethical Considerations When Recovering Photos?
When recovering photos, respect privacy and avoid accessing data without permission. Ensure you have the right to recover the data, especially if it belongs to someone else or contains sensitive information.
Here’s a more detailed breakdown of the legal and ethical considerations:
- Privacy:
- Respect Personal Data: When recovering photos, be mindful of the privacy of the individuals in the images. Avoid accessing or sharing photos that contain sensitive or private information without consent.
- Data Protection Laws: Comply with data protection laws such as the General Data Protection Regulation (GDPR) in Europe and the California Consumer Privacy Act (CCPA) in the United States, which regulate the collection, processing, and storage of personal data.
- Ownership and Rights:
- Right to Recover Data: Ensure you have the right to recover the data, especially if it belongs to someone else. If you are recovering data from a device that is not your own, obtain permission from the owner.
- Copyright Issues: Be aware of copyright issues when recovering and using photos. Respect the rights of photographers and content creators.
- Confidentiality:
- Data Security: Implement strict data security measures to protect the confidentiality of recovered photos. Use encryption, access controls, and secure storage to prevent unauthorized access.
- Non-Disclosure Agreements: If you are hiring a data recovery service, ensure they have non-disclosure agreements in place to protect your privacy.
- Ethical Conduct:
- Honesty and Transparency: Be honest and transparent in your data recovery efforts. Disclose any limitations or potential risks to the client or device owner.
- Avoid Misrepresentation: Do not misrepresent your capabilities or guarantee successful recovery when it is not possible.
- Legal Compliance:
- Search Warrants and Subpoenas: Comply with legal requirements such as search warrants and subpoenas when recovering data in law enforcement or legal contexts.
- Chain of Custody: Maintain a clear chain of custody for recovered data to ensure its admissibility in legal proceedings.
15. How To Choose The Right Data Recovery Expert?
Choosing the right data recovery expert involves assessing their experience, expertise, equipment, and reputation. Look for specialists with a proven track record and positive reviews. Also, ensure they have strict data security and confidentiality policies.
Here’s a detailed guide on how to choose the right data recovery expert:
- Assess Their Experience and Expertise:
- Years of Experience: Look for data recovery experts with several years of experience in the field.
- Specialization: Determine if they specialize in the type of data loss you are experiencing (e.g., physical damage, logical corruption, encryption).
- Certifications: Check if they have relevant certifications or training in data recovery techniques.
- Evaluate Their Equipment and Technology:
- Advanced Tools: Ensure they have access to advanced data recovery tools and equipment, including cleanroom environments, data imaging devices, and chip-off recovery tools.
- Technology Updates: Verify that they stay up-to-date with the latest data recovery technologies and techniques.
- Check Their Reputation and Reviews:
- Online Reviews: Look for online reviews and testimonials from previous clients.
- References: Ask for references from past clients and contact them to inquire about their experience.
- Industry Reputation: Check if they have a good reputation within the data recovery industry.
- Inquire About Their Data Security and Confidentiality Policies:
- Data Protection Measures: Ensure they have strict data protection measures in place, including encryption, access controls, and secure storage.
- Non-Disclosure Agreements (NDAs): Verify that they are willing to sign non-disclosure agreements to protect the confidentiality of your data.
- Understand Their Recovery Process and Success Rate:
- Diagnostic Process: Ask about their diagnostic process and how they assess the extent of data loss and potential recovery options.
- Success Rate: Inquire about their success rate for similar data recovery cases.
- Transparency: Ensure they are transparent about the potential risks and limitations of the recovery process.
- Get a Clear Cost Estimate:
- Diagnostic Fee: Ask if there is a diagnostic fee and how it is applied to the overall cost.
- Recovery Fee: Get a clear estimate of the recovery fee and understand the payment terms.
- No Data, No Fee Policy: Inquire if they have a “no data, no fee” policy, which means you only pay if they successfully recover your data.
- Ask About Their Turnaround Time:
- Estimated Timeframe: Get an estimate of the turnaround time for the data recovery process.
- Updates: Inquire how they will keep you updated on the progress of the recovery.
- Consider Their Location and Accessibility:
- Local vs. Remote: Determine if you prefer a local data recovery service or if you are comfortable shipping your device to a remote service.
- Accessibility: Ensure they are easily accessible and responsive to your inquiries.
 Samsung Smart Switch screen on a Samsung PC
16. What Are The Hidden Costs Of Photo Recovery?
Hidden costs in photo recovery can include diagnostic fees, additional charges for advanced recovery techniques, and return shipping fees. Always get a clear and detailed estimate before proceeding with any recovery service.
Here are some potential hidden costs to be aware of:
- Diagnostic Fees: Some data recovery services charge a diagnostic fee to assess the extent of the data loss and determine the potential for recovery.
- Advanced Recovery Fees: Additional charges may apply for advanced recovery techniques, such as chip-off recovery or physical reconstruction of storage media.
- Parts and Materials: Costs for replacement parts or materials used during the recovery process may not be included in the initial estimate.
- Rush Service Fees: If you need the data recovered urgently, you may be charged a rush service fee.
- Return Shipping Fees: Return shipping fees for sending the recovered data back to you may not be included in the initial estimate.
- Hidden Labor Costs: Some data recovery services may have hidden labor costs that are not explicitly stated in the initial estimate.
- “No Data, No Fee” Exceptions: Some “no data, no fee” policies may have exceptions for certain types of data loss or recovery scenarios.
- Cancellation Fees: If you cancel the data recovery service after the diagnostic process, you may be charged a cancellation fee.
- Unexpected Data Damage: In some cases, the data recovery process may cause further damage to the storage device, resulting in additional costs.
17. How To Backup Photos From Samsung To PC?
To backup photos from your Samsung phone to a PC, connect your phone using a USB cable and transfer the files manually. Alternatively, use Samsung Smart Switch or cloud services like Google Photos or OneDrive to sync your photos to your computer.
Here’s a detailed guide:
Method 1: Manual Transfer via USB Cable
- Connect Your Samsung Phone to Your PC:
- Use a USB cable to connect your Samsung phone to your computer.
- When prompted on your phone, select Transfer files or MTP (Media Transfer Protocol).
- Access Your Phone’s Storage on Your PC:
- Open File Explorer (Windows) or Finder (Mac) on your computer.
- Your Samsung phone should appear as a connected device in the left sidebar.
- Navigate to the Photos Folder:
- Click on your Samsung phone to access its internal storage or SD card (if applicable).
- Look for the DCIM (Digital Camera Images) folder, which typically contains your photos and videos.
- Copy the Photos to Your PC:
- Select the photos and videos you want to backup.
- Right-click and choose Copy.
- Navigate to the folder on your PC where you want to store the backup.
- Right-click and choose Paste.
- Verify the Backup:
- Check the copied files on your PC to ensure they are intact and accessible.
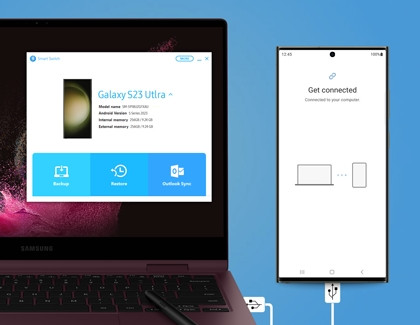
Method 2: Using Samsung Smart Switch
- Install Samsung Smart Switch on Your PC:
- Download and install Samsung Smart Switch from the official Samsung website.
- Connect Your Samsung Phone to Your PC:
- Use a USB cable to connect your Samsung phone to your computer.
- Open Samsung Smart Switch on your PC.
- Select Backup:
- In Samsung Smart Switch, click on the Backup option.
- Choose Data to Backup:
- Select the data types you want to backup, including Photos, Videos, and other media files.
- Start Backup:
- Click on the Backup button to start the backup process.
- Wait for the backup to complete.
- Verify the Backup:
- Check the location on your PC where the backup files are stored to ensure they are intact and accessible.
Method 3: Using Cloud Services (Google Photos or OneDrive)
- Set Up Cloud Sync on Your Samsung Phone:
- Google Photos:
- Open the Google Photos app.
- Tap on your Profile icon > Photos settings > Backup & sync.
- Ensure that Backup & sync is turned on.
- OneDrive:
- Install the OneDrive app from the Google Play Store.
- Open the OneDrive app and sign in with your Microsoft account.
- Enable automatic photo uploads in the OneDrive settings.
- Google Photos:
- Access Your Photos on Your PC:
- Google Photos:
- Go to the Google Photos website and sign in with the same Google account you used on your phone.
- Your photos should be synced and accessible on the website.
- OneDrive:
- Open the OneDrive app on your PC or go to the OneDrive website.
- Your photos should be synced and accessible.
- Google Photos:
- Download the Photos to Your PC:
- Download the photos from the cloud service to your PC to create a local backup.
18. How To Factory Reset Samsung Phone?
To factory reset a Samsung phone, go to Settings, tap General Management, select Reset, and choose Factory Data Reset. Confirm your decision and follow the on-screen instructions. Remember to back up your data before performing a factory reset.
Here’s a