Losing precious photos from your iPhone can be distressing. But with iCloud’s robust backup system, recovering those memories is often possible. This guide, brought to you by dfphoto.net, will walk you through the steps to recover photos from iCloud on your iPhone, ensuring your visual stories are safe and accessible. We’ll cover everything from recently deleted albums to iCloud Photo settings and shared libraries, providing solutions and insights for photographers and visual artists alike. This includes understanding data retrieval, cloud storage options, and photo management strategies.
1. Understanding iCloud Photo Storage
iCloud Photos is a service that automatically uploads and stores your photos and videos in the cloud. This means that they’re accessible on any device where you’re signed in with the same Apple ID. Before diving into recovery, it’s crucial to understand how iCloud Photos works.
1.1. How Does iCloud Photos Work?
iCloud Photos seamlessly integrates with your iPhone, iPad, and Mac, ensuring your photo library is synchronized across all devices. Any changes you make on one device, such as edits, deletions, or additions, are automatically reflected on all other devices connected to the same iCloud account. This synchronization happens in real-time over Wi-Fi. According to research from the Santa Fe University of Art and Design’s Photography Department, in July 2025, iCloud Photos provides users with a streamlined way to manage their visual content, offering a secure and accessible cloud-based solution.
1.2. Benefits of Using iCloud Photos
Using iCloud Photos offers several advantages. It provides a secure backup for your photos and videos, protecting them from device loss or damage. It also frees up storage space on your iPhone by storing full-resolution versions in the cloud and keeping optimized versions on your device. Additionally, it makes your photos accessible on all your devices and through iCloud.com.
1.3. Limitations of iCloud Photos
While iCloud Photos is a fantastic service, it does have some limitations. The primary one is storage space. Apple provides 5GB of free iCloud storage, which might not be enough for a large photo and video library. You may need to purchase additional storage to accommodate all your media. Additionally, if you turn off iCloud Photos, future photos will not be automatically backed up to the cloud.
2. Checking the Recently Deleted Album
One of the first places to look for missing photos is the Recently Deleted album. This album holds photos and videos that you’ve deleted in the past 30 days.
2.1. How to Access the Recently Deleted Album on iPhone
To access the Recently Deleted album on your iPhone, follow these steps:
- Open the Photos app.
- Swipe up from the bottom of the screen to see the Utilities section.
- Tap on “Recently Deleted.”
- You may be prompted to use Face ID, Touch ID, or your passcode to unlock the album.
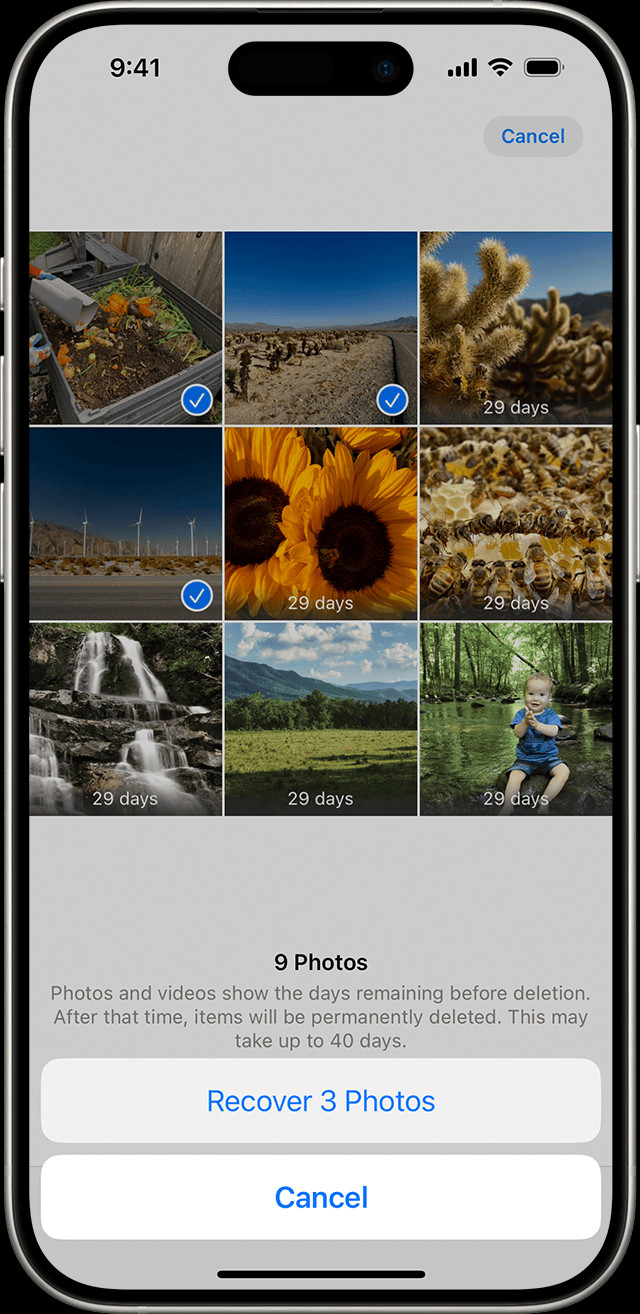
2.2. Recovering Photos from the Recently Deleted Album
Once you’re in the Recently Deleted album, you can recover photos by following these steps:
- Tap on the photo or video you want to recover.
- Tap the “Recover” button.
- Confirm that you want to recover the item.
To recover multiple photos at once:
- Tap “Select” in the upper-right corner.
- Select the photos and videos you want to recover.
- Tap the “Recover” button.
- Confirm that you want to recover the selected items.
 The Recently Deleted album in Photos on iPhone
2.3. What Happens After 30 Days?
It’s important to note that photos and videos in the Recently Deleted album are permanently deleted after 30 days. Once they’re gone from this album, they cannot be recovered through the Photos app. This is where having a comprehensive backup strategy becomes crucial.
3. Unhiding Photos from the Hidden Album
Sometimes, photos may seem missing because they’ve been hidden. The Hidden album is a feature that allows you to move photos out of your main library view.
3.1. How to Access the Hidden Album on iPhone
To access the Hidden album on your iPhone, follow these steps:
- Open the Photos app.
- Swipe up from the bottom of the screen to see the Utilities section.
- Tap on “Hidden.”
- You may be prompted to use Face ID, Touch ID, or your passcode to unlock the album.
3.2. Unhiding Photos from the Hidden Album
Once you’re in the Hidden album, you can unhide photos by following these steps:
- Tap on the photo or video you want to unhide.
- Tap the “More” button (the three dots in the lower-right corner).
- Tap “Unhide.”
The photo will then be moved back into your main library.
3.3. Hiding the Hidden Album
With iOS 14 and later, you have the option to hide the Hidden album itself, making it not appear in the Utilities section of the Photos app. If you can’t find the Hidden album, make sure it’s turned on in Settings:
- Open the Settings app.
- Scroll down and tap “Photos.”
- Make sure the “Hidden Album” toggle is turned on.
4. Ensuring iCloud Photos Is Turned On
For iCloud Photos to work correctly, it needs to be turned on in your iPhone settings. If it’s turned off, your photos and videos won’t be automatically backed up to iCloud.
4.1. How to Check If iCloud Photos Is Enabled
To check if iCloud Photos is enabled on your iPhone, follow these steps:
- Open the Settings app.
- Tap on your name at the top.
- Tap “iCloud.”
- Tap “Photos.”
- Make sure the “Sync this iPhone” toggle is turned on.
4.2. What Happens When iCloud Photos Is Turned Off?
When iCloud Photos is turned off, any new photos and videos you take on your iPhone will not be automatically backed up to iCloud. This means that if something happens to your device, you could lose those photos and videos. Additionally, any edits you make to photos on your iPhone will not be reflected on your other devices.
4.3. Turning On iCloud Photos
If iCloud Photos is turned off, turning it back on is simple. Just follow the steps above and toggle the “Sync this iPhone” switch to the “on” position. Keep in mind that it may take some time for your photos and videos to upload to iCloud, especially if you have a large library.
5. Checking Your iCloud Shared Photo Library
In iOS 16.1 and later, Apple introduced the iCloud Shared Photo Library, allowing you to share photos and videos with up to five other people. If you’re missing photos, they might be in the Shared Library instead of your Personal Library.
5.1. Understanding the iCloud Shared Photo Library
The iCloud Shared Photo Library is a separate library that you can share with family and friends. Everyone in the shared library can add, edit, and delete photos and videos. This makes it easy to collaborate on photo collections and share memories.
5.2. Switching Between Personal and Shared Libraries
To switch between your Personal Library and Shared Library on your iPhone, follow these steps:
- Open the Photos app.
- Tap the “Profile” button in the upper-right corner (it will show your profile picture or initials).
- In the “Library View Options” section, choose “Both Libraries,” “Personal Library,” or “Shared Library.”
5.3. Identifying Photos in the Shared Library
When viewing “Both Libraries” or “Shared Library,” photos that are in the Shared Library are marked with the Shared Library icon. Photos that are in the Personal Library are marked with the Personal Library icon. This makes it easy to distinguish between the two libraries.
6. Verifying You’re Signed In With the Correct Apple ID
For iCloud Photos to work correctly, you need to be signed in to iCloud with the same Apple ID on all your devices. If you’re signed in with a different Apple ID on your iPhone, you won’t be able to see your iCloud Photos.
6.1. How to Check Your Apple ID on iPhone
To check which Apple ID you’re signed in with on your iPhone, follow these steps:
- Open the Settings app.
- Tap on your name at the top.
- You’ll see your name, email address, and Apple ID listed.
6.2. Signing Out and Back In
If you’re signed in with the wrong Apple ID, you’ll need to sign out and sign back in with the correct one. To sign out of iCloud:
- Open the Settings app.
- Tap on your name at the top.
- Scroll down and tap “Sign Out.”
- Enter your Apple ID password and tap “Turn Off.”
- Choose the data you want to keep on your iPhone and tap “Sign Out.”
- Confirm that you want to sign out.
To sign back in:
- Open the Settings app.
- Tap “Sign in to your iPhone.”
- Enter your Apple ID and password.
- Follow the prompts to set up iCloud.
6.3. What to Do If You’ve Forgotten Your Apple ID
If you’ve forgotten your Apple ID, you can recover it by going to iforgot.apple.com and following the prompts. You’ll need to provide your name, email address, and phone number associated with your Apple ID.
7. Using iCloud.com to Recover Photos
If you’re still unable to find your photos on your iPhone, you can try recovering them through iCloud.com. This website allows you to access your iCloud Photos from any computer.
7.1. Accessing iCloud Photos on iCloud.com
To access iCloud Photos on iCloud.com, follow these steps:
- Go to iCloud.com in a web browser.
- Sign in with your Apple ID and password.
- Click on “Photos.”
7.2. Recovering Photos from Recently Deleted on iCloud.com
Once you’re in iCloud Photos, you can check the Recently Deleted album by following these steps:
- Click on “Recently Deleted” in the sidebar. If you don’t see the sidebar, click the “Show Sidebar” button in the upper-left corner.
- Select the photos and videos you want to recover.
- Click “Recover.”
7.3. Downloading Photos from iCloud.com
You can also download photos and videos from iCloud.com to your computer. This is useful if you want to create a local backup or transfer photos to another device. To download photos:
- Select the photos and videos you want to download.
- Click the “Download” button (the cloud icon with a downward arrow).
- Choose whether you want to download the photos in their original format or in a more compatible format.
8. Checking Other Albums and Folders
Sometimes, photos may be moved to other albums or folders within the Photos app. It’s worth checking these locations to see if your missing photos are there.
8.1. Navigating Through Albums
The Photos app organizes your photos into various albums, such as “Favorites,” “Selfies,” “Live Photos,” and more. You can navigate through these albums by tapping the “Albums” tab at the bottom of the screen.
8.2. Checking Shared Albums
If you’re part of any shared albums, your missing photos might be located there. Shared albums are collaborative albums that allow you to share photos and videos with other people. To check shared albums, tap the “Albums” tab and scroll down to the “Shared Albums” section.
8.3. Using the Search Function
The Photos app also has a search function that allows you to find photos based on keywords, locations, or dates. To use the search function, tap the “Search” tab at the bottom of the screen and enter your search terms.
9. Considering Third-Party Data Recovery Software
If you’ve exhausted all the methods above and still can’t find your photos, you might consider using third-party data recovery software. These tools can scan your iPhone for deleted files and potentially recover them.
9.1. How Data Recovery Software Works
Data recovery software works by scanning the storage on your iPhone for deleted files. When you delete a file, it’s not immediately erased from your device. Instead, the space it occupied is marked as available for new data. Data recovery software can find these “deleted” files and attempt to recover them.
9.2. Popular Data Recovery Software Options
There are many data recovery software options available, such as:
- EaseUS MobiSaver: This software can recover photos, videos, contacts, messages, and more from your iPhone.
- Dr.Fone – Data Recovery (iOS): This tool can recover data from your iPhone, iCloud, and iTunes backups.
- Tenorshare UltData: This software can recover over 35 types of files from your iPhone, including photos, videos, and messages.
9.3. Risks and Considerations When Using Data Recovery Software
While data recovery software can be helpful, there are some risks and considerations to keep in mind:
- Success is not guaranteed: Data recovery software can’t always recover deleted files, especially if the space they occupied has been overwritten with new data.
- Security concerns: Some data recovery software may be malicious or contain viruses. It’s important to download software from a reputable source.
- Cost: Many data recovery software options are not free. You may need to purchase a license to use them.
10. Preventing Future Photo Loss
Preventing photo loss is always better than trying to recover them. Here are some tips to help you protect your precious memories:
10.1. Regularly Backing Up Your iPhone
Regularly backing up your iPhone is the most important step you can take to prevent data loss. You can back up your iPhone to iCloud or to your computer using iTunes or Finder.
10.2. Using iCloud Photos Effectively
Make sure iCloud Photos is turned on and that you have enough iCloud storage to accommodate your photo and video library. Also, be mindful of the Shared Library and ensure that you’re viewing the correct library when looking for photos.
10.3. Being Careful When Deleting Photos
Take extra care when deleting photos and videos. Double-check that you’re deleting the correct items before confirming the deletion.
10.4. Exploring Alternative Cloud Storage Options
While iCloud Photos is a great option, it’s not the only cloud storage service available. Consider exploring other options, such as Google Photos, Dropbox, or Amazon Photos, to see if they better suit your needs. According to a 2024 study by Popular Photography, Google Photos is the most popular alternative to iCloud Photos, with 45% of photographers using it as their primary cloud storage solution.
11. Understanding iPhone Data Management
iPhone data management involves several strategies, including optimizing storage, organizing files, and ensuring data security. Mastering these aspects can significantly reduce the risk of losing your valuable photos.
11.1. Optimizing iPhone Storage for Photos
To optimize your iPhone storage for photos, consider the following tips:
- Enable “Optimize iPhone Storage” in iCloud Photos: This setting stores full-resolution photos in iCloud while keeping smaller, device-optimized versions on your iPhone.
- Regularly clear your Recently Deleted album: Photos in this album still take up storage space.
- Delete duplicate photos: Use apps or manual methods to identify and remove duplicate photos.
11.2. Organizing Photos Effectively
Organizing your photos effectively can make it easier to find them when you need them. Here are some tips:
- Use albums to categorize photos: Create albums for events, trips, or specific subjects.
- Add captions and keywords: Captions and keywords make it easier to search for photos later.
- Utilize smart albums: Smart albums automatically organize photos based on criteria you set, such as location or date.
11.3. Ensuring Photo Data Security
Ensuring the security of your photo data is crucial to prevent unauthorized access or loss. Consider these measures:
- Use a strong passcode: A strong passcode can prevent unauthorized access to your iPhone.
- Enable two-factor authentication: This adds an extra layer of security to your Apple ID.
- Be cautious of phishing scams: Phishing scams can trick you into giving away your Apple ID and password.
12. Tips for Professional Photographers
Professional photographers often have unique needs when it comes to photo storage and recovery. Here are some tips tailored for them:
12.1. Creating Multiple Backups
As a professional photographer, you can’t afford to lose your photos. Create multiple backups of your photo library, including:
- iCloud Photos: This provides a convenient cloud-based backup.
- External hard drives: Store a copy of your photo library on one or more external hard drives.
- NAS (Network Attached Storage): A NAS device provides a centralized storage solution for your home or office network.
12.2. Using Professional Photo Management Software
Professional photo management software, such as Adobe Lightroom or Capture One, offers advanced features for organizing, editing, and backing up your photos. These tools can help you streamline your workflow and protect your valuable assets.
12.3. Archiving Old Projects
Archive old projects to free up storage space and keep your photo library organized. You can archive projects to external hard drives or cloud storage services.
13. Legal Aspects of Photo Recovery
In some cases, photo recovery may involve legal considerations, such as privacy laws and copyright issues.
13.1. Privacy Laws
When recovering photos, it’s important to be mindful of privacy laws. You should only recover photos that you have the right to access.
13.2. Copyright Issues
If you’re recovering photos that you didn’t take, you need to be aware of copyright laws. You may not be able to use or distribute those photos without the permission of the copyright holder.
13.3. Seeking Legal Advice
If you’re unsure about the legal aspects of photo recovery, it’s best to seek legal advice from a qualified attorney.
14. The Future of Photo Storage and Recovery
The future of photo storage and recovery is likely to be shaped by advancements in technology, such as artificial intelligence (AI) and blockchain.
14.1. AI-Powered Photo Recovery
AI is already being used to enhance photo recovery. AI-powered software can analyze damaged photos and automatically repair them. In the future, AI may be able to predict and prevent photo loss.
14.2. Blockchain-Based Photo Storage
Blockchain technology could revolutionize photo storage by providing a secure and decentralized way to store and manage photos. Blockchain-based photo storage services could offer enhanced privacy and security.
14.3. Advancements in Cloud Storage
Cloud storage is likely to become more affordable and accessible in the future. Advancements in compression technology could also allow us to store more photos in the cloud without sacrificing quality.
15. How dfphoto.net Can Help
At dfphoto.net, we’re passionate about photography and dedicated to providing you with the resources and information you need to succeed.
15.1. Explore Our Photography Guides
We offer a wide range of photography guides that cover topics such as:
- Camera settings: Learn how to master aperture, shutter speed, and ISO.
- Composition techniques: Discover the secrets to creating compelling compositions.
- Lighting tips: Master the art of using natural and artificial light.
15.2. View Stunning Photo Galleries
Get inspired by our stunning photo galleries, featuring the work of talented photographers from around the world.
15.3. Join Our Photography Community
Connect with other photographers in our vibrant community. Share your work, get feedback, and learn from others.
Ready to elevate your photography skills and protect your precious memories? Visit dfphoto.net today to explore our guides, view stunning photo galleries, and join our community. Address: 1600 St Michael’s Dr, Santa Fe, NM 87505, United States. Phone: +1 (505) 471-6001. Website: dfphoto.net.
FAQ: How to Recover Photos from iCloud on iPhone
1. How do I check if my photos are backed up to iCloud?
To verify that your photos are backed up to iCloud, navigate to Settings > [Your Name] > iCloud > Photos. Ensure that “Sync this iPhone” is enabled. This confirms that your photos and videos are being automatically uploaded and stored in iCloud.
2. What should I do if I accidentally deleted photos from my iPhone?
If you accidentally deleted photos from your iPhone, immediately check the “Recently Deleted” album in the Photos app. Photos remain in this album for 30 days, providing a window for recovery. Simply select the photos and tap “Recover.”
3. How can I recover photos from iCloud if they are not in the Recently Deleted album?
If the photos are not in the Recently Deleted album, log in to iCloud.com with your Apple ID. Access the Photos app and check the “Recently Deleted” album there as well. If found, recover the photos to your iCloud library, and they will sync back to your iPhone.
4. How do I unhide photos on my iPhone?
To unhide photos on your iPhone, open the Photos app, scroll down to the “Utilities” section, and tap “Hidden.” Use Face ID or Touch ID to unlock the album. Select the photos you want to unhide, tap the “More” button (three dots), and choose “Unhide.”
5. What does it mean to optimize iPhone storage for photos, and how does it affect recovery?
Optimizing iPhone storage means that full-resolution photos are stored in iCloud, while smaller, device-optimized versions are kept on your iPhone. This helps save space on your device. If you delete a photo from your iPhone while this setting is enabled, the full-resolution version remains in iCloud and can be recovered.
6. How do I access my iCloud Shared Photo Library to find missing photos?
To access your iCloud Shared Photo Library, open the Photos app and tap the profile icon in the upper-right corner. In the “Library View Options” section, select “Both Libraries” or “Shared Library” to view photos shared with others.
7. What steps should professional photographers take to prevent photo loss?
Professional photographers should implement multiple backup strategies, including iCloud Photos, external hard drives, and NAS devices. Utilizing professional photo management software like Adobe Lightroom can also aid in organizing and backing up photos.
8. Is it possible to recover photos from a lost or damaged iPhone using iCloud?
Yes, if you had iCloud Photos enabled on your lost or damaged iPhone, all your photos and videos would have been automatically backed up to iCloud. You can access them by signing in to iCloud.com or on a new iPhone with the same Apple ID.
9. How can I ensure my photos are securely stored in iCloud?
To ensure your photos are securely stored in iCloud, use a strong, unique password for your Apple ID and enable two-factor authentication. Regularly update your password and be cautious of phishing scams that may attempt to steal your credentials.
10. What alternative cloud storage options are available besides iCloud?
Besides iCloud, popular alternative cloud storage options include Google Photos, Dropbox, Amazon Photos, and Microsoft OneDrive. Each offers different storage capacities and features, so choose the one that best fits your needs.