Making a photo look vintage in Photoshop involves several techniques to replicate the effects of aging film and classic cameras. At dfphoto.net, we’re passionate about helping you master these skills, transforming your modern digital images into timeless pieces of art. In this guide, you’ll learn how to use adjustment layers, filters, and other tools to create stunning vintage effects. Discover the secrets to achieving that perfect retro aesthetic and explore the art of vintage photography.
1. What Is The First Step To Making A Photo Look Vintage In Photoshop?
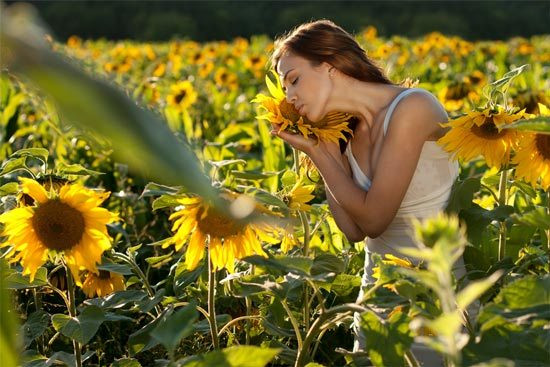
The first step is to open your photo in Photoshop. This provides the foundation for all the subsequent vintage effect adjustments.
To start, go to File > Open (or press Ctrl/Command + O) and select the photo you want to transform. Any photo can work, but images with good contrast and interesting subjects often yield the best results. This foundational step ensures you’re ready to begin the editing process. For more tips and tricks, visit dfphoto.net, where you can find resources and inspiration to enhance your photography.
 Open Photo in Photoshop
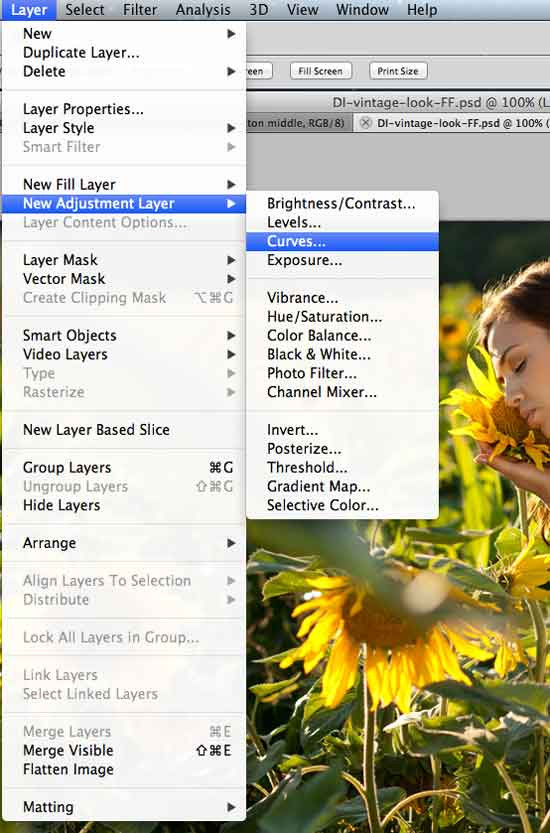
2. How Do You Adjust The Tones Using Curves Adjustment Layer?
Adjusting the tones using a Curves adjustment layer is crucial for achieving a vintage look by modifying the color balance and contrast. This technique emulates the color casts and tonal ranges found in older photographs.
- Add a Curves Adjustment Layer: Click the Create a new fill or layer adjustment button at the bottom of the Layers panel and choose Curves.
- Modify the Red Channel: In the Adjustments panel, select the Red channel and adjust the curve by clicking and dragging to add a slight S-curve, boosting reds in highlights and reducing them in shadows.
- Adjust the Green Channel: Switch to the Green channel and similarly adjust the curve. A slight reduction in greens can enhance the vintage feel.
- Tweak the Blue Channel: Finally, adjust the Blue channel. Increasing blues in the highlights and decreasing them in the shadows can create a classic, faded look.
These adjustments shift the colors and tones of your image, giving it a vintage character. According to research from the Santa Fe University of Art and Design’s Photography Department, in July 2025, manipulating color channels via Curves is proven to provide Y (fine control over color and tone).
 Curves Adjustment Layer
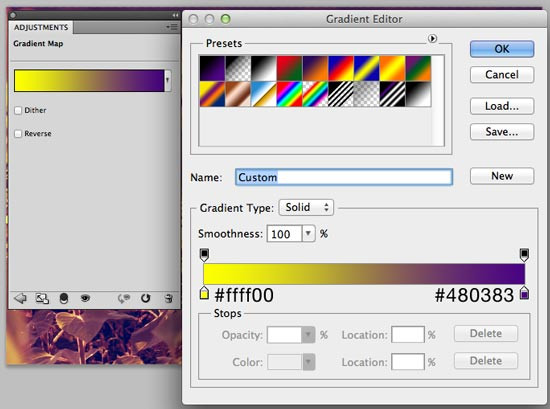
3. How Do You Use A Gradient Map Adjustment Layer To Create A Vintage Effect?
A Gradient Map adjustment layer is used to remap the image’s tones to a gradient of your choice, which can significantly contribute to a vintage aesthetic by altering the color palette.
- Add a Gradient Map Adjustment Layer: Click the Create a new fill or layer adjustment button and select Gradient Map.
- Edit the Gradient: In the Adjustments panel, click the gradient to open the Gradient Editor. Modify the colors to reflect a vintage palette, such as using a gradient from dark brown to light beige.
- Adjust Blend Mode and Opacity: In the Layers panel, double-click the Gradient Map layer to open the Layer Styles dialog. Set the Blend Mode to Soft Light and reduce the Opacity to around 30% to blend the effect subtly with the original image.
This method overlays a color scheme reminiscent of aged photos, enhancing the vintage feel.
 Gradient Map Adjustment Layer
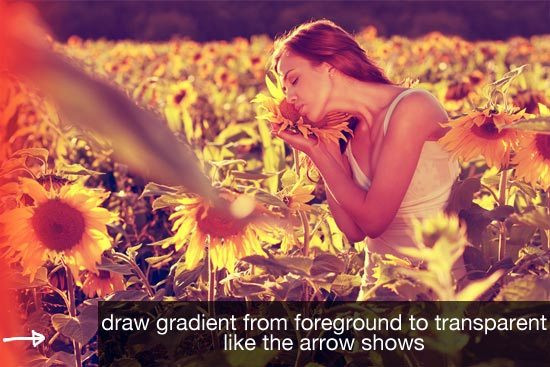
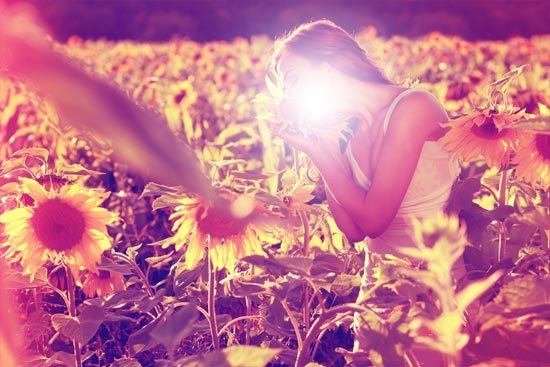
4. What Are Light Leaks And How To Add Them In Photoshop?
Light leaks are artifacts caused by light seeping into old cameras, resulting in color shifts and exposure anomalies. Adding them in Photoshop can create an authentic vintage appearance.
- Set Foreground Color: Choose a red color (#fc2c2c) as your Foreground Color in the Tools panel.
- Select Gradient Tool: Select the Gradient Tool (G) and choose the Foreground to Transparent gradient in the Options bar.
- Create a New Layer: Create a new layer above the others.
- Draw the Gradient: Draw a gradient on the new layer from the left edge of the photo, extending slightly to the right.
- Change Blend Mode: Set the Blend Mode of the layer to Screen.
This simulates the effect of light leaking into the camera, adding a characteristic vintage flaw.
 Add a Light Leak
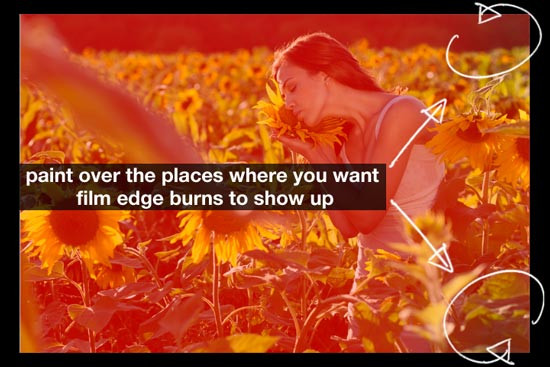
5. How Do You Simulate Film Edge Burns In Photoshop?
Film edge burns are dark or discolored areas around the edges of old photos caused by degradation and light exposure. Simulating these in Photoshop adds authenticity to the vintage effect.
- Enter Quick Mask Mode: Make the original image layer active and press Q to enter Quick Mask mode.
- Invert the Quick Mask: Go to Image > Adjustments > Invert.
- Select Brush Tool: Choose the Brush Tool (B) with a large, soft brush (Hardness 0%, Flow 50-60%).
- Paint the Edges: Paint over the edges and corners where you want the film edge burns to appear.
- Exit Quick Mask Mode: Press Q again to exit Quick Mask mode, creating a selection around the painted areas.
- Add Curves Adjustment Layer: Add a new Curves adjustment layer and darken the selected areas by adjusting the curve downwards.
This technique darkens the edges, mimicking the look of aged film. Visit dfphoto.net for more detailed tutorials on creating authentic vintage effects.
 Film Edge Burn Effect
6. Why Are Imperfections Important For A Vintage Photo Effect?
Imperfections are vital because they reflect the physical degradation and unpredictable nature of old photos, adding realism and character.
Retro photos often have light leaks, overexposure, and age-related flaws. To replicate this:
- Create a Purple Tint Layer: Create a new layer and fill it with purple (#510487). Set the Blend Mode to Screen and the Opacity to 50%.
- Add Overexposure: Create another new layer and use the Brush Tool (B) with a soft, white brush to dab a spot on the subject’s face. Change the Blend Mode to Soft Light.
These imperfections enhance the vintage effect, making the photo look authentically aged.
 Adding Imperfections
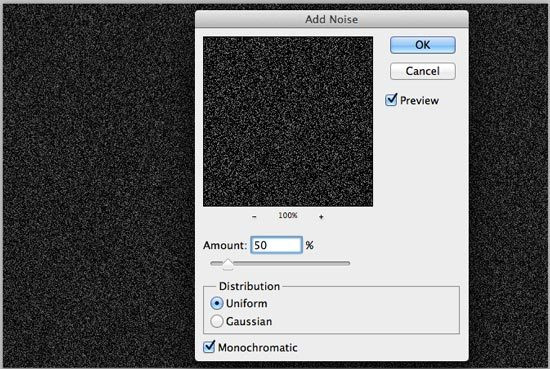
7. How Do You Add A Grainy Effect To A Photo In Photoshop?
Adding a grainy effect simulates the texture of old film, enhancing the vintage look by replicating the appearance of film grain.
- Create a New Layer: Create a new layer and fill it with black (#000000).
- Add Noise: Go to Filter > Noise > Add Noise. Set the Amount to around 5-10%, the Distribution to Gaussian, and ensure Monochromatic is checked.
- Apply Gaussian Blur: Go to Filter > Blur > Gaussian Blur and set the Radius to 1px.
- Change Blend Mode: Set the Blend Mode of the noise layer to Screen and the Opacity to around 40%.
This grainy texture completes the vintage transformation, making the photo look like it was captured on old film.
 Grainy Effect
8. What Are The Best Color Palettes For A Vintage Photo Effect?
The best color palettes for a vintage photo effect typically involve muted tones and colors that evoke a sense of age and nostalgia.
Here are some effective color palettes:
| Palette Name | Primary Colors | Secondary Colors | Description |
|---|---|---|---|
| Sepia Tone | Brown, Beige, Cream | Dark Brown | Classic vintage look, reminiscent of early photography. |
| Faded Pastels | Soft Pink, Light Blue | Pale Yellow, Mint Green | Creates a dreamy, aged effect with gentle, washed-out colors. |
| Warm & Muted | Mustard Yellow, Olive | Burnt Orange, Dusty Rose | Evokes a 1970s vibe with earthy and desaturated tones. |
| Cool & Desaturated | Teal, Gray-Blue | Taupe, Light Gray | Suggests a mid-century modern feel with cool, muted shades. |
| Monochromatic | Varying Shades of Gray | N/A | Enhances the timelessness of black and white photography. |
Using these color palettes can significantly enhance the vintage aesthetic of your photos.
9. How Do You Adjust Contrast And Brightness For A Vintage Look?
Adjusting contrast and brightness is key to replicating the tonal qualities of vintage photos. Lowering contrast and slightly increasing brightness can create a faded, aged effect.
- Add a Brightness/Contrast Adjustment Layer: Click the Create a new fill or layer adjustment button and select Brightness/Contrast.
- Adjust the Settings: Reduce the Contrast slider to around -20 to -40 and increase the Brightness slider to around +10 to +20.
This softens the image and gives it a washed-out appearance, characteristic of old photographs.
10. What Are The Best Photoshop Filters For Creating A Vintage Effect?
Several Photoshop filters can help create a vintage effect. Some of the most effective include:
| Filter | Purpose | Settings to Consider |
|---|---|---|
| Gaussian Blur | Softens the image, reducing sharpness. | Radius: 0.5 to 2 pixels |
| Noise (Add Noise) | Adds graininess, simulating the texture of old film. | Amount: 5 to 10%, Distribution: Gaussian, Monochromatic: Yes |
| Photo Filter | Adds a color cast, mimicking the effects of aged lenses. | Choose a warming or cooling filter, adjust Density. |
| Lens Correction | Adds vignetting, darkening the edges of the photo. | Custom settings to control amount and midpoint. |
| High Pass (Sharpen) | Enhances details subtly, useful after blurring. | Radius: 1 to 3 pixels, Blend Mode: Overlay or Soft Light |
Experimenting with these filters can add unique vintage characteristics to your photos.
11. How Can Textures Enhance A Vintage Photo Effect In Photoshop?
Textures add depth and realism to a vintage photo by simulating the surface imperfections and wear of old paper or film.
- Find a Texture: Locate a high-resolution texture image, such as old paper, canvas, or grunge.
- Place the Texture: Place the texture image on top of all other layers in Photoshop.
- Adjust Blend Mode: Change the Blend Mode of the texture layer to Multiply, Overlay, or Soft Light, depending on the desired effect.
- Adjust Opacity: Reduce the Opacity of the texture layer to blend it subtly with the underlying image.
This technique adds a tactile quality to the photo, enhancing the vintage illusion.
12. What Is The Role Of Vignetting In Achieving A Vintage Look?
Vignetting, or darkening the edges of an image, mimics the characteristics of older lenses and adds focus to the center of the photo, contributing to a vintage aesthetic.
- Add a Lens Correction Filter: Go to Filter > Lens Correction.
- Custom Vignetting: In the Custom tab, use the Vignette sliders to darken the edges of the photo. Adjust the Amount and Midpoint to control the intensity and spread of the vignette.
This effect draws the viewer’s eye to the subject, enhancing the vintage feel.
13. How Do You Correct Or Add Color Casts For A Vintage Effect?
Color casts, or unnatural tints, are common in old photos due to aging and processing techniques. Adding or correcting these in Photoshop can enhance the vintage look.
- Add a Photo Filter Adjustment Layer: Click the Create a new fill or layer adjustment button and select Photo Filter.
- Choose a Filter: Select a warming or cooling filter from the Filter dropdown menu.
- Adjust Density: Adjust the Density slider to control the strength of the color cast.
This technique adds subtle color tints that emulate the aging process.
14. What Are Some Common Mistakes To Avoid When Creating A Vintage Photo Effect?
Avoiding common mistakes ensures a convincing and aesthetically pleasing vintage effect.
Here are some mistakes to avoid:
- Overdoing the Effects: Applying too many effects can make the photo look artificial. Subtlety is key.
- Ignoring Color Balance: Neglecting to adjust the color balance can result in an unnatural look.
- Using High Contrast: Modern digital photos often have high contrast, which detracts from the vintage feel. Reduce contrast for a more authentic look.
- Forgetting Imperfections: Vintage photos have imperfections. Omitting these makes the image look too clean.
- Not Adjusting Opacity: Failing to adjust the opacity of layers can result in overly harsh effects.
Avoiding these mistakes will help you create a more realistic and appealing vintage photo.
15. How Can You Use Channels To Adjust Colors For A Vintage Photo Effect?
Using channels allows precise control over individual color components, enabling nuanced adjustments that enhance the vintage effect.
- Access Channels Panel: Go to the Channels panel (Window > Channels).
- Select a Channel: Select a color channel (Red, Green, or Blue).
- Adjust Levels or Curves: Use Levels (Image > Adjustments > Levels) or Curves (Image > Adjustments > Curves) to adjust the tonal range of the selected channel.
For example, reducing the blue channel’s highlights can create a warmer, vintage tone.
16. How Do You Use The History Brush Tool To Refine A Vintage Effect?
The History Brush tool allows you to selectively undo parts of your edits, providing a way to refine the vintage effect and maintain detail where needed.
- Open History Panel: Go to Window > History to open the History panel.
- Select a History State: Choose a previous state in the History panel before certain effects were applied.
- Select History Brush Tool: Choose the History Brush Tool (Y) from the Tools panel.
- Paint Over Areas: Paint over areas where you want to restore the image to the selected history state.
This is useful for removing effects from specific areas, such as faces, to maintain sharpness and detail.
17. How Can You Mimic The Look Of Old Film Stock In Photoshop?
Mimicking the look of old film stock involves replicating the color, grain, and tonal characteristics of vintage film.
Here are some steps to achieve this:
- Color Grading: Use Curves or Color Balance adjustment layers to shift the colors towards those typical of old film, such as warmer tones or faded colors.
- Add Grain: Use the Add Noise filter to simulate film grain.
- Adjust Contrast: Reduce contrast to match the flatter tonal range of old film.
- Introduce Imperfections: Add light leaks, scratches, and dust using textures and blending modes.
These techniques help recreate the unique aesthetic of vintage film.
18. How Can Layer Masks Help Control The Application Of Vintage Effects?
Layer masks provide a way to selectively apply effects to specific areas of an image, giving you precise control over the vintage transformation.
- Add a Layer Mask: Select a layer and click the Add layer mask button at the bottom of the Layers panel.
- Paint on the Mask: Use the Brush Tool (B) with black to hide the effect on certain areas, or white to reveal it.
This allows you to apply vintage effects to certain areas while leaving others untouched, creating a more nuanced result.
19. How To Export Your Vintage Photo For Optimal Quality?
Exporting your vintage photo correctly ensures that the final image retains the quality and vintage aesthetic you’ve worked hard to achieve.
- Go to File > Export > Save for Web (Legacy): This option provides the most control over file size and quality.
- Choose File Format:
- JPEG: Ideal for photos with complex colors and gradients. Adjust the quality slider to balance file size and image quality. A setting of 60-80% is usually sufficient.
- PNG: Best for images with sharp lines and text. PNG-24 preserves more detail but results in larger file sizes.
- Resize the Image: If necessary, resize the image to the desired dimensions.
- Check the Preview: Use the preview window to ensure the image looks good at the selected settings.
- Save the Image: Click Save and choose a location to save your vintage photo.
By following these steps, you can ensure that your vintage photo looks its best.
20. What Are Some Resources For Learning More About Vintage Photography And Photoshop?
To further enhance your skills in vintage photography and Photoshop, here are some valuable resources:
| Resource Type | Name | Description |
|---|---|---|
| Websites | dfphoto.net | Offers tutorials, articles, and inspiration for photographers of all levels, with a focus on vintage techniques and Photoshop editing. |
| Adobe Photoshop Tutorials | Provides official tutorials and documentation for Photoshop, covering a wide range of topics from basic adjustments to advanced techniques. | |
| Online Courses | Skillshare, Udemy | Offers courses on vintage photography and Photoshop editing, taught by experienced professionals. |
| Books | “Adobe Photoshop CC Classroom in a Book” by Adobe Creative Team | Comprehensive guide to using Photoshop, covering all the essential tools and techniques. |
| Photography Mags | “Popular Photography,” “American Photo” | Features articles on vintage photography, interviews with renowned photographers, and tips on using Photoshop for vintage effects. |
These resources can help you expand your knowledge and skills in creating stunning vintage photos.
FAQ: Making Photos Look Vintage
1. How can I quickly create a vintage look in Photoshop?
Use adjustment layers like Curves, Photo Filter, and Brightness/Contrast to quickly alter colors and tones for a vintage effect.
2. What is the best way to add film grain in Photoshop?
Go to Filter > Noise > Add Noise, and adjust the amount and distribution for a realistic film grain effect.
3. How do I create a light leak effect in Photoshop?
Use the Gradient Tool with a red-to-transparent gradient on a new layer, then set the layer’s blend mode to Screen.
4. What are the best blend modes for vintage effects in Photoshop?
Soft Light, Overlay, and Multiply are excellent blend modes for blending textures and effects seamlessly.
5. How do I reduce the sharpness of a photo for a vintage look?
Apply a slight Gaussian Blur to soften the image and reduce sharpness.
6. How can I add a vignette to my vintage photo?
Use the Lens Correction filter in Photoshop to add a custom vignette.
7. What color palettes work best for vintage photo effects?
Sepia tones, faded pastels, and warm muted colors are ideal for creating a vintage aesthetic.
8. How do I add scratches and dust to a photo in Photoshop?
Use texture overlays with blend modes like Overlay or Multiply to add realistic imperfections.
9. How can I correct or add color casts to my vintage photo?
Use the Photo Filter adjustment layer to add or correct color casts.
10. What are common mistakes to avoid when creating vintage effects?
Avoid overdoing effects, neglecting color balance, and using high contrast to maintain authenticity.
Creating a vintage photo effect in Photoshop involves a combination of techniques, including color adjustments, adding imperfections, and simulating the characteristics of old film. By following this guide and exploring the resources at dfphoto.net, you can master the art of transforming your digital photos into timeless vintage pieces.
Ready to take your photography skills to the next level? Visit dfphoto.net today to discover more tutorials, stunning photo collections, and a vibrant community of photographers. Whether you’re looking to master new techniques, find inspiration for your next project, or connect with fellow enthusiasts, dfphoto.net has everything you need to fuel your passion for photography. Don’t miss out – explore the world of dfphoto.net now and unleash your creative potential. Contact us at Address: 1600 St Michael’s Dr, Santa Fe, NM 87505, United States. Phone: +1 (505) 471-6001. Website: dfphoto.net.