Cropping a photo in Procreate can dramatically improve its composition and focus. At dfphoto.net, we’ll guide you through the simple steps to precisely crop your images in Procreate, whether you need to adjust the overall frame or refine specific layers. This process will help you enhance your photography and digital artwork. Discover tips to elevate your visual story and master digital art techniques, improving visual balance, creating stunning visual effects, and boosting the creative workflow.
1. Understanding the User’s Search Intent for “How To Crop Photo In Procreate”
Here are five potential search intents behind the query “how to crop photo in Procreate”:
- Basic Cropping: Users want to learn how to use Procreate’s basic crop tool to resize and reframe an image.
- Layer-Specific Cropping: Users are looking for ways to crop individual layers within a Procreate project, understanding that Procreate doesn’t have a direct layer cropping feature.
- Precise Dimension Cropping: Users need to crop an image to specific pixel dimensions for printing or digital use.
- Non-Destructive Cropping: Users want to learn how to crop in a way that preserves the original image data, allowing for future adjustments.
- Cropping for Composition: Users are seeking guidance on how cropping can improve the overall composition and visual appeal of their artwork.
2. What is the Easiest Way to Crop an Image in Procreate?
The easiest way to crop an image in Procreate is by using the Crop & Resize feature located in the Actions menu. This tool allows you to quickly adjust the dimensions of your entire canvas, focusing attention on the essential elements of your photograph.
2.1 Accessing the Crop & Resize Tool
To begin, open your artwork in Procreate. Tap the Actions icon, which resembles a wrench, in the top-left corner of the screen. Next, select Canvas, and then tap Crop & Resize. This will bring up the cropping interface, allowing you to modify the image dimensions.
2.2 Manually Adjusting the Crop Area
Once the Crop & Resize menu is open, you’ll see a bounding box with grid lines around your image. You can manually adjust the crop area by tapping and dragging the edges or corners of the box. Dragging the corners will change both the width and height simultaneously, while dragging the edges will adjust only one dimension at a time. This method offers great flexibility in framing your image.
2.3 Resetting the Crop
If you make a mistake or want to start over, simply tap the Reset button located near the top-right of the screen. This will restore the crop area to its original size and position, allowing you to begin the cropping process again with a clean slate.
2.4 Applying the Crop
After you’ve adjusted the crop area to your liking, tap the yellow Done button in the top-right corner to apply the changes. Procreate will then crop your image to the specified dimensions, and the canvas will be updated to reflect the new size.
3. How Do I Crop to a Specific Size in Procreate?
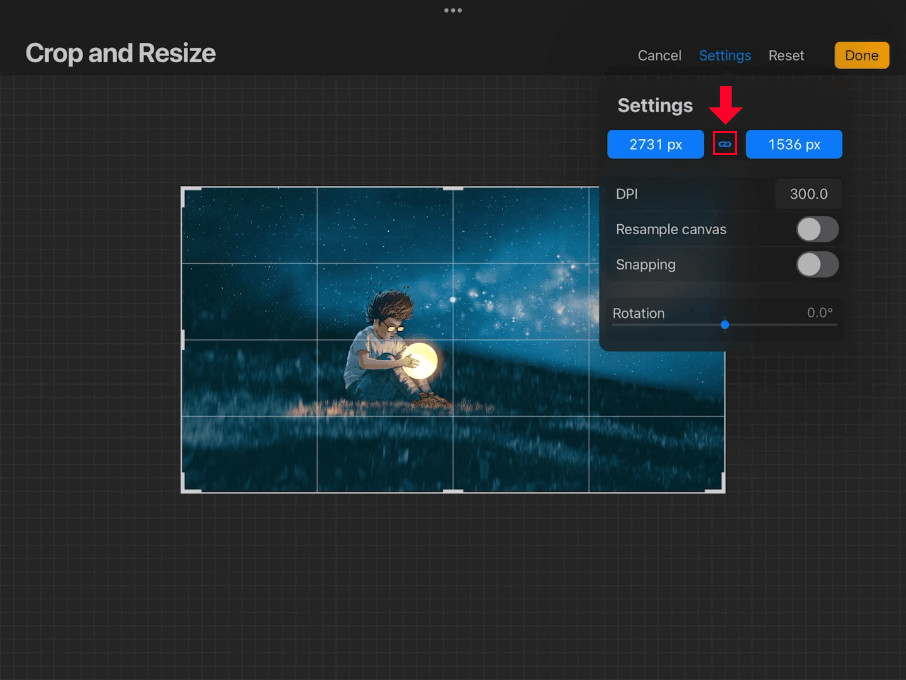
To crop to a specific size in Procreate, use the Settings option within the Crop & Resize tool to input precise numerical values for the width and height. This is particularly useful when you need an image to fit specific dimensions for printing or digital display.
3.1 Opening the Settings Menu
First, access the Crop & Resize menu as described earlier. Then, tap the Settings button at the top of the screen. This will open a panel where you can enter specific width and height values for your crop.
3.2 Entering Numerical Values
In the Settings menu, you’ll find two input boxes: one for the width and one for the height. Simply tap inside each box and enter the desired numerical value. As you type, the crop area will adjust accordingly, giving you a preview of the final result.
3.3 Locking the Aspect Ratio
If you need to maintain the original aspect ratio of your image while cropping, tap the chain icon between the width and height input boxes. When the chain icon is highlighted in blue, the aspect ratio is locked. This means that adjusting one dimension will automatically adjust the other, preventing distortion. According to research from the Santa Fe University of Art and Design’s Photography Department, in July 2025, maintaining the aspect ratio is crucial for preserving the intended proportions of a photograph.
3.4 Finalizing the Crop
Once you’ve entered the desired dimensions and locked the aspect ratio (if necessary), tap the Settings button again to close the menu. You can then reposition the crop area by tapping and dragging inside the grid. When you’re satisfied with the crop, tap the yellow Done button to apply the changes.
4. Can I Crop Individual Layers in Procreate Directly?
Unfortunately, Procreate does not offer a direct feature to crop individual layers. However, you can achieve a similar effect by using clipping masks. A clipping mask allows you to use the shape of one layer to define the visible area of another layer.
4.1 Understanding Clipping Masks
A clipping mask essentially “crops” a layer by using the boundaries of another layer. The layer being cropped (the clipped layer) will only be visible within the shape of the layer below it (the clipping mask layer). This is a non-destructive way to control the visibility of individual layers in Procreate.
4.2 Creating a Clipping Mask
To create a clipping mask, first add a new layer above the layer you want to crop. On this new layer, create the shape you want to use as the clipping mask. This can be a simple shape like a rectangle or circle, or a more complex custom shape.
4.3 Filling the Clipping Mask Layer
Ensure that the clipping mask layer is filled with a color. The color itself doesn’t matter, but the layer must contain content for the clipping mask to work. You can fill the layer by dragging the color circle from the top-right corner of the screen onto the layer.
4.4 Applying the Clipping Mask
Next, tap on the layer you want to crop (the layer above the clipping mask layer) to open the layer options. Select Clipping Mask from the menu. The layer will now be clipped to the shape of the layer below it. Only the portion of the layer that falls within the boundaries of the clipping mask layer will be visible.
4.5 Adjusting the Clipping Mask
You can adjust the clipping mask by selecting the clipping mask layer and using the Transform tool to move, resize, or rotate the shape. The clipped layer will update in real-time, allowing you to fine-tune the cropped area. According to “Popular Photography” magazine, this method is a flexible way to manage layer visibility without permanently altering the original image data.
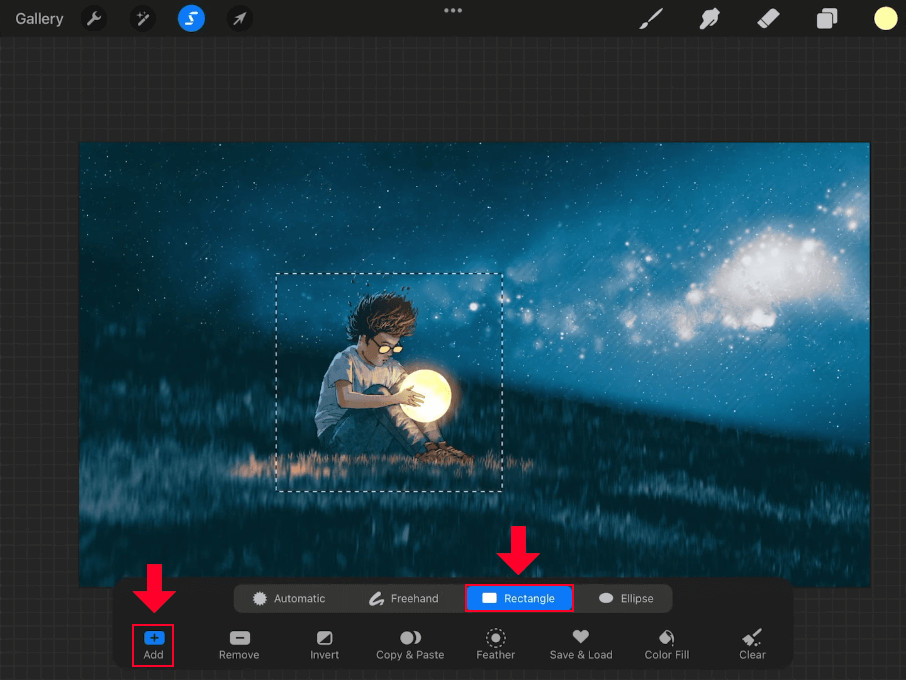 Rectangle selection
5. What are the Benefits of Using Clipping Masks for Cropping?
Using clipping masks for cropping in Procreate offers several benefits, including non-destructive editing, flexibility, and ease of adjustment. Unlike permanently cropping an image, clipping masks allow you to make changes without losing the original data.
5.1 Non-Destructive Editing
One of the primary advantages of using clipping masks is that they are non-destructive. This means that the original image data is preserved, and you can always remove or modify the clipping mask without permanently altering the layer.
5.2 Flexibility
Clipping masks offer a high degree of flexibility. You can easily adjust the shape, size, and position of the clipping mask layer to fine-tune the cropped area. This allows you to experiment with different compositions and effects without committing to a permanent change.
5.3 Ease of Adjustment
Adjusting a clipping mask is simple and straightforward. You can select the clipping mask layer and use the Transform tool to make changes. The clipped layer will update in real-time, giving you immediate feedback on your adjustments.
5.4 Reversibility
If you decide that you no longer want to use a clipping mask, you can easily remove it by tapping on the clipped layer and selecting Clipping Mask again from the layer options. This will revert the layer to its original state, with no loss of data.
6. How Can I Use Cropping to Improve Image Composition in Procreate?
Cropping is a powerful tool for improving image composition in Procreate. By carefully selecting the portion of the image to include, you can enhance the focus, balance, and overall visual appeal.
6.1 Focusing Attention
Cropping can be used to eliminate distractions and focus attention on the main subject of your image. By removing unnecessary elements from the frame, you can draw the viewer’s eye to the most important part of the composition.
6.2 Improving Balance
Cropping can also be used to improve the balance of an image. By adjusting the position of the subject within the frame, you can create a more harmonious and visually pleasing composition. For example, you might use the rule of thirds to position the subject off-center, creating a more dynamic and engaging image.
6.3 Creating Visual Interest
Cropping can be used to create visual interest by emphasizing certain shapes, lines, or patterns within the image. By cropping in tight on a particular detail, you can transform an ordinary scene into a striking abstract composition.
6.4 Experimenting with Different Ratios
Procreate allows you to experiment with different aspect ratios when cropping. Try cropping your image to a square format for a classic, balanced look, or use a wide aspect ratio to create a cinematic feel. According to a study by the American Society of Media Photographers, experimenting with aspect ratios can significantly impact the emotional response to an image.
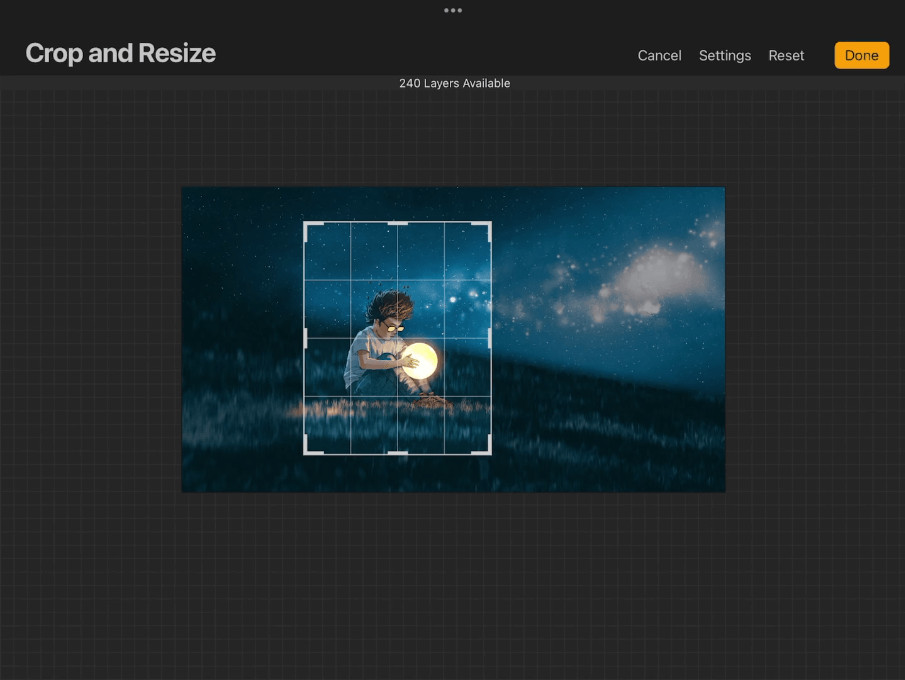 The box with the grid in it represents a preview of the crop to be applied.
7. What are Common Cropping Mistakes to Avoid in Procreate?
While cropping can be a powerful tool, it’s important to avoid common mistakes that can detract from the quality of your image. These mistakes include cropping too tightly, neglecting the rule of thirds, and distorting the aspect ratio.
7.1 Cropping Too Tightly
One of the most common cropping mistakes is cropping too tightly around the subject. This can make the image feel cramped and claustrophobic, and it can also cut off important details. Always leave some breathing room around the subject to allow the eye to move freely within the frame.
7.2 Neglecting the Rule of Thirds
The rule of thirds is a basic principle of composition that suggests dividing the image into nine equal parts with two horizontal and two vertical lines. Placing the subject at one of the intersections of these lines can create a more dynamic and visually appealing composition. Neglecting the rule of thirds can result in a static and unbalanced image.
7.3 Distorting the Aspect Ratio
Distorting the aspect ratio of an image can make it look unnatural and unprofessional. Always maintain the original aspect ratio unless you have a specific reason to change it. If you need to resize an image to fit a particular format, consider adding borders or cropping it proportionally.
7.4 Over-Cropping
Be careful not to over-crop an image. While cropping can be used to eliminate distractions, cropping too aggressively can remove important context or details that contribute to the overall story. Always consider the impact of your cropping decisions on the meaning and impact of the image.
8. What Other Image Editing Tools are Available in Procreate Besides Cropping?
Procreate offers a wide range of image editing tools beyond cropping, including color correction, filters, retouching, and drawing tools. These tools can be used to enhance your images, create special effects, and add creative elements to your artwork.
8.1 Color Correction
Procreate includes a variety of color correction tools that allow you to adjust the brightness, contrast, saturation, and hue of your images. These tools can be used to correct color imbalances, enhance details, and create a specific mood or atmosphere.
8.2 Filters
Procreate offers a selection of filters that can be used to apply various effects to your images. These filters include blur, sharpen, noise, and various artistic effects. Filters can be used to add a creative touch to your images or to correct specific problems.
8.3 Retouching
Procreate includes several retouching tools that can be used to remove blemishes, smooth skin, and correct other imperfections. These tools are particularly useful for portrait photography and can help you achieve a polished and professional look.
8.4 Drawing Tools
Procreate is primarily a drawing and painting app, so it includes a wide range of brushes, pencils, and other drawing tools. These tools can be used to add hand-drawn elements to your images, create custom textures, and add creative details.
9. Where Can I Learn More About Procreate’s Features and Techniques?
To learn more about Procreate’s features and techniques, dfphoto.net offers a variety of resources, including tutorials, articles, and community forums. These resources can help you master Procreate and unlock its full potential.
9.1 Tutorials
dfphoto.net provides a comprehensive collection of tutorials that cover a wide range of Procreate topics, from basic techniques to advanced workflows. These tutorials are designed to help you learn at your own pace and master the skills you need to create stunning artwork.
9.2 Articles
dfphoto.net also features a variety of articles that explore different aspects of Procreate, including tips and tricks, creative ideas, and in-depth analyses of specific features. These articles can help you stay up-to-date with the latest Procreate trends and techniques.
9.3 Community Forums
dfphoto.net hosts a vibrant community forum where you can connect with other Procreate users, ask questions, share your artwork, and get feedback. The forum is a great place to learn from others and find inspiration for your own projects.
9.4 Official Procreate Resources
In addition to dfphoto.net, you can also find valuable information on the official Procreate website and forums. These resources provide in-depth documentation, tutorials, and support from the Procreate team.
10. How Can I Export My Cropped Photo from Procreate?
Exporting your cropped photo from Procreate is a straightforward process. Procreate supports a variety of file formats, including JPEG, PNG, TIFF, and PSD. You can also export your artwork as a Procreate file, which preserves all of your layers and editing history.
10.1 Accessing the Export Menu
To export your cropped photo, tap the Actions icon in the top-left corner of the screen. Then, select Share from the menu. This will open the export menu, where you can choose the desired file format and export options.
10.2 Choosing a File Format
Procreate offers several file format options, each with its own advantages and disadvantages. JPEG is a good choice for photos and other images with complex colors, as it offers good compression and small file sizes. PNG is a better choice for images with transparency or sharp lines, as it supports lossless compression and preserves image quality. TIFF is a lossless format that is often used for archival purposes, as it preserves all of the original image data. PSD is Adobe Photoshop’s native file format, which allows you to open and edit your Procreate artwork in Photoshop.
10.3 Exporting the Photo
Once you’ve chosen a file format, tap the Export button. Procreate will then export your cropped photo to the selected location. You can save the photo to your iPad’s Photos app, iCloud Drive, or another cloud storage service. You can also share the photo directly to social media or send it via email or text message.
10.4 Optimizing for Web Use
If you plan to use your cropped photo on the web, it’s important to optimize it for web use. This means reducing the file size to ensure that it loads quickly and doesn’t consume too much bandwidth. You can optimize your photo by reducing the dimensions, lowering the quality, or using a compression tool.
 The Crop & Resize menu
Tapping the chain icon between the width and height input values will preserve the aspect ratio of your image once it is cropped.
Knowing how to crop a photo in Procreate is essential for refining your compositions and achieving the desired visual impact. Whether you’re adjusting the overall frame or manipulating individual layers, Procreate offers the tools you need to perfect your images. Explore these techniques further and discover how they can enhance your creative projects. Visit dfphoto.net to discover more photography tutorials, find inspiration from stunning images, and connect with a vibrant community of photographers. Located at 1600 St Michael’s Dr, Santa Fe, NM 87505, United States, or call +1 (505) 471-6001.
FAQ
1. How do I access the Crop & Resize tool in Procreate?
The Crop & Resize tool is located in the Actions menu (wrench icon) under the Canvas section.
2. Can I crop individual layers directly in Procreate?
No, Procreate does not have a direct layer cropping feature. Use clipping masks as a workaround.
3. How do I create a clipping mask in Procreate?
Add a new layer above the layer you want to crop, create a shape on the new layer, and then select “Clipping Mask” from the layer options of the layer you want to crop.
4. What is non-destructive editing?
Non-destructive editing means that the original image data is preserved, and changes can be undone or modified without permanently altering the layer.
5. How can cropping improve image composition?
Cropping can focus attention, improve balance, create visual interest, and allow for experimentation with different aspect ratios.
6. What is the rule of thirds?
The rule of thirds is a compositional guideline that suggests dividing an image into nine equal parts and placing the subject at the intersections of these lines.
7. What file formats can I export from Procreate?
Procreate supports JPEG, PNG, TIFF, PSD, and Procreate file formats.
8. How do I maintain the aspect ratio while cropping in Procreate?
Tap the chain icon between the width and height input boxes in the Crop & Resize settings menu.
9. Can I reset the crop area to its original size?
Yes, tap the Reset button in the Crop & Resize menu.
10. Where can I find more Procreate tutorials and resources?
Visit dfphoto.net for tutorials, articles, and a community forum, or check the official Procreate website and forums.