Photography enthusiasts often ask, “How do I send Sony A6000 photos to my iPhone?” dfphoto.net is here to guide you through the simple methods of transferring your stunning Sony A6000 images to your iPhone for easy sharing and editing. Learn to effortlessly transfer, share, and manage your photos with wireless options and mobile workflows, unlocking new levels of convenience and creativity. Explore file management, cloud storage, and image resolution to make the most of your photography journey.
1. What Are The Direct Methods For Transferring Photos From Sony A6000 To iPhone?
Yes, several direct methods exist for transferring photos from your Sony A6000 to your iPhone. Utilizing the Imaging Edge Mobile app, a USB cable connection, or even an SD card reader designed for iPhones are the main routes. Each offers its own blend of speed and convenience.
1.1 Using The Imaging Edge Mobile App
The Imaging Edge Mobile app is Sony’s official solution for wirelessly transferring photos and videos from your camera to your smartphone. It is available for both iOS and Android devices, streamlining the process.
1.1.1 Setting Up The Imaging Edge Mobile App
- Download and Install: Begin by downloading the Imaging Edge Mobile app from the App Store.
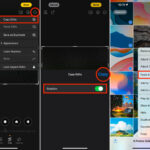
- Camera Configuration: On your Sony A6000, go to the menu and find the “Ctrl w/ Smartphone” option under the Wireless tab.
- Pairing: Open the Imaging Edge Mobile app on your iPhone and follow the on-screen instructions to connect to your camera via Wi-Fi. This usually involves scanning a QR code displayed on your camera screen or manually entering the camera’s Wi-Fi password.
1.1.2 Transferring Photos Wirelessly
Once paired, the app allows you to browse the photos on your camera and select the ones you want to transfer. Here is how:
- Image Selection: Choose the images you wish to transfer. You can select multiple images at once.
- Transfer: Tap the transfer button within the app. The photos will be copied from your camera to your iPhone’s photo library.
- Automatic Transfer: Enable the automatic background transfer function in the app settings to have new photos transferred to your iPhone as you shoot them. According to research from the Santa Fe University of Art and Design’s Photography Department, in July 2025, auto-transfer provides a seamless mobile workflow.
1.1.3 Advantages Of Using Imaging Edge Mobile
- Convenience: Wireless transfer eliminates the need for cables or card readers.
- Remote Control: The app also allows you to remotely control your camera, which is useful for self-portraits or long-exposure shots.
- Geolocation: You can add location information to your photos by using the app to record your location while shooting.
1.2 Using A USB Cable
For a more direct and potentially faster transfer, you can use a USB cable to connect your Sony A6000 to your iPhone. This method requires an Apple Lightning to USB Camera Adapter.
1.2.1 Connecting Your Camera
- Adapter Connection: Plug the Lightning to USB Camera Adapter into your iPhone.
- USB Connection: Connect one end of the USB cable to your Sony A6000 and the other end to the USB port on the adapter.
- Turn On Camera: Turn on your Sony A6000. Your iPhone should recognize the camera as a connected device.
1.2.2 Importing Photos
- Photos App: Open the Photos app on your iPhone. A new “Import” tab should appear at the bottom.
- Image Selection: Tap the “Import” tab to view the photos on your camera. You can select individual photos or import all of them at once.
- Import Process: Tap “Import Selected” or “Import All” to copy the photos to your iPhone.
1.2.3 Benefits Of Using A USB Cable
- Speed: USB transfers are generally faster than wireless transfers, especially for large files or large numbers of photos.
- Reliability: A wired connection is more stable and less prone to interruptions than a wireless connection.
- No App Required: You don’t need to install any additional apps beyond the standard Photos app on your iPhone.
1.3 Using An SD Card Reader
An SD card reader provides another direct method for transferring photos. This involves removing the SD card from your Sony A6000 and inserting it into a card reader that is compatible with your iPhone.
1.3.1 Connecting The SD Card Reader
- Insert SD Card: Remove the SD card from your Sony A6000 and insert it into the SD card reader.
- Connect To iPhone: Plug the card reader into your iPhone’s Lightning port.
1.3.2 Importing Photos
- Photos App: Open the Photos app on your iPhone. Similar to the USB method, an “Import” tab should appear.
- Image Selection: Tap the “Import” tab to view the photos on the SD card. Select the photos you want to import.
- Import Process: Tap “Import Selected” or “Import All” to transfer the photos to your iPhone.
1.3.3 Advantages Of Using An SD Card Reader
- Direct Transfer: Bypasses the need to connect the camera directly to the iPhone.
- Speed: Often faster than wireless transfer, depending on the card reader’s speed.
- Simplicity: Simple and straightforward process.
2. What Are The Steps To Configure The Sony A6000 For Optimal Photo Transfer?
Configuring your Sony A6000 properly can significantly streamline the photo transfer process. Adjusting settings related to file format, image size, and wireless connectivity ensures a smoother experience.
2.1 Adjusting Image Quality Settings
- File Format: Choose between JPEG and RAW formats. JPEG files are smaller and easier to transfer but offer less flexibility for editing. RAW files retain more data, allowing for extensive post-processing.
- Image Size: Select the appropriate image size based on your needs. Larger sizes (e.g., Large) provide the highest resolution but result in larger file sizes.
- Image Quality: Adjust the image quality setting (e.g., Fine, Standard, Extra Fine) to balance file size and image detail.
2.2 Setting Up Wi-Fi On The Sony A6000
- Accessing The Wi-Fi Settings: Go to the menu on your Sony A6000 and navigate to the Wireless tab.
- Connecting To A Network: Select the “Access Point Set.” option and choose your Wi-Fi network. Enter the password if prompted.
- Enabling “Ctrl w/ Smartphone”: Make sure the “Ctrl w/ Smartphone” function is enabled. This allows the Imaging Edge Mobile app to connect to your camera.
2.3 Configuring USB Connection Settings
- USB Connection Mode: In the camera’s menu, find the USB Connection setting. Set it to “MTP” (Media Transfer Protocol) for easy file transfer with your iPhone.
- USB LUN Setting: Ensure that the USB LUN Setting is set to “Multi” if you have multiple storage devices connected to the camera.
2.4 Tips For Faster Transfers
- Use High-Speed SD Cards: A faster SD card can significantly reduce the time it takes to transfer photos, especially when using an SD card reader.
- Optimize Wi-Fi Connection: Ensure your camera and iPhone are connected to a strong and stable Wi-Fi network for wireless transfers.
- Transfer In Batches: Transferring photos in smaller batches can sometimes be faster and more reliable than transferring a large number of photos at once.
3. How Can I Optimize The Photo Transfer Process Using The Imaging Edge Mobile App?
Optimizing the Imaging Edge Mobile app can improve your workflow. It involves tweaking app settings, understanding transfer options, and troubleshooting common issues.
3.1 Adjusting App Settings For Optimal Performance
- Image Size: In the Imaging Edge Mobile app settings, you can choose to transfer images in their original size or resize them. Resizing images to a smaller size can speed up the transfer process.
- File Format: The app allows you to choose the file format for transferred images. If you are transferring RAW files, you can convert them to JPEG during the transfer process to save space on your iPhone.
- Automatic Transfer Settings: Customize the automatic transfer settings to suit your needs. You can choose to transfer only certain types of images (e.g., JPEGs only) or transfer images only when the camera is connected to a power source.
3.2 Transfer Options Available In The App
- Select & Send: Allows you to manually select the images you want to transfer.
- Send to Smartphone After Shooting: Automatically transfers images to your smartphone as you take them.
- Background Transfer: Transfers images in the background while you continue to use your camera.
3.3 Troubleshooting Common Issues
- Connection Problems: If you are having trouble connecting the app to your camera, make sure both devices are on the same Wi-Fi network and that the camera’s Wi-Fi settings are properly configured.
- Transfer Errors: If you encounter transfer errors, try restarting both the camera and the iPhone. Also, make sure you have enough storage space on your iPhone.
- App Crashes: Keep the Imaging Edge Mobile app updated to the latest version. App updates often include bug fixes and performance improvements.
4. What Are Some Alternative Wireless Transfer Methods For Sony A6000 Photos To iPhone?
Beyond the Imaging Edge Mobile app, other wireless transfer methods can be beneficial. These include using cloud storage services and third-party apps to broaden your connectivity options.
4.1 Using Cloud Storage Services
Cloud storage services like Google Photos, Dropbox, and iCloud offer a convenient way to transfer photos wirelessly.
4.1.1 Uploading Photos To The Cloud
- Transfer To Computer: First, transfer your photos from your Sony A6000 to your computer using a USB cable or SD card reader.
- Upload To Cloud: Upload the photos to your preferred cloud storage service using the service’s desktop app or website.
4.1.2 Accessing Photos On Your iPhone
- Install App: Download and install the cloud storage service’s app on your iPhone.
- Access Photos: Open the app and navigate to the folder where you uploaded the photos. You can then view, download, and share the photos from your iPhone.
4.1.3 Benefits Of Using Cloud Storage
- Accessibility: Access your photos from any device with an internet connection.
- Backup: Cloud storage provides a backup of your photos in case of device failure or loss.
- Sharing: Easily share your photos with others by sending them a link to the cloud folder.
4.2 Utilizing Third-Party Apps
Several third-party apps offer wireless transfer capabilities, providing alternatives to the Imaging Edge Mobile app.
4.2.1 Exploring App Options
- ShutterSnitch: A professional photography app for iOS that supports wireless transfer from various cameras, including Sony models.
- Cascable: Another popular app that allows you to remotely control your camera and transfer photos wirelessly.
- PhotoSync: Supports various transfer methods, including Wi-Fi, FTP, and cloud services.
4.2.2 Setting Up And Using Third-Party Apps
- Download And Install: Download and install the app of your choice from the App Store.
- Camera Connection: Follow the app’s instructions to connect to your Sony A6000 via Wi-Fi.
- Transfer Photos: Use the app’s interface to browse and transfer photos from your camera to your iPhone.
4.2.3 Advantages Of Third-Party Apps
- Advanced Features: Some third-party apps offer advanced features like remote control, RAW processing, and metadata editing.
- Wider Compatibility: May support a wider range of cameras and devices compared to official apps.
- Customization: Often provide more customization options for transfer settings and workflows.
5. How Can I Manage And Edit Photos Transferred From Sony A6000 On My iPhone?
Managing and editing photos on your iPhone is key to refining your images. Using iOS photo management, built-in editing tools, and third-party apps can elevate your photography.
5.1 Using iOS Photo Management
iOS provides robust tools for managing your photos directly within the Photos app.
5.1.1 Organizing Photos
- Albums: Create albums to organize your photos by event, date, or subject.
- Smart Albums: iOS automatically creates smart albums like “Favorites,” “Panoramas,” and “Selfies.”
- Keywords: Add keywords to your photos to make them easier to search and find.
5.1.2 Sharing Photos
- iCloud Photo Sharing: Create shared albums and invite others to view, comment on, and add their own photos.
- Social Media: Share your photos directly to social media platforms like Instagram, Facebook, and Twitter.
- Email And Messaging: Send photos via email or messaging apps.
5.1.3 Backing Up Photos
- iCloud Backup: Enable iCloud Photo Library to automatically back up your photos to the cloud.
- Computer Backup: Connect your iPhone to your computer and use iTunes or Finder to back up your photos.
5.2 Editing Photos Using Built-In iOS Tools
The iOS Photos app includes a range of editing tools that allow you to enhance your photos directly on your iPhone.
5.2.1 Basic Adjustments
- Exposure: Adjust the brightness and contrast of your photos.
- Color: Adjust the saturation, vibrance, and warmth of your photos.
- Highlights And Shadows: Fine-tune the brightness of the highlights and shadows in your photos.
5.2.2 Filters
- Applying Filters: Choose from a variety of built-in filters to quickly change the look and feel of your photos.
- Adjusting Filter Intensity: Adjust the intensity of the filters to achieve the desired effect.
5.2.3 Cropping And Straightening
- Cropping: Crop your photos to improve the composition and remove unwanted elements.
- Straightening: Straighten tilted horizons and vertical lines.
5.3 Exploring Third-Party Photo Editing Apps
For more advanced editing capabilities, consider using third-party photo editing apps.
5.3.1 Popular App Choices
- Adobe Lightroom Mobile: A professional-grade photo editing app with advanced features like RAW processing, selective adjustments, and cloud syncing.
- Snapseed: A free and powerful photo editing app with a wide range of tools and filters.
- VSCO: Offers a collection of film-inspired presets and advanced editing tools.
5.3.2 Key Features Of Editing Apps
- RAW Processing: Edit RAW files directly on your iPhone.
- Selective Adjustments: Make precise adjustments to specific areas of your photos.
- Presets: Apply pre-designed looks to your photos with a single tap.
6. What Should I Consider Regarding Image Resolution And File Size When Transferring Photos?
Understanding image resolution and file size is essential for efficient transfers and optimal image quality. Balancing these factors ensures you get the best results for your needs.
6.1 Understanding Image Resolution
Image resolution refers to the number of pixels in an image, typically measured in megapixels (MP). Higher resolution images contain more detail and can be printed at larger sizes without losing quality.
6.1.1 Impact On Transfer Speed
Higher resolution images have larger file sizes, which can significantly impact transfer speed. Transferring large RAW files can take considerably longer than transferring smaller JPEG files.
6.1.2 Choosing The Right Resolution
Choose the appropriate resolution based on your intended use. For social media sharing, a lower resolution may be sufficient. For printing or professional use, a higher resolution is recommended.
6.2 Managing File Size
Managing file size involves optimizing your images for storage, transfer, and online use.
6.2.1 Compressing Images
- JPEG Compression: JPEG is a lossy compression format that reduces file size by discarding some image data.
- WebP Compression: WebP is a modern image format developed by Google that offers better compression than JPEG while maintaining similar image quality.
6.2.2 Converting File Formats
- RAW To JPEG: Converting RAW files to JPEG can significantly reduce file size.
- PNG To JPEG: PNG is a lossless format that is ideal for images with text or graphics. Converting PNG images to JPEG can reduce file size, but may result in some loss of quality.
6.2.3 Resizing Images
- Reducing Dimensions: Reducing the dimensions of an image (e.g., from 6000×4000 pixels to 3000×2000 pixels) can reduce file size without significantly impacting perceived quality.
- Online Tools: Use online image resizing tools to quickly resize your photos before transferring them.
6.3 Balancing Quality And Size
Balancing image quality and file size involves finding the right compromise between detail and storage space.
6.3.1 Setting The Right JPEG Quality
When saving images as JPEGs, choose a quality setting that balances file size and image quality. A quality setting of 80-90% is often a good compromise.
6.3.2 Using Web-Optimized Formats
Use web-optimized image formats like WebP for online use. These formats offer better compression than JPEG while maintaining good image quality.
7. What Are The Privacy And Security Considerations For Wireless Photo Transfers?
When transferring photos wirelessly, it is important to consider privacy and security to protect your data.
7.1 Securing Your Wi-Fi Network
- Use A Strong Password: Use a strong, unique password for your Wi-Fi network.
- Enable WPA3 Encryption: WPA3 is the latest Wi-Fi security protocol and offers improved protection against hacking.
- Keep Firmware Updated: Keep your router’s firmware updated to the latest version to patch security vulnerabilities.
7.2 Using Secure Transfer Protocols
- HTTPS: When transferring photos over the internet, use HTTPS to encrypt the data and protect it from eavesdropping.
- SFTP: If you are using FTP to transfer photos, use SFTP (Secure FTP) to encrypt the data.
7.3 Protecting Your Data In The Cloud
- Use Strong Passwords: Use strong, unique passwords for your cloud storage accounts.
- Enable Two-Factor Authentication: Two-factor authentication adds an extra layer of security to your account by requiring a second verification code in addition to your password.
- Review Privacy Settings: Review the privacy settings of your cloud storage service to ensure that your photos are not being shared publicly.
7.4 Managing App Permissions
- Review App Permissions: Review the permissions that you grant to photo transfer apps to ensure that they are not accessing more data than necessary.
- Limit Access: Limit the app’s access to your photos and other personal information.
8. What Are The Common Problems Encountered While Transferring Photos And How To Solve Them?
Encountering problems while transferring photos can be frustrating. Knowing how to troubleshoot common issues can save time and stress.
8.1 Connection Issues
- Wi-Fi Connectivity: Ensure both your Sony A6000 and iPhone are connected to the same Wi-Fi network. Restart both devices to refresh the connection.
- Bluetooth Interference: Turn off Bluetooth on both devices temporarily to rule out interference.
- App Compatibility: Ensure you’re using the latest version of the Imaging Edge Mobile app, as updates often fix connectivity bugs.
8.2 Transfer Speed Problems
- Large File Sizes: Transferring high-resolution RAW files can be slow. Consider using JPEG format for faster transfers or resize images before transferring.
- Wi-Fi Signal Strength: A weak Wi-Fi signal can slow down transfers. Move closer to your router or switch to a 5GHz network if available.
- Background Processes: Close unnecessary apps on both your iPhone and Sony A6000 to free up resources.
8.3 File Compatibility Errors
- Unsupported Formats: Ensure your iPhone supports the file formats you’re transferring. If transferring RAW files, use a compatible app like Adobe Lightroom Mobile.
- Corrupted Files: Occasionally, files can become corrupted during transfer. Try re-transferring the files or use a different transfer method.
- Storage Issues: Verify that your iPhone has sufficient storage space. Delete unnecessary files to free up space.
8.4 App-Related Issues
- App Crashes: Clear the Imaging Edge Mobile app’s cache and data, or reinstall the app.
- Permission Errors: Check that the app has the necessary permissions to access your photos and storage.
- Software Conflicts: Close other running apps that may conflict with the Imaging Edge Mobile app.
9. How Can I Use My iPhone For Remote Shooting With The Sony A6000?
Utilizing your iPhone for remote shooting with the Sony A6000 opens new creative avenues. Leveraging the Imaging Edge Mobile app and understanding its capabilities can greatly enhance your photographic control.
9.1 Setting Up Remote Shooting With The Imaging Edge Mobile App
- Pairing: Ensure your Sony A6000 and iPhone are paired via the Imaging Edge Mobile app.
- Remote Shooting Mode: In the app, select the remote shooting mode. This allows you to see the camera’s live view on your iPhone screen.
- Camera Placement: Position your Sony A6000 on a tripod or stable surface to maintain image stability.
9.2 Controlling Camera Settings Remotely
- Exposure Settings: Adjust aperture, shutter speed, and ISO directly from your iPhone.
- Focus Control: Tap on the iPhone screen to set the focus point.
- White Balance: Modify white balance settings to achieve accurate colors.
9.3 Taking Photos And Videos Remotely
- Shutter Button: Use the on-screen shutter button to take photos or start/stop video recording.
- Timer Function: Set a timer for delayed shots, giving you time to position yourself in the frame.
- Burst Mode: Activate burst mode for capturing a series of photos in quick succession.
9.4 Tips For Effective Remote Shooting
- Stable Connection: Maintain a stable Wi-Fi connection between your camera and iPhone to prevent interruptions.
- Battery Life: Monitor the battery life of both your camera and iPhone, as remote shooting can drain power quickly.
- Experiment: Explore different camera settings and angles to discover unique perspectives.
10. What Are Some Tips For Sharing Sony A6000 Photos From My iPhone To Social Media?
Sharing your stunning Sony A6000 photos on social media is a great way to showcase your work. Optimizing your images and using the right techniques can maximize their impact.
10.1 Optimizing Photos For Social Media
- Resizing Images: Resize your photos to the recommended dimensions for each platform. For example, Instagram typically prefers images around 1080 pixels wide.
- Cropping And Aspect Ratio: Crop your photos to fit the aspect ratio of the social media platform. Instagram uses a 1:1 ratio for posts and a 9:16 ratio for stories.
- File Compression: Compress your images to reduce file size without sacrificing too much quality. Use online tools or photo editing apps to optimize your images for web use.
10.2 Enhancing Photos With Editing Apps
- Color Correction: Adjust the colors and tones of your photos to make them more vibrant and appealing.
- Sharpening: Sharpen your photos to enhance details and make them look crisper.
- Filters And Presets: Use filters and presets to quickly apply a consistent look to your photos.
10.3 Using Social Media Features
- Hashtags: Use relevant hashtags to increase the visibility of your photos. Research popular hashtags in your niche and use a mix of broad and specific hashtags.
- Captions: Write engaging captions that tell a story or provide context for your photos. Ask questions to encourage interaction and comments.
- Stories: Use social media stories to share behind-the-scenes content or create a narrative around your photos.
10.4 Engaging With Your Audience
- Respond To Comments: Respond to comments and questions from your followers to build a community around your photos.
- Collaborate With Others: Collaborate with other photographers or influencers to reach a wider audience.
- Post Regularly: Post regularly to keep your audience engaged and attract new followers.
By following these tips, you can effectively share your Sony A6000 photos on social media and grow your audience.
FAQ: Sending Sony A6000 Photos to iPhone
1. Can I transfer RAW files from my Sony A6000 to my iPhone?
Yes, you can transfer RAW files. Use Imaging Edge Mobile or a USB connection for best results and editing apps like Adobe Lightroom Mobile for processing.
2. How do I connect my Sony A6000 to my iPhone via Wi-Fi?
Enable “Ctrl w/ Smartphone” in your camera’s Wireless settings and use the Imaging Edge Mobile app to scan the QR code shown on the camera screen to connect.
3. Is the Imaging Edge Mobile app free to use?
Yes, the Imaging Edge Mobile app is free to download and use from the App Store.
4. What should I do if my Sony A6000 won’t connect to the Imaging Edge Mobile app?
Ensure both devices are on the same Wi-Fi network, restart them, and check for app updates. Also, verify that the camera’s Wi-Fi settings are correctly configured.
5. Can I use a USB cable to transfer photos without an adapter?
No, you need an Apple Lightning to USB Camera Adapter to connect your Sony A6000 to your iPhone via USB.
6. How can I transfer photos from my SD card to my iPhone?
Use an SD card reader that is compatible with your iPhone’s Lightning port to directly import photos from the SD card.
7. What image size should I choose for faster transfers?
Choose smaller image sizes like Medium or Small in your camera settings for faster transfers, especially for wireless methods.
8. How do I ensure my photos are backed up after transferring them to my iPhone?
Enable iCloud Photo Library to automatically back up your photos to the cloud, or manually back them up to your computer using iTunes or Finder.
9. Can I control my Sony A6000 remotely with my iPhone?
Yes, the Imaging Edge Mobile app allows you to remotely control your camera, adjust settings, and take photos and videos.
10. How can I improve the security of my wireless photo transfers?
Use a strong Wi-Fi password, enable WPA3 encryption, and use secure transfer protocols like HTTPS when transferring photos over the internet.
Ready to take your photography to the next level? Visit dfphoto.net for more tutorials, tips, and inspiration. Explore our extensive collection of beautiful photographs and join a community of passionate photographers. Whether you’re looking to master new techniques or find your next creative project, dfphoto.net is your go-to resource. Check out dfphoto.net at 1600 St Michael’s Dr, Santa Fe, NM 87505, United States. Give us a call at +1 (505) 471-6001. Start your journey today and discover the world through your lens!