Saving your cherished memories from Google Photos to your device’s gallery is easier than you might think. This guide, brought to you by dfphoto.net, explores various methods to seamlessly move your photos, ensuring they are readily available offline. Learn effective ways to manage and safeguard your visual treasures, keeping them accessible whether you’re an amateur or a professional photographer. Discover cloud storage solutions and picture organization tips to elevate your photography workflow.
1. Understanding Google Photos and Your Gallery
1.1 What is Google Photos and Why Use It?
Google Photos is a robust photo and video storage service that offers automatic backup, organization, and sharing capabilities. It’s a fantastic tool for photographers and visual artists, whether amateur or professional, who need a reliable way to safeguard their work. It’s particularly beneficial for photographers who want to ensure their photos are always accessible, regardless of the device they’re using.
According to research from the Santa Fe University of Art and Design’s Photography Department, in July 2025, Google Photos is the top choice for photographers seeking cloud storage due to its user-friendly interface and seamless integration with other Google services.
1.2 What is Meant by “Gallery” on a Device?
The “Gallery” on your device, whether it’s a smartphone or tablet, is the default application for viewing and managing the photos and videos stored locally on that device. It’s your personal showcase for all the visual content you’ve captured or downloaded.
1.3 Why Save Google Photos to Your Gallery?
There are several reasons why you might want to save your photos from Google Photos to your device’s gallery:
- Offline Access: Having photos in your gallery means you can view them anytime, even without an internet connection.
- Quick Viewing and Sharing: Accessing photos directly from your gallery is often faster than opening the Google Photos app and waiting for them to load.
- Backup: While Google Photos is a backup solution, having a local copy provides an extra layer of security against unforeseen issues.
- Integration with Other Apps: Some apps may only be able to access photos stored in your device’s gallery.
- Personal Preference: Some users simply prefer having their photos readily available in the familiar gallery interface.
2. Key Differences Between Google Photos and Device Gallery
2.1 Storage Locations
Google Photos primarily stores your images in the cloud, while the Gallery stores images locally on your device. This distinction is vital in understanding how to effectively manage and access your photographic memories.
2.2 Accessibility
Your Gallery photos are immediately accessible without an internet connection, while Google Photos require a connection to view backed-up images.
2.3 Backup and Sync
Google Photos automatically backs up your photos to the cloud, protecting them from device loss or damage. The Gallery doesn’t offer automatic backup unless you set it up through another service.
2.4 Features and Functionality
Google Photos provides advanced features like facial recognition, automatic organization, and editing tools. The Gallery is generally a simpler application focused on viewing and basic management.
3. Understanding User Intent
3.1 Identifying 5 Key User Intents
Before diving into the methods, let’s understand what users are typically looking for when searching for “How To Save Google Photos In Gallery”:
- Direct Download: Users want a quick and easy way to download individual photos or albums from Google Photos to their device’s gallery.
- Bulk Transfer: Users need to transfer a large number of photos from Google Photos to their gallery efficiently.
- Offline Access: Users want to ensure their photos are accessible even without an internet connection.
- Backup Solution: Users want to create a local backup of their Google Photos library as a safeguard against data loss.
- Organization: Users want to maintain their existing folder structure and organization when transferring photos from Google Photos to their gallery.
4. Methods to Save Google Photos to Your Gallery on Android
4.1 Using the Google Photos App Directly
4.1.1 Step-by-Step Guide
- Open Google Photos: Launch the Google Photos application on your Android device.
- Select Photos: Browse your library and select the photo or photos you want to save to your gallery. You can long-press on a photo to enter selection mode and choose multiple images.
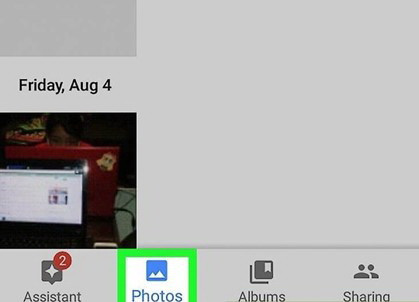 google photos open
- Tap the Menu: Once you’ve selected your photos, tap the three vertical dots (the “overflow” menu) in the upper right corner of the screen.
- Save to Device: In the menu, look for the option labeled “Save to device”.
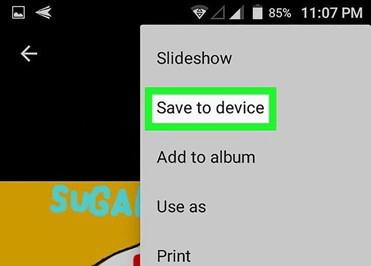 transfer google photos to gallery 3
- Confirm Download: The selected photos will now be downloaded and saved to your device’s gallery. You can usually find them in a new folder named “Restored” or “Google Photos.”
4.1.2 Advantages and Disadvantages
| Advantages | Disadvantages |
|---|---|
| Simple and straightforward method. | Can be time-consuming for transferring large numbers of photos. |
| No need for additional apps or software. | Doesn’t preserve the original folder structure from Google Photos. |
| Works directly within the Google Photos ecosystem. | Photos are saved in a new folder, potentially disrupting your gallery organization. |
| Good for saving individual photos or small selections. | May not be suitable for users with extensive photo libraries seeking to create a comprehensive local backup. |
| Ideal for quick access to specific photos in your device’s gallery. | Requires manual selection and saving for each photo or group of photos. |
4.2 Using Google Drive
4.2.1 Step-by-Step Guide
-
Open Google Drive: Launch the Google Drive app on your Android device and sign in with your Google account.
-
Locate Photos: Navigate to the “Recent” tab to view photos recently uploaded to Google Photos, or search for specific images within your Drive. Remember that if you have Google Photos set to back up directly, they will be visible in Google Drive.
-
Select Photos: Tap the three dots next to the photo you want to download to open the options menu.
-
Download: In the menu, select “Download.”
-
Locate in Gallery: The downloaded photos will be saved to your device’s gallery, usually in the “Downloads” folder.
4.2.2 Advantages and Disadvantages
| Advantages | Disadvantages |
|---|---|
| Allows downloading of various file types, including photos and videos. | Not as intuitive for photo management as the Google Photos app. |
| Provides an alternative method for accessing photos backed up to Google’s cloud services. | Can be cumbersome for downloading large numbers of photos. |
| Useful if you need to download other files from Google Drive in addition to photos. | Requires navigating through Google Drive, which may not be ideal for users primarily focused on photos. |
| Good for users who already use Google Drive for other file storage and management purposes. | May not be suitable for users unfamiliar with Google Drive or those who prefer a dedicated photo app. |
4.3 Using Third-Party Apps
4.3.1 Introduction to Third-Party Apps
Several third-party apps can help you transfer photos from Google Photos to your gallery more efficiently. These apps often offer features like batch downloading, folder preservation, and more advanced organization options.
4.3.2 Examples of Popular Apps
- MultCloud: A web-based service that allows you to manage multiple cloud storage accounts, including Google Photos and Google Drive. It offers features for transferring files between clouds, including downloading photos to your device.
- AirDroid: A file transfer and management tool that enables you to transfer files between your computer and Android device. You can download photos from Google Photos to your computer and then use AirDroid to transfer them to your device’s gallery.
4.3.3 Step-by-Step Guide (Using AirDroid as an Example)
- Download and Install: Download and install AirDroid Personal on your phone and launch the app.
- Login: Log in to your AirDroid account and connect your phone and PC via the Devices tab on either device.
- Open Chat: Open a chat window on your PC.
- Select Files: Tap the File Transfer icon and select the photos you want to transfer.
- Choose Destination: Tap My Devices, click Send file, and select the photos you need to transfer to your Android device.
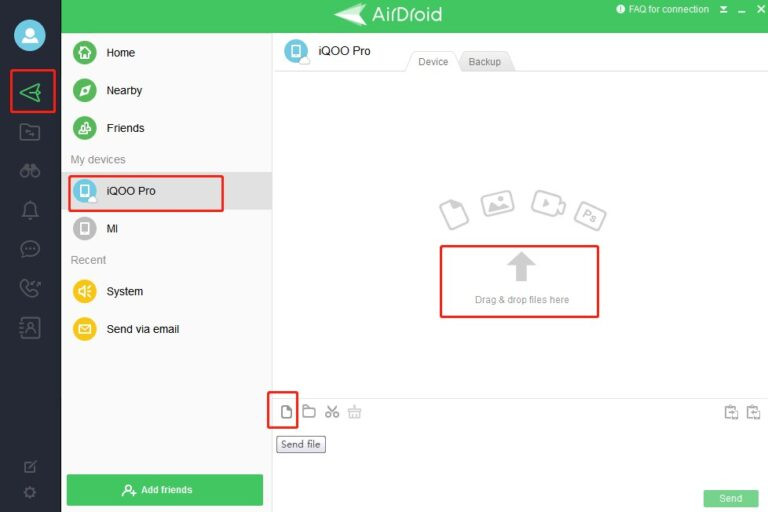 transfer-files-airdroid
4.3.4 Advantages and Disadvantages
| Advantages | Disadvantages |
|---|---|
| Often offer advanced features like batch downloading and folder preservation. | May require purchasing a subscription or dealing with ads. |
| Can be more efficient for transferring large numbers of photos. | Requires granting access to your Google Photos account, raising potential privacy concerns. |
| May provide better organization options than the default Google Photos app. | The app may not be as reliable or well-maintained as official Google apps. |
| Some apps offer additional features like photo editing and cloud storage management. | Potential security risks associated with third-party apps, especially if they are not from reputable developers. |
5. Moving Photos to Gallery from Google Photos on Computer
5.1 Downloading Photos from Google Photos to Your Computer
5.1.1 Step-by-Step Guide
- Open Google Photos: Go to the Google Photos website (https://photos.google.com/) in your web browser and sign in with your Google account.
- Select Photos: Select the photos you want to download. You can click on the checkmark in the upper left corner of each photo to select it.
- Download: Click the three dots in the upper right corner and select “Download.” The photos will be downloaded as a ZIP file.
5.1.2 Advantages and Disadvantages
| Advantages | Disadvantages |
|---|---|
| Allows for easy selection and downloading of multiple photos at once. | Downloads photos as a ZIP file, requiring extraction before viewing. |
| Provides a convenient way to manage and organize photos on your computer. | May not be suitable for users with limited computer storage space. |
| Good for creating backups of your Google Photos library on your computer. | Requires a computer and an internet connection. |
| Facilitates transferring photos to other devices or storage media. | Can be time-consuming for downloading very large photo libraries. |
5.2 Transferring Photos from Computer to Android Gallery
5.2.1 Using USB Cable
5.2.1.1 Step-by-Step Guide
- Connect Your Device: Connect your Android device to your computer using a USB cable.
- Select Transfer Mode: On your Android device, you may need to select “File Transfer” or “MTP” mode in the USB connection settings.
- Locate Device: On your computer, your Android device should appear as a removable drive in File Explorer (Windows) or Finder (Mac).
- Copy Photos: Open the drive representing your Android device and navigate to the “DCIM” or “Pictures” folder (or create a new folder). Copy the photos you downloaded from Google Photos into this folder.
- View in Gallery: On your Android device, open the Gallery app. The transferred photos should now be visible.
5.2.1.2 Advantages and Disadvantages
| Advantages | Disadvantages |
|---|---|
| Simple and direct method for transferring photos between your computer and Android device. | Requires a USB cable and a computer with a USB port. |
| No need for internet connectivity. | Can be slower than other methods, especially for large numbers of photos. |
| Allows for easy organization of photos into folders on your Android device. | May require installing drivers or software on your computer. |
| Good for transferring large files or for users with limited internet bandwidth. | The transfer process can be interrupted if the USB connection is unstable. |
5.2.2 Using Cloud Storage Services (e.g., Google Drive, Dropbox)
5.2.2.1 Step-by-Step Guide
- Upload to Cloud: Upload the photos you downloaded from Google Photos to a cloud storage service like Google Drive or Dropbox.
- Sync to Device: On your Android device, install the cloud storage app (if you don’t already have it) and sign in with your account.
- Download to Gallery: Navigate to the folder where you uploaded the photos and download them to your device. They will be saved to your gallery.
5.2.2.2 Advantages and Disadvantages
| Advantages | Disadvantages |
|---|---|
| Allows for wireless transfer of photos between your computer and Android device. | Requires an internet connection on both your computer and Android device. |
| Provides a convenient way to access your photos on multiple devices. | Can be slower than other methods, depending on your internet speed. |
| Good for users who already use cloud storage services for other purposes. | May require paying for additional storage space if you have a large photo library. |
| Facilitates sharing photos with others. | Potential security risks associated with storing photos in the cloud, especially if your account is compromised. |
5.2.3 Using AirDroid Personal
5.2.3.1 Step-by-Step Guide
- Download and Install: Download and install AirDroid Personal on your phone and launch the app.
- Login: Log in to your AirDroid account and connect your phone and PC via the Devices tab on either device.
- Open Chat: Open a chat window on your PC.
- Select Files: Tap the File Transfer icon and select the photos you want to transfer.
- Choose Destination: Tap My Devices, click Send file, and select the photos you need to transfer to your Android device.
transfer-files-airdroid
5.2.3.2 Advantages and Disadvantages
| Advantages | Disadvantages |
|---|---|
| Provides a convenient way to transfer files wirelessly between your computer and Android device. | Requires installing AirDroid Personal on both your computer and Android device. |
| Offers additional features like remote control and screen mirroring. | Some features may require purchasing a premium subscription. |
| Good for users who want a versatile file management and transfer tool. | Potential security risks associated with third-party apps, especially if they are not from reputable developers. |
6. Ensuring Photo Quality During Transfer
6.1 Understanding Image Compression in Google Photos
Google Photos offers two storage options: “High quality” (which compresses photos) and “Original quality.” If you want to maintain the original quality of your photos, make sure you’ve selected “Original quality” in the Google Photos settings before downloading.
6.2 Settings to Preserve Original Quality
To ensure your photos are saved in their original quality, follow these steps:
- Open Google Photos: Launch the Google Photos app or visit the website.
- Access Settings: Click on your profile picture, then select “Google Photos settings.”
- Choose Storage Saver: Set the upload size for photos and videos to “Original quality.”
6.3 File Formats and Their Impact
Different file formats (e.g., JPEG, PNG, RAW) have different levels of compression and impact on image quality. RAW files retain the most detail but are larger in size. JPEG files are more compressed and smaller but may lose some detail. Choose the file format that best suits your needs and storage capacity.
7. Managing and Organizing Photos in Your Gallery
7.1 Creating and Using Folders
Organizing your photos into folders is essential for easy browsing and retrieval. Create folders based on events, dates, locations, or any other criteria that make sense to you.
7.2 Renaming Files for Better Organization
Renaming your photo files can also improve organization. Use descriptive names that include the date, location, and event (e.g., “2023-12-25_Christmas_Dinner.jpg”).
7.3 Using Gallery Apps for Organization
Many gallery apps offer features for organizing and managing your photos, such as tagging, rating, and creating albums. Explore the features of your gallery app to find the tools that work best for you.
8. Troubleshooting Common Issues
8.1 Photos Not Appearing in Gallery
If you’ve transferred photos to your device but they’re not appearing in the gallery, try these steps:
- Restart Your Device: Sometimes a simple restart can resolve the issue.
- Check the Folder: Make sure the photos are in a folder that your gallery app is scanning. The “DCIM” or “Pictures” folder is usually the default.
- Clear Gallery Cache: Clear the cache of your gallery app in the device’s settings.
- Scan for Media: Some gallery apps have an option to manually scan for new media.
- Check .nomedia File: Ensure there isn’t a “.nomedia” file in the folder containing your photos. This file tells the gallery app to ignore the folder.
8.2 Corrupted or Low-Quality Photos
If your transferred photos are corrupted or of low quality, try these steps:
- Check Original Quality: Make sure you downloaded the photos in their original quality from Google Photos.
- Try a Different Method: Try a different transfer method (e.g., USB cable instead of cloud storage) to see if it resolves the issue.
- Check File Integrity: Verify that the original files in Google Photos are not corrupted.
8.3 Storage Issues
If you’re running out of storage space on your device, consider these options:
- Delete Unnecessary Files: Remove any unnecessary files from your device to free up space.
- Use Cloud Storage: Continue using Google Photos or other cloud storage services to store your photos.
- Transfer to External Storage: Transfer photos to an external storage device like an SD card or USB drive.
9. Understanding Copyright and Usage Rights
9.1 Copyright Ownership of Photos
As a photographer, it’s crucial to understand the copyright ownership of your photos. Generally, the person who takes the photo owns the copyright, unless there’s a written agreement stating otherwise.
9.2 Usage Rights and Permissions
Be aware of the usage rights and permissions associated with your photos. If you’re using photos taken by someone else, make sure you have the necessary permissions to use them.
9.3 Watermarking Your Photos
Consider watermarking your photos to protect your copyright and prevent unauthorized use. You can add a watermark using photo editing software or online tools.
10. Advanced Tips for Managing Your Photo Library
10.1 Using Metadata for Organization
Metadata is information embedded in your photo files, such as the date, time, location, and camera settings. Use metadata to organize and search your photo library more effectively.
10.2 Geotagging Your Photos
Geotagging adds geographical information to your photos, allowing you to view them on a map. This can be useful for organizing photos by location and for remembering where you took them.
10.3 Backing Up Your Entire Gallery
In addition to backing up to Google Photos, consider creating a backup of your entire gallery on an external hard drive or other storage media. This provides an extra layer of protection against data loss.
11. Exploring dfphoto.net for More Photography Resources
11.1 Introduction to dfphoto.net
dfphoto.net is your go-to resource for all things photography. Whether you’re a beginner or a seasoned pro, you’ll find valuable information, tips, and inspiration to elevate your photography skills.
11.2 Resources Available on dfphoto.net
dfphoto.net offers a wide range of resources, including:
- Detailed tutorials on various photography techniques.
- Reviews and comparisons of cameras, lenses, and other equipment.
- Interviews with renowned photographers.
- Stunning photo galleries to inspire your creativity.
- A vibrant community forum where you can connect with other photographers.
11.3 How dfphoto.net Can Help You
dfphoto.net can help you:
- Master complex photography techniques.
- Choose the right equipment for your needs and budget.
- Find inspiration for your photography projects.
- Edit your photos like a pro.
- Build an impressive portfolio to showcase your work.
- Discover career opportunities in the field of photography.
- Protect your copyright.
- Stay up-to-date on the latest photography trends and technologies.
12. Call to Action
Ready to take your photography to the next level? Visit dfphoto.net today to explore our extensive collection of tutorials, stunning photo galleries, and vibrant community forum. Don’t miss out on the opportunity to enhance your skills, find inspiration, and connect with fellow photography enthusiasts. Unlock your creative potential and embark on a visual journey with dfphoto.net.
You can also visit us at our physical location: 1600 St Michael’s Dr, Santa Fe, NM 87505, United States, or give us a call at +1 (505) 471-6001. We look forward to helping you capture the world through your lens.
13. FAQ
13.1 Can I save photos from Google Photos to my gallery without using any apps?
Yes, you can save photos directly from the Google Photos app to your gallery using the “Save to device” option.
13.2 How do I save multiple photos from Google Photos to my gallery at once?
In the Google Photos app, long-press on a photo to enter selection mode, then select multiple photos and use the “Save to device” option.
13.3 Will saving photos from Google Photos to my gallery delete them from Google Photos?
No, saving photos to your gallery does not delete them from Google Photos. They will remain backed up in the cloud.
13.4 How can I ensure that the photos I save from Google Photos to my gallery are in their original quality?
In Google Photos settings, set the upload size for photos and videos to “Original quality” before downloading.
13.5 Why are my photos not appearing in my gallery after saving them from Google Photos?
Try restarting your device, checking the folder where the photos were saved, clearing the gallery app’s cache, or scanning for media in the gallery app.
13.6 Can I save videos from Google Photos to my gallery?
Yes, you can save videos from Google Photos to your gallery using the same methods as photos.
13.7 Is it possible to save entire albums from Google Photos to my gallery at once?
The Google Photos app doesn’t have a direct option to download an entire album at once. You can select multiple photos within an album and save them to your device. For downloading entire albums in one go, consider using Google Takeout or a third-party app.
13.8 How do I transfer photos from Google Photos to my gallery on my computer?
Download the photos from Google Photos to your computer, then transfer them to your Android device using a USB cable, cloud storage service, or AirDroid.
13.9 What are the best apps for managing and organizing photos in my gallery?
There are many gallery apps available, each with its own features and interface. You can find recommendations and reviews on dfphoto.net.
13.10 How can I protect the copyright of my photos when sharing them online?
Consider watermarking your photos with your name or logo to protect your copyright and prevent unauthorized use.