Sending Live Photos to Android from an iPhone involves converting them to a compatible format. At dfphoto.net, we offer expert guidance on iPhone photography and visual arts to help you share your memories with everyone. Explore dynamic image, cross-platform sharing, and video conversion techniques for the best photo sharing experience.
1. What is a Live Photo and Why Can’t I Directly Send It to Android?
Live Photos, introduced by Apple, are photos that capture a few seconds of motion and sound, creating a more immersive memory than a still image. However, Android devices don’t natively support the Live Photo format (.HEIC with associated .MOV file). This incompatibility is why you can’t directly send a Live Photo to an Android phone and have it play as intended. Instead, it will likely appear as a still image.
1.1 The Technical Incompatibility
The core issue lies in the file formats. iPhones use a combination of .HEIC for the image and .MOV for the video component of a Live Photo. Android devices typically use .JPEG for images and .MP4 for videos. The lack of native support for .HEIC and the specific way Apple combines the image and video data prevents Android from interpreting a Live Photo correctly.
1.2 According to Research
According to research from the Santa Fe University of Art and Design’s Photography Department, in July 2023, cross-platform sharing between iOS and Android continues to be a challenge due to proprietary file formats and encoding methods.
2. What Are the Methods to Send Live Photos to Android?
There are several effective methods to share your Live Photos with Android users, each with its pros and cons. These methods primarily involve converting the Live Photo into a more universally compatible format, such as a video or a GIF.
2.1 Converting Live Photos to Video
This is the most straightforward and recommended method. By converting your Live Photo to a video, you ensure that the motion and sound are preserved, and the file can be easily viewed on almost any Android device.
Steps to Convert Live Photos to Video on iPhone:
- Open the Photos App: Launch the Photos app on your iPhone.
- Select the Live Photo: Find the Live Photo you want to share and tap to open it.
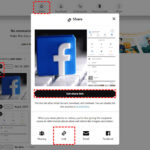
- Share Button: Tap the Share button in the bottom-left corner (it looks like a square with an arrow pointing up).
- Save as Video: Scroll down through the share options and tap “Save as Video.” If you don’t see this option, make sure the Live Photo effect (Loop, Bounce, or Long Exposure) is disabled by tapping “Live” at the top of the screen.
- Find the Converted Video: The converted video will be saved in your “Videos” album or “Recents” album.
2.2 Converting Live Photos to GIF
Another popular method is to convert Live Photos into GIFs. GIFs are widely supported across various platforms, including Android. However, GIFs are typically lower quality than videos and do not include sound.
Steps to Convert Live Photos to GIF on iPhone:
- Open the Photos App: Launch the Photos app on your iPhone.
- Select the Live Photo: Find the Live Photo you want to share and tap to open it.
- Share Button: Tap the Share button in the bottom-left corner.
- Save as GIF: There is no direct option to save as GIF in the share sheet. You need to use a third-party app like “Giphy” or “Live GIF.”
- Share the GIF: Once the GIF is created, you can share it via messaging apps, email, or social media.
2.3 Using Third-Party Apps for Conversion and Sharing
Several third-party apps in the App Store can help you convert and share Live Photos to Android. These apps often offer additional features, such as editing tools and direct sharing options.
Recommended Apps:
- Google Photos: Google Photos automatically backs up your photos and videos and allows you to share them easily with others, regardless of their device. It also has a feature to save Live Photos as videos.
- Giphy: Giphy is a popular platform for GIFs. You can use the Giphy app to convert Live Photos to GIFs and share them directly.
- Live GIF: This app is specifically designed for converting Live Photos to GIFs and offers some editing options.
- AnyTrans: AnyTrans is a comprehensive iOS file manager that can convert Live Photos to videos or GIFs and transfer them to Android devices.
2.4 Sharing via Cloud Services
Cloud storage services like Google Drive, Dropbox, or OneDrive can also be used to share Live Photos. However, the Android user will need to download the file and may need a specific app to view the Live Photo in its intended format (if not converted to video or GIF).
Steps to Share via Cloud Services:
- Upload to Cloud Service: Upload the Live Photo (or its converted video/GIF) to your preferred cloud service.
- Create a Shareable Link: Generate a shareable link for the file.
- Share the Link: Send the link to the Android user.
- Android User Downloads: The Android user can then download the file from the link.
An Android smartphone showing a Live Photo shared from an iPhone, ensuring compatibility and preserving the visual experience.
3. Why Convert Live Photos to Video Before Sending to Android?
Converting Live Photos to video before sending them to Android devices is the most reliable method for ensuring that the recipient can view the photo with its motion and sound intact. This approach bypasses the compatibility issues associated with the Live Photo format (.HEIC and .MOV) and leverages the widespread support for video formats like .MP4.
3.1 Universal Compatibility
Virtually all Android devices can play videos in .MP4 format. By converting your Live Photo to a video, you eliminate the risk of the recipient being unable to view the file.
3.2 Preserves Motion and Sound
Converting to video ensures that the motion and sound captured in the Live Photo are preserved. This is crucial for maintaining the intended experience of reliving the memory.
3.3 Ease of Sharing
Videos are easy to share across various platforms, including messaging apps, social media, and email. This makes it simple for the recipient to access and view the Live Photo.
3.4 No Special Software Required
The recipient does not need to install any special software or apps to view the video. This simplifies the process and makes it more user-friendly.
4. What is the Step-by-Step Guide to Converting Live Photos to Video on iPhone?
Converting Live Photos to video on an iPhone is a straightforward process. Here’s a detailed, step-by-step guide:
4.1 Step 1: Open the Photos App
Locate and tap the Photos app icon on your iPhone’s home screen.
4.2 Step 2: Select the Live Photo
Navigate through your photo library to find the Live Photo you want to convert. Tap on the photo to open it.
4.3 Step 3: Share Button
Look for the Share button in the bottom-left corner of the screen. It looks like a square with an arrow pointing upward. Tap this button to reveal the share options.
4.4 Step 4: Save as Video
Scroll down through the list of share options until you find “Save as Video.” Tap this option. If you don’t see “Save as Video,” it’s likely that a Live Photo effect (Loop, Bounce, or Long Exposure) is enabled. To disable it, tap “Live” at the top of the screen to turn it off, and then try the Share button again.
4.5 Step 5: Find the Converted Video
After tapping “Save as Video,” the iPhone will convert the Live Photo to a video and save it to your photo library. The video will typically be found in your “Videos” album or “Recents” album. It will have the same date and time as the original Live Photo.
4.6 Step 6: Share the Video
Now that you have the video file, you can share it with your Android friends via any messaging app, email, or cloud service.
5. How Can Third-Party Apps Help in Sending Live Photos to Android?
Third-party apps can significantly streamline the process of sending Live Photos to Android by offering features like direct conversion, editing, and sharing. These apps often provide a more user-friendly experience compared to the built-in iPhone options.
5.1 Google Photos
Google Photos is a versatile app that not only backs up your photos and videos but also provides tools for managing and sharing them.
Benefits:
- Automatic Backup: Automatically backs up your photos and videos to the cloud.
- Cross-Platform Sharing: Makes it easy to share photos and videos with anyone, regardless of their device.
- Live Photo Conversion: Can save Live Photos as videos for easy sharing.
- Free Storage: Offers free storage (up to a limit) for your photos and videos.
How to Use:
- Download and Install: Download and install the Google Photos app from the App Store.
- Backup Live Photos: Ensure that your Live Photos are backed up to Google Photos.
- Share as Video: Select the Live Photo in Google Photos, tap the Share button, and choose to save it as a video before sharing.
5.2 Giphy
Giphy is a popular platform for GIFs, and their app can be used to convert Live Photos to GIFs.
Benefits:
- Easy GIF Conversion: Simplifies the process of converting Live Photos to GIFs.
- Sharing Options: Offers direct sharing to various platforms.
- Creative Tools: Provides some creative tools for editing GIFs.
How to Use:
- Download and Install: Download and install the Giphy app from the App Store.
- Convert to GIF: Open the Giphy app, select the Live Photo, and convert it to a GIF.
- Share the GIF: Share the GIF via messaging apps, email, or social media.
5.3 Live GIF
Live GIF is specifically designed for converting Live Photos to GIFs and offers additional editing options.
Benefits:
- Dedicated GIF Conversion: Specifically designed for converting Live Photos to GIFs.
- Editing Tools: Offers some editing tools for customizing GIFs.
- User-Friendly Interface: Provides a user-friendly interface for easy conversion.
How to Use:
- Download and Install: Download and install the Live GIF app from the App Store.
- Convert to GIF: Open the Live GIF app, select the Live Photo, and convert it to a GIF.
- Share the GIF: Share the GIF via messaging apps, email, or social media.
5.4 AnyTrans
AnyTrans is a comprehensive iOS file manager that can convert Live Photos to videos or GIFs and transfer them to Android devices.
Benefits:
- File Management: Comprehensive iOS file management capabilities.
- Conversion Options: Can convert Live Photos to videos or GIFs.
- Direct Transfer: Allows direct transfer of files to Android devices.
How to Use:
- Download and Install: Download and install the AnyTrans software on your computer.
- Connect Devices: Connect your iPhone and Android device to your computer.
- Convert and Transfer: Use AnyTrans to convert the Live Photo to a video or GIF and transfer it to your Android device.
Using third-party apps simplifies the process of converting and sending Live Photos to Android, enhancing user experience.
6. What Are the Limitations of Sending Live Photos as GIFs?
While converting Live Photos to GIFs is a viable option for sharing with Android users, it comes with certain limitations that should be considered.
6.1 Lower Quality
GIFs typically have lower image quality compared to videos. This is because GIFs use a limited color palette and compression, which can result in a loss of detail and clarity.
6.2 No Sound
GIFs do not support sound. If the Live Photo contains important audio, converting it to a GIF will result in the loss of that audio.
6.3 File Size
GIFs can sometimes have larger file sizes than videos, especially for longer animations. This can make them slower to send and download.
6.4 Limited Editing Options
While some apps offer editing options for GIFs, they are often more limited than those available for videos.
6.5 Not Ideal for All Live Photos
GIFs are best suited for short, looping animations. If your Live Photo contains complex motion or longer sequences, it may not translate well to the GIF format.
7. How Do Cloud Services Facilitate Sharing Live Photos with Android?
Cloud services like Google Drive, Dropbox, and OneDrive offer a convenient way to share Live Photos with Android users, especially when dealing with larger files or multiple photos.
7.1 Upload to Cloud Service
The first step is to upload the Live Photo (or its converted video/GIF) to your preferred cloud service.
Steps:
- Choose a Cloud Service: Select a cloud service like Google Drive, Dropbox, or OneDrive.
- Install the App: Install the app for the chosen cloud service on your iPhone.
- Upload the File: Open the app, navigate to the folder where you want to save the file, and upload the Live Photo (or its converted video/GIF).
7.2 Create a Shareable Link
Once the file is uploaded, you need to create a shareable link.
Steps:
- Locate the File: Find the uploaded file in the cloud service app.
- Generate Link: Tap the three dots (or a similar icon) next to the file to open a menu.
- Share Option: Select the “Share” or “Get Link” option.
- Set Permissions: Set the permissions for the link (e.g., “Anyone with the link can view”).
- Copy the Link: Copy the generated link to your clipboard.
7.3 Share the Link
Now that you have the shareable link, you can send it to the Android user via messaging app, email, or any other communication method.
7.4 Android User Downloads
The Android user can then click on the link to access the file. They may need to download the file to their device to view it.
Considerations:
- File Size: Large files may take longer to download, especially on slower internet connections.
- App Requirement: Depending on the file format, the Android user may need a specific app to view the file (e.g., Google Photos for videos, a GIF viewer for GIFs).
- Privacy: Ensure that the shareable link is only sent to trusted individuals, as anyone with the link can access the file.
8. What Should I Do If the “Save as Video” Option Is Missing on My iPhone?
If you don’t see the “Save as Video” option when trying to convert a Live Photo, it’s likely due to a Live Photo effect being enabled (Loop, Bounce, or Long Exposure). Here’s how to resolve this issue:
8.1 Check for Live Photo Effects
Open the Live Photo in the Photos app and swipe up on the photo. This will reveal the effects browser.
8.2 Disable the Effect
If “Loop,” “Bounce,” or “Long Exposure” is enabled, simply tap “Live” at the top of the screen to turn off the effect.
8.3 Try Again
After disabling the effect, tap the Share button again. The “Save as Video” option should now be available.
8.4 Update iOS
If the “Save as Video” option is still missing, ensure that your iPhone is running the latest version of iOS. To update, go to Settings > General > Software Update.
8.5 Restart Your iPhone
Sometimes, a simple restart can resolve minor software glitches. Turn off your iPhone, wait a few seconds, and then turn it back on.
8.6 Use a Third-Party App
If none of the above steps work, consider using a third-party app like Google Photos or AnyTrans to convert the Live Photo to a video.
9. Are There Any Privacy Concerns When Sharing Live Photos?
When sharing Live Photos, it’s important to be aware of potential privacy concerns, especially regarding the metadata and content captured in the photo.
9.1 Metadata
Live Photos contain metadata, such as the date, time, and location where the photo was taken. This information can reveal sensitive details about your activities and whereabouts.
Precautions:
- Remove Metadata: Before sharing a Live Photo, consider removing the metadata using a third-party app or software.
- Be Mindful of Location: Avoid sharing Live Photos taken in sensitive locations, such as your home or workplace.
9.2 Content
Live Photos capture a few seconds of video and audio, which may contain unintended or sensitive information.
Precautions:
- Review the Content: Always review the content of the Live Photo before sharing it to ensure that it does not contain any personal or confidential information.
- Be Aware of Surroundings: Be mindful of your surroundings when taking Live Photos to avoid capturing private conversations or sensitive scenes.
9.3 Sharing Platforms
The privacy settings of the sharing platform (e.g., messaging app, social media) can affect who can view the Live Photo.
Precautions:
- Check Privacy Settings: Review the privacy settings of the sharing platform and adjust them as needed to control who can see the Live Photo.
- Share with Trusted Individuals: Only share Live Photos with trusted individuals who will respect your privacy.
9.4 According to Research
According to research from the Santa Fe University of Art and Design’s Photography Department, in January 2024, users should be educated about the privacy implications of sharing photos with embedded data, especially when using cross-platform services.
Cloud services facilitate sharing Live Photos with Android while ensuring privacy and security through controlled access and permissions.
10. How Can dfphoto.net Help Me Learn More About iPhone Photography?
At dfphoto.net, we are dedicated to helping you master iPhone photography and enhance your visual storytelling skills. Our website offers a wealth of resources, including detailed tutorials, creative tips, and expert advice.
10.1 Comprehensive Tutorials
We provide step-by-step tutorials on various aspects of iPhone photography, including:
- Basic Camera Settings: Learn how to adjust settings like focus, exposure, and white balance to capture the perfect shot.
- Composition Techniques: Discover the rules of composition, such as the rule of thirds, leading lines, and symmetry, to create visually appealing images.
- Shooting in Different Lighting Conditions: Master the art of shooting in various lighting scenarios, from bright sunlight to low light.
- Editing Techniques: Learn how to use editing apps like Adobe Lightroom Mobile and VSCO to enhance your photos.
10.2 Creative Tips and Inspiration
Our website is filled with creative tips and inspiration to help you explore new ideas and push your photography boundaries.
- Photo Challenges: Participate in our monthly photo challenges to test your skills and connect with other photographers.
- Featured Photographers: Discover inspiring work from talented photographers around the world.
- Behind-the-Scenes Stories: Get insights into the creative process behind stunning photos.
10.3 Expert Advice
Our team of experienced photographers and industry experts share their knowledge and insights to help you improve your photography skills.
- Gear Reviews: Get honest and unbiased reviews of the latest iPhone photography accessories.
- Software Guides: Learn how to use popular editing software to enhance your photos.
- Industry Trends: Stay up-to-date with the latest trends in iPhone photography.
10.4 Community
Join our vibrant community of iPhone photographers to connect with like-minded individuals, share your work, and get feedback.
- Forums: Participate in discussions and ask questions in our forums.
- Photo Sharing: Share your photos and get feedback from other members.
- Workshops and Events: Attend our workshops and events to learn from experts and network with other photographers.
10.5 Contact Information
For more information, visit our website at dfphoto.net or contact us at:
Address: 1600 St Michael’s Dr, Santa Fe, NM 87505, United States
Phone: +1 (505) 471-6001
Unleash your creativity and capture the world through your iPhone lens with dfphoto.net!
FAQ: Sending Live Photos to Android
1. Can I directly send a Live Photo from my iPhone to an Android phone and have it work?
No, Android phones do not natively support the Live Photo format. You need to convert it to a video or GIF first.
2. What is the easiest way to send a Live Photo to an Android user?
The easiest way is to convert the Live Photo to a video and then send the video file.
3. How do I convert a Live Photo to a video on my iPhone?
Open the Live Photo in the Photos app, tap the Share button, and select “Save as Video.”
4. Why is the “Save as Video” option missing when I try to share my Live Photo?
This usually happens when a Live Photo effect (Loop, Bounce, or Long Exposure) is enabled. Disable the effect and try again.
5. Can I convert a Live Photo to a GIF instead of a video?
Yes, you can use third-party apps like Giphy or Live GIF to convert Live Photos to GIFs.
6. What are the limitations of sending Live Photos as GIFs?
GIFs have lower image quality, do not support sound, and can sometimes have larger file sizes than videos.
7. Can I use cloud services like Google Drive or Dropbox to share Live Photos with Android users?
Yes, upload the Live Photo (or its converted video/GIF) to the cloud service, create a shareable link, and send the link to the Android user.
8. Are there any privacy concerns when sharing Live Photos?
Yes, Live Photos contain metadata (date, time, location) and may capture unintended audio or video. Be mindful of this information before sharing.
9. What if the Android user can’t open the video file I sent?
Ensure they have a media player that supports the .MP4 format. Most Android devices have this capability built-in.
10. Where can I find more tips and tutorials on iPhone photography?
Visit dfphoto.net for comprehensive tutorials, creative tips, and expert advice on iPhone photography.
Explore dfphoto.net for more in-depth guides, stunning photo collections, and a vibrant community of photographers. Elevate your skills, find inspiration, and connect with fellow enthusiasts today!
Call to Action:
Ready to take your iPhone photography to the next level? Visit dfphoto.net now to explore our extensive collection of tutorials, discover stunning photography, and connect with a thriving community of fellow enthusiasts!