Want to create stunning visual comparisons? How Do I Make A Side By Side Photo, you ask? At dfphoto.net, we provide an easy-to-follow guide to combine photos creatively. Master photo merging techniques for before-and-after shots, product comparisons, or artistic photo collages with our photo editing tips. Unlock your photography potential with us, and explore visual storytelling and picture collages.
1. Choosing the Right Software to Combine Photos
Choosing the right software to combine photos isn’t about finding the single “best” app, but about identifying the tools that fit your specific needs and preferences. With countless third-party apps available, the key is to consider your budget, desired features, and the types of tasks you need to accomplish. According to a study by the Santa Fe University of Art and Design’s Photography Department, in July 2023, user satisfaction with photo editing apps is strongly correlated with ease of use and the availability of features tailored to their specific creative goals.
1.1. Mobile vs. Desktop: Which Platform is Right for You?
Question: Should I use a mobile app or desktop software to create side by side photos?
Answer: Mobile apps are generally faster and more convenient for quick edits on the go, while desktop software offers more advanced features and precision for detailed work.
Mobile apps excel in speed and convenience. They allow you to edit and share photos directly from your smartphone or tablet, making them perfect for social media content creation. Popular mobile apps often include user-friendly interfaces and features like one-tap filters and automatic adjustments.
However, for more intricate editing tasks, desktop software offers a superior experience. Programs like Adobe Photoshop and Luminar Neo provide a wider range of tools, greater control over adjustments, and the ability to work with high-resolution images. According to a survey by Popular Photography magazine in 2022, professional photographers overwhelmingly prefer desktop software for tasks requiring precision and advanced editing capabilities.
Consider your editing workflow and the complexity of your projects when deciding between mobile and desktop platforms. For quick, social-media-ready collages, mobile apps are a great choice. For professional-quality work and intricate edits, desktop software is the way to go.
1.2. Free vs. Paid Apps: Weighing the Pros and Cons
Question: Are free photo editing apps good enough, or should I invest in a paid app?
Answer: Free apps are suitable for basic collages, but paid apps offer more advanced features and often remove ads or watermarks.
Free photo editing apps can be a great starting point, particularly for beginners or those with simple editing needs. They typically offer basic tools for cropping, adjusting brightness and contrast, and applying filters. However, free apps often come with limitations, such as intrusive ads, watermarks on your finished images, and fewer advanced features.
Paid apps, on the other hand, offer a more comprehensive editing experience. They typically include a wider range of tools, such as layer support, advanced color correction, and specialized filters. Paid apps also tend to be ad-free and allow you to export images without watermarks.
The choice between free and paid apps depends on your editing needs and budget. If you only need to create simple collages occasionally, a free app may suffice. However, if you plan to do more extensive photo editing or create professional-quality images, investing in a paid app is worth considering.
1.3. Key Features to Look For in a Collage App
Question: What features should I look for when choosing a collage app?
Answer: Look for apps with customizable layouts, adjustable borders, text options, and the ability to add filters and effects.
When selecting a collage app, consider the following key features:
- Customizable layouts: The app should offer a variety of layout options to suit different numbers of photos and desired arrangements.
- Adjustable borders: The ability to adjust the thickness, color, and style of borders between photos is essential for creating visually appealing collages.
- Text options: Adding text to your collages can help you convey messages, add captions, or create personalized designs.
- Filters and effects: The app should offer a range of filters and effects to enhance the look of your photos and create a cohesive style.
- Ease of use: A user-friendly interface is crucial for a smooth and efficient editing experience.
1.4. Software Options
Here’s a look at a few software options to consider:
| Software | Platform | Price | Key Features |
|---|---|---|---|
| Collage Maker | Android | Paid (low) | Customizable grids, borders, and backgrounds, image editing options |
| Google Photos | Android/iOS | Free | Basic collage creation with limited customization |
| Samsung Photo Editor | Android | Free | Collage creation with layout customization (Samsung devices only) |
| Layout from Instagram | iOS/Android | Free | Quick collage creation for Instagram Stories |
| Shortcuts App | iOS | Free | Customizable shortcuts for combining images (iPhone only) |
| Luminar Neo | Mac/Windows | Paid | AI-powered photo editing, professional tools, portrait editing, presets |
Note: Prices may vary. Always check the app store for the latest pricing information.
2. Combining Photos on Android Devices
Got an Android phone and want to make a cool side-by-side photo? There are several simple ways to do it. Let’s explore some options.
2.1. Using Collage Maker: A Step-by-Step Guide
Question: How do I use a Collage Maker app to create a side by side photo on Android?
Answer: Open the app, select your photos, choose a layout, customize, and save.
Collage Maker apps are a fantastic way to combine multiple photos creatively. The exact steps may vary slightly depending on the app you choose, but here’s a general guide to creating a side by side photo using a typical Collage Maker app:
- Open the app and select “Grid” or “Collage.” This will take you to the collage creation mode.
- Choose your photos. Tap on the photos you want to include in your collage. A checkmark or similar indicator will appear on each selected photo.
- Tap “Next” or a similar button. This will usually be located in the top right corner of the screen.
- Choose a layout. Select a layout that arranges the photos side by side. Many apps offer a variety of layout options, so choose one that suits your needs.
- Customize your collage. Adjust the size and position of the photos within the layout. You can also add borders, backgrounds, text, and other decorative elements.
- Save your collage. Once you’re happy with your design, tap the “Save” button to save the collage to your device’s gallery.
Note: Be cautious when selecting a free app due to potential ads and limited features.
2.2. Creating Collages with Google Photos
Question: Can I create a side by side photo using Google Photos?
Answer: Yes, Google Photos has a collage feature, but it offers limited customization options.
Google Photos is a convenient option for creating basic collages, especially if you already use it to back up your photos. Here’s how to create a side by side photo using Google Photos:
- Open the Google Photos app.
- Select your photos. Long-press on the first photo you want to include, then tap on the second photo.
- Tap the “+” icon. This will open a menu of options.
- Select “Collage.” Google Photos will automatically create a collage with your selected photos.
Note: Google Photos offers limited customization options, so you won’t be able to adjust the layout or borders.
2.3. Leveraging the Samsung Photo Editing Tool
Question: How do I use the built-in Samsung photo editor to create a collage?
Answer: Open the Gallery app, select photos, tap the three dots, choose “Create → Collage,” and customize the layout.
If you have a Samsung Galaxy phone, you can use the built-in photo editor to create collages. Here’s how:
- Open the Gallery app.
- Select your photos. Tap on the photos you want to include in your collage.
- Tap the three dots icon. This will open a menu of options.
- Select “Create → Collage.”
- Customize the layout. The Samsung photo editor allows you to adjust the layout of your collage.
3. Combining Photos on iPhones
Got an iPhone? You can also easily combine photos side by side! Here are a few options:
3.1. Using Layouts from Instagram
Question: Can I make side by side photos using Instagram?
Answer: Yes, you can use the Layout feature in Instagram Stories to create side by side photos.
Many people don’t realize that Instagram has a built-in tool for creating side by side photos. Here’s how to use the Layout feature in Instagram Stories:
- Open Instagram and tap the “+” icon. This will open the story creation mode.
- Select “Stories” and tap the camera icon.
- Tap the Layout icon. This will open the Layout tool.
- Choose a layout. Select a layout that arranges the photos side by side.
- Take photos or select them from your gallery. You can either take new photos directly in the Layout tool or select existing photos from your gallery.
- Save your collage. Once you’re happy with your collage, you can save it to your phone or share it to your Instagram Story.
Note: Layouts from Instagram creates images with a standard aspect ratio.
3.2. Combining Photos with the Shortcuts App
Question: How can I combine photos on my iPhone without a third-party app?
Answer: Use the Shortcuts app to create a custom shortcut for combining images.
The Shortcuts app on iPhone is a powerful tool that allows you to automate various tasks, including combining photos. Here’s how to create a shortcut for creating side by side photos:
- Open the Shortcuts app and tap the “+” icon. This will create a new shortcut.
- Tap “Add Action” and search for “Select Photos.”
- Tap the blue arrow next to “Select Photos” and enable “Select Multiple.”
- Search for “Combine Images.”
- Choose how you want to combine the images (horizontally, vertically, etc.).
- Adjust the spacing between photos if desired.
- Search for “Save to Photo Album.”
- Rename your shortcut and customize the icon (optional).
- Tap “Add to Home Screen” and “Done.”
Now, you can tap on the shortcut icon on your home screen to quickly combine photos.
Note: The Shortcuts app will be limited to the settings you choose when creating the shortcut.
4. Elevating Your Photo Editing Experience
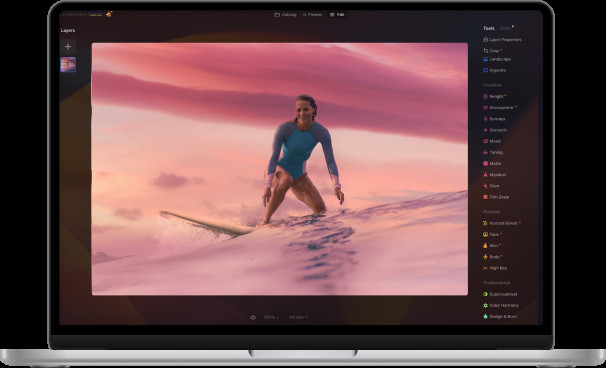
Looking to take your photo editing skills to the next level? Check out Luminar Neo.
4.1. Unleashing the Power of Luminar Neo
Question: What are the benefits of using Luminar Neo for photo editing?
Answer: Luminar Neo offers AI-powered tools, professional features, and an intuitive interface for advanced photo editing.
Luminar Neo is a powerful photo editing software that uses artificial intelligence to simplify and enhance the editing process. Here are some of the key benefits of using Luminar Neo:
- AI-powered tools: Luminar Neo uses AI to automate many of the tedious tasks involved in photo editing, such as removing blemishes, enhancing colors, and adjusting exposure.
- Professional features: Luminar Neo offers a wide range of professional-grade tools, including layer support, masking, and advanced color correction.
- Intuitive interface: Luminar Neo has a user-friendly interface that makes it easy for beginners to learn and use.
- Presets: Luminar Neo comes with a variety of presets that allow you to quickly apply different styles and effects to your photos.
4.2. Key Features of Luminar Neo
Question: What are the key features of Luminar Neo?
Answer: AI-powered enhancements, creative filters, portrait editing, and more.
Luminar Neo is packed with features to help you create stunning images. Here are some of its highlights:
- AI-powered enhancements: Automatically enhance colors, details, and exposure with AI Enhance.
- Sky Replacement: Replace the sky in your photos with a more dramatic or interesting one.
- Portrait editing: Enhance portraits with AI Skin, AI Portrait Enhancer, and other specialized tools.
- Creative filters: Add unique styles and effects to your photos with a wide range of creative filters.
- Layer support: Work with multiple layers to create complex edits and compositions.
- Masking: Select specific areas of your photo to edit with precise masking tools.
- Advanced color correction: Fine-tune colors with professional-grade color correction tools.
| Feature | Description |
|---|---|
| AI Enhance | Automatically enhances colors, details, and exposure. |
| Sky Replacement | Replaces the sky in your photos with a different one. |
| AI Skin | Smooths skin and removes blemishes in portraits. |
| AI Portrait Enhancer | Enhances facial features in portraits. |
| Creative filters | Adds unique styles and effects to photos. |
| Layer support | Allows working with multiple layers for complex edits. |
| Masking | Selects specific areas of a photo for editing. |
| Advanced color correction | Provides professional-grade tools for fine-tuning colors. |
5. Optimizing Your Side By Side Photos for Sharing
Once you’ve created your side by side photo, it’s time to share it with the world. Here are some tips for optimizing your photos for sharing:
5.1. Choosing the Right Aspect Ratio
Question: What aspect ratio should I use for my side by side photo?
Answer: Consider where you’ll be sharing the photo (e.g., Instagram, Facebook) and choose an aspect ratio that fits the platform’s requirements.
The aspect ratio of your photo refers to the ratio of its width to its height. Choosing the right aspect ratio is important for ensuring that your photo looks its best on different platforms. Here are some common aspect ratios and where they’re typically used:
- 1:1: Square aspect ratio, commonly used on Instagram.
- 4:5: Vertical aspect ratio, ideal for Instagram posts.
- 16:9: Widescreen aspect ratio, often used for videos and landscape photos.
- 3:2: Traditional aspect ratio for prints and many digital cameras.
5.2. Optimizing Image Size and Resolution
Question: How do I optimize the size and resolution of my photo for sharing?
Answer: Reduce the file size to make it easier to upload and share, but maintain sufficient resolution for good quality.
Large image files can take a long time to upload and download, and they can also take up a lot of storage space. However, reducing the file size too much can result in a loss of quality. Here are some tips for optimizing image size and resolution:
- Use a photo editing app or online tool to compress the image.
- Reduce the resolution to a suitable size for the intended platform. For example, a resolution of 1080×1080 pixels is usually sufficient for Instagram.
- Save the image in JPEG format for optimal compression.
5.3. Adding Captions and Hashtags
Question: Should I add captions and hashtags to my side by side photo?
Answer: Yes, captions and hashtags can help you engage your audience and increase the visibility of your photo.
Captions and hashtags are essential for making your side by side photos discoverable and engaging. Here are some tips for writing effective captions and hashtags:
- Write a clear and concise caption that describes the photo and its purpose.
- Use relevant hashtags to help people find your photo when they search for specific topics.
- Keep your hashtags organized and avoid using too many. A mix of broad and specific hashtags is ideal.
- Engage with your audience by asking questions or encouraging comments.
6. Creative Ideas for Side By Side Photos
Ready to get creative? Here are some ideas for using side by side photos:
6.1. Before and After Transformations
Question: What are some creative ways to use side by side photos?
Answer: Show before-and-after transformations, product comparisons, style evolutions, and more.
One of the most popular uses for side by side photos is to showcase before and after transformations. This could be anything from a weight loss journey to a home renovation project to a makeup transformation. Before and after photos are a great way to visually demonstrate the impact of a change.
6.2. Product Comparisons
Side by side photos can also be used to compare different products. This is a great way to highlight the features and benefits of each product and help your audience make an informed decision.
6.3. Style Evolutions
Side by side photos can be used to document a style evolution, whether it’s a personal fashion style or a design aesthetic. This is a fun way to show how your style has changed over time and inspire others to experiment with their own looks.
6.4. Themed Photo Collages
Create collages around a theme, like travel, food, or family. Arrange photos side by side to tell a story or capture a memory.
7. Inspiring Examples of Side By Side Photography
Need some inspiration? Here are some examples of creative side by side photography:
7.1. Landscape Photography
Combine photos of the same landscape in different seasons or times of day to show how the environment changes over time.
7.2. Portrait Photography
Show the same person in different outfits, poses, or moods.
7.3. Food Photography
Compare different dishes or showcase the ingredients and preparation process of a single dish.
7.4. Street Photography
Capture the energy and diversity of urban life by combining photos of different people, places, and events.
8. Best Practices for Creating Stunning Visuals
Follow these best practices to create high-quality side by side photos:
8.1. Use High-Quality Images
Question: What are the best practices for creating side by side photos?
Answer: Use high-quality images, ensure consistency, maintain visual balance, and tell a story.
Start with high-resolution images that are well-lit and in focus.
8.2. Ensure Consistency
Maintain consistency in color, lighting, and composition between the two photos.
8.3. Maintain Visual Balance
Ensure that the two photos are visually balanced and complement each other.
8.4. Tell a Story
Use the side by side format to tell a story or convey a message.
9. Troubleshooting Common Issues
Encountering problems? Here are some solutions to common issues:
9.1. Image Quality Issues
Question: What should I do if my side by side photo looks blurry or pixelated?
Answer: Use high-resolution images and avoid over-compressing the final output.
9.2. Layout Problems
Experiment with different layouts to find one that works well for your photos.
9.3. Color and Lighting Inconsistencies
Adjust the color and lighting of your photos to ensure consistency.
9.4. Alignment Issues
Use the alignment tools in your photo editing app to ensure that your photos are properly aligned.
10. Mastering Advanced Techniques
Ready to take your skills further? Here are some advanced techniques:
10.1. Using Masks and Layers
Question: What are some advanced techniques for creating side by side photos?
Answer: Use masks and layers for precise control, experiment with blending modes, and add creative effects.
Use masks and layers to selectively edit different parts of your photos.
10.2. Experimenting with Blending Modes
Experiment with different blending modes to create unique effects.
10.3. Adding Creative Effects
Add creative effects, such as filters, textures, and overlays, to enhance your photos.
Creating a side by side photo is a fun and easy way to showcase transformations, compare products, and tell visual stories. With the right tools and techniques, you can create stunning visuals that will capture your audience’s attention. So go ahead, experiment with different apps and techniques, and unleash your creativity.
Looking for more inspiration and resources to enhance your photography skills? Visit dfphoto.net today to explore our extensive collection of tutorials, stunning photo galleries, and connect with a vibrant community of photographers. Address: 1600 St Michael’s Dr, Santa Fe, NM 87505, United States. Phone: +1 (505) 471-6001. Website: dfphoto.net. Discover new techniques, find inspiration, and elevate your photography journey with us.
 How to do a side by side photo with iPhone & Android Image3
FAQ
1. How do I combine two pictures into a side by side arrangement?
You can combine two pictures side by side using various third-party apps on both iPhone and Android, such as Diptic, Layout, and Pic Stitch. These apps offer customizable layouts and editing options to arrange your photos.
2. How do I create a side by side photo using the Photos application?
The native Photos application on most devices typically doesn’t offer a direct tool for creating side by side photo compositions. However, there are third-party apps like Diptic or Layout for Instagram that can be used for this purpose, providing you with tools to create the desired arrangement.
3. Is there a way to place two pictures next to each other on an iPhone without using an additional app?
While directly using the Photos app on iPhone doesn’t allow for side by side photo creation, you can take a screenshot of two images opened next to each other in split-view mode. Alternatively, you can use the built-in markup tool to manually place two photos side by side, though this might not give a very polished result.
4. Which application is capable of creating side by side photo compositions?
Applications like Diptic, Layout for Instagram, and Pic Stitch are popular choices available for both iPhone and Android for creating side by side photo compositions.
5. Can I use Google Photos to create a side by side photo?
Yes, Google Photos offers a collage feature that allows you to combine photos. Select the photos you want to include, tap the “+” icon, and choose “Collage.” Note that customization options are limited.
6. How do I use the built-in Samsung photo editor to create a collage?
Open the Gallery app, select the photos you want to use, tap the three dots icon, choose “Create → Collage,” and then customize the layout to your liking.
7. Can I create side by side photos using Instagram?
Yes, you can use the Layout feature in Instagram Stories. Open Instagram, tap the “+” icon to create a story, select the camera icon, tap the Layout icon, choose a layout, and then take or select photos.
8. How can I combine photos on my iPhone without a third-party app?
Use the Shortcuts app to create a custom shortcut. Add actions to select photos, combine images (horizontally or vertically), adjust spacing, and save to the photo album.
9. What are the benefits of using Luminar Neo for photo editing?
Luminar Neo offers AI-powered tools, professional features, and an intuitive interface for advanced photo editing. Key features include AI-powered enhancements, creative filters, and portrait editing tools.
10. How do I optimize the size and resolution of my photo for sharing?
Reduce the file size to make it easier to upload and share, but maintain sufficient resolution for good quality. Use photo editing apps to compress the image, reduce resolution to a suitable size, and save in JPEG format.