Are you looking to free up space on your iPhone or iPad, or simply want a physical backup of your precious photos? Transferring photos to a flash drive is a straightforward solution, but it can be a little confusing if you’re not sure where to start. This guide will walk you through the simple steps to put photos on a flash drive from your Apple devices, ensuring a smooth and efficient process.
Understanding the DCIM Folder Requirement for iOS
Apple devices, including iPhones and iPads, are designed to seamlessly work with the Photos app. When it comes to importing photos from external storage like USB flash drives directly into the Photos app, there are specific formatting requirements that need to be met. This is primarily related to how digital cameras and iOS devices organize and recognize image files.
For your iPhone or iPad to recognize and import photos from a flash drive directly into the Photos app, the flash drive needs to mimic the file structure of a digital camera’s memory card. This involves using a DCIM folder. DCIM stands for “Digital Camera Images.” It’s a standard folder name used by virtually all digital cameras to store photos and videos.
Inside the DCIM folder, you also need to create another subfolder. While the specific name of this subfolder is somewhat flexible, it’s crucial to adhere to a naming convention that iOS recognizes.
Folder and File Naming Conventions Explained
Here’s a breakdown of the required folder and file naming conventions to ensure successful photo import into the Photos app:
- Root Folder: The flash drive itself.
- Main Folder: Must be named DCIM (all caps).
- Subfolder: Located inside the DCIM folder. The name must be 8 characters long, and it’s observed that names starting with three numbers are reliably recognized by iOS. For example,
100ABCDE,12345678, or100NCD90are all valid. - Image Files:
- File Extension: Must be .jpg (lowercase). While JPEG is a common image format, ensure your files have the
.jpgextension. - File Name: Needs to be 8 characters long, with the last 4 characters being numbers. The first four characters can be letters, numbers, or underscores. Examples include
DSC_0001.jpg,IMGP0001.jpg, or123A0001.jpg.
- File Extension: Must be .jpg (lowercase). While JPEG is a common image format, ensure your files have the
Alt text: A silver USB flash drive is plugged into the port of a space gray iPad, illustrating the connection for transferring photos.
Why These Specific Requirements?
These requirements are rooted in the standard protocols used by digital cameras and memory cards. By adhering to these conventions, you’re essentially making your flash drive “look like” a digital camera to your iPhone or iPad. This allows the Photos app to recognize and import the images as if they were directly from a camera’s memory card.
Step-by-Step Guide: Preparing Your Flash Drive and Importing Photos
Now that you understand the folder and file naming requirements, let’s get your flash drive ready and transfer your photos.
-
Format Your Flash Drive (If Necessary): Ensure your flash drive is formatted in a file system that is compatible with both your computer (for preparing the files) and your iPad/iPhone. exFAT or FAT32 are generally good choices for cross-compatibility.
-
Create the DCIM Folder: On your computer, create a new folder on your flash drive and name it DCIM (all capital letters).
-
Create a Subfolder Inside DCIM: Inside the DCIM folder, create another new folder. Name this folder with an 8-character name, starting with three numbers. For example, you can use
100NCD90or123PHOTO. -
Prepare Your Photos:
- Check File Extensions: Make sure your photos have the
.jpgfile extension. If they are.jpeg, rename them to.jpg. - Rename Files (If Necessary): If your photo filenames don’t follow the 8-character naming convention (e.g.,
DSC_0001.jpg), rename them accordingly. Batch renaming tools can be helpful if you have many files. - Move Photos to Subfolder: Copy or move your prepared
.jpgimage files into the 8-character subfolder you created inside the DCIM folder.
- Check File Extensions: Make sure your photos have the
Alt text: A screenshot showing the folder structure on a USB drive: a DCIM folder containing a subfolder named “100NCD90”, inside which several JPG image files are listed.
-
Connect Flash Drive to Your iPad or iPhone: Use a compatible adapter to connect your USB flash drive to your iPhone or iPad. This might be a Lightning to USB adapter or a USB-C adapter, depending on your device.
-
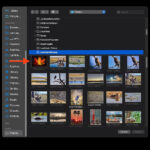
Import Photos Using the Photos App:
- Open the Photos app on your iPhone or iPad.
- Go to the Import tab (it usually appears automatically when a storage device with compatible photos is connected).
- You should see your photos from the flash drive displayed.
- Select the photos you want to import.
- Choose to import them to your Library or a specific Album. (The Album option is available on recent iOS versions).
- Tap Import Selected or Import All.
Alt text: The import screen of the Photos app on an iPad, displaying thumbnails of photos from the connected USB drive and options to “Import All” or select specific images.
Important Considerations and Tips for Smooth Transfer
-
iOS Version: The direct import functionality into the Photos app is generally consistent across recent iOS versions. However, the availability of the “Album” selection during import is a feature of newer iOS versions. On older versions like iOS 10, you might only have the “Library” option.
-
Using the Files App (Alternative Method): If you are using the Files app (available on iOS 11 and later), you can also import photos. However, the destination options within the Files app might be limited to “Library” or “Shared Album,” and not directly into specific albums you’ve created in the Photos app.
-
Troubleshooting:
- Drive Not Recognized: Ensure your adapter is compatible and properly connected. Try restarting your device.
- Photos Not Showing Up: Double-check the folder structure and file naming conventions. Make sure your photos are
.jpgfiles and are located in the correct subfolder within the DCIM folder.
Conclusion: Take Control of Your Photo Transfers
By understanding and applying these simple formatting and naming conventions, you can easily put photos on a flash drive and import them directly into the Photos app on your iPhone or iPad. This method provides a convenient way to back up your photos, transfer them between devices, or share them with others without relying solely on cloud services. Enjoy the flexibility of managing your photos with flash drives and your Apple devices!