So, you’re venturing into the world of online selling and have a product ready to showcase. You know great visuals are key, especially in today’s visually-driven platforms like Instagram. But the idea of professional photography might seem daunting and expensive. The good news is, you don’t need to be a pro or break the bank to capture eye-catching product photos. With your smartphone, some natural light, and the right techniques, you can create images that truly make your products shine.
This guide will walk you through a step-by-step process to master product photography using your phone. We’ll cover everything from setting up your shooting space to editing your final images, empowering you to take control of your product visuals and elevate your online store.
6 Essential Steps to Elevate Your Phone Product Photography
Many online store owners start with the basics: a white background, natural light, and the highest quality settings on their phone. While this is a solid starting point, a few extra steps and tools can significantly enhance your photos, allowing customers to truly appreciate your product and envision it in their own lives.
If you’re ready to take your smartphone product photography to the next level and create images that convert browsers into buyers, here’s how to build your setup and master the techniques.
1. Find a Room with Optimal Natural Light
The foundation of great product photography, especially when using a smartphone, is natural light. Your first step is to locate a room in your home or workspace that boasts a large window. The size of the window directly impacts the amount of natural light available to illuminate your product and bring it to life in photos.
A simple home studio setup utilizing natural light from a window, showcasing the placement of the product and light source.
As illustrated in the setup from Pixc, you can easily create a professional-looking product photography studio right at home. The distance between your product and the window influences the light quality. Positioning your product closer to the window results in softer light and more gradual shadows, ideal for a gentle and diffused look. Moving further away from the light source will create sharper, more defined shadows, adding contrast and drama to your images. Experiment with different distances to achieve your desired lighting effect.
2. Select the Right Smartphone Camera
Fortunately, modern smartphone cameras are incredibly advanced, offering excellent alternatives to traditional DSLRs, particularly for product photography. The megapixel count is a crucial factor; a higher megapixel count generally translates to better image quality and more detail in your product photos.
While you can achieve great results with almost any smartphone equipped with a decent camera, aiming for a newer model with a minimum of a 12-megapixel camera is recommended. This will provide the image resolution and clarity needed for compelling product visuals. Consider exploring your phone’s camera settings; many smartphones offer features like Pro or Manual mode that allow for greater control over ISO, aperture (simulated), and shutter speed, though for basic product photography, automatic mode with good lighting is often sufficient.
3. Invest in a Mini Tripod for Stability
A mini tripod is an invaluable tool for product photography, regardless of your budget. From affordable to professional-grade options, a tripod is a worthwhile investment that yields significant improvements in your photos. Its primary benefit is reducing camera shake, which is crucial for capturing sharp and clear images, especially in close-up product shots.
Furthermore, a tripod helps standardize your photo angles and maintain a consistent style across your entire product line. This visual consistency is essential for branding and creating a cohesive look for your online store.
For beginners seeking a user-friendly and reliable mini tripod, the Manfrotto Pixi mini tripod kit is an excellent choice. It’s designed for ease of use, securely holds your phone in place, and is perfectly sized for tabletop product photography setups.
The Manfrotto Pixi mini tripod, a beginner-friendly and versatile tool for stable phone product photography.
For more advanced stability and flexibility, consider tripods with adjustable legs and ball heads. These features allow for precise positioning and angle adjustments, giving you greater creative control over your product shots.
4. Establish a Clean White Backdrop
A white backdrop is a staple in product photography for its ability to create clean, consistent, and professional-looking images. Placing a white backdrop behind your product eliminates distracting backgrounds and keeps the focus entirely on the item itself.
You have several options for creating a white backdrop. A seamless white paper sweep, which curves from vertical to horizontal to eliminate harsh lines, is a professional choice. However, for budget-friendly alternatives, you can use inexpensive white poster board purchased from a local drugstore or art supply store. You’ll also need a table or flat surface to set up your backdrop.
To secure your backdrop and product, you can use tape or removable adhesive putty like Sticky Tack. If you need to prop up your product, consider using clear acrylic blocks or risers which are virtually invisible in photos.
It’s crucial to maintain a pure white backdrop. White reflects natural light effectively, ensuring your product is evenly lit and minimizing unwanted shadows. A white background also simplifies the editing process, particularly if you need to remove the background entirely for use on different platforms or marketplaces. Avoid using cream or off-white backdrops, as these can create color casts and complicate both lighting and editing.
Ideally, position your backdrop not just behind, but also underneath your product, creating a seamless “infinity curve” effect. This eliminates any horizon line and further isolates your product.
A stark white backdrop in use, demonstrating its role in creating a clean and distraction-free product photo.
5. Utilize White Bounce Boards to Control Shadows
Mastering lighting is paramount when learning how to take professional-looking product photos with a smartphone. Even with ample natural light, shadows can be a challenge. White bounce boards, also known as reflectors, are essential tools for controlling shadows and achieving balanced lighting.
Bounce boards work by reflecting light back onto your product, filling in harsh shadows and creating a more even and flattering illumination. This technique helps to bring out the finer details of your product, ensuring they are clearly visible in your photos.
You can purchase professional white bounce boards made of foam core from photography stores or online marketplaces like Amazon. Alternatively, you can create DIY bounce boards using white foam board, poster board, or even cardboard covered in white paper or aluminum foil (for a stronger, more directional reflection). The size of your bounce board should be proportionate to your product; smaller products require smaller bounce boards.
Experiment with the placement of your bounce boards. Typically, positioning a bounce board opposite your main light source (the window) and angled towards your product will effectively soften shadows. You can also use multiple bounce boards to further refine your lighting setup.
6. Diffuse Harsh Sunlight with a Diffuser Sheet
While natural light is ideal, direct, harsh sunlight can create overly bright highlights and deep, unflattering shadows in your product photos. If you’re shooting on a particularly sunny day, or if direct sunlight is streaming through your window, a diffuser sheet is essential for softening the light.
Diffuser sheets are translucent materials that scatter and soften harsh light, creating a more gentle and even illumination. You can purchase professional diffuser sheets online or at photography stores. For DIY diffusers, you can use readily available materials like parchment paper, a frosted shower curtain liner, or even tracing paper. Simply position the diffuser sheet between your light source (the window) and your product to filter and soften the light.
The distance between the diffuser and your light source, as well as the diffuser and your product, will affect the degree of softening. Experiment with different distances to achieve the desired light quality. For very harsh sunlight, you might even consider using multiple layers of diffuser material.
Mastering Natural Lighting Techniques for Product Photography
Effective photography lighting is the key differentiator between amateur and professional-looking product images. While image editing can enhance your photos, no amount of retouching can fully compensate for poorly lit images.
Here are three crucial tips to maximize natural light and capture the best possible product photos:
- Prioritize Shooting in a Well-Lit Room with Natural Light: Natural light from a window is almost always superior to artificial studio lighting for beginners. Firstly, it’s readily accessible and free. Secondly, window light originates from a single, directional source, which creates natural shadows and adds depth and texture to your products, making them appear more three-dimensional and appealing.
Consider the weather conditions and time of day. Overcast days often provide beautifully soft and diffused light, minimizing harsh shadows. Direct sunlight, while brighter, can be more challenging to work with and may require diffusion. You might find that slightly overcast conditions are preferable to full, direct sunlight, depending on the desired look.
A side-by-side comparison demonstrating the difference between product photos taken in direct sunlight (left – overexposed, harsh shadows) and diffused natural light (right – balanced exposure, soft shadows).
- Optimize Setup Placement Relative to the Window: Position your product photography setup close to the window, ideally at a 90-degree angle to the right or left of your setup. This side-lighting technique is generally more flattering than direct front-lighting, which can flatten your product and eliminate shadows.
Plan your photoshoot to coincide with the brightest time of day to maximize available natural light. If the sunlight becomes too intense, utilize your diffuser sheet to soften it.
An example of ideal product placement near a window, showcasing side lighting that creates pleasing shadows and highlights.
Experiment with slight adjustments to your setup’s position relative to the window and shoot at different times of day to discover the optimal lighting conditions for your product and desired aesthetic. Crucially, avoid “hard light” at all costs. Hard light, often from direct, undiffused sunlight or harsh flash, creates strong, unflattering shadows, washes out colors, and can accentuate even minor imperfections in your product that are typically imperceptible to the naked eye.
- Master Light Manipulation with Foam Boards and Reflectors: Natural light can be unpredictable. The sun might suddenly disappear behind clouds mid-shoot, altering your lighting dramatically. Don’t worry – this is where foam boards and reflectors become invaluable.
Use white foam boards to “bounce” and intensify the available light, effectively filling in shadows and maintaining consistent illumination, even when natural light fluctuates. Reflectors, often silver or gold, are designed to redirect light more efficiently than simple white foam boards.
By adjusting the distance and angle of your reflector, you can precisely control the amount of reflected light falling onto your product. Experiment with different angles to achieve the perfect balance between highlights and shadows, creating depth and dimension in your product photos.
Learn more: A Behind-the-Scenes Look at Jewelry Photography
Best Camera Angles to Showcase Your Products
When photographing products for your ecommerce website, certain camera angles are more effective than others in conveying information and visual appeal. Offering diverse perspectives of your product is essential for addressing customer questions and showcasing key features that product descriptions alone might not fully capture.
Providing a comprehensive visual representation from multiple viewpoints allows shoppers to thoroughly examine your product, envision themselves using or wearing it, and ultimately boosts purchase confidence and sales conversions.
Close-up shots are equally critical. They enable you to highlight intricate details that communicate product quality – fabric texture, print details, unique design elements, or usage demonstrations. These close-ups mimic the way shoppers would inspect a product in a physical retail store, building trust and transparency.
Whether you’re engaged in clothing photography, footwear photography, or photographing any other product type, these five camera angles are fundamental to explore during your photoshoot:
- Eye-Level Angle: This angle presents the product as you would naturally see it when looking straight ahead, offering a familiar and relatable perspective.
- High Angle: Shooting from slightly above, looking down at the product, provides a comprehensive overview and is excellent for showcasing product shape and arrangement, especially for flat lays or products viewed from above.
- Low Angle: Photographing from below, looking upwards at the product, can create a sense of grandeur, emphasize height, and offer a unique, less common viewpoint, often used to highlight product features on the underside or create a dramatic effect.
- Bird’s-Eye View: A direct top-down shot, taken from directly above the product, is perfect for flat lay arrangements, showcasing product components laid out, or highlighting patterns and designs visible from above.
- Slanted Angle (45-degree angle): This angle, taken from the side at approximately a 45-degree angle, offers a dynamic and visually interesting perspective that showcases product depth and dimension, often preferred for lifestyle shots or to add visual interest.
A visual demonstration of the five key camera angles in product photography, showcasing a sneaker photographed from eye-level, high angle, low angle, bird’s-eye, and slanted perspectives.
For beginners in phone product photography, maintaining a consistent camera position throughout the shoot is highly recommended. Keep your smartphone and tripod stationary and instead rotate the product to achieve different angles. This approach ensures consistent framing across all your images, simplifies post-shoot editing, and promotes visual coherence in your product presentation.
Step-by-Step Guide to Shooting Phone Product Photos
Now that you have your equipment assembled, understand lighting principles, and are familiar with essential camera angles, it’s time to start capturing product photos.
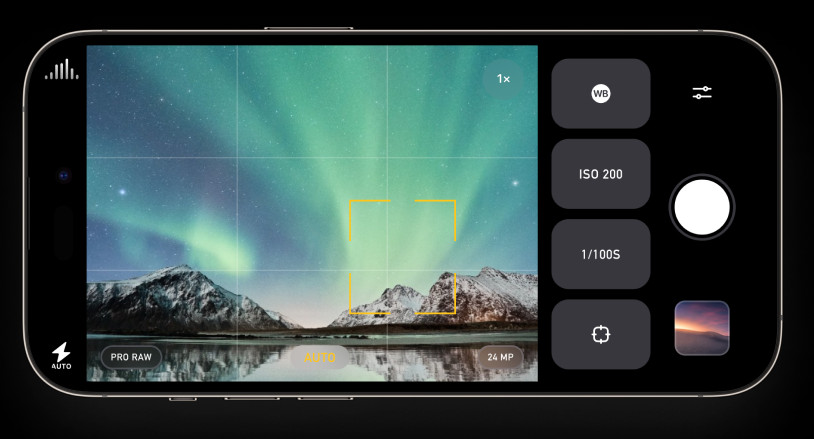
Before you begin shooting, utilize the following checklist to ensure your Android or iPhone camera is optimally configured for product photography:
- Prepare Your Phone: Verify that your phone is fully charged to avoid interruptions during your photoshoot. Also, ensure you have ample storage space available for your images, or consider using cloud storage to back up photos in real-time.
- Set Your White Balance (WB): Accurate white balance is crucial for achieving true-to-life colors in your product photos. To set the white balance according to your lighting conditions, locate the WB button in your camera app (often found in Pro or More settings). Tap the WB button and then touch the white backdrop in your setup. This tells your camera to calibrate color temperature based on the white reference point, ensuring accurate color rendering.
- Check and Adjust Exposure: Exposure determines the overall brightness of your image. Tap the circular Exposure button (or look for exposure compensation settings, often represented by a +/- icon) in your camera app. Then, tap on your product in the viewfinder. This instructs the camera to prioritize proper exposure for your product. Observe the brightness of the image; if it appears too dark or too bright, use the exposure compensation slider (if available) to fine-tune brightness levels until your product is well-exposed without being washed out or underexposed.
- Ensure Sharp Focus: Sharp focus is essential for highlighting product details. Locate the circular Focus button in your camera app (or tap-to-focus functionality). Tap on your product on the screen to set the focus point. Ensure the most important areas of your product, particularly any intricate details or textures, are sharply in focus.
- Lock Camera Settings for Consistency: Once you have adjusted white balance, exposure, and focus to your satisfaction, it’s crucial to lock these settings. Tap each of the setting buttons again (WB, Exposure, Focus) to lock them in place. This prevents the camera from automatically readjusting these settings between shots, ensuring consistency in your images throughout the photoshoot, especially when shooting multiple angles of the same product.
With your camera settings locked, you are now fully prepared to begin shooting your product photos!
After taking your initial test shot, carefully review the image on your phone screen. Assess the exposure; does the image need to be brighter or darker? If adjustments are needed, locate the +/- button (exposure compensation) typically positioned below or near the Focus button in your camera app. Use the slider to subtly adjust the exposure up or down until you achieve the desired brightness level for your product. Take a few test shots and review them until you are satisfied with the lighting and exposure before proceeding with the full photoshoot.
Common Mistakes to Avoid in Phone Product Photography
The widespread availability of smartphones has democratized product photography, making it accessible to virtually anyone. However, this accessibility also means that certain common mistakes are frequently made. Being aware of these pitfalls will enable you to proactively avoid them and elevate the quality of your product images.
Remember to consciously steer clear of these three prevalent mistakes in phone product photography to consistently capture the best possible shots:
- Resist the Urge to Zoom In: Your phone’s digital zoom function, while seemingly convenient, is generally detrimental to image quality in product photography. Digital zoom does not actually magnify the image optically; instead, it crops into the existing image and enlarges the pixels, resulting in a significant loss of image detail and sharpness. If you require a closer shot of your product, physically move your camera or tripod closer to the product instead of using the zoom function. If necessary, cropping the image during post-editing is a far superior approach to achieve a closer view without sacrificing initial image quality.
- Prioritize the Rear-Facing Camera: While front-facing “selfie cameras” have improved considerably, they typically still lag behind the rear-facing camera in terms of image quality. This can vary slightly depending on your specific phone model and specifications, but generally, rear-facing cameras are equipped with higher megapixel sensors and superior lens quality. Consequently, the rear camera consistently delivers higher image resolution, sharper detail, and better overall image quality, crucial for professional-looking product photos. Always default to using your phone’s rear-facing camera for product photography unless there is a specific, compelling reason to use the front-facing camera.
- Never Use the Phone’s Flash: Your phone’s built-in flash is almost universally unsuitable for product photography. The direct, harsh light from the flash invariably overexposes the subject, creating blown-out highlights, obscuring details, and distorting colors, rendering your product photos unprofessional and unappealing. It is always preferable to rely on natural lighting techniques, as outlined earlier in this guide, or to invest in external, controlled lighting sources if natural light is insufficient. Completely avoid using your phone’s built-in flash for product photography to ensure optimal image quality and accurate color representation.
Current Trends in Phone Product Photography
The ecommerce landscape is in constant flux, and this dynamism directly influences the evolving trends in product imagery. Staying informed about current trends is essential for understanding customer expectations and aligning your visual content with contemporary aesthetic preferences and market demands.
Here are three significant product photography trends to consider as you refine your smartphone product photography strategy:
- Embrace 360-Degree Product Photos: Technological advancements have empowered brands to offer immersive 360-degree views of their products online. While these interactive visuals may appear to be videos, they are typically constructed from a series of numerous still images captured from slightly different angles around the product. 360-degree photos provide customers with a comprehensive and interactive product viewing experience, allowing them to virtually rotate and examine the product from every perspective, significantly enhancing product understanding and purchase confidence.
- Leverage AI-Powered Photo Editing Tools: Artificial intelligence (AI) is revolutionizing various aspects of business operations, including product photography workflows. AI-powered photo editing tools can streamline tasks such as background removal from product shots, automated image enhancement, and even style transfer. While AI tools can greatly enhance efficiency, it’s still crucial to meticulously review the output, particularly for critical aspects like background removal, as current AI tools can occasionally introduce imperfections or artifacts that require manual correction. Utilize AI as a powerful assistant, but maintain a discerning eye for quality control.
- Integrate Product Videos into Your Visual Strategy: Product videos are not a nascent trend, but rather a continuously growing and increasingly essential component of effective ecommerce visual marketing. Consumer demand for video content is surging; in fact, 89% of people report wanting to see more videos from brands. Similar to 360-degree images, product videos offer shoppers a more complete and dynamic understanding of the product. Videos can showcase the product in action, demonstrate its features and benefits in a visually engaging manner, and create a more compelling and persuasive shopping experience compared to static images alone. Consider incorporating short, informative product videos alongside your still product photos to maximize customer engagement and conversion rates.
Essential Steps for Editing Your Product Photos
The prospect of photo editing might initially seem intimidating, but with modern smartphone apps, it’s surprisingly accessible and user-friendly. Basic photo editing is often essential to refine your product images and ensure they are polished and visually appealing for your online store.
Here’s a step-by-step guide to effective product photo editing on your smartphone:
- Choose a Dedicated Product Photography App: Begin by selecting a suitable photo editing app from your phone’s app store. Numerous apps are specifically designed for photo editing and offer a range of tools and features. Some smartphone photographers prefer professional-grade mobile apps like Adobe Lightroom Mobile or Snapseed, while others may opt for desktop-based photo editing software for more advanced editing capabilities. Explore different app options and choose one that aligns with your editing needs and skill level.
- Import Your Image into the Editing App: Open your chosen photo editing app and import the product image you wish to prepare for your online store. Most product photos benefit from at least minor adjustments to enhance their visual impact.
- Apply Basic Edits for Refinement: Focus on applying fundamental edits that enhance image quality without overly manipulating the natural appearance of your product. Key basic edits include adjusting brightness to ensure proper exposure, tweaking contrast to enhance detail and visual separation, increasing sharpness slightly to improve image clarity, fine-tuning highlights and shadows to balance lighting and reveal details in both bright and dark areas, and correcting white balance if necessary to ensure accurate color rendering. Resist the temptation to overuse filters, borders, excessive color tints, or oversaturation. The primary objective is to make your product look its absolute best while maintaining a realistic and accurate representation of its appearance in real life.
- Save Edits as Presets for Efficiency: After meticulously editing your first product photo and achieving a desired aesthetic, save the editing settings as a preset within your chosen app. Presets allow you to apply the identical set of adjustments to subsequent photos from the same photoshoot with a single tap, significantly streamlining your editing workflow and ensuring visual consistency across your product images. While presets are invaluable for time-saving efficiency, always remember to review each image after applying a preset to determine if any additional, image-specific tweaks are needed to optimize each individual photo.
- Consider Applying a Pure White Background Layer (Optional): If your original white backdrop has any minor blemishes, creases, or slight imperfections, you can further refine your product photos by replacing the existing background with a digitally created pure white layer in your editing app. Because you initially shot your product against a white background, the process of isolating the product and adding a clean white background layer is generally straightforward in most photo editing apps. This technique ensures a pristine and flawlessly white background, further enhancing the professional polish of your product images.
Once your product image is meticulously edited to be clean, crisp, and visually appealing, it’s ready to be uploaded to your Shopify store and begin contributing to your online sales success!
Top 5 Product Photo Editing Apps for Smartphones
Selecting the right photo editing apps is an integral aspect of mastering product photography with a smartphone. While some smartphones offer basic in-app editing features, dedicated third-party apps provide a more comprehensive suite of tools and functionalities to truly make your product photos stand out.
Here are five highly-rated product photo app options to consider:
1. Lightroom Mobile
Available for: iOS and Android
Price: Requires Adobe Creative Cloud subscription (starting at $9.99/month)
Adobe Lightroom Mobile interface showcasing its editing tools and functionalities.
Adobe Lightroom Mobile is widely regarded by many photographers as the premier app for product photography on mobile devices. It boasts a user-friendly interface with intuitive tools like sliders and presets, empowering you to precisely shape your photos to achieve your desired aesthetic. Lightroom Mobile also seamlessly integrates with Adobe’s Creative Cloud ecosystem, making it an excellent choice if you also plan to edit product photos on your desktop computer. You can initiate edits on your mobile device, web browser, or desktop application, and all edits are automatically synchronized across all devices, facilitating a fluid and efficient workflow.
To fully unlock the capabilities of Lightroom Mobile, consider subscribing to the Adobe Creative Cloud Photography plan, which includes Lightroom Mobile for desktop, mobile, and web, along with the industry-standard Adobe Photoshop desktop application, for a monthly subscription fee of $9.99.
2. Photoshop Express
Available for: iOS, Android, and Windows
Price: Free (with optional Adobe Creative Cloud subscription for premium features)
Adobe Photoshop Express mobile app interface, highlighting its photo editing capabilities.
Adobe Photoshop Express brings the power and versatility of the renowned Adobe Photoshop desktop software to your smartphone. With Photoshop Express, you gain access to a robust suite of photo editing features directly on your mobile device. You can import product photos directly from your phone’s gallery or capture new photos within the app itself. Photoshop Express provides intuitive tools to effortlessly adjust hue, saturation, brightness, exposure, contrast, and numerous other parameters, enabling you to create compelling and visually refined product photos for your online store. While a free version is available, a paid Adobe Creative Cloud subscription unlocks premium features and advanced functionalities.
3. Snapseed
Available for: iOS and Android
Price: Free
Google Snapseed mobile app interface, showcasing its editing tools and user-friendly design.
Snapseed is a professional-grade photo editing app developed by Google and available completely free of charge. Snapseed brings the robust editing capabilities typically found in expensive desktop software directly to your smartphone. The app offers a vast array of features, including precise control over tone, color, sharpening, and numerous creative effects. Snapseed also caters to beginner photographers with features like “Stacks,” which allows you to non-destructively revert your edits to earlier versions and easily save and apply custom editing settings across multiple photos. Snapseed is a powerful and free option for comprehensive product photo editing on mobile devices.
4. VSCO
Available for: iOS and Android
Price: Free version available; paid annual plans at $29.99 or $59.99
VSCO mobile app interface, emphasizing its filters and editing tools for stylistic photo enhancement.
VSCO offers both free and paid versions of its popular photo editing app. VSCO provides a comprehensive set of basic editing tools, including adjustments for exposure, contrast, color balance, and more, empowering you to create stunning product photos on the go. VSCO is particularly renowned for its extensive library of film-inspired filters and presets, which can add unique stylistic effects to your product images. Beyond product photo editing, VSCO also functions as an effective Instagram tool with its social sharing features and community-focused platform.
5. Photon Camera & Editor
Available for: iOS only
Price: Free
 Screenshot of Photon
Photon Camera & Editor app interface, highlighting its camera controls and photo editing features.
Photon Camera & Editor is exclusively available for iOS devices. Photon is a versatile app suitable for both experienced and novice smartphone photographers. Photon functions not only as a powerful photo editor but also as a sophisticated camera app for capturing your product photos directly within the app. Photon provides manual camera controls, allowing you to precisely set exposure, focus, and white balance, and includes a built-in image stabilizer to minimize camera shake. The app interface and control scheme are designed to emulate the shooting experience of a high-quality DSLR camera, offering a more professional and hands-on approach to smartphone photography.
For photographers who prefer to perform more advanced editing on a desktop computer, Photon offers the capability to capture product photos in RAW image format. RAW format preserves all image data without compression, resulting in higher-quality product images with greater editing flexibility in post-processing software.
Maximizing the Impact of Your Product Photography
Initially, learning how to take professional-quality product photos with an iPhone or Android device might seem challenging. However, with practice and consistent application of these techniques, you’ll quickly develop proficiency and confidence behind the camera. Equipped with the knowledge and strategies outlined in this guide, you are well on your way to mastering smartphone product photography and effectively using compelling visuals to drive sales in your online store. As your skills progress, you might even consider expanding your photography endeavors by selling your photography online as an additional revenue stream.
Further Reading
[Link to related article on dfphoto.net about advanced product photography techniques]
[Link to dfphoto.net article about lighting for photography]
Phone Product Photography FAQ
How can I take professional pictures at home with my iPhone?
- Utilize a Recent iPhone Model: Opt for an iPhone 13 or newer model, as these typically feature enhanced camera capabilities.
- Explore Third-Party Camera Apps: Experiment with third-party camera apps that offer manual controls for greater creative flexibility.
- Employ a White Background Setup: Use a white backdrop to create clean and distraction-free product photos.
- Position Setup Near Natural Light: Place your product photography setup near a window to maximize natural light illumination.
- Lock Focus for Sharpness: Hold down on the viewfinder screen to lock focus on your product, ensuring sharpness.
- Avoid Digital Zoom: Refrain from using the phone’s zoom function, as it degrades image quality.
- Experiment with Camera Angles: Shoot from various camera angles to showcase your product comprehensively.
- Utilize a Photo Editing App: Employ a photo editing app to refine and enhance your product images post-capture.
How do I take quality product photos?
- Employ a High-Resolution Smartphone Camera: Use a smartphone camera with a minimum resolution of 12 megapixels for detailed images.
- Shoot with a Tripod for Stability: Utilize a tripod to minimize camera shake and ensure sharp, clear product photos.
- Maximize Natural Window Light: Prioritize natural light from a window as your primary light source for soft and flattering illumination.
- Bounce Light with Foam Boards: Use white foam boards to bounce light and soften shadows, creating balanced lighting.
- Highlight Product Features: Employ sweeps or close-up shots to effectively showcase key product features and details.
- Capture Diverse Angles and Image Sizes: Shoot a variety of camera angles and consider different image sizes to provide comprehensive product visuals.