Jewelry often stands out as a truly special and thoughtful gift, a perfect way to express affection and understanding of someone’s personal style. Among these cherished items, locket necklaces hold a unique appeal. Their timeless charm is amplified by the intimate touch of holding tiny photographs of loved ones, allowing you to keep those dearest to you close, wherever life takes you.
This article will guide you through the process of printing locket necklace photos, ensuring you can perfectly personalize this classic piece of jewelry.
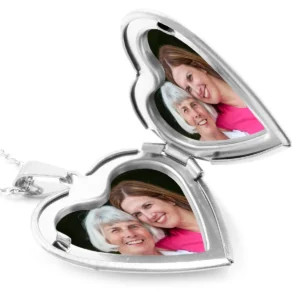 Heart Shaped Locket Photos
Alt text: Close-up of a heart-shaped silver locket opened to reveal two small photographs inside, showcasing a sentimental jewelry gift.
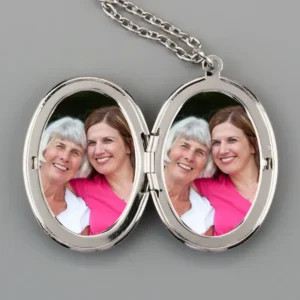 Oval shaped locket with photos
Alt text: An oval silver locket pendant shown open, displaying two miniature photos within, ideal examples of personalized photo jewelry.
Lockets are available in a variety of materials, from gold to silver, and come in numerous shapes and sizes, including the classic heart, round, faceted, and oval designs. Often gifted to commemorate significant life events like births, weddings, or milestone anniversaries, they carry deep sentimental value. However, the beauty of a locket is that it’s a perfect gift for any occasion – or even a treat for yourself! Modern lockets have moved beyond traditional designs, offering diverse finishes, metals, and styles to suit every taste.
The real challenge often lies in printing photos that are perfectly sized for these petite frames. Fortunately, services like PostSnap specialize in locket photo printing, making the process seamless and stress-free. Their dedicated locket photo service provides precisely sized prints, ready to be inserted directly into your locket.
Forget the days of struggling with oversized 6×4 prints, trying to cut out a face small enough to fit. This guide provides all the essential information on locket photographs, from selecting and measuring to trimming and fitting your photos, ensuring they are the perfect size and shape for your cherished pendant. Learn how to easily print photos directly from your phone and insert them into your new locket.
 Photo for locket
Alt text: A hand holding a small, trimmed photograph ready to be placed inside a locket, illustrating the final step in preparing locket photos.
Step 1: Selecting the Perfect Photo for Your Locket
Lockets are intimate pieces of jewelry, held close to the heart, so the photo you choose to place inside carries significant emotional weight. Often, people select sentimental photos of family, friends, or beloved pets. Take your time in choosing the ideal locket photos, remembering that you may need to crop the image to best fit the locket’s shape and size.
Tips for Choosing the Best Locket Photos:
-
Opt for Simplicity: Choose a photo that isn’t overly detailed or busy. The clearer the main subject’s face is, the better it will translate in a small format. Fine details can get lost in miniature photos, so focus on the overall clarity and main subject.
-
Prioritize Good Lighting: Well-lit photos are crucial. Avoid images that are too dark, as details will be lost when reduced to locket size. Bright and clear photos will maintain their quality even when printed small.
-
Consider Locket Shape: The shape of your locket greatly influences how your photo will appear. For example, a heart-shaped locket will have a pointed top center, which will impact the photo’s composition. What looks great in a heart might not suit a round or oval locket, so visualize your photo within the locket’s shape.
-
Ensure Recognizability at Small Sizes: Locket photos are tiny, so choose images where the subjects are clearly recognizable even when small. Close-up shots of faces are ideal to ensure features remain defined and visible.
-
Headshots with Background are Ideal: Headshots with some background are generally excellent choices. If the photo includes two people, ensure their heads are close together to fit well within the small space. Avoid large group photos, as individual faces will become too small and indistinguishable. Save group photos for larger prints or photo cards.
-
High-Quality Images Yield Better Results: As with any photo printing, the quality of your original image directly impacts the printed result. High-resolution images are best, but modern smartphones generally capture photos with sufficient megapixels for excellent locket photo prints.
-
Keep Important Elements Away from Edges: Avoid having crucial parts of your photo near the edges. These areas are most likely to be trimmed off to fit the locket shape, potentially cutting out important details.
-
Double Photos, Double the Love: For lockets that accommodate photos on both sides, you can select two images. Choose two separate photos, or creatively crop a single image to split subjects across both sides of the locket.
-
Center Your Subject: After cropping, ensure the main subject remains centered with enough background around the face(s). This way, any necessary trimming will affect the background rather than the subject itself, keeping the focus where it should be.
Step 2: Measuring Your Locket for Perfectly Sized Photos
A common question is, “What size are locket photos?” The truth is, there’s no standard size because lockets vary greatly. They are made from different materials, in diverse shapes, and in a wide range of sizes. Most lockets, however, are designed to hold at least one small photo, and sometimes two. Getting the dimensions right is key to a perfect fit.
While most locket photos range from approximately 15mm x 15mm to 25mm x 25mm (1.5cm x 1.5cm to 2.5cm x 2.5cm), each piece of jewelry is unique. Accurate measurement is essential.
Services like PostSnap’s locket photo creator simplify this process. You input the maximum dimensions of your locket’s photo area, and the system generates a square or rectangular photo template that roughly matches your locket’s size. You then trim the printed photo to the precise shape and size once it arrives.
These photo prints are designed to be adaptable for virtually any locket or pendant size. Some lockets come with a paper template, which simplifies measuring and trimming. If your locket doesn’t have a template, don’t worry. You can easily measure the locket itself to get the necessary dimensions and even create your own template to guide your trimming later.
To measure for your locket photo print using a template, lay the paper template that came with your locket on a flat surface. Use a ruler to measure the widest and highest points in millimeters.
Tip: A typical locket photo measures around 20mm +/- 5mm at its widest and highest point. These are the measurements you’ll need when you order your locket prints online.
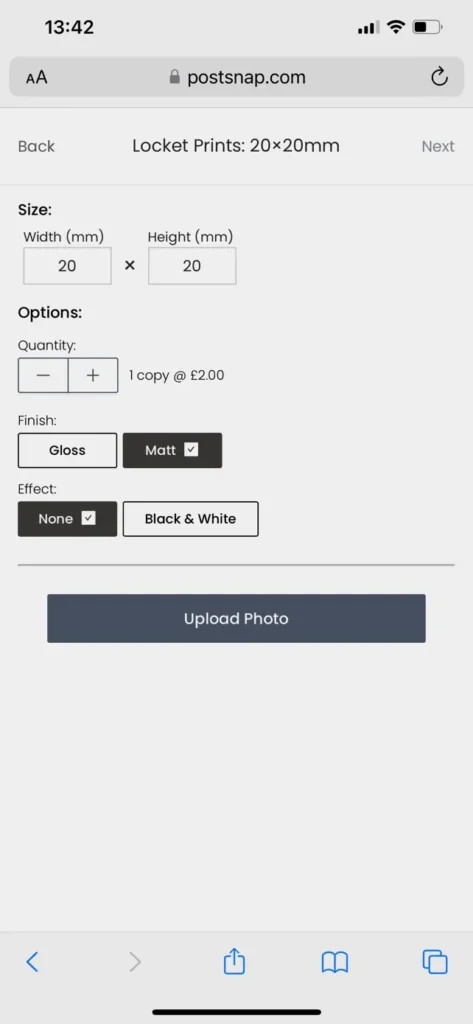 Enter locket photo measurements into PostSnap
Alt text: A screenshot of the PostSnap website interface showing input fields for locket photo measurements in millimeters, guiding users on how to order correctly sized prints.
Enter your measurements in millimeters when ordering your locket photo prints from your phone, tablet, or computer. If you’ve measured in centimeters or inches, convert them to millimeters first. Remember, 1 centimeter equals 10 millimeters, and 1 inch is approximately 25 millimeters.
Once you have the width and height, set aside the template for when your photos arrive. If your locket didn’t come with a template, you’ll need to make one. This is straightforward: measure the width and height of the photo area inside the locket. If there’s a rim, add half its width to each dimension.
If your locket doesn’t have a rim, simply measure the widest and highest parts of the photo area. If you measure the entire locket instead of just the photo area, remember you’ll need to trim more of the photo print to fit correctly.
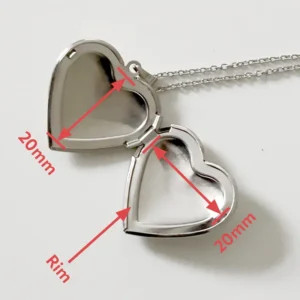
To create your locket template, open the locket and lay it flat. Measure the widest and highest points of the photo area. For lockets with a rim, add about 2mm to each dimension (typically, a 2mm rim is about 1mm on each side of the photo area).
Tip: Locket rims usually run around the photo area and are typically about 2mm thick.
These adjusted measurements are what you’ll use when ordering your locket prints online. You can enter these measurements in centimeters or inches on many websites, ordering directly from your device. Now, create your template using these dimensions.
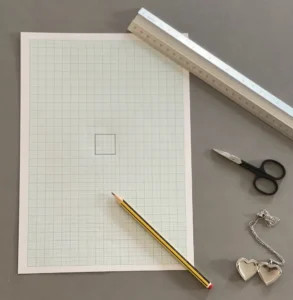
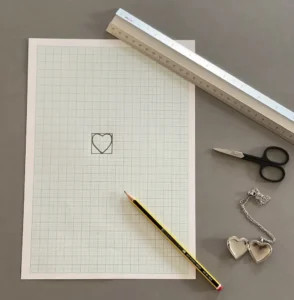
Start by drawing a square or rectangle on graph paper using your measurements. Graph paper helps ensure accuracy. After drawing the rectangle, set the graph paper aside and use tracing paper to sketch the exact shape of your locket.
 Heart shaped locket measurements
Alt text: An illustration showing measurements being taken on a heart-shaped locket with a ruler, emphasizing the process of accurately sizing locket photos.
Place tracing paper over one side of your open locket and carefully trace around the photo area or rim if there is one. You should now have a shape that matches your locket—heart, oval, circle, rectangle, or square. Place the tracing paper over your graph paper, aligning the sketched shape within the rectangle you drew earlier. Taping the tracing paper in place can be helpful. Trace over the sketched shape onto the graph paper. Finally, using sharp, curved nail scissors, carefully cut out the template. Keep this template safe until your locket photo prints arrive.
What You’ll Need for Measuring and Template Creation:
- Ruler or tape measure (millimeters preferred)
- Pencil
- Tracing paper
- Graph paper
- Sharp curved nail scissors
Step 3: Printing Locket Photos from Your Phone or Computer
Enter locket photo measurements into PostSnap
Alt text: A close-up view of a mobile screen showing the PostSnap website where users can input custom dimensions for locket photos, emphasizing ease of use.
 Locket photo uploaded to PostSnap
Alt text: A mobile interface displaying an uploaded photo ready for locket printing on PostSnap, illustrating the photo selection process.
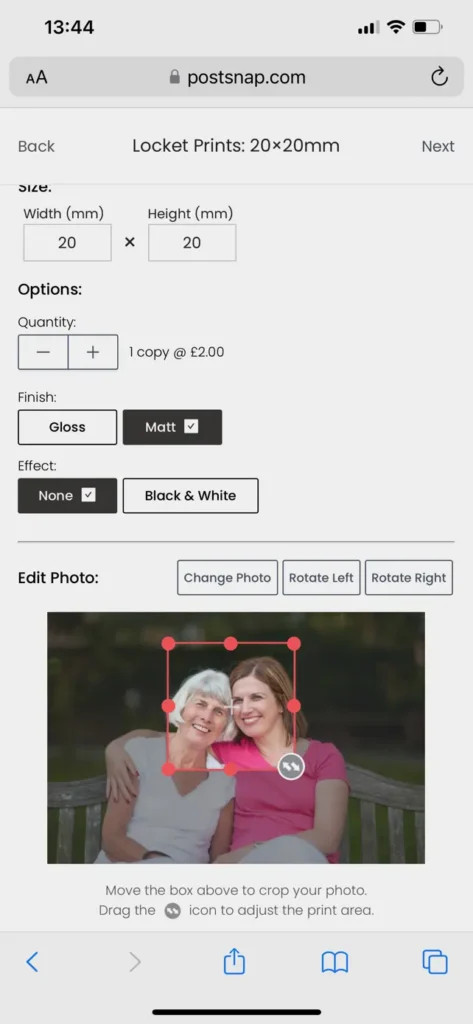 Photo cropped to fit locket necklace
Alt text: A screenshot showing the cropping tool on PostSnap, allowing users to adjust their photo to perfectly fit a locket necklace, highlighting customization features.
 Locket photo preview on iPhone
Alt text: A preview of a locket photo on an iPhone screen using PostSnap, demonstrating how users can see their photo before printing.
 Locket Photo Tiled
Alt text: A tiled print layout of a locket photo on PostSnap, showing multiple copies of the same image for easy trimming and fitting, a practical printing feature.
With your locket template and measurements ready, you’re now set to print your chosen photo(s) as square or rectangular prints. Services like PostSnap have streamlined the process to make printing locket photos incredibly easy and convenient.
Steps to Print Your Locket Photos:
-
Navigate to Locket Photos: Find the dedicated section for locket photos on your chosen photo printing service’s website. This area is specifically designed for creating perfectly sized locket pictures.
-
Start and Input Dimensions: Click ‘Get Started’ or a similar button and enter the width and height measurements you recorded in millimeters. Remember to account for trimming and double-check that you are using millimeters as your unit of measurement to avoid sizing errors.
-
Select Print Options: Choose whether you want your photos in full color or black and white, and select your preferred finish—gloss or matte. For lockets, matte finishes often work best as they reduce glare and fingerprints.
-
Upload Your Photo: Upload the photo you’ve selected from your device.
-
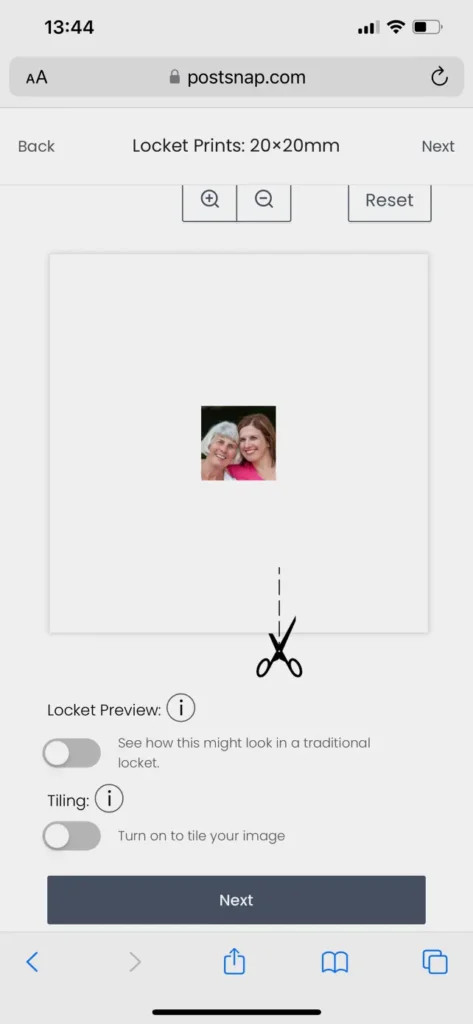
Adjust Crop: Once uploaded, use the cropping tool, usually indicated by a red box, to adjust the crop of your photo. Ensure the key parts of your image are within the crop area, and preview your cropped image to ensure it looks right for your locket.
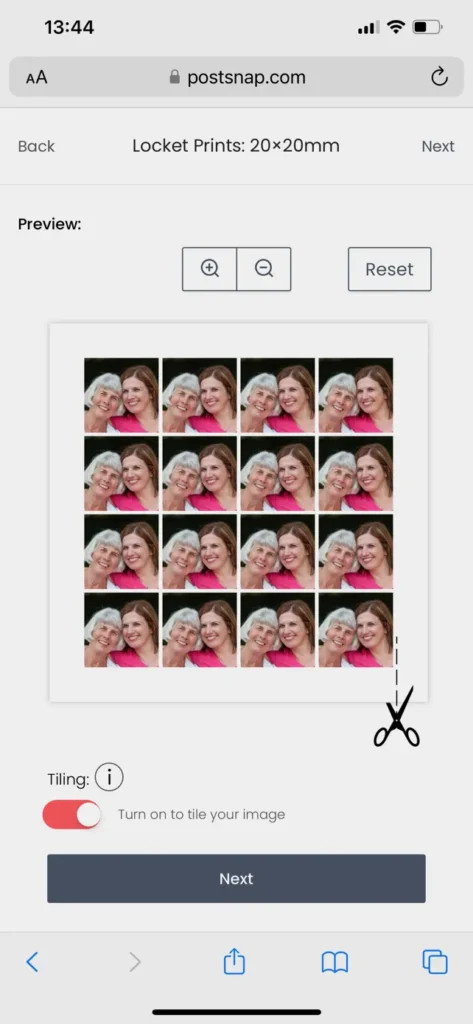
-
Enable Tiling (Crucial Step!): This is a vital step: make sure to turn the ‘Tiling’ toggle ON. Tiling duplicates your cropped photo across the print sheet, giving you multiple copies. This is incredibly helpful for practicing trimming and ensuring you get the perfect fit without needing to reprint if you make a mistake.
-
Approve and Order: Review your print settings and preview one last time, then proceed to checkout to place your order.
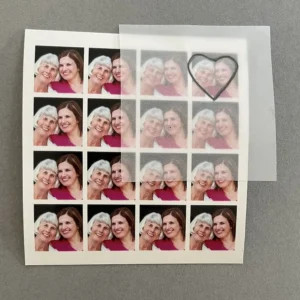
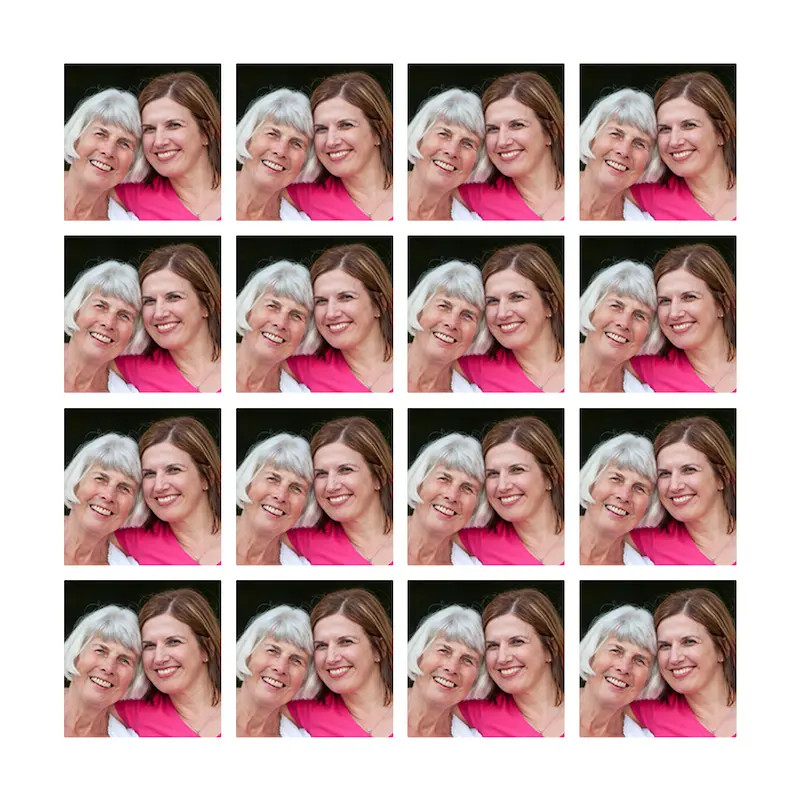 Locket photos
Alt text: A sheet of printed locket photos showcasing multiple tiled images ready for trimming, demonstrating the output from a locket photo printing service.
Remember, most services, including PostSnap, print square or rectangular photos which are designed to be trimmed to your locket’s specific shape and size once they arrive.
Step 4: Trimming and Fitting Your Locket Photo Prints
Once your prints arrive, the final step is to trim them and place them into your locket. This is where your template becomes invaluable.
 locket photo template
Alt text: A paper template cut out for a locket photo, demonstrating the tool used for precise trimming of locket photos.
 locket photo template 2
Alt text: Another example of a paper template for locket photos, highlighting different shapes and sizes that templates can accommodate for custom jewelry.
Alt text: Tracing paper being used to sketch the shape of a locket, illustrating the method for creating a custom template for photo trimming.
 locket heart tracing
Alt text: A heart shape being traced onto paper, showing the process of transferring a locket’s shape to create a trimming guide for photos.
Place your template over one of your tiled photo prints. Use a pencil to lightly trace around the template, creating a clear guideline for trimming.
Tip: Curved nail scissors or very sharp embroidery scissors work best for achieving clean edges, especially for curved shapes like hearts, ovals, or circles.
Trim carefully and evenly from all sides of the photo to keep the subject centered. Don’t worry if it takes a few attempts to get the size perfect. This is why tiling is recommended – you have multiple backup photos to work with.
 heart shaped locket with photo
Alt text: A heart-shaped locket necklace with a perfectly fitted photo inside, showcasing the successful result of printing and trimming locket photos.
Once you’ve cut out your photo, gently insert it into the locket. Use pointed or slanted tweezers to carefully press around the edges, tucking the photo under the locket’s lip, if present.
The rim should hold the photo in place. If it doesn’t, or if your locket lacks a rim, use a tiny dab of photo-safe glue on the back of the print before inserting it. If you encounter folds, creases, or if the photo is slightly too large, re-trim small slivers from the edges until it fits smoothly and perfectly.
Tools for Trimming and Fitting:
- Sharp curved nail scissors
- Tweezers (pointed tweezers are ideal)
- Photo glue or glue dots (photo-safe adhesive)
Beyond the Locket: Creative Uses for Miniature Photos
Miniature photos aren’t just for lockets. Their small size opens up a world of creative possibilities. Consider including a few with your holiday cards to give family and friends a personal, visual update. When gifting jewelry, a tiny photo placed inside the gift box adds an extra layer of thoughtfulness. Or simply carry a selection of these mini photos in your wallet or purse for a daily dose of personal memories. These little prints are perfect for adding a personal touch to many aspects of life.