Creating your own photo frame is a rewarding DIY project that allows for complete customization, cost savings, and a personal touch that store-bought frames simply can’t match. Whether you have a cherished photograph, a piece of art, or a special print, framing it yourself lets you tailor the frame to perfectly complement your piece and your home decor. In this guide, we’ll walk you through the process of building a custom DIY picture frame, complete with a glass panel and a professionally cut mat.
While there are numerous ways to construct a picture frame, this tutorial focuses on using mitered corners, wood dowels for strength, and routed edges for a refined look. This method offers a step up in complexity and aesthetics compared to simpler frame-making techniques, resulting in a frame that’s both durable and visually appealing. If you’re looking for easier methods, explore tutorials on basic frames, but if you’re ready to enhance your woodworking skills and create a truly custom piece, let’s dive into building this elegant photo frame.
Materials You’ll Need to Make Your Own Photo Frame:
Before you begin, gather all the necessary materials. This list includes everything you’ll need to build a frame similar to the one showcased, but feel free to adjust wood types and decorative elements to suit your personal style.
- 1×3 Lumber: The amount will depend on the size of your frame. Choose your preferred wood type – pine, oak, maple, or even reclaimed wood.
- Wood Dowels (3/8″ diameter): For reinforcing mitered corners.
- Dowel Jig (3/8″): Ensures accurate and centered dowel holes.
- Clamps: Bar clamps or pipe clamps are ideal for assembling the frame.
- Drill: For drilling dowel holes.
- Wood Glue: High-quality wood glue for strong joints.
- Miter Saw: For precise 45-degree miter cuts.
- Router: A trim router or full-size router will work.
- Roman Ogee Router Bit: For decorative edge (optional).
- Rabbeting Router Bit: To create a groove for glass, mat, and backing.
- Chisel: For squaring the corners of the rabbet (if needed).
- Glass Panel: Custom cut to size (more on this later).
- Picture Mat Board: Choose your desired color and thickness.
- Exacto Knife or Utility Knife: For cutting the mat board.
- Picture Frame Turn Buttons or Flexipoints: To secure the backing.
- 1/4″ Plywood or Stiff Cardboard: For the frame backing.
- Sandpaper: Various grits for smoothing wood.
- Wood Finish: Stain, paint, varnish, or polyurethane as desired.
- Safety Glasses and Hearing Protection: Essential for woodworking safety.
Step-by-Step Guide: Crafting Your Custom Photo Frame
Now that you have your materials ready, let’s embark on the journey of creating your personalized photo frame. Follow these detailed steps to bring your vision to life.
Step 1: Calculating Frame Dimensions for Your DIY Photo Frame
Accurate measurements are crucial for a perfectly fitting frame. The size of your frame is determined by the dimensions of your picture, the desired width of the mat, and the width of the frame itself. Use this formula to calculate the length of your wood pieces:
Width of Frame Piece = Picture Width + (2 x Mat Width) + (2 x Frame Width) – ¾″
Height of Frame Piece = Picture Height + (2 x Mat Width) + (2 x Frame Width) – ¾″
Let’s break down each component:
- Picture Width & Height: Measure your picture or print precisely.
- Mat Width: Decide how wide you want the mat border to be around your picture. A common width is 2-3 inches, but you can customize this to your preference. For example, a 3-inch mat width means you add 3 inches on each side of the picture.
- Frame Width: This is the visible width of the wood frame itself. If you are using 1×3 lumber, the actual width is approximately 2.5 inches.
Example Calculation:
Let’s say you have an 8×10 inch photo and you want a 3-inch mat border on all sides, and you’re using 1×3 lumber (2.5 inches wide).
Width Calculation: 8″ (picture width) + (2 x 3″ mat) + (2 x 2.5″ frame) – ¾″ = 8″ + 6″ + 5″ – ¾″ = 18.25″
Height Calculation: 10″ (picture height) + (2 x 3″ mat) + (2 x 2.5″ frame) – ¾″ = 10″ + 6″ + 5″ – ¾″ = 20.25″
Therefore, you’ll need two pieces of wood cut to 18.25 inches (top and bottom) and two pieces cut to 20.25 inches (sides), measured along the longest point after making miter cuts.
To determine the total lumber needed, add up all the calculated lengths: (2 x 20.25″) + (2 x 18.25″) = 77″. Always purchase a little extra lumber to account for cuts and potential errors.
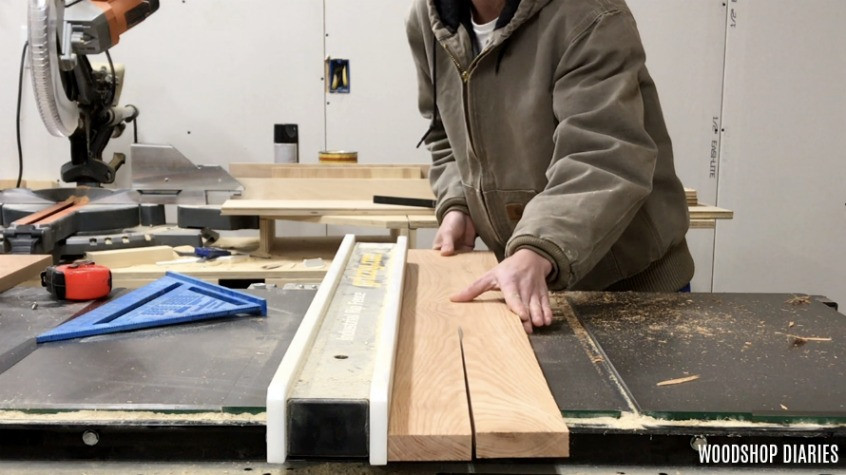
Step 2: Cutting the DIY Picture Frame Pieces with Mitered Corners
With your measurements calculated, it’s time to cut the wood pieces. Mitered corners are essential for a professional-looking frame, creating seamless 45-degree joints.
- Set Your Miter Saw: Adjust your miter saw to a 45-degree angle. Ensure the angle is precise for tight-fitting corners.
- Cut the First Piece: Position your lumber on the miter saw and make the first 45-degree cut.
- Cut the Second Piece (Opposite Miter): Flip the lumber and make the second 45-degree cut so that the two pieces form a 90-degree corner when joined. The longest point of these mitered cuts should match the widths and heights calculated in Step 1.
- Repeat for All Pieces: Cut two pieces for the width (top and bottom) and two pieces for the height (sides) of your frame, ensuring you have two pairs of pieces with opposite miter directions.
 Shara Woodshop Diaries ripping coffee wood on table saw
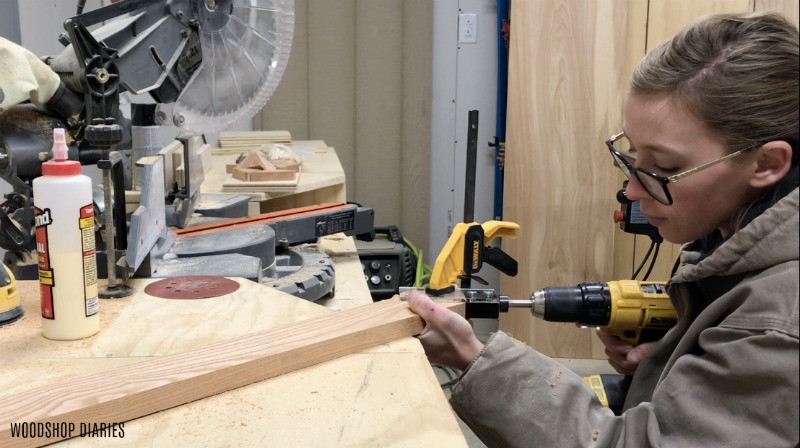
Step 3: Drilling Dowel Holes for Strong Corner Joints
Dowels significantly strengthen mitered corners, preventing them from separating over time. A dowel jig ensures accurate and centered holes for perfect alignment.
- Sanding: Before assembly, thoroughly sand all frame pieces. It’s much easier to sand individual pieces now than a fully assembled frame.
- Mark Dowel Locations: Decide where you want to place the dowels in each corner. Typically, one or two dowels per corner is sufficient.
- Use a Dowel Jig: Clamp your dowel jig onto the inside corner of a mitered piece. Align the jig so the dowel holes will be centered across the joint.
- Drill Dowel Holes: Using a drill bit that matches your dowel diameter (typically 3/8″), drill holes to a depth of about ¾″ into each mitered corner.
- Ensure Hole Correspondence: The most critical aspect of using dowels is ensuring that the holes on mating pieces align perfectly. Be consistent in how you position the dowel jig on each corner piece to guarantee proper alignment during assembly.
 Shara Woodshop Diaries drilling dowel holes into mitered corners to assemble
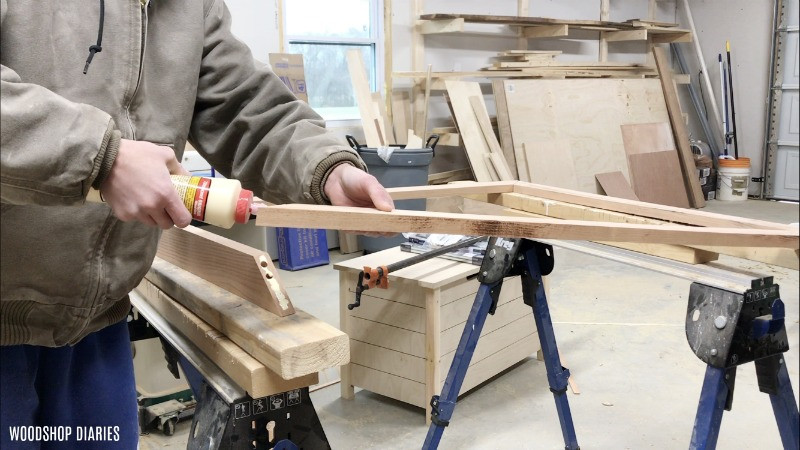
Step 4: Assembling Your DIY Picture Frame with Glue and Dowels
The glue-up process requires careful attention to ensure square corners and tight joints. Working methodically and using clamps are key to success.
- Apply Wood Glue: Apply a generous amount of wood glue to one mitered corner joint. Be sure to get glue into the dowel holes as well.
- Insert Dowels: Insert dowels into the holes on one of the pieces.
- Join Corners: Carefully align and join the mitered corners, pressing them firmly together.
- Clamp the Joint: Immediately clamp the corner using bar clamps or pipe clamps. Apply even pressure to create a tight joint. Ensure the corner is square by checking with a square tool.
- Repeat for Remaining Corners: Work one corner at a time, gluing, doweling, and clamping each joint until the entire frame is assembled.
- Allow Glue to Dry: Let the glue dry completely according to the manufacturer’s instructions, typically several hours or overnight, before removing clamps.
 Applying wood glue to mitered joints on picture frame made with dowels
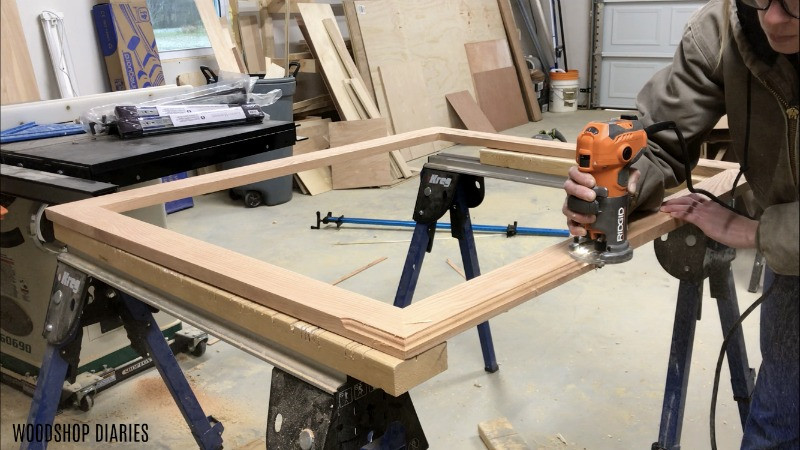
Step 5: Add a Decorative Edge with a Router (Optional)
Routing a decorative edge elevates the frame’s appearance, adding a touch of elegance. This step is optional but highly recommended for a professional finish.
- Choose Router Bit: Install a Roman Ogee router bit (or your preferred decorative bit) into your router.
- Adjust Router Depth: Set the router bit depth according to the desired profile.
- Route the Outer Edges: Carefully guide the router along the outside edges of the frame. For outside edges, move the router counterclockwise for better control and to work against the bit’s rotation.
- Maintain Consistent Pressure: Keep the router base flat on the wood and maintain a consistent feed rate for a smooth, even edge.
 Roman Ogee edge being routed along DIY picture frame with palm router
Step 6: Route a Rabbet for Glass, Mat, and Backing
A rabbet, or groove, on the inside back edge of the frame is essential for holding the glass, mat, picture, and backing securely in place.
- Install Rabbeting Bit: Insert a rabbeting router bit into your router.
- Adjust Rabbet Depth and Width: Set the rabbeting bit to cut a rabbet that is deep and wide enough to accommodate the thickness of your glass, mat board, picture, and backing material. A depth of approximately ⅜″ is usually sufficient.
- Route the Inner Edges: Guide the router along the inside back edges of the frame, routing clockwise for inside edges to work against the bit’s rotation and maintain control.
- Square Rabbet Corners (If Necessary): Rabbeting bits often create rounded corners. If you need square corners to fit glass or mat board precisely, use a chisel to carefully square the corners of the rabbet. Alternatively, consider routing the rabbet before frame assembly to avoid chiseling in tight corners.
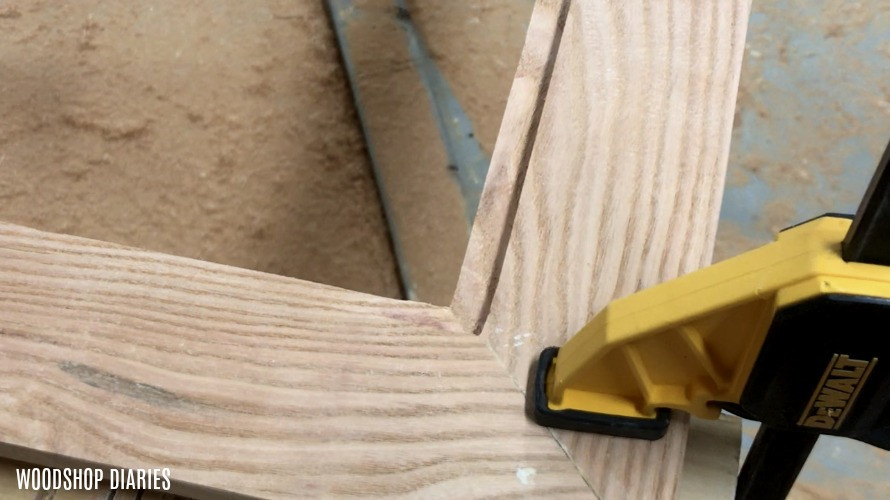 Rabbeted corner chiseled square
Step 7: Cutting the Mat Board for Your Photo Frame
A mat board provides a professional border around your picture, enhancing its presentation. You can purchase pre-cut mats in standard sizes, but for custom sizes or to save money, cutting your own mat is easy.
- Measure and Mark Mat Board: Measure the inside dimensions of your frame’s rabbet. This will be the overall size of your mat board. Then, decide on your desired mat width (e.g., 3 inches). Measure and mark the opening for your picture on the mat board, centered within the overall dimensions.
- Cut the Mat Opening: Use a sharp Exacto knife or utility knife and a straight edge to carefully cut out the mat opening. Make multiple light passes rather than trying to cut through in one go for a clean edge.
- Bevel Edges (Optional): For a professional mat look, use a mat cutter with a bevel blade to create a beveled edge on the inside opening.
- Mount Picture: Once the mat is cut, carefully position your picture behind the mat and use archival tape to secure the corners of the picture to the back of the mat board.
Step 8: Final Assembly and Finishing Your DIY Photo Frame
With all components ready, the final step is to assemble your custom photo frame and add the finishing touches.
- Finishing the Frame: Before final assembly, apply your chosen finish to the wooden frame. This could be stain, paint, varnish, or polyurethane. Apply finish in a well-ventilated area and follow product instructions for drying times.
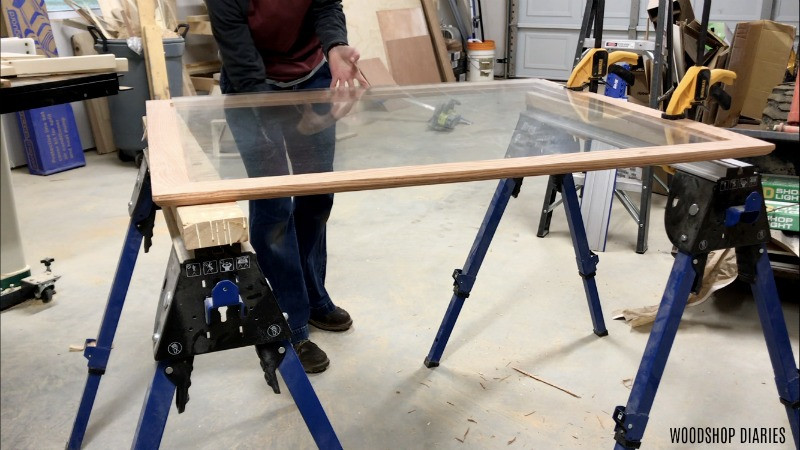
- Install Glass: Order a piece of picture frame glass cut to fit snugly within the rabbet. Local glass shops can custom cut glass to your exact dimensions. Place the glass panel into the rabbet.
- Insert Mat and Picture: Carefully place the mat board with the mounted picture on top of the glass.
- Add Backing Board: Cut a piece of ¼″ plywood or stiff cardboard to fit snugly into the rabbet behind the mat and picture. This acts as a backing board to protect and hold everything in place.
- Secure Backing: Use picture frame turn buttons (also called flexipoints or retainer clips) to secure the backing board in place. Screw or press these into the back of the frame around the perimeter to hold all layers together.
- Hanging Hardware: Attach your desired hanging hardware to the back of the frame. D-rings with wire, sawtooth hangers, or even keyhole hangers can be used depending on the weight and size of your frame and your hanging preference.
 Placing glass onto picture frame rabbet
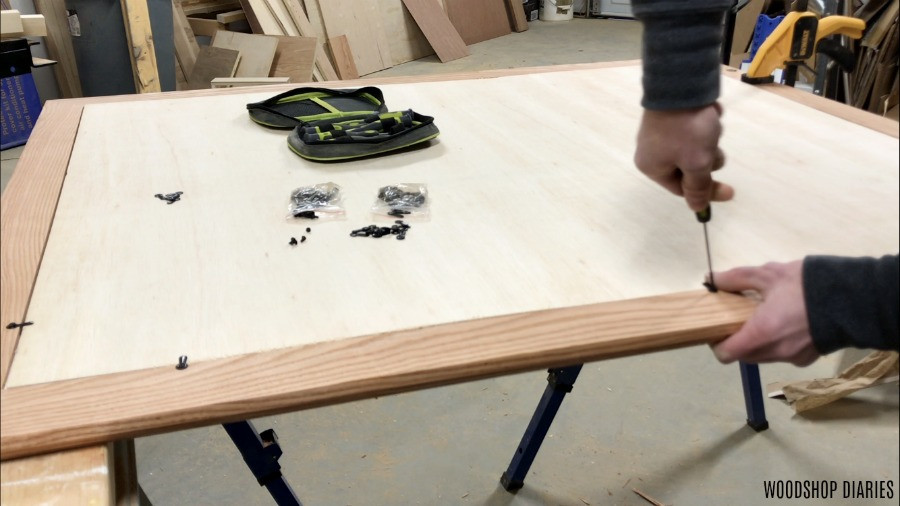 Attaching turn buttons onto back side of custom picture frame
Congratulations! You have now successfully crafted your own custom photo frame. By following these steps, you can create beautiful, personalized frames for all your cherished photos and artwork. Making your own photo frames not only saves you money compared to custom framing services but also offers the satisfaction of creating something unique and meaningful with your own hands.
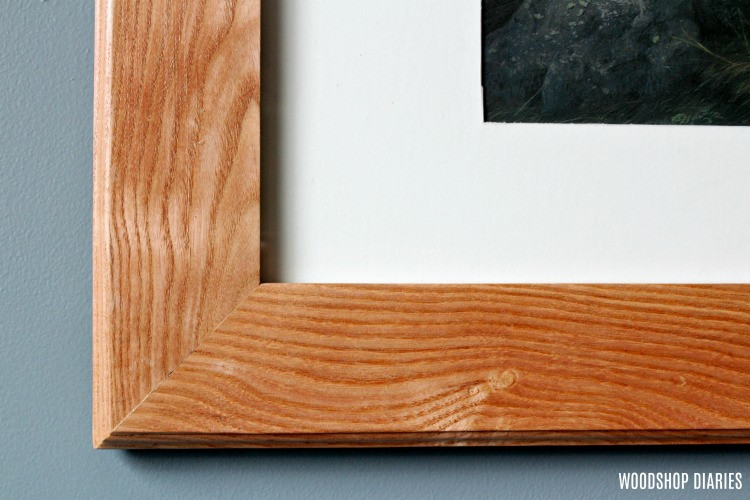 Close up of mitered corners and decorative edges of DIY custom picture frame
Embrace the creativity and enjoy displaying your framed memories! Remember to pin this guide for future projects and share your DIY photo frame creations!