iCloud Photos is a fantastic service for Apple users, seamlessly backing up your precious photos and videos to the cloud, making them accessible across all your Apple devices. But what if you also use a Windows PC? You might wonder, “How do I view iCloud Photos on my PC?”. The good news is, Apple provides a straightforward way to access and manage your iCloud Photos directly from your Windows computer. This guide will walk you through the process, ensuring you can effortlessly view, download, and even upload photos to your iCloud account from your PC.
Setting up iCloud Photos on Your Windows PC
To begin viewing your iCloud Photos on your PC, you’ll need to install and configure iCloud for Windows. This application acts as a bridge, syncing your iCloud services, including iCloud Photos, with your Windows environment.
Prerequisites
Before you start, ensure you have the following:
- Apple ID: You need an active Apple ID and password, the same one you use for iCloud on your Apple devices.
- iCloud Setup on Apple Devices: iCloud Photos should be already enabled on at least one of your Apple devices (iPhone, iPad, or Mac). This ensures your photos are already being backed up to iCloud.
Installing iCloud for Windows
- Download iCloud for Windows: Visit the official Apple support page or the Microsoft Store to download the latest version of iCloud for Windows.
- Installation: Run the downloaded installer and follow the on-screen instructions to install iCloud for Windows on your PC.
- Sign in: Once installed, open iCloud for Windows. You’ll be prompted to sign in with your Apple ID and password. Enter your credentials and sign in.
Enabling iCloud Photos
After signing in, you’ll see a list of iCloud services. To enable iCloud Photos:
-
Locate iCloud Photos: In the iCloud for Windows window, find “iCloud Photos”.
-
Click the Arrow: Next to “iCloud Photos,” you’ll see a small arrow. Click on this arrow to access iCloud Photos settings.
-
Turn on iCloud Photos: In the settings panel, you’ll find a checkbox or toggle switch labeled “iCloud Photos”. Make sure this is turned on or checked.
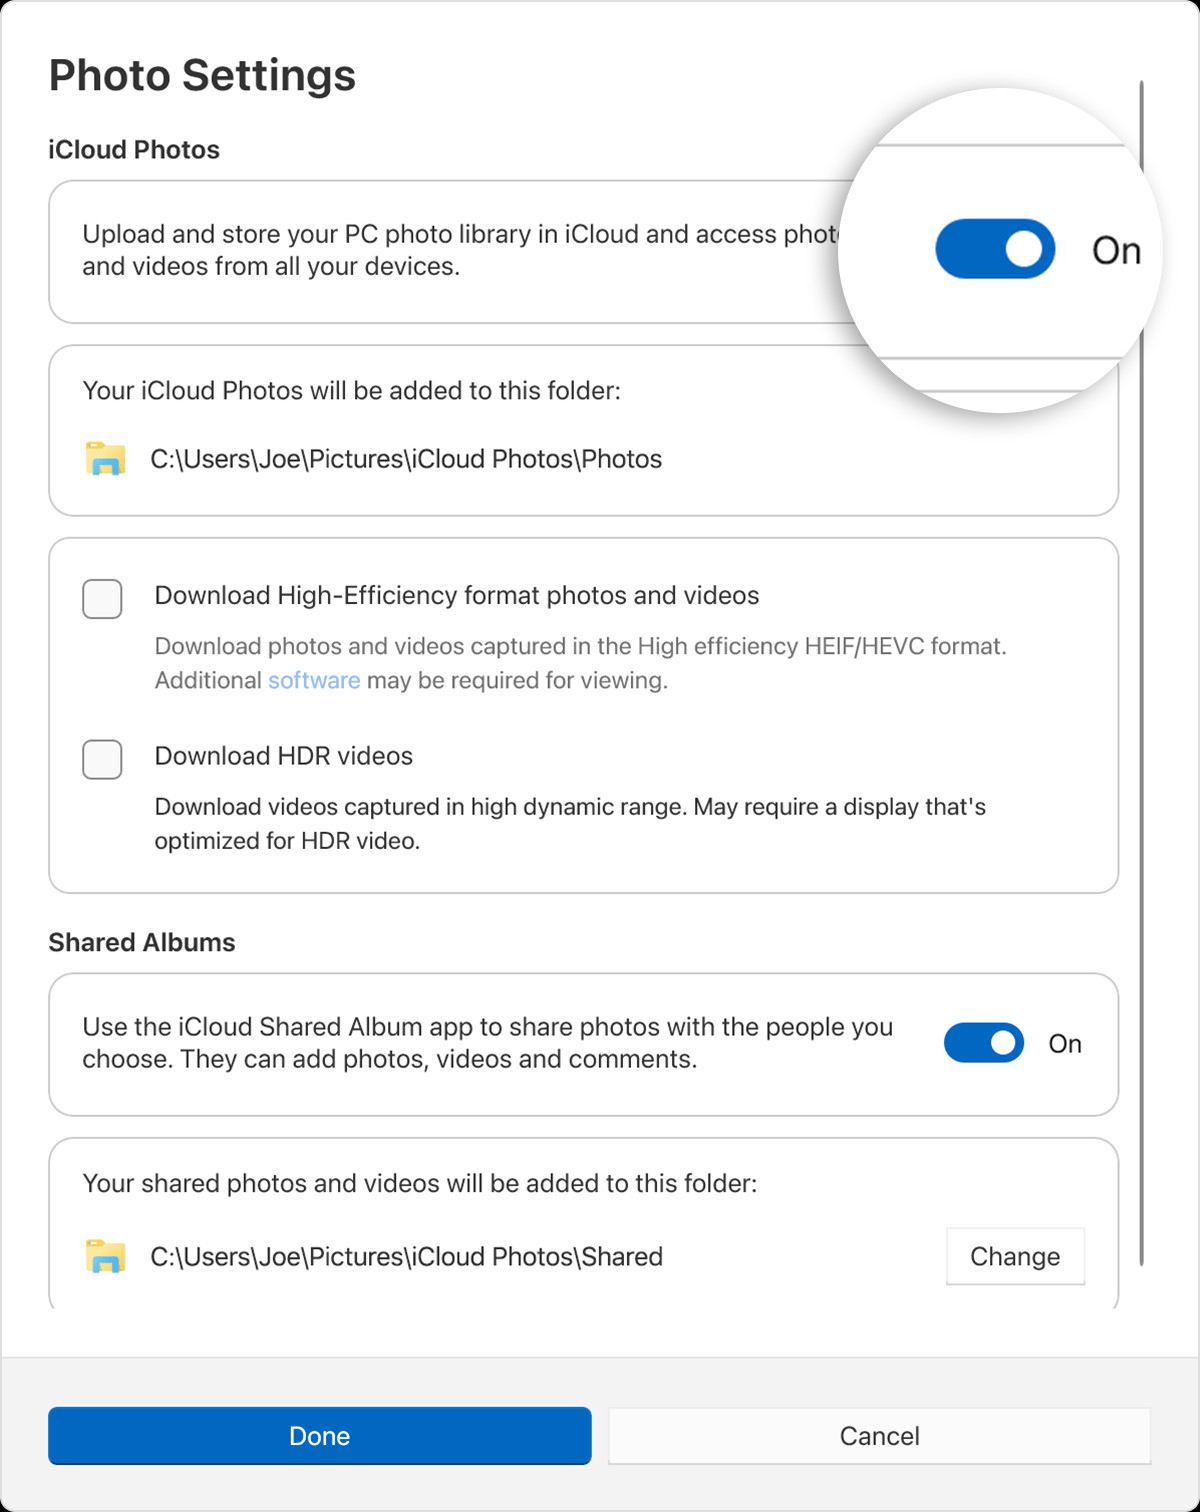 Turn on the toggle below Photo Settings, iCloud Photos.
Advanced Download Options
For users of iCloud for Windows 14.2 or later, you have advanced options for managing photo and video formats:
- Click “Advanced”: In the iCloud Photos settings, click the “Advanced” button.
- Choose Download Format: You can choose between:
- “Download High-Efficiency format photos and videos”: This option downloads photos and videos in HEIF and HEVC formats, which are high-efficiency formats that save storage space but might require compatible codecs on your PC.
- “Download HDR videos”: This option ensures HDR (High Dynamic Range) videos are downloaded in their original HDR quality.
Choose the options that best suit your needs and PC capabilities.
Enabling Shared Albums
If you use Shared Albums in iCloud to share photos and videos with family and friends, you can also access these on your PC:
- Turn on Shared Albums: In the iCloud Photos settings panel, ensure the “Shared Albums” option is turned on.
Once you’ve configured these settings, click “Done” to save your changes.
Accessing Your iCloud Photos on PC
After setting up iCloud Photos in iCloud for Windows, your photos and videos will be synced to your PC. Here’s how to find them:
Finding the iCloud Photos Folder in File Explorer
iCloud Photos creates a dedicated folder on your PC to store your synced photos and videos. You can find this folder in File Explorer:
- Open File Explorer: Open File Explorer (Windows key + E).
- Navigate to Pictures Folder: In the left-hand navigation pane, click on “Pictures”.
- Find iCloud Photos Folder: Under the Pictures folder, you’ll see an “iCloud Photos” folder. Your iCloud Photos are stored here, organized within “Photos” and potentially “Shared” subfolders. The full path is typically
C:Users[your user name]PicturesiCloud PhotosPhotos.
Viewing Photos in Windows 10 and Windows 11
You can view your iCloud Photos using either File Explorer or the Microsoft Photos app:
Using File Explorer:
- Open File Explorer: Navigate to the “iCloud Photos” folder as described above.
- Browse Photos: You can browse your photos directly within File Explorer. Thumbnails will be displayed, and you can double-click on any photo or video to view it.
Using Microsoft Photos App (Windows 11 & Windows 10):
- Open Microsoft Photos: Launch the Microsoft Photos app from the Start Menu.
- Select iCloud Photos: In the left-hand pane of the Photos app, you should see “iCloud Photos” listed under “Folders” or “Sources”. Click on “iCloud Photos”.
- View Your Photos: Your iCloud Photos library will be displayed within the Microsoft Photos app, allowing for a more visually oriented browsing experience.
Managing iCloud Photos on Your PC
iCloud for Windows not only allows you to view your photos but also manage them to some extent:
Downloading Photos for Offline Access
By default, iCloud for Windows might only download thumbnails of your photos to save space. When you double-click a thumbnail to view a photo, the full-resolution version is downloaded from iCloud. However, if you want to ensure certain photos are always available offline on your PC:
- Open File Explorer and Navigate to iCloud Photos.
- Select Photos: Select the specific photos or videos you want to keep permanently on your PC.
- Right-Click and Choose “Always keep on this device”: Right-click on your selection. In the context menu, choose the option “Always keep on this device.” This will download and store the full-resolution files locally on your PC, ensuring offline access.
Uploading Photos from PC to iCloud
You can easily add photos and videos from your PC to your iCloud Photos library:
- Open two File Explorer windows.
- Navigate to iCloud Photos in one window.
- In the other window, open the folder containing the photos you want to upload.
- Drag and Drop: Select the photos and videos you want to upload and drag them from the source folder into the “iCloud Photos” folder in the other File Explorer window.
These uploaded photos and videos will automatically sync to iCloud and become available on all your Apple devices connected to the same Apple ID.
Syncing and Deleting Photos
Any changes you make to your iCloud Photos on your PC, such as deletions, will be synced with iCloud and reflected on your other devices. If you delete a photo from the iCloud Photos folder in File Explorer or within the Microsoft Photos app (when viewing iCloud Photos), it will be deleted from iCloud Photos across all your devices.
By following these steps, you can seamlessly integrate iCloud Photos with your Windows PC, making it easy to view, manage, and share your memories across all your devices, regardless of the operating system. Enjoy having your photo library at your fingertips, whether you’re on your Apple devices or your Windows PC!