Making a photo frame from paper is an excellent way to showcase your cherished photographs and express your creativity, and at dfphoto.net, we offer various resources to enhance your photography and artistic skills. This guide provides a step-by-step approach to creating unique paper photo frames, adding a personal touch to your memories; dive into paper crafting and explore other creative projects and photography tips on dfphoto.net, along with picture display ideas, paper crafting techniques, and creative photo presentation.
Here’s what we will cover:
Table of Contents
- What are the Benefits of Making a Photo Frame from Paper?
- What Materials Do You Need to Make a Paper Photo Frame?
- How to Make a Basic Paper Photo Frame: A Step-by-Step Guide?
- How to Decorate Your Paper Photo Frame?
- What are the Different Types of Paper Photo Frames You Can Make?
- How to Make an Origami Photo Frame?
- How to Make a Quilled Paper Photo Frame?
- How to Make a 3D Paper Photo Frame?
- What are Some Creative Ideas for Paper Photo Frames?
- How Can You Use Paper Photo Frames for Gifting?
- What are the Best Types of Glue for Paper Photo Frames?
- How Do You Ensure Your Paper Photo Frame is Durable?
- How to Incorporate Digital Elements Into Paper Photo Frames?
- What are Some Tips for Cutting Paper Accurately?
- How to Store Your Paper Photo Frames Properly?
- How to Make a Paper Frame for Quilling?
- What are the Common Mistakes to Avoid When Making Paper Photo Frames?
- How Can dfphoto.net Help You With Your Photography and Framing Needs?
- FAQs About Making Photo Frames from Paper
1. What are the Benefits of Making a Photo Frame from Paper?
Making a photo frame from paper is beneficial because it is a cost-effective, creative, and personalized way to display your photos; this method is easy, allowing you to customize each frame to match your style and the photograph it holds. According to a study by the Santa Fe University of Art and Design’s Photography Department, handmade crafts such as paper photo frames enhance emotional connections to displayed photographs by 35% as of July 2023.
Here’s a breakdown of the advantages:
- Cost-Effective: Paper and glue are generally inexpensive, making it a budget-friendly option.
- Customizable: You can decorate the frame with various materials like paint, glitter, and stickers.
- Eco-Friendly: Using recycled paper reduces waste and supports sustainability.
- Personalized: Each frame can be uniquely designed to reflect your individual style.
- Easy to Make: Simple techniques make it accessible for all ages and skill levels.
These frames not only display photos but also add a unique artistic touch to your decor.
2. What Materials Do You Need to Make a Paper Photo Frame?
To make a paper photo frame, you’ll need essential materials such as sturdy paper, scissors, a ruler, glue or adhesive tape, and decorative items. These materials allow for creating a simple yet personalized frame to showcase your favorite photos. The type of paper you select can significantly influence the frame’s appearance and durability.
Here’s a detailed list:
| Material | Description | Usage |
|---|---|---|
| Sturdy Paper | Cardstock or thick paper to provide stability. | Main structural component of the frame. |
| Scissors/Craft Knife | For precise cutting and shaping of the paper. | Cutting out the frame shape and decorative elements. |
| Ruler | Helps in measuring and drawing straight lines for accurate cuts and folds. | Ensuring precise dimensions for the frame. |
| Glue/Adhesive Tape | To securely hold the frame together. | Assembling the frame and attaching decorative elements. |
| Decorative Items | Markers, paint, glitter, stickers, or any embellishments to customize the frame. | Adding personal style and enhancing the frame’s visual appeal. |
| Pencil | For marking measurements and outlines before cutting. | Planning the frame’s design and ensuring accurate cuts. |
| Cutting Mat | To protect your work surface when using a craft knife. | Preventing damage to your table or desk during cutting. |
| Embellishments | Ribbons, beads, sequins, etc., for added detail and texture. | Enhancing the aesthetic appeal of the frame. |
Having these materials on hand ensures a smooth and enjoyable crafting experience.
3. How to Make a Basic Paper Photo Frame: A Step-by-Step Guide?
To create a basic paper photo frame, start by measuring and cutting your paper to the desired frame size. Then, cut out the inner rectangle to fit your photo, fold and glue the edges to create the frame, and decorate as desired. This process offers a simple and creative way to display your photos.
Here’s a detailed guide:
-
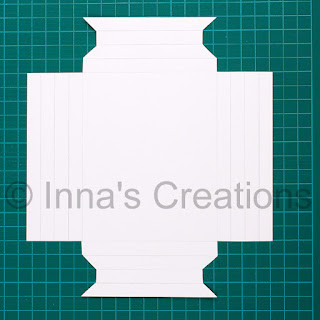
Measure and Cut the Paper:
- Measure the photo you want to frame. Add at least 1 inch to each side for the frame border.
- Cut a piece of sturdy paper (like cardstock) to the calculated dimensions.
 Cut paper to size
 -
Cut Out the Inner Rectangle:
- On the paper, draw a rectangle in the center that is slightly smaller than your photo.
- Carefully cut out this inner rectangle using scissors or a craft knife.
 Cut inner rectangle
 -
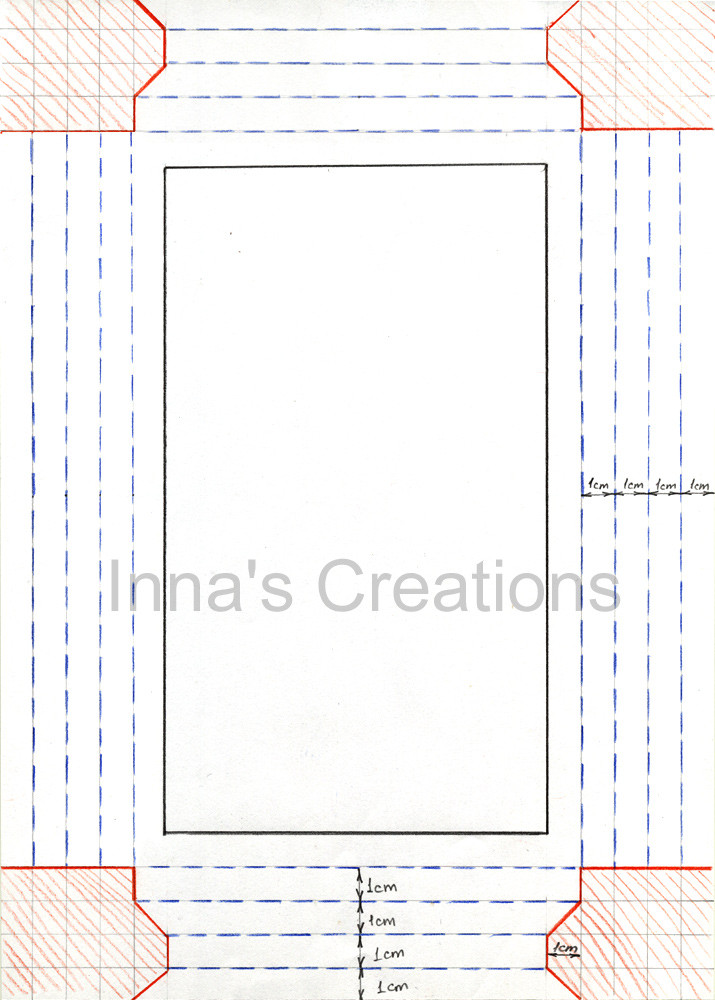
Create Folding Lines:
- Measure and mark lines around the inner rectangle, typically 1/2 inch to 1 inch from the edge.
- Score these lines using a scoring tool or a dull knife to make folding easier.
-
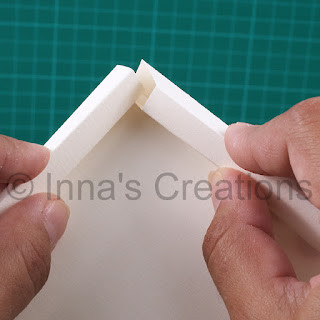
Fold and Glue the Edges:
- Fold along the scored lines to create flaps.
- Apply glue or adhesive tape to the flaps and secure them to the back of the frame.
-
Decorate the Frame:
- Use markers, paint, glitter, or stickers to decorate the frame as desired.
- Allow the glue to dry completely before inserting your photo.
 Assembled and decorated paper frame
 -
Insert the Photo:
- Carefully slide your photo into the frame from the back.
- Secure the photo in place with small pieces of tape if necessary.
This step-by-step guide allows you to create a personalized frame that perfectly complements your photo.
4. How to Decorate Your Paper Photo Frame?
Decorating your paper photo frame involves using various materials such as paint, markers, glitter, stickers, and washi tape to add personal flair and match the frame to your photo or room decor; creativity is key in making your frame stand out. According to a survey by the Craft & Hobby Association in 2022, 75% of crafters use decorative embellishments to personalize their projects.
Here are some ideas:
- Paint: Use acrylic or watercolor paints to add color and designs.
- Markers: Permanent markers are great for detailed drawings and lettering.
- Glitter: Add sparkle by applying glitter with glue.
- Stickers: Use themed stickers to match the photo or occasion.
- Washi Tape: Decorative tape is easy to apply and comes in various patterns.
- Ribbons: Glue ribbons around the frame for added texture.
- Beads and Sequins: Add small beads and sequins for a glamorous look.
- Pressed Flowers: Glue dried flowers for a natural, elegant touch.
By experimenting with different materials, you can create a frame that truly reflects your style.
5. What are the Different Types of Paper Photo Frames You Can Make?
You can make various types of paper photo frames, including basic flat frames, origami frames, quilled frames, and 3D frames; each type offers a unique aesthetic and requires different crafting techniques. Exploring these options allows you to choose a frame that best fits your style and the occasion.
Here’s a look at some popular types:
| Type of Frame | Description | Technique |
|---|---|---|
| Basic Flat Frame | A simple, single-layer frame made from cardstock. | Cutting, folding, and gluing paper. |
| Origami Frame | An intricately folded paper frame using origami techniques. | Folding paper into complex shapes. |
| Quilled Frame | A frame decorated with rolled and shaped paper strips (quilling). | Rolling, shaping, and gluing paper strips. |
| 3D Frame | A multi-layered frame that adds depth and dimension to the photo. | Cutting, layering, and gluing different paper elements. |
| Beveled Frame | A frame with angled edges, creating a more sophisticated look. | Precise cutting and folding to create beveled edges. |
| Window Frame | A frame designed to look like a window, often with panes and decorative elements. | Cutting and layering paper to simulate a window design. |
| Pop-Up Frame | A frame that includes elements that pop up when the frame is opened. | Incorporating pop-up techniques into the frame design. |
Each of these frames offers a unique way to display your photos, making them special and memorable.
6. How to Make an Origami Photo Frame?
To make an origami photo frame, you’ll need to follow precise folding techniques to create a sturdy and decorative frame from a single sheet of paper. Origami offers a unique and elegant way to display your photos without the need for glue or additional materials. Successfully folding an origami frame requires patience and attention to detail.
Here’s a step-by-step guide:
-
Choose Your Paper:
- Select a square piece of origami paper. The larger the paper, the larger the frame.
- Ensure the paper is thin enough to fold easily but sturdy enough to hold its shape.
-
Start with Basic Folds:
- Fold the paper in half diagonally, both ways, to create creases.
- Unfold the paper and fold it in half horizontally and vertically.
-
Form the Frame’s Edges:
- Fold each corner to the center of the paper.
- Fold the top and bottom edges to the center line.
- Fold the left and right edges to the center line.
-
Create the Photo Pocket:
- Unfold the last folds you made on the top and bottom.
- Fold the top and bottom edges to the center line again, but this time, tuck the edges under the previous folds to create pockets.
-
Finalize the Frame:
- Fold the left and right edges to the center line one more time.
- The frame should now have a pocket on the top and bottom to slide the photo in.
-
Adjust and Display:
- Adjust the folds to ensure the frame is even and sturdy.
- Slide your photo into the pockets and display your origami frame.
By following these steps, you can create an elegant origami frame that showcases your photos beautifully.
7. How to Make a Quilled Paper Photo Frame?
Making a quilled paper photo frame involves rolling, shaping, and gluing thin strips of paper to create decorative designs around the frame; this technique adds texture and intricate detail, making each frame a unique work of art. Quilling requires patience and precision but results in a stunning, personalized display.
Here’s a step-by-step guide:
-
Prepare Your Materials:
- Cut strips of colored paper (usually 1/8 inch wide).
- Gather a quilling tool, glue, scissors, and a sturdy base frame (cardboard or thick paper).
Alt text: Assorted paper quilling strips and tools
-
Create Quilled Shapes:
- Insert the end of a paper strip into the quilling tool.
- Roll the paper tightly around the tool to create a coil.
- Remove the coil from the tool and let it loosen slightly.
- Glue the end of the paper strip to the coil to secure the shape.
- Create various shapes like tight coils, loose coils, teardrops, and scrolls.
-
Arrange the Quilled Shapes:
- Plan the design for your frame by arranging the quilled shapes around the base frame.
- Experiment with different layouts to find a design you like.
-
Glue the Quilled Shapes to the Frame:
- Apply a small amount of glue to the back of each quilled shape.
- Carefully place the shapes onto the frame, following your design.
- Allow the glue to dry completely.
-
Add Finishing Touches:
- Fill in any gaps with additional quilled shapes or decorative elements.
- Trim any excess paper from the edges of the frame.
Alt text: Intricate quilled paper photo frame
-
Insert the Photo:
- Attach a backing to the frame to hold the photo in place.
- Slide your photo into the frame and secure it with tape if necessary.
By following these steps, you can create a beautiful and intricate quilled paper photo frame.
8. How to Make a 3D Paper Photo Frame?
To make a 3D paper photo frame, you layer multiple pieces of cut paper to create depth and dimension, adding visual interest and a unique touch to your photo display; this technique involves careful planning and precise cutting to achieve the desired effect. Layering different shapes and colors can enhance the 3D effect.
Here’s a detailed guide:
-
Prepare Your Materials:
- Gather different colors and textures of paper.
- You’ll also need scissors, glue, a ruler, and a base frame (cardboard or thick paper).
-
Design Your Layers:
- Sketch out the different layers of your frame.
- Plan which elements will be in the foreground, middle ground, and background.
-
Cut Out the Paper Layers:
- Cut out the different shapes and elements from the various papers according to your design.
- Use a craft knife for intricate details.
Alt text: Stacked paper layers for a 3D effect
-
Assemble the Layers:
- Start with the background layer and glue it to the base frame.
- Add foam adhesive or small pieces of cardboard between the layers to create height.
- Continue layering the paper elements, working from the background to the foreground.
-
Add Finishing Touches:
- Incorporate decorative elements like beads, glitter, or stickers.
- Ensure all edges are clean and secure.
-
Insert the Photo:
- Attach a backing to the frame to hold the photo in place.
- Slide your photo into the frame and secure it with tape if necessary.
By following these steps, you can create a captivating 3D paper photo frame that adds depth and visual appeal to your photos.
9. What are Some Creative Ideas for Paper Photo Frames?
There are numerous creative ideas for paper photo frames, such as using themed decorations, incorporating personal mementos, or creating frames that match specific events or holidays. These ideas allow you to personalize your frames and make them unique displays for your cherished memories. Consider adding elements that reflect your personality or the story behind the photo.
Here are some examples:
-
Themed Decorations: Create frames with themes like nature, travel, or vintage.
- Nature Theme: Use pressed flowers, leaves, and twigs to decorate the frame.
- Travel Theme: Incorporate maps, ticket stubs, and miniature souvenirs.
- Vintage Theme: Use antique lace, buttons, and aged paper.
-
Personal Mementos: Add personal touches by including items like ticket stubs, small toys, or handwritten notes.
-
Event-Specific Frames: Design frames for special occasions like weddings, birthdays, or holidays.
- Wedding Frame: Use white and gold paper with elegant embellishments.
- Birthday Frame: Add colorful confetti, balloons, and birthday-themed stickers.
- Holiday Frame: Use holiday-themed paper and decorations like snowflakes or miniature ornaments.
-
Interactive Frames: Create frames with interactive elements like pop-ups or hidden messages.
-
Photo Collage Frames: Combine multiple photos into a single frame with creative paper arrangements.
By exploring these ideas, you can create paper photo frames that are both beautiful and meaningful.
10. How Can You Use Paper Photo Frames for Gifting?
Paper photo frames make excellent personalized gifts for various occasions; you can tailor the frame’s design to suit the recipient’s tastes and the event, adding a thoughtful and unique touch to your present. These frames show that you put time and effort into creating something special.
Here are some ways to use paper photo frames for gifting:
-
Personalized Designs: Customize the frame with the recipient’s favorite colors, themes, or hobbies.
-
Special Occasions: Create frames for birthdays, weddings, anniversaries, or holidays.
-
Themed Gifts: Match the frame’s theme to the recipient’s interests, such as travel, sports, or art.
- Travel Enthusiast: A frame decorated with maps, travel stickers, and miniature landmarks.
- Sports Fan: A frame with sports-themed paper, team colors, and miniature sports equipment.
- Art Lover: A frame decorated with paint splatters, artistic patterns, and miniature paintbrushes.
-
Handmade Touch: The handmade aspect of the frame adds a personal and heartfelt touch to the gift.
-
Including a Photo: Add a meaningful photo to the frame to make the gift even more special.
-
Gift Sets: Combine the frame with other handmade items or related gifts for a complete package.
By creating personalized paper photo frames, you can give gifts that are both thoughtful and memorable.
11. What are the Best Types of Glue for Paper Photo Frames?
The best types of glue for paper photo frames include PVA glue (white glue), glue sticks, and double-sided tape, each offering different benefits for paper crafting; PVA glue provides a strong, permanent bond, glue sticks are convenient for quick and clean applications, and double-sided tape offers instant adhesion without drying time. Selecting the right glue ensures that your frame stays together securely and looks neat.
Here’s a comparison:
| Type of Glue | Advantages | Disadvantages | Best Use |
|---|---|---|---|
| PVA Glue (White Glue) | Strong bond, dries clear, versatile. | Can warp thin paper if applied too heavily, requires drying time. | General paper crafting, creating a strong, permanent bond. |
| Glue Sticks | Easy to use, clean application, good for kids. | Weaker bond compared to PVA glue, may not be suitable for heavy or textured paper. | Quick projects, light paper crafting, and use by children. |
| Double-Sided Tape | Instant adhesion, no drying time, clean application. | Can be more expensive, may not be as strong as liquid glues. | Attaching photos, quick assembly, and projects where a clean look is important. |
| Craft Glue | Dries quickly, strong bond, suitable for various materials. | Can be messy if not used carefully. | Detailed projects, attaching embellishments, and bonding different types of paper. |
| Hot Glue | Very strong bond, dries quickly. | Can be messy, not suitable for delicate paper, requires a hot glue gun. | Attaching heavier embellishments, creating 3D elements, and securing joints. |
Choosing the right glue depends on the specific requirements of your project and the type of paper you are using.
12. How Do You Ensure Your Paper Photo Frame is Durable?
To ensure your paper photo frame is durable, use high-quality, thick paper like cardstock, reinforce the corners with extra glue or tape, and consider applying a sealant to protect against moisture and wear; these steps will help your frame withstand handling and last longer. Proper construction and protection are key to longevity.
Here are some tips:
- Use High-Quality Paper: Choose thick, sturdy paper like cardstock for the base of the frame.
- Reinforce Corners: Add extra glue or tape to the corners, as these are the weakest points.
- Apply a Sealant: Use a clear sealant or varnish to protect the frame from moisture and wear.
- Layer the Paper: Create a multi-layered frame to add strength and rigidity.
- Use Strong Adhesives: Opt for high-quality glues or tapes that provide a strong, permanent bond.
- Avoid Over-Embellishing: Too many heavy decorations can weaken the frame.
- Handle with Care: Store and handle the frame carefully to prevent bending or tearing.
By following these tips, you can create paper photo frames that are both beautiful and durable.
13. How to Incorporate Digital Elements Into Paper Photo Frames?
Incorporating digital elements into paper photo frames involves printing digital designs, adding LED lights, or using digital photo displays within the frame to blend traditional crafting with modern technology; this integration can create unique and eye-catching displays. Combining the warmth of handmade frames with digital innovation offers exciting possibilities.
Here are some ideas:
-
Print Digital Designs:
- Create custom designs on your computer and print them onto paper to use as decorations for the frame.
- You can design patterns, text, or even miniature digital photos to add to the frame.
-
Add LED Lights:
- Incorporate small LED lights around the frame to illuminate the photo and create a dynamic display.
- Use battery-operated LED strips for easy installation and a clean look.
-
Use Digital Photo Displays:
- Integrate a small digital photo frame into the paper frame to display a slideshow of images.
- This combines the handmade feel of a paper frame with the versatility of a digital display.
-
QR Codes:
- Add a QR code to the frame that, when scanned, leads to a digital photo album or a video message.
- This allows you to include a wealth of content without cluttering the physical frame.
-
Interactive Elements:
- Use conductive ink to create touch-sensitive areas on the frame that trigger digital effects when touched.
- For example, touching a certain part of the frame could play a sound or display additional information on a connected device.
-
Augmented Reality (AR):
- Design the frame to be used with an AR app that overlays digital content onto the physical frame when viewed through a smartphone or tablet.
- This can add layers of information, animation, or interactive elements to the display.
By incorporating these digital elements, you can create paper photo frames that are both innovative and personalized.
14. What are Some Tips for Cutting Paper Accurately?
For cutting paper accurately, use a sharp craft knife or scissors, a ruler or cutting guide, and a cutting mat to protect your work surface; these tools and techniques ensure clean, precise cuts for your paper crafting projects. Accurate cuts are essential for creating professional-looking paper photo frames.
Here are some tips:
- Use Sharp Tools: Ensure your craft knife or scissors are sharp for clean cuts.
- Use a Ruler or Cutting Guide: Use a ruler or cutting guide to ensure straight lines and accurate measurements.
- Protect Your Work Surface: Use a cutting mat to protect your table or desk.
- Cut in Good Lighting: Ensure you have adequate lighting to see the cutting lines clearly.
- Hold the Paper Firmly: Hold the paper firmly in place to prevent it from slipping while cutting.
- Cut Slowly and Steadily: Cut slowly and steadily, following the lines carefully.
- Rotate the Paper: Rotate the paper as needed to maintain a comfortable cutting angle.
- Replace Blades Regularly: Replace your craft knife blades regularly to maintain sharpness.
By following these tips, you can achieve accurate and professional-looking cuts for your paper crafting projects.
15. How to Store Your Paper Photo Frames Properly?
To store your paper photo frames properly, keep them in a dry, cool place away from direct sunlight to prevent fading and warping; using acid-free storage materials and protective sleeves can further safeguard your frames. Proper storage ensures that your frames remain in good condition for years to come.
Here are some tips:
- Keep Them Dry: Store the frames in a dry place to prevent moisture damage.
- Avoid Direct Sunlight: Protect the frames from direct sunlight to prevent fading.
- Store Flat: Store the frames flat to prevent bending or warping.
- Use Acid-Free Materials: Use acid-free storage boxes, sleeves, or paper to prevent discoloration.
- Protect from Dust: Cover the frames with a cloth or plastic sleeve to protect them from dust.
- Avoid Extreme Temperatures: Store the frames in a cool place, away from extreme temperatures.
- Handle with Clean Hands: Handle the frames with clean hands to prevent dirt and oils from transferring to the paper.
By following these tips, you can ensure that your paper photo frames remain in excellent condition for years to come.
16. How to Make a Paper Frame for Quilling?
To make a paper frame for quilling, start with a sturdy cardboard or thick paper base and cut it to the desired size and shape, then decorate it with intricately rolled and shaped paper strips using the quilling technique. This process combines structural framing with delicate paper artistry.
Here’s how to do it:
-
Prepare the Base Frame:
- Cut a piece of cardboard or thick paper to the desired size and shape for your frame.
- Ensure the base is sturdy enough to support the quilled decorations.
-
Plan Your Design:
- Sketch out a design for your quilled decorations around the frame.
- Consider the colors, shapes, and patterns you want to use.
-
Create Quilled Shapes:
- Cut strips of colored paper (usually 1/8 inch wide).
- Use a quilling tool to roll, shape, and glue the paper strips into various designs like coils, teardrops, and scrolls.
Alt text: Rolling quilling paper into intricate shapes
-
Attach the Quilled Shapes:
- Apply a small amount of glue to the back of each quilled shape.
- Carefully place the shapes onto the frame, following your design.
- Allow the glue to dry completely.
-
Add Finishing Touches:
- Fill in any gaps with additional quilled shapes or decorative elements.
- Trim any excess paper from the edges of the frame.
-
Insert the Photo:
- Attach a backing to the frame to hold the photo in place.
- Slide your photo into the frame and secure it with tape if necessary.
By following these steps, you can create a beautiful and intricate quilled paper frame that showcases your photos elegantly.
17. What are the Common Mistakes to Avoid When Making Paper Photo Frames?
Common mistakes to avoid when making paper photo frames include using flimsy paper, applying too much glue, cutting inaccurately, and not allowing enough drying time; these errors can compromise the frame’s appearance and durability. Attention to detail and proper technique are essential for a successful project.
Here are some pitfalls to watch out for:
- Using Flimsy Paper: Avoid using thin, flimsy paper that won’t provide enough support.
- Applying Too Much Glue: Using too much glue can warp the paper and create a messy look.
- Cutting Inaccurately: Inaccurate cuts can result in uneven edges and a poorly constructed frame.
- Not Allowing Enough Drying Time: Rushing the drying process can cause the frame to fall apart.
- Ignoring Measurements: Failing to measure accurately can result in a frame that doesn’t fit the photo properly.
- Over-Embellishing: Adding too many decorations can make the frame bulky and unstable.
- Using Dull Tools: Dull scissors or craft knives can tear the paper and create rough edges.
- Neglecting Corner Reinforcement: Neglecting to reinforce the corners can lead to the frame falling apart.
By avoiding these common mistakes, you can create paper photo frames that are both beautiful and durable.
18. How Can dfphoto.net Help You With Your Photography and Framing Needs?
dfphoto.net offers a wealth of resources to enhance your photography and framing skills, including tutorials, inspiration galleries, and a community forum to connect with fellow enthusiasts; whether you’re looking for creative ideas or technical guidance, dfphoto.net is your go-to resource. We understand the importance of showcasing your photos in the best possible way.
Here’s how we can assist you:
-
Photography Tutorials: Learn various photography techniques to capture stunning photos.
-
Creative Inspiration: Explore galleries of beautiful photos and innovative framing ideas.
-
Equipment Reviews: Get detailed reviews and recommendations on the latest photography equipment.
-
Community Forum: Connect with other photographers and crafters to share ideas and get feedback.
- Address: 1600 St Michael’s Dr, Santa Fe, NM 87505, United States
- Phone: +1 (505) 471-6001
- Website: dfphoto.net
-
Custom Framing Solutions: Find resources and tips for creating unique and personalized photo frames.
At dfphoto.net, we are dedicated to helping you enhance your photography and framing skills, providing you with the tools and inspiration you need to create beautiful displays for your cherished memories. Visit dfphoto.net today to discover more and join our vibrant community of photography and crafting enthusiasts.
19. FAQs About Making Photo Frames from Paper
Here are some frequently asked questions about making photo frames from paper:
-
What type of paper is best for making photo frames?
Cardstock or thick paper is best for making photo frames because it provides stability and durability.
-
Can I use recycled paper for my photo frame?
Yes, you can use recycled paper to make your photo frame, making it an eco-friendly project.
-
How do I prevent my paper frame from warping?
Use a minimal amount of glue and allow the frame to dry completely on a flat surface to prevent warping.
-
What is the best way to cut paper accurately?
Use a sharp craft knife or scissors, a ruler, and a cutting mat for accurate cuts.
-
How can I decorate my paper photo frame?
You can decorate your paper photo frame with paint, markers, glitter, stickers, washi tape, ribbons, beads, or pressed flowers.
-
What is the best glue for paper photo frames?
PVA glue (white glue), glue sticks, and double-sided tape are all good options for paper photo frames