Taking photos on Windows can be an incredibly rewarding experience. Are you looking to capture stunning aerial shots from your next flight or simply improve your everyday photography skills? At dfphoto.net, we’re passionate about helping you unlock your photographic potential. Dive into expert techniques and tips, mastering your camera settings and editing skills to achieve breathtaking results. Discover how to use natural light, apply filters, and edit RAW files for the best outcomes in aerial photography, landscapes, and night shots, enhancing your artistic vision.
Table of Contents
- Understanding the Challenges of Airplane Window Photography
- Achieving Crisp Shots: Eliminating Smears and Blemishes
- Mastering Exposure in Harsh Lighting
- Cutting Through Haze, Glare, and Whitewash
- Night Photography: Gauges and Stargazing
- Best Camera Settings for Window Photography
- Essential Gear for Airplane Window Photography
- Post-Processing Techniques for Stunning Results
- Advanced Tips for Unique Aerial Shots
- Inspiration and Ideas for Your Next Flight
- FAQ: How To Take Photo On Windows
1. Understanding the Challenges of Airplane Window Photography
What are the primary obstacles in capturing quality photos through airplane windows? The primary obstacles include heavy UV radiation, extreme brights mixed with heavy shadows, and dirty windows, all of which can degrade image quality. According to research from the Santa Fe University of Art and Design’s Photography Department, in July 2025, these conditions can overwhelm even high-end cameras, leading to photos with fuzz, whitewash, and blur.
To truly grasp the nuances of airplane window photography, it’s essential to consider various factors that can impact the final image. Understanding these challenges allows you to prepare effectively and adjust your techniques accordingly.
- Window Imperfections: Airplane windows often have scratches, smudges, and dirt that can distort your images. Cleaning the window isn’t always possible, so knowing how to minimize these imperfections through camera settings is crucial.
- Reflections: Internal reflections from the cabin can appear in your photos, especially in low-light conditions. Careful positioning and the use of dark clothing can help reduce these reflections.
- Vibration: The constant vibration of the aircraft can cause blur, particularly at slower shutter speeds. Stabilizing your camera against the window or using faster shutter speeds can mitigate this issue.
- Limited Space: The confined space of an airplane seat can restrict your movement and angles. Being creative and adaptable in your approach is key to capturing unique shots.
- Changing Light: The light outside the window can change rapidly as the plane moves, affecting your exposure settings. Being prepared to adjust your settings quickly is essential.
2. Achieving Crisp Shots: Eliminating Smears and Blemishes
How can I eliminate bug smears and other window blemishes from my airplane window photos? You can eliminate bug smears by setting the f-stop as low as possible, turning off autofocus, and holding the camera as close to the window as possible. This combination helps focus on distant objects rather than imperfections on the window.
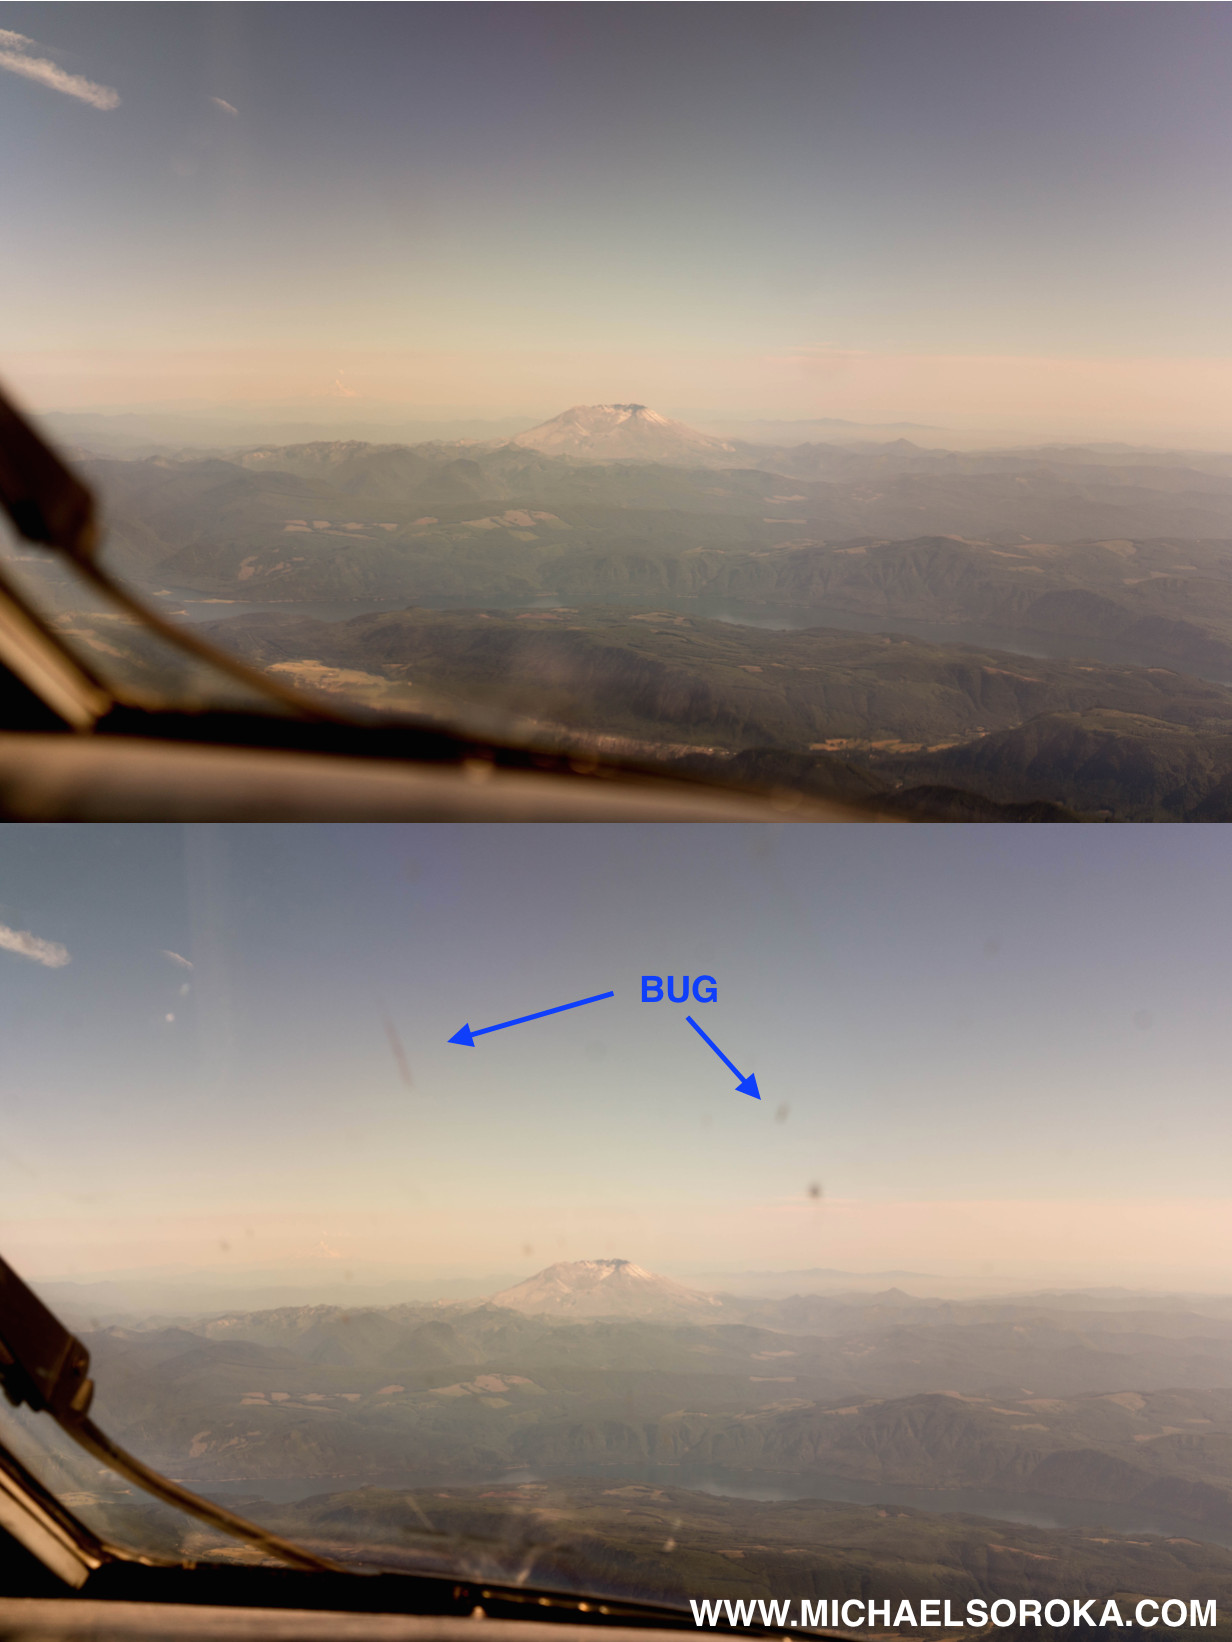 Close-up of Mount St. Helens from the cockpit eliminating bug smears and blemishes
Airplane windows, especially those in the cockpit, often accumulate bug smears, crazing, and pilot sneezes. These imperfections can severely degrade the clarity of your photos, making it difficult to capture sharp, clear images of the scenery outside. To combat this issue, several techniques can be employed to minimize the impact of these blemishes.
- Manual Focus: Switch your camera to manual focus to avoid the autofocus system locking onto the window imperfections. Adjust the focus manually to ensure the distant landscape is sharp.
- Wide Aperture: Use a wide aperture (low f-stop number) to create a shallow depth of field. This will blur the window imperfections, making them less noticeable in the final image.
- Close Proximity: Hold the camera as close to the window as possible without touching it. This reduces the amount of visible debris and imperfections in the foreground.
- Clean the Window: If possible, gently clean the window with a soft, lint-free cloth. Be careful not to scratch the glass, and avoid using harsh chemicals.
- Angle Adjustment: Experiment with different angles to minimize the appearance of scratches and smudges. Sometimes a slight shift in perspective can make a big difference.
3. Mastering Exposure in Harsh Lighting
What is the best way to handle the contrast between the bright sky and the dark interior of an airplane cockpit? The best way is to take photos during the “magic hours” of sunrise and sunset, use manual exposure settings, and adjust white balance in post-editing software. This approach balances the light levels inside and outside the plane.
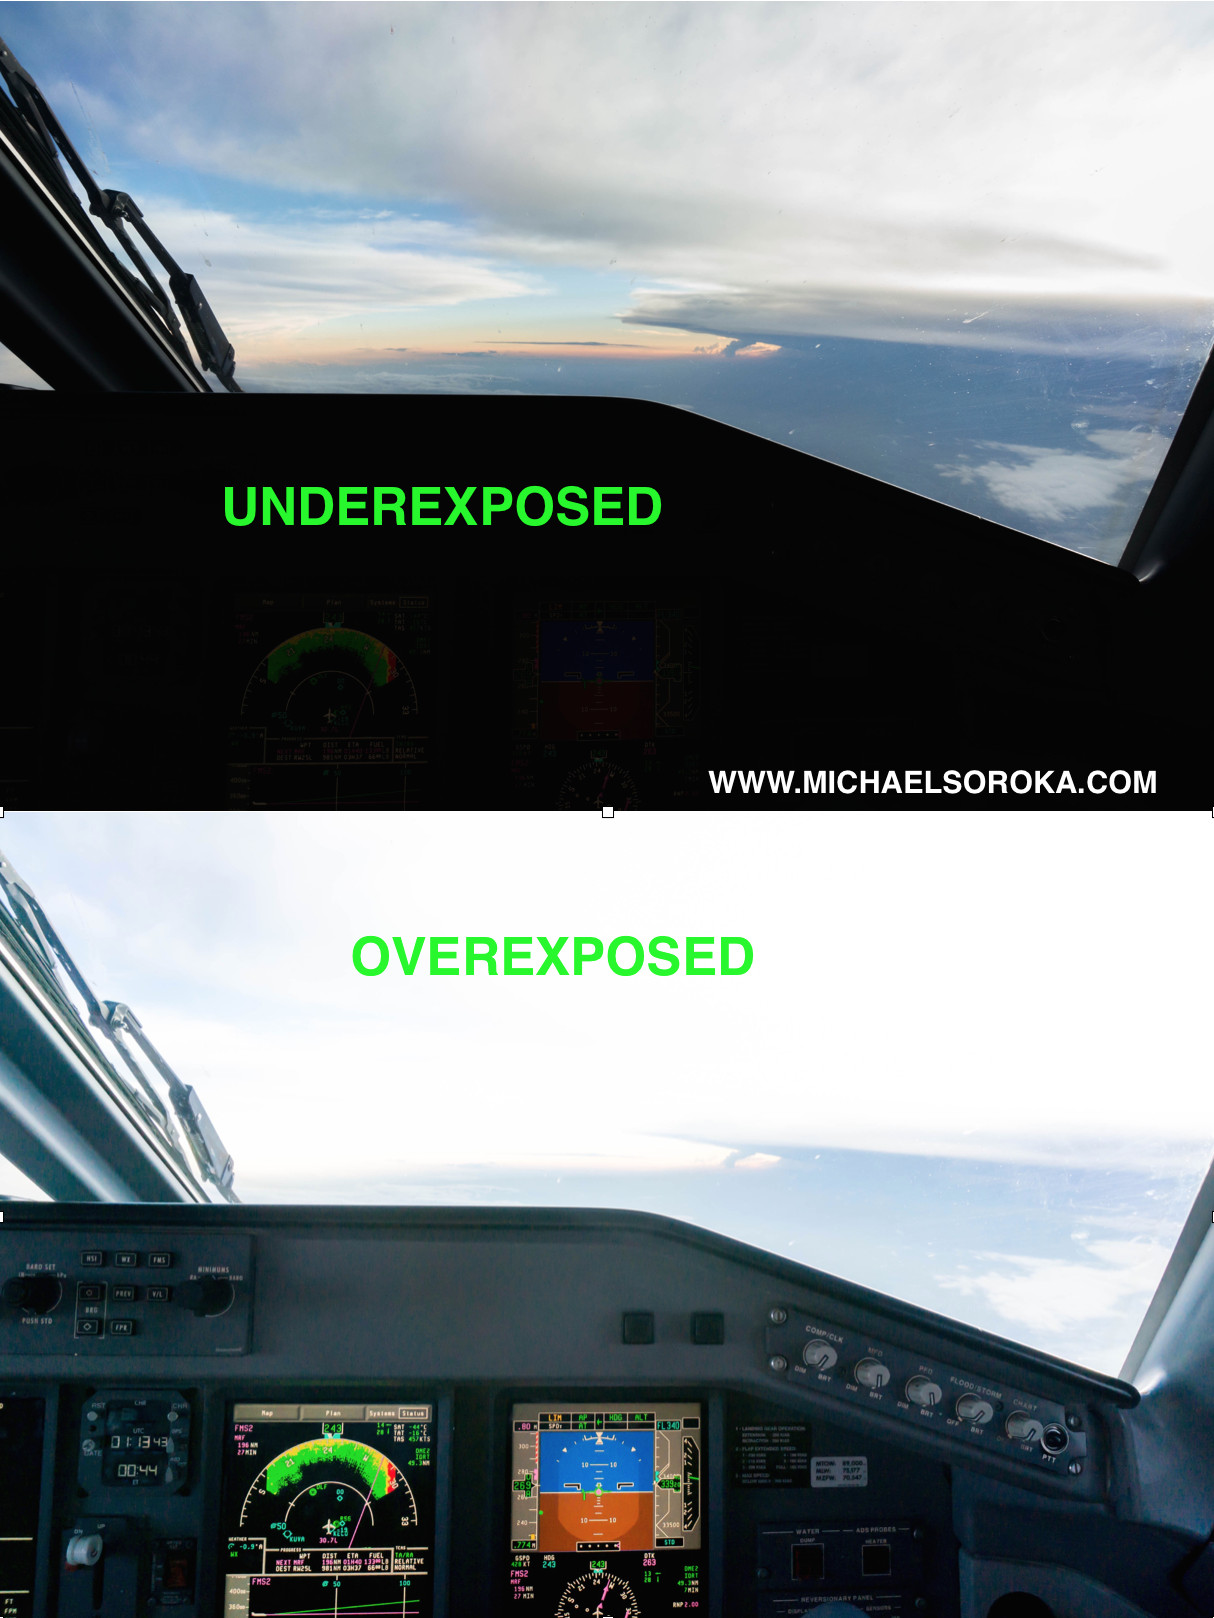 Examples of Under and Over Exposed Images Adjusting white balance is necessary to ensure that the images aren't too dark or too bright.
The extreme contrast between the bright sky and the relatively dark interior of an airplane cockpit presents a significant challenge for photographers. Capturing a balanced image that properly exposes both the inside and outside elements requires a combination of careful camera settings and post-processing techniques.
- Manual Mode: Switch to manual mode to have full control over your camera’s settings. This allows you to adjust the aperture, shutter speed, and ISO independently.
- ISO Setting: Start with a low ISO setting (e.g., ISO 200) to minimize noise in your images.
- Shutter Speed: Adjust the shutter speed to balance the exposure between the cockpit and the outside scenery. Take test shots and review the results to fine-tune your settings.
- RAW Format: Shoot in RAW format to capture as much data as possible. This gives you more flexibility in post-processing to adjust the exposure and white balance.
- Metering Modes: Experiment with different metering modes, such as spot metering or center-weighted metering, to see which one works best for your specific situation.
To further refine your exposure, consider these additional tips:
- Exposure Compensation: Use exposure compensation to slightly overexpose or underexpose the image, depending on the scene.
- HDR Photography: Consider using HDR (High Dynamic Range) techniques to capture a wider range of tones. This involves taking multiple shots at different exposures and combining them in post-processing.
4. Cutting Through Haze, Glare, and Whitewash
How can I reduce the blue tint and glare often seen in photos taken through airplane windows? You can reduce blue tint and glare by using a UV filter, a polarizer, or a light red filter. Post-editing RAW files to adjust white balance can also help remove excessive blue and haze.
 Mount St. Helens From Air Cutting through haze, glare, and whitewash
Atmospheric conditions like haze, glare, and whitewash can significantly degrade the quality of your airplane window photos. These effects are caused by the scattering of light in the atmosphere, resulting in excessive blue tones and reduced contrast. Fortunately, there are several techniques and tools you can use to combat these issues and capture clearer, more vibrant images.
- UV Filter: A UV filter is an essential accessory for airplane window photography. It reduces the amount of ultraviolet light entering the lens, which helps to minimize haze and whitewash.
- Polarizing Filter: A circular polarizing filter can cut through glare and reflections, enhancing contrast and saturation in your photos. However, be cautious when using a polarizer on jet windows, as they may be lightly polarized and cause dark splotches.
- Red Filter: If you don’t have photo editing software, a light red filter can help to correct the blue tint in your images. This works by counteracting the excessive blue light, resulting in more natural-looking colors.
Additionally, consider these post-processing adjustments:
- White Balance Correction: Adjust the white balance in your photo editing software to remove the blue tint. Moving the temperature slider towards yellow can help to neutralize the blue tones.
- Contrast Adjustment: Increase the contrast in your photo to add more definition and reduce haze. Adjusting the whites and blacks can also help to improve the overall clarity of the image.
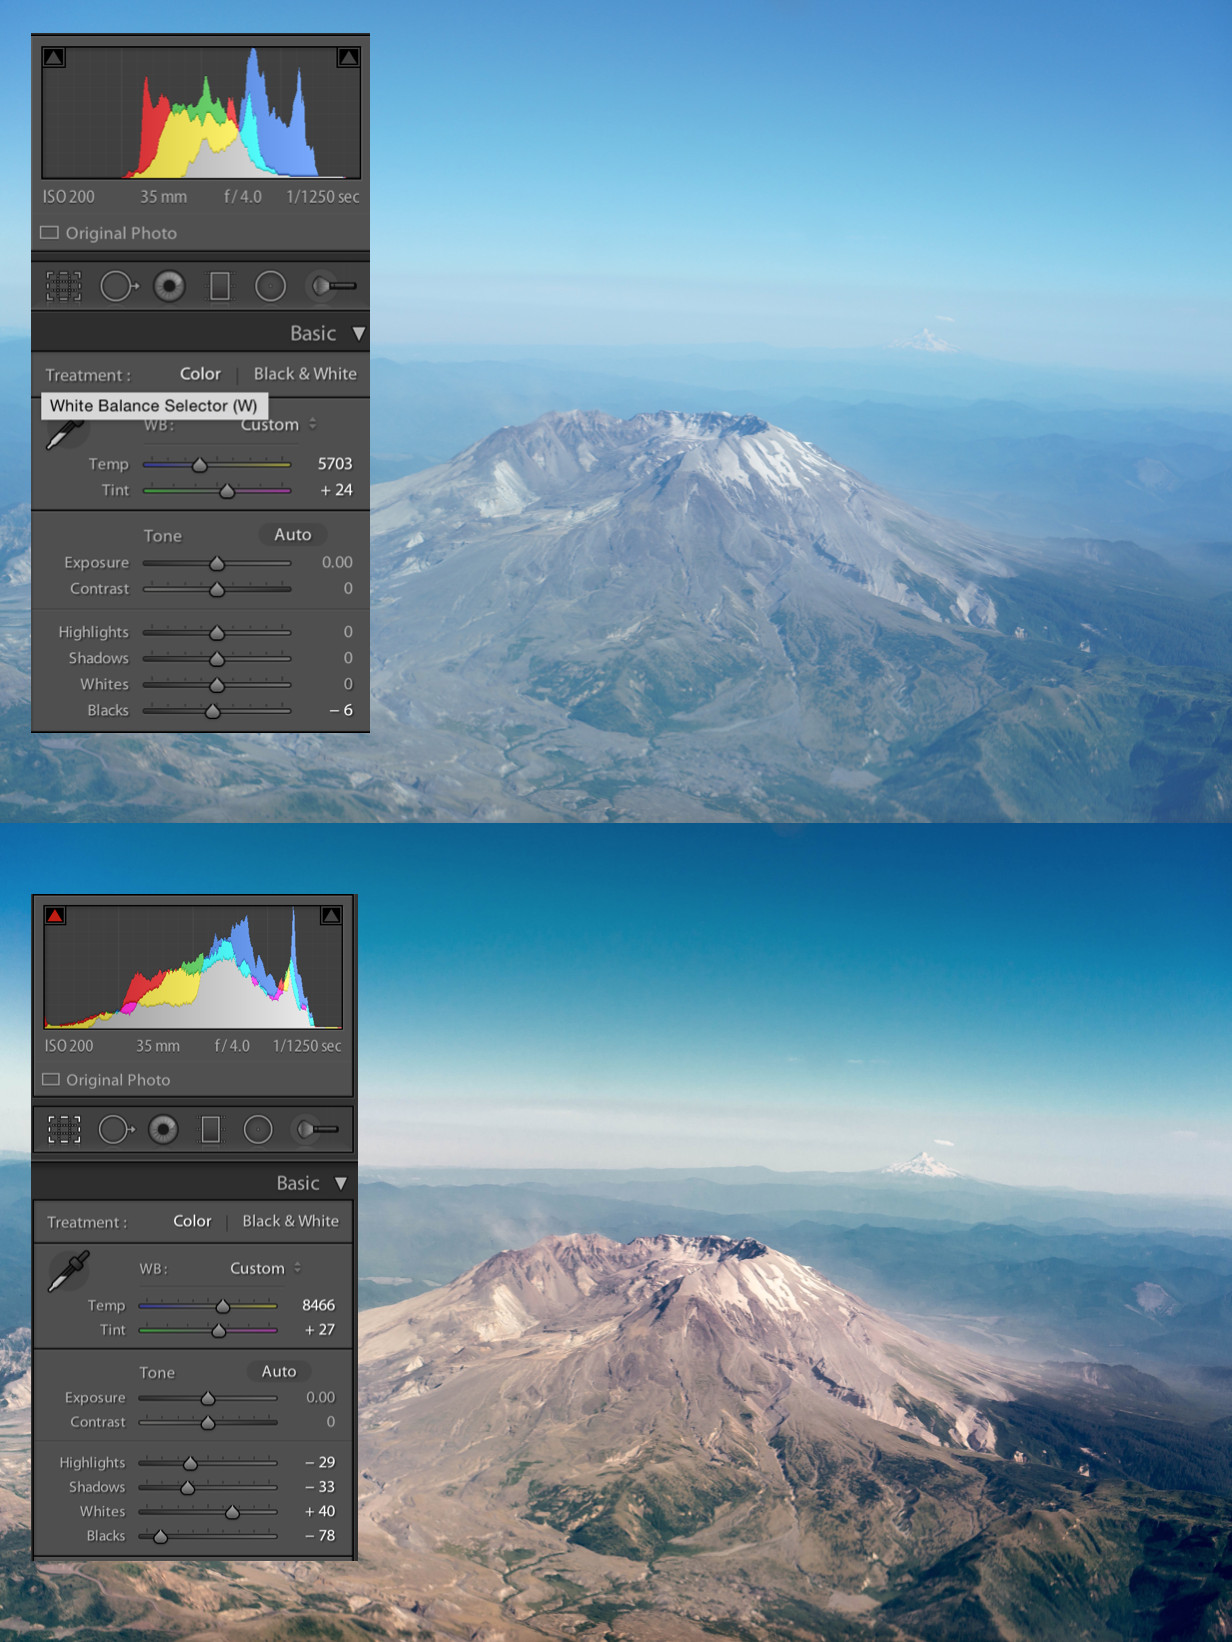 Adjusting White Balance Correct the white balance of your photo to make it look normal.
5. Night Photography: Gauges and Stargazing
What techniques are effective for taking photos inside the cockpit and of stars at night? For cockpit shots, use a sturdy mount, manual focus, and long exposures with low ISO to avoid noise. For stars, use similar settings, focusing on a bright star and allowing for a 30-second exposure.
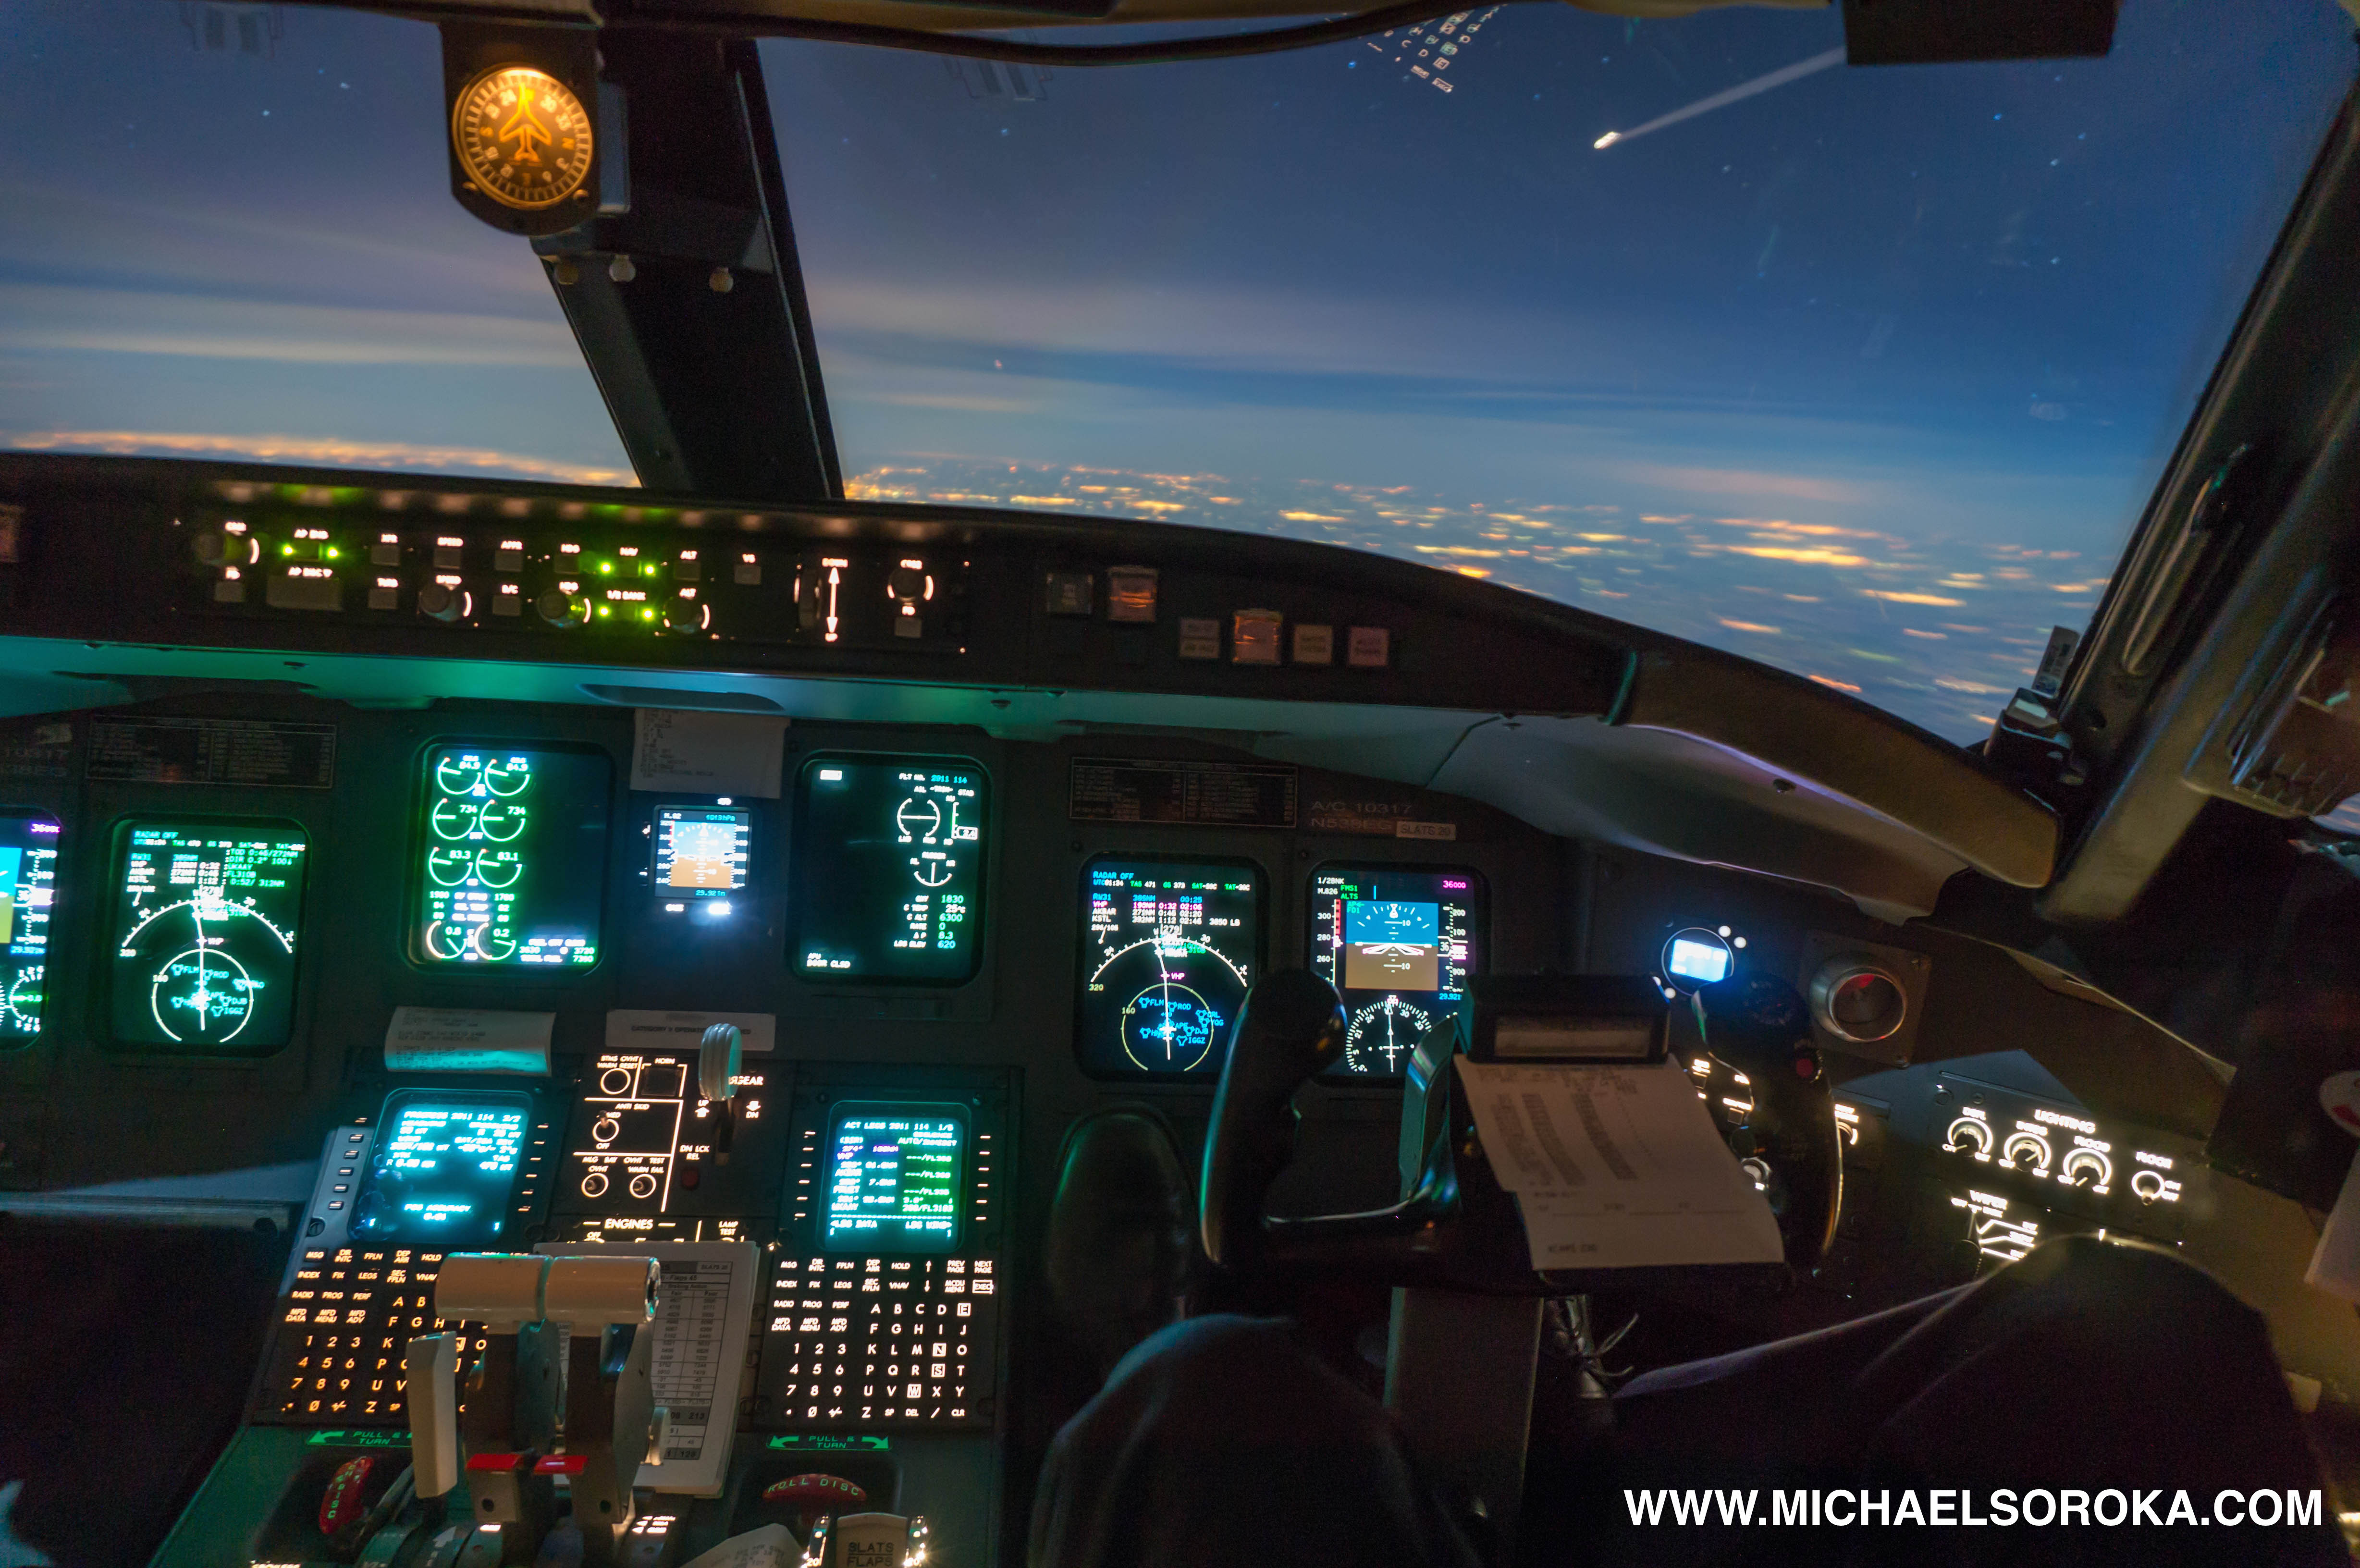 CRJ-700 Cockpit Take pictures at night and avoid turning up the ISO on your camera.
Night photography from an airplane offers unique opportunities to capture stunning images of illuminated gauges, city lights, and even the stars. However, the low-light conditions and the movement of the aircraft present several challenges that require specific techniques to overcome.
- Stable Mount: Use a sturdy camera mount to minimize vibrations and ensure sharp images during long exposures. Avoid suction cups, which can be unreliable, and opt for a clamp-style mount instead.
- Manual Focus: Autofocus systems often struggle in dark environments, so switch to manual focus and carefully adjust the focus until the gauges or stars appear sharp.
- Long Exposure: Use long exposure times (e.g., 5-30 seconds) to capture enough light. Experiment with different exposure times to find the optimal setting for your specific conditions.
- Low ISO: Keep the ISO as low as possible (e.g., ISO 200) to minimize noise in your images.
- Wide Aperture: Use a wide aperture (low f-stop number) to allow more light to enter the lens.
For capturing the stars:
- Clear Window: Choose a window with minimal scratches and smudges to avoid distortion in your images.
- Focus on a Star: Focus on a bright star to ensure sharpness. Use the camera’s live view mode to zoom in and fine-tune the focus.
- 30-Second Exposure: Start with a 30-second exposure time and adjust as needed. Even though the plane is moving, the relative movement to distant stars is minimal, allowing for reasonably sharp images.
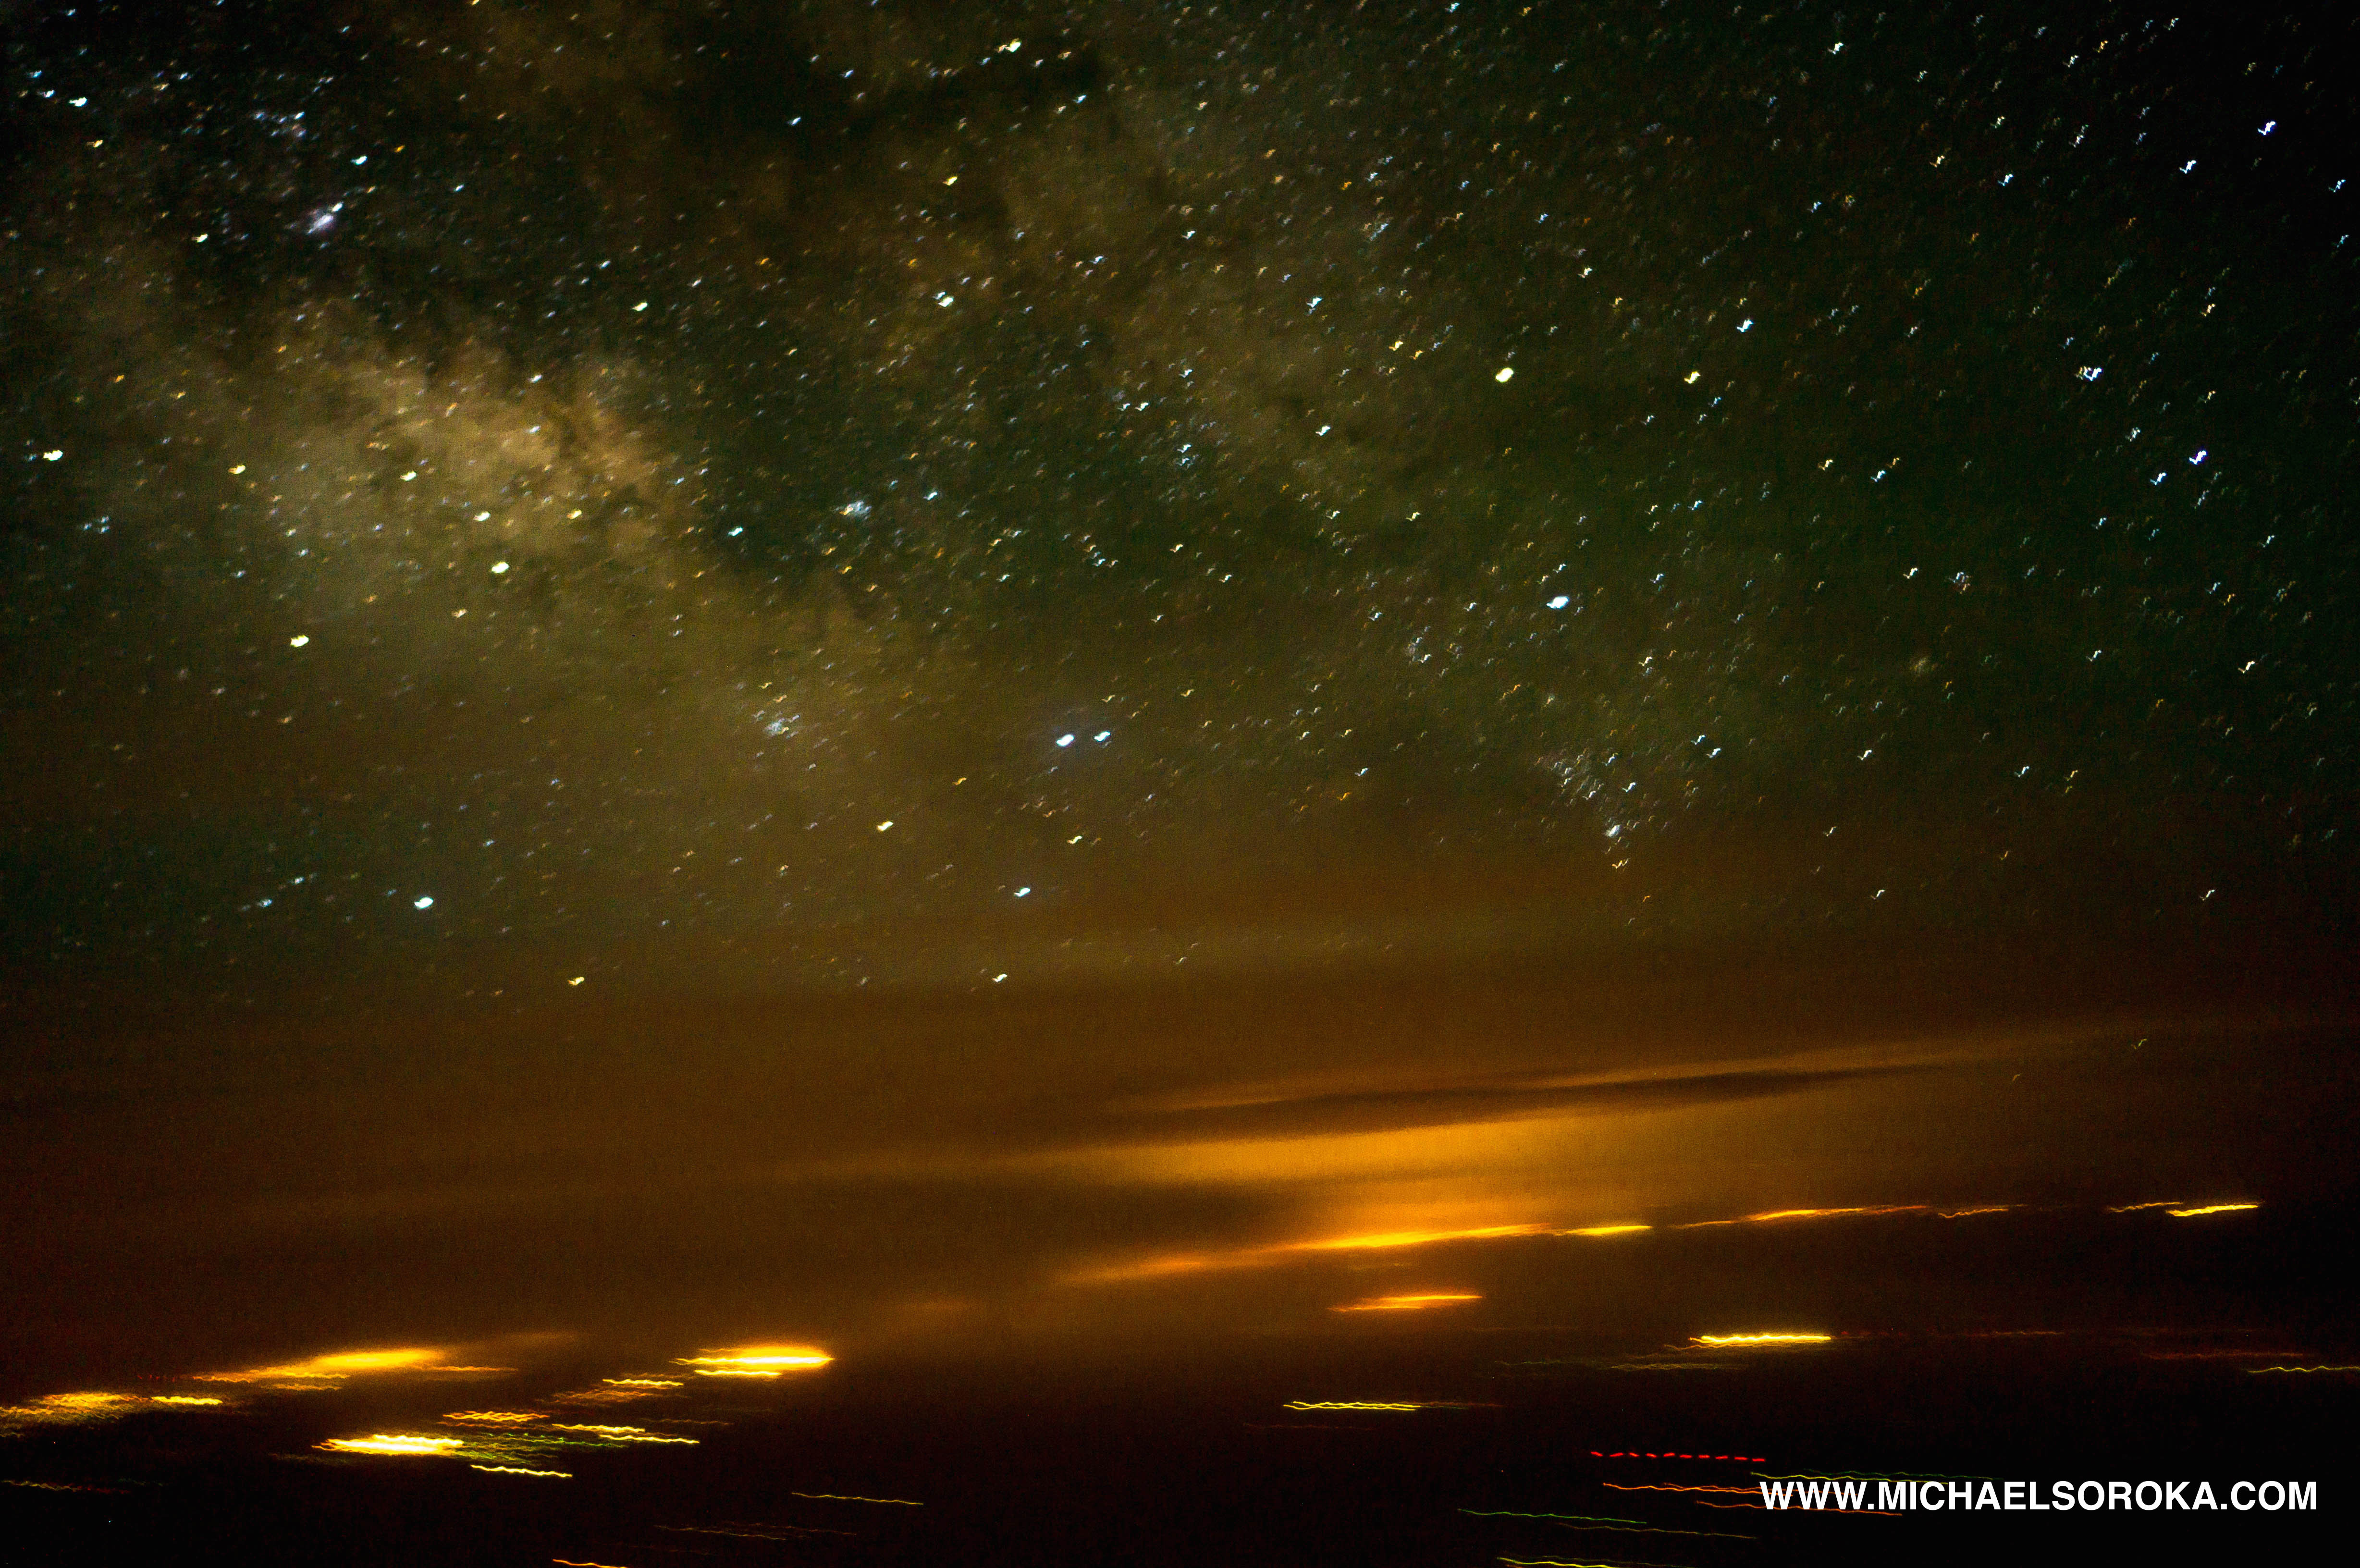 Milky Way From Cockpit Take pictures of stars with 30 second exposure times and get fairly sharp images.
6. Best Camera Settings for Window Photography
What are the recommended camera settings for taking photos through airplane windows? Here’s a list:
| Setting | Recommendation |
|---|---|
| ISO | Low (e.g., 200) to minimize noise |
| Aperture | Wide (low f-stop number) to create a shallow depth of field and blur window imperfections |
| Shutter Speed | Adjust to balance exposure; use faster speeds to avoid blur from vibration |
| Focus | Manual focus to ensure sharpness on distant objects |
| File Format | RAW for maximum flexibility in post-processing |
| White Balance | Adjust in post-processing to correct color casts |
7. Essential Gear for Airplane Window Photography
What essential gear should I bring for airplane window photography? Here’s a comprehensive list to ensure you’re well-equipped:
| Item | Description |
|---|---|
| DSLR or Mirrorless Camera | Offers manual controls and interchangeable lenses for maximum flexibility |
| Wide-Angle Lens | Ideal for capturing expansive landscapes and cockpit views |
| UV Filter | Reduces haze and protects your lens from scratches |
| Polarizing Filter | Cuts through glare and reflections, enhancing contrast and saturation (use with caution on polarized windows) |
| Camera Mount | Provides stability for long exposures; clamp-style mounts are preferable to suction cups |
| Lens Cleaning Cloth | Keeps your lens and the airplane window clean from smudges and dirt |
| Extra Batteries | Ensures you don’t run out of power during your flight |
| Memory Cards | Provides ample storage for all your photos; high-speed cards are recommended for shooting in RAW format |
| Photo Editing Software | Allows you to adjust exposure, white balance, and other settings in post-processing (e.g., Adobe Lightroom, Photoshop) |
8. Post-Processing Techniques for Stunning Results
What post-processing techniques can significantly improve airplane window photos? The table below outlines key techniques:
| Technique | Description |
|---|---|
| Exposure Adjustment | Adjust the overall brightness of the image to balance the exposure between the cockpit and the outside scenery. |
| White Balance Correction | Correct color casts, such as excessive blue tones, by adjusting the temperature and tint sliders. |
| Contrast Enhancement | Increase the contrast to add more definition and reduce haze. Adjust the whites and blacks to improve the overall clarity of the image. |
| Highlight and Shadow Recovery | Recover details in the highlights (e.g., clouds) and shadows (e.g., cockpit instruments) to balance the dynamic range of the image. |
| Noise Reduction | Reduce noise in the image, especially in low-light conditions, while preserving details. |
| Sharpening | Add sharpness to the image to enhance details and make the photo appear crisper. |
| Lens Correction | Correct lens distortions, such as vignetting and chromatic aberration, using the lens correction tools in your photo editing software. |
9. Advanced Tips for Unique Aerial Shots
What advanced tips can help me capture unique and compelling aerial shots? To capture truly unique aerial shots, consider these advanced tips that go beyond the basics:
- Plan Your Flight: Research your route and identify potential landmarks or scenic areas you want to photograph. Use flight tracking apps to anticipate your position and timing.
- Communicate with the Pilot: If possible, talk to the pilot beforehand and explain your photographic goals. They may be able to adjust the flight path slightly to give you better views.
- Shoot in Burst Mode: Use burst mode to capture a series of shots in quick succession. This increases your chances of getting a sharp image, especially in turbulent conditions.
- Experiment with Angles: Don’t be afraid to try different angles and perspectives. Tilting the camera or shooting at a diagonal can create more dynamic and interesting compositions.
- Capture Motion: Use slower shutter speeds to capture the motion of clouds or the ground below. This can add a sense of speed and dynamism to your images.
- Look for Abstract Patterns: Look for abstract patterns and textures in the landscape below. Fields, rivers, and mountains can create interesting geometric shapes and designs.
- Include the Wing: Incorporating the wing of the airplane into your composition can provide a sense of context and scale. It can also add a visually interesting element to your photos.
10. Inspiration and Ideas for Your Next Flight
Where can I find inspiration for my next aerial photography project? Here are some ideas:
- Landscapes: Capture the beauty of mountains, deserts, coastlines, and forests from above. Look for unique geological formations, rivers, and other natural features.
- Cityscapes: Photograph cities from a bird’s-eye view, focusing on iconic landmarks, skyscrapers, and urban patterns.
- Infrastructure: Capture the scale and complexity of bridges, highways, railways, and other man-made structures.
- Agriculture: Photograph fields, farms, and vineyards from above, showcasing the patterns and colors of agricultural landscapes.
- Weather: Capture dramatic weather phenomena, such as storms, clouds, and sunsets, from a unique aerial perspective.
- Abstract Art: Look for abstract patterns and textures in the landscape below, creating artistic and visually striking images.
By exploring these themes and techniques, you can unlock your creativity and capture truly unique and compelling aerial shots from your next flight. Remember to visit dfphoto.net for more inspiration, tutorials, and community support.
Address: 1600 St Michael’s Dr, Santa Fe, NM 87505, United States
Phone: +1 (505) 471-6001
Website: dfphoto.net
11. FAQ: How To Take Photo On Windows
-
How do I prevent reflections in airplane window photos?
To minimize reflections, hold your camera as close to the window as possible, wear dark clothing, and try to shoot at an angle. -
What’s the best time of day to take photos from an airplane window?
The best times are during the “magic hours” of sunrise and sunset when the light is softer and more balanced. -
Can I use my phone to take good photos through an airplane window?
Yes, you can. Use the tips mentioned above, such as turning off autofocus and adjusting exposure manually, to improve your results. -
How do I clean an airplane window before taking photos?
If possible, gently clean the window with a soft, lint-free cloth. Avoid using harsh chemicals that could damage the glass. -
Is it better to shoot in JPEG or RAW format when taking photos through an airplane window?
RAW format is better because it captures more data, giving you more flexibility in post-processing to adjust exposure and white balance. -
What is the ideal ISO setting for airplane window photography?
Keep the ISO as low as possible (e.g., ISO 200) to minimize noise in your images. -
Do I need a special lens for airplane window photography?
A wide-angle lens is ideal for capturing expansive landscapes and cockpit views, but any lens can work with the right techniques. -
How can I stabilize my camera when taking photos on a moving airplane?
Use a camera mount or stabilize your camera against the window to minimize vibrations. -
What should I do if my photos are too blue?
Adjust the white balance in your photo editing software to remove the blue tint. Moving the temperature slider towards yellow can help. -
How can I make my airplane window photos sharper?
Use manual focus, a stable mount, and sharpen the image in post-processing to enhance details.