In the realm of photo editing, sharpening is a crucial step to enhance detail and clarity. However, applying a standard unsharp mask across an entire image in GIMP can sometimes lead to undesirable artifacts, particularly amplifying noise in areas like skies or shadows, especially when dealing with high ISO images or film grain. This tutorial introduces a smarter approach to sharpening in GIMP, focusing on luminosity and edges to refine your photos without accentuating noise.
 Original image before smart sharpening in GIMP
 Image after applying smart sharpening technique in GIMP
This method, adapted for GIMP from techniques used in professional photo editing, strategically sharpens only the areas that truly need it by:
- Targeting Luminosity: Sharpening is applied exclusively to the luminosity channel, which typically contains the most detail and is less prone to color noise.
- Edge-Based Masking: A custom channel mask is created to isolate the edges within the image. This mask is then used as a selection, ensuring that the unsharp mask effect is concentrated only on these edges, leaving smoother areas untouched.
This smart sharpening technique in GIMP helps you achieve a crisp, detailed image while minimizing the risk of over-sharpening noise and grain, resulting in a more refined and professional look for your photographs. Let’s delve into the step-by-step procedure.
Step-by-Step Procedure for Smart Sharpening in GIMP
For optimal viewing of this tutorial, especially the finer details related to sharpening, it’s recommended to maximize your browser window. The subtle nuances of sharpening and noise are more apparent at larger image sizes.
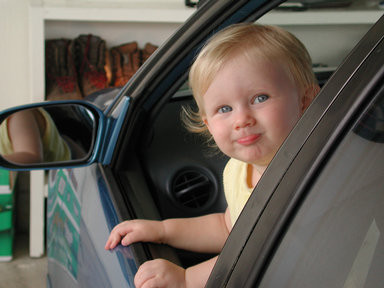
Step 1: Open Your Image in GIMP
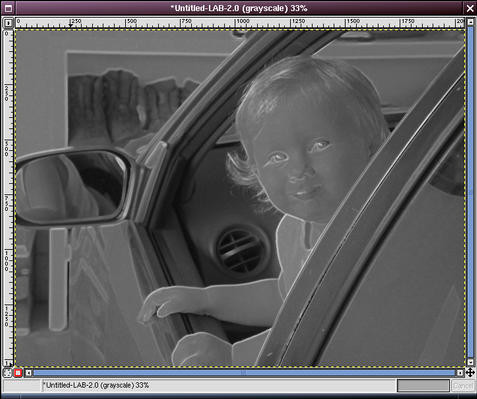
 Original soft image loaded in GIMP, ready for sharpening
Begin by opening the image you wish to sharpen in GIMP. As you can see in the example, the image appears somewhat soft, possibly due to autofocus issues. This softness becomes more noticeable in printed photographs.
Important Note: Ensure that sharpening is the absolute final step in your editing workflow. Complete all other adjustments, including resizing (downsampling or upsampling), color correction, and retouching, before proceeding with sharpening.
Step 2: Decompose the Image into LAB Channels
 Layers dialog box showing the decomposed LAB layers in GIMP
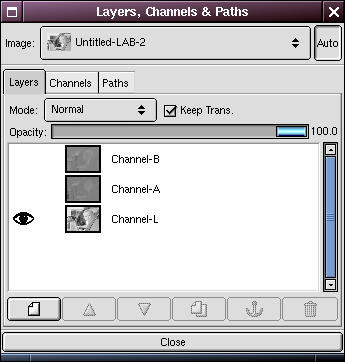
 Image window showing the LAB decomposed image with Luminosity, A, and B layers
Duplicate your image by pressing Ctrl+D or by right-clicking on the image and selecting Image -> Duplicate. It’s advisable to minimize the original image at this point for comparison later.
Right-click on the duplicated image and navigate to Image -> Mode -> Decompose. In the Decompose dialog, choose LAB (or HSV as an alternative, explained in Note 1 below). Crucially, check the “As layers” checkbox (see Note 2) and click OK.
This action will create a new image window, decomposing your image into three layers representing the Luminosity (“brightness”), A, and B channels. This decomposition is essential as it allows us to isolate and sharpen only the luminosity channel, which is generally the cleanest channel in terms of noise and carries the most visual detail.
After decomposition, it’s recommended to turn off the visibility of the A and B layers in the Layers dialog by clicking on the eye icons next to them. This will help you focus solely on the Luminosity layer for the subsequent steps.
Note 1: If your GIMP version lacks the LAB option in the decompose plugin, use HSV (Hue, Saturation, Value) instead. Throughout this tutorial, whenever “LAB” image or “luminosity” channel is mentioned, substitute with “HSV” image/ “value” channel accordingly.
Note 2: Older versions of the decompose plugin might not have the “As layers” checkbox. In such cases, the channels will be created as separate windows rather than layers within one window. This variation is functionally similar; the layers approach simply reduces screen clutter. If you don’t have “As layers,” minimize (but don’t close) the Hue and Saturation (or A and B) windows to avoid accidentally selecting them in the following steps.
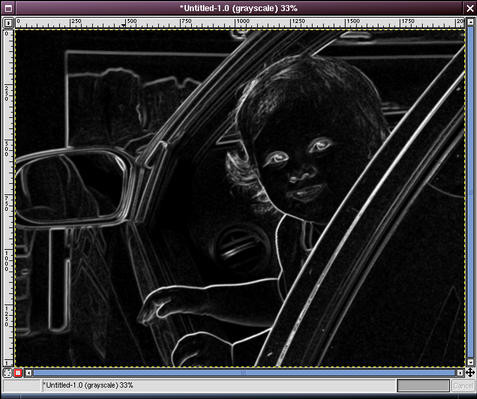
Step 3: Apply Edge Detection
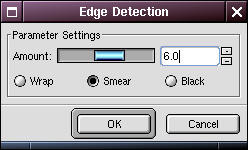 GIMP Edge Detect filter dialog box set to "Edge"
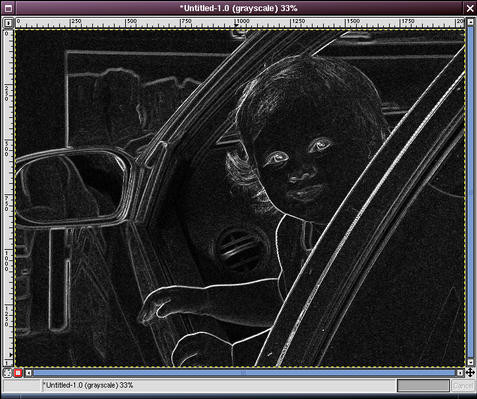 Grayscale image resulting from edge detection in GIMP
Navigate back to the duplicated image (the one you decomposed). Right-click and go to Filters -> Edge Detect -> Edge. In the Edge Detect dialog, choose a parameter value appropriate for the edges in your image. Experimentation may be needed to find the best value. For the example image, a value of 6 was used.
Next, convert the edge-detected image to grayscale. Right-click on this image and select Image -> Mode -> Grayscale. This grayscale image will serve as our sharpening mask.
Note: Some tutorials may recommend converting to grayscale before applying edge detection, under the assumption that you might not want noise to be detected as edges. However, detecting edges in color can capture transitions between light colors that might be lost after grayscale conversion. With a sufficiently high edge detection parameter (like 6 in this example), random noise is less likely to be detected as edges.
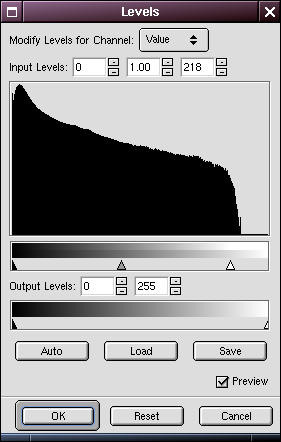
Step 4: Adjust Levels for the Edge Mask
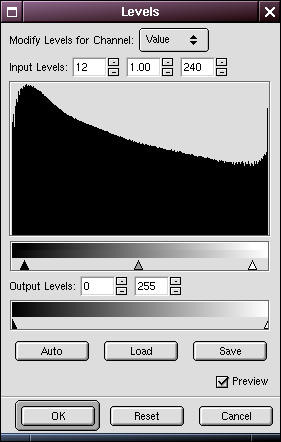 GIMP Levels dialog box being used to adjust the edge mask
 Adjusted levels of the grayscale edge detection image in GIMP
The next step is to refine the tonality of the edge mask. We want areas that need sharpening to be distinctly white and areas that should remain unsharpened to be black.
Open the Levels dialog by going to Colors -> Levels. Adjust the black point slider to the right and the white point slider to the left. This will filter out less significant edges. You’ll need to fine-tune the slider positions based on your image. Aim for an image where significant edges are highlighted in white, and most other areas are black. Click OK when satisfied.
The extent of level adjustment depends on the specific image. In this example, only minor adjustments were necessary as there weren’t many spurious edges initially.
Step 5: Apply Gaussian Blur to the Edge Mask
 GIMP Gaussian Blur filter dialog box
 Blurred edge mask after applying Gaussian Blur in GIMP
Apply a Gaussian blur to the edge mask to smooth out the edges slightly. Go to Filters -> Blur -> Gaussian Blur. A radius between 3 and 10 pixels (both horizontal and vertical) should suffice. In this example, a radius of 7 was used.
Step 6: Refine Levels Again (Optional)
 GIMP Levels dialog box being used for a second adjustment of the edge mask
 Refined edge mask after second Levels adjustment in GIMP
Optionally, you can use the Levels tool again to further refine the white and black points of the mask after blurring. This step is often beneficial.
In this example, the white point slider was slightly pulled down to further refine the mask.
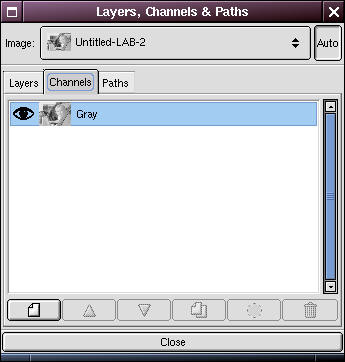
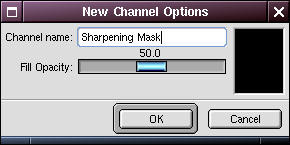
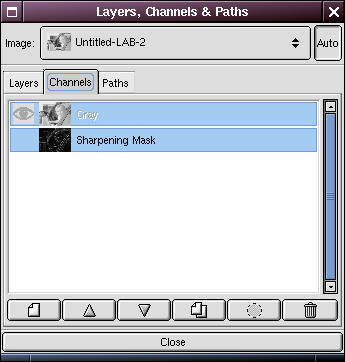
Step 7: Create a Sharpening Mask Channel
 Layers dialog box with the Channels tab selected in GIMP
 New Channel Options dialog box in GIMP, naming the new channel "Sharpening Mask"
 Layers dialog box showing the newly created "Sharpening Mask" channel in GIMP
Open the Layers dialog. Ensure you have selected the LAB image (or HSV value image if you used HSV decomposition) from the dropdown menu at the top. Then, click on the Channels tab.
Click the “new channel” button ( ) located at the bottom of the dialog to create a new channel. Name it “Sharpening Mask”.
Step 8: Copy and Paste the Edge Mask into the Sharpening Mask Channel
 Selecting all in the blurred edge mask image in GIMP
 Copying the selected edge mask in GIMP
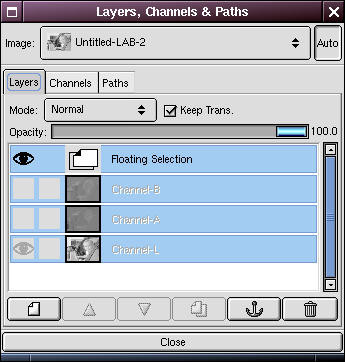
 LAB image with the pasted sharpening mask as a floating selection in GIMP
Right-click within the blurred/edges image window and select Select -> All. Right-click again and choose Edit -> Copy (or use keyboard shortcuts Ctrl+A then Ctrl+C).
In the Layers dialog, ensure that the “Sharpening Mask” channel is selected. Go back to the LAB (or value) image window and paste by selecting Edit -> Paste or pressing Ctrl+V.
In the Layers dialog, click the anchor button ( ) to anchor the floating selection. This integrates the pasted edge mask into the “Sharpening Mask” channel.
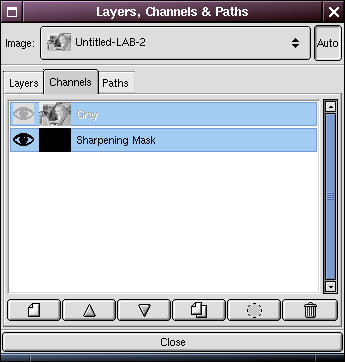
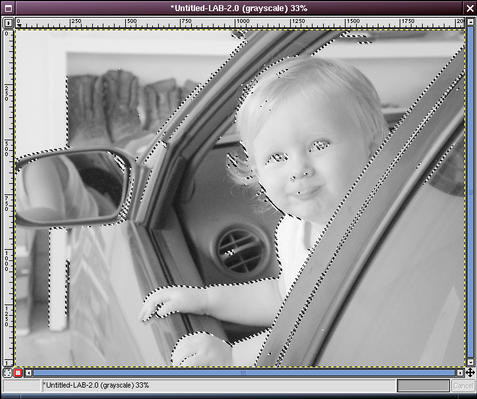
Step 9: Load Sharpening Mask as a Selection
 Layers dialog box with the Channels tab showing the Sharpening Mask channel in GIMP
 LAB image with the Sharpening Mask channel loaded as a selection ("marching ants") in GIMP
Click on the Channels tab in the Layers dialog. You should see a miniature representation of your sharpening mask in the “Sharpening Mask” channel icon, confirming that the mask was successfully pasted. You can optionally click the eye icon next to the “Sharpening Mask” channel to hide its visibility.
Select the “Sharpening Mask” channel and click the “Channel to Selection” button ( ). This will load your sharpening mask as a selection, indicated by the “marching ants” around the edges in your image.
You can experiment with feathering the selection at this point if desired, although it’s often not necessary for this technique.
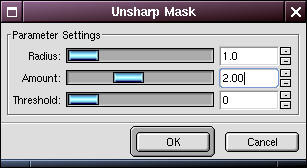
Step 10: Apply Unsharp Mask to the Luminosity Layer
 Layers dialog box with the Layers tab selected and Luminosity layer highlighted in GIMP
 GIMP Unsharp Mask filter dialog box with example settings
 Zoomed-in view of the sharpened image in GIMP, focusing on detail enhancement
Crucially, in the Layers dialog, click on the Layers tab and ensure that the luminosity layer (or the Background layer of the Value window if using HSV) is selected and is the only layer selected. We want to apply sharpening exclusively to the luminosity channel.
Apply the Unsharp Mask filter by navigating to Filters -> Enhance -> Unsharp Mask. Experiment with the settings to achieve the desired sharpening effect. You’ll find that you can often use higher sharpening amounts compared to sharpening the entire image, without introducing significant artifacts.
In the example, settings of Radius=1, Amount=2.0 (200%), and Threshold=0 were used.
Remove the selection by right-clicking and selecting Select -> None. Zoom in (using the + key) to examine the results closely. If you’re not satisfied, undo the unsharp mask step and try again with different parameters until you achieve the desired level of sharpness.
Step 11: Compose Back to RGB
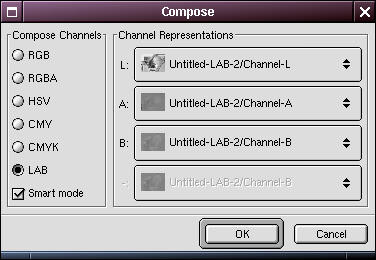 GIMP Compose dialog box set to LAB, matching Luminosity, A, and B components
 Recomposed RGB image after smart sharpening in GIMP
Now it’s time to reconstruct your original RGB image from the modified LAB (or HSV) components.
Right-click in the luminosity (or value) window and select Image -> Mode -> Compose. In the Compose Options dialog, ensure that LAB (or HSV) is selected on the left. On the right side, verify that the Luminosity, A, and B (or Hue, Saturation, and Value) components are correctly matched with their respective images.
Click OK. This will generate a new composite image, now smartly sharpened.
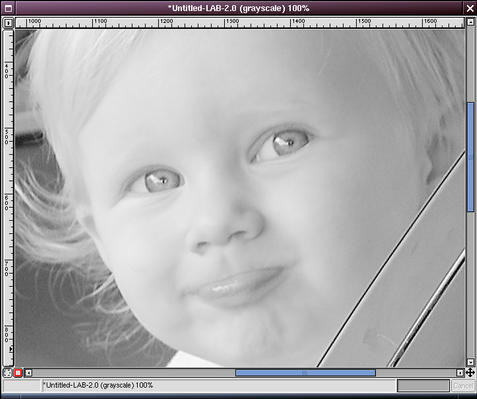
Final Result and Comparison
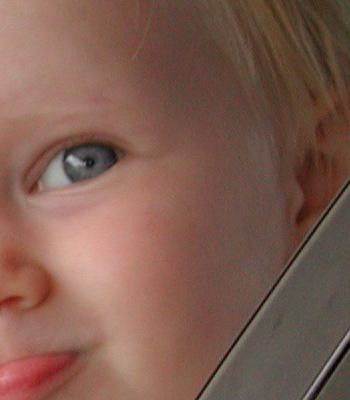 Cropped and zoomed view of the original image at 100% in GIMP
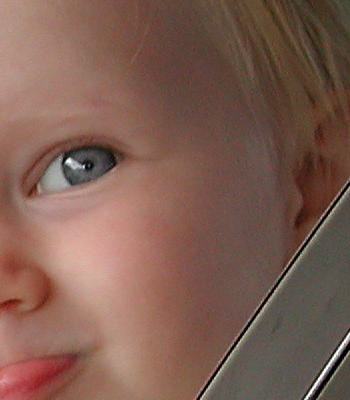 Cropped and zoomed view of the smart sharpened image at 100% in GIMP
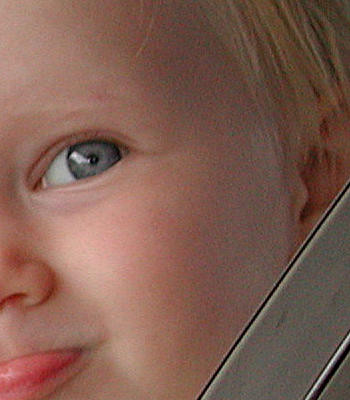 Cropped and zoomed view of the regularly sharpened image at 100% in GIMP
Examine the final image, zooming in to scrutinize edge detail. Unminimize the original image for a direct comparison. If you feel the image needs more or less sharpening, return to the LAB window, undo the last two steps (unsharp mask and compose), and re-apply the unsharp mask with adjusted settings.
Once you are satisfied with the result, you can close the extraneous windows, keeping only the final sharpened image.
The zoomed 100% crops above illustrate the difference:
- Left: Original image.
- Center: Smart-sharpened image.
- Right: Image sharpened with a standard unsharp mask (Radius=1, Amount=1.0 (100%), Threshold=0).
The smart-sharpened image exhibits minimal additional noise compared to the original, while effectively enhancing detail. Notice how the “regular” unsharp masked version, even at half the sharpening amount, shows considerably more visible noise, especially in shadow areas like the side of the face and the car door frame.
Tips for Smart Sharpening
-
Histogram Monitoring: Regularly check the histogram during editing. It’s an invaluable tool for numerically monitoring the impact of your adjustments on the image’s tonal range and detail. Observe the histogram before and after smart sharpening to understand its effect on your image data.
-
Experimentation is Key: Sharpening is subjective and image-dependent. Experiment with different Unsharp Mask settings (Radius, Amount, Threshold) to find the optimal balance for each photograph. Don’t hesitate to undo and redo the sharpening step with varied parameters to achieve the best outcome.
-
Consider Image Noise: If your image is already low in noise, the mode conversion might not be strictly necessary. In such cases, simpler sharpening methods might suffice. However, for noisy images, smart sharpening offers a distinct advantage in preserving image quality.
-
Sharpening as the Final Step: Reinforcing the earlier note, always perform sharpening as the very last step in your photo editing workflow. Any adjustments made after sharpening can potentially negate or alter the intended sharpening effect.
By following this comprehensive guide, you can effectively use smart sharpening in GIMP to enhance your photos, achieving crisp detail and minimizing unwanted noise amplification. This technique offers a refined approach to image sharpening, particularly beneficial for images where noise control is a concern.
