Are you curious about how to add photos to a shared Google Album without using Google Photos? At dfphoto.net, we provide simple and effective solutions for contributing your images, even if you prefer other photo management systems. Learn how to seamlessly share your cherished memories using our expert guide and discover alternative methods for photo sharing, ensuring your photos reach the intended album without any hassle, while also optimizing your visual content for better online visibility.
1. What Is A Google Shared Album and Why Use It?
A Google Shared Album is a feature within Google Photos that allows users to collect and share photos and videos with a group of people. It’s like creating a collaborative scrapbook in the cloud.
Answer: A Google Shared Album is a collaborative online photo album that simplifies sharing photos and videos with specific people. It’s beneficial for events, trips, or ongoing projects where multiple people want to contribute and view media together, offering a central hub for memories. Google Shared Albums offer several key benefits:
- Centralized Collection: Everyone can add their photos and videos to one place, eliminating the need for emailing or messaging individual files.
- Easy Sharing: You can invite specific people via email or share a link, making it easy to control who has access to the album.
- Cross-Platform Access: Viewers can access the album from any device with a web browser or the Google Photos app.
- Comment and Like: Album members can interact with the photos and videos by leaving comments and likes.
- Notification: Receive updates when new photos or comments are added.
The Google Photos app, which is maintained by Google itself, had over 1 billion users by 2019. This shows how many people value features like Shared Albums.
2. What Are The Prerequisites For Adding Photos To A Shared Google Album Without Google Photos?
Before contributing to a Google Shared Album without the app, there are a couple of essential requirements to ensure a smooth process.
Answer: You need an active Google Account and must ensure the Google Photos app is not interfering with the process on your device.
- Google Account: You need a Google account (typically a @gmail.com address, but it can be any email registered with Google) to authenticate and contribute to the album.
- No Google Photos App Interference: If you’re an iPhone user, it’s best to ensure that the Google Photos app is not installed. If it is, and you don’t want it to automatically back up all your photos, it can interfere with the web-based upload process.
3. How Do I Access A Shared Google Album Link?
To add photos, you’ll first need access to the shared album link.
Answer: The owner of the Google Shared Album must share a link with you, typically via email, text message, or another social network. Once you receive the link, simply click on it using your phone or computer.
Upon clicking the link, you should see an interface that prompts you to add photos, such as the images displayed below.
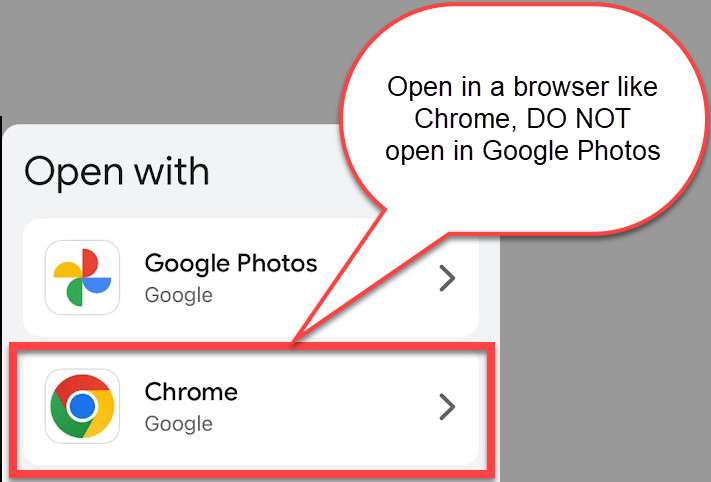 Access the Google Shared Album Link provided by the album owner
4. What Are The Step-By-Step Instructions For Adding Photos To A Shared Google Album Without Google Photos?
Once you have the link and meet the prerequisites, the process is straightforward.
Answer: To add photos, click the shared album link, sign in to your Google account if prompted, choose “Continue on Web” instead of using the app, select your photos, and upload them. Here’s a more detailed breakdown:
- Click the Shared Album Link: Open the link provided to you by the album owner.
- Sign In (If Prompted): You may be asked to sign in with your Google account. Use the same email and password you use for other Google services like Gmail or YouTube.
- Continue on Web: If you see a message suggesting you use the app, choose the “Continue on Web” option. This ensures you’re using the browser-based interface.
- Add Photos: Tap the “Add Photos” button.
- Select Photos: Choose the photos you want to add from your phone’s gallery.
- Upload: Tap the “Upload” button (often a cloud icon with an upward arrow).
5. What If I Don’t See My Photos Uploaded Immediately?
Sometimes, there might be a delay before your photos appear in the album.
Answer: Tap the “Upload” button (the cloud with the up arrow at the top right) to manually initiate the upload if your photos don’t appear immediately. This ensures that your selected images are actively being added to the shared album.
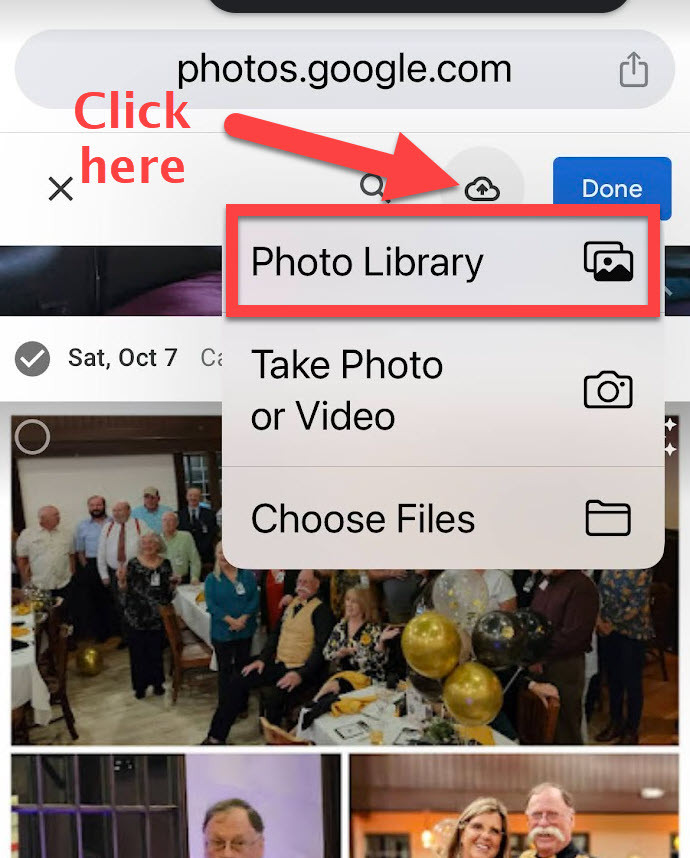 Click the upload button on your screen
6. Is There A Limit To The Number Of Photos I Can Add To A Shared Album?
Google Photos does have some limits, but they are generally quite generous.
Answer: A Google Shared Album can hold up to 20,000 photos or videos. Keep in mind that extremely high-resolution files may affect performance, but for most users, this limit is more than sufficient.
- Storage Considerations: Although Google Photos no longer offers unlimited storage, the storage used by Shared Albums counts towards the Google account of the album’s owner, not the contributors.
- File Size: Large individual files might take longer to upload, particularly on slower internet connections.
7. What Happens To The Photos I Upload To The Shared Album?
Understanding where your photos go and how they are stored is important for privacy and organization.
Answer: When you upload photos to a Shared Google Album, they are stored in your Google Account within Google Photos. This is how Google facilitates sharing while maintaining user control over their personal content.
- Ownership: You retain ownership of the photos you upload.
- Visibility: Only members of the shared album can see the photos unless the album owner changes the sharing settings.
- Non-App Uploads: As long as you do not install the Google Photos app, the rest of your photos will not be automatically uploaded.
8. How Do I Remove Photos I’ve Added To A Shared Album?
If you accidentally upload the wrong photo or change your mind, removing it is simple.
Answer: To remove a photo you’ve added, open the shared album, select the photo, click the three dots (more options), and choose “Remove from album.” This action only removes the photo from the album, not from your Google Photos library.
- Open the Shared Album: Navigate to the shared album where you want to remove the photo.
- Select the Photo: Click on the photo you wish to remove.
- More Options: Look for the three dots (usually in the top right corner) to access more options.
- Remove from Album: Select “Remove from album” from the dropdown menu.
9. Can I Add Photos From A Computer Instead Of A Phone?
Yes, the process is similar on a computer.
Answer: Yes, you can add photos to a Google Shared Album from a computer by opening the shared link in a web browser, signing in to your Google account, and uploading the photos from your computer’s files. The interface is similar to the mobile version.
- Drag and Drop: On a computer, you can often drag and drop photos directly into the album window.
- Batch Upload: Computers usually allow you to select and upload multiple photos at once, making the process faster.
10. What If I Don’t Have A Google Account?
While a Google Account is required to contribute, setting one up is free and easy.
Answer: While a Google Account is essential for adding photos to a shared Google Album, creating one is free and straightforward. Just visit the Google Accounts page, and sign up. You can use any email address to create one.
- Gmail Account: If you want a new Gmail address, you can create one during the signup process.
- Existing Email: Alternatively, you can use your existing email address (e.g., Yahoo, Outlook) to create a Google Account.
11. What Are Some Common Issues And How To Troubleshoot Them?
Sometimes, things don’t go as planned. Here are some common issues and solutions:
Answer: Common issues include being prompted to use the app, not seeing the upload button, or photos not appearing after upload. Ensure you select “Continue on Web” if prompted, manually upload if needed, and check your internet connection.
| Issue | Solution |
|---|---|
| Prompted to use the app | Select “Continue on Web” to use the browser interface. |
| No upload button | Look for a cloud icon with an upward arrow, usually at the top right. If it’s not there, refresh the page or try a different browser. |
| Photos not appearing | Manually initiate the upload by tapping the “Upload” button. Also, check your internet connection. |
| Sign-in loop | Clear your browser’s cache and cookies or try using a different browser. |
| Uploads timing out | Ensure you have a stable internet connection. Large files may take longer to upload; try uploading smaller batches. |
| Album appears empty | Make sure you are logged in with the correct Google account that was invited to the shared album. |
| Link doesn’t direct properly | Ask the album owner to generate a new sharing link. Sometimes, links can become corrupted or deactivated. |
| Formatting Issues | If photos appear distorted or with incorrect orientation, ensure your device’s settings allow for proper image rendering in web browsers. Try rotating or re-saving the image before uploading if necessary. |
12. How Can I Control The Quality Of Photos I Upload?
Depending on your Google Account settings, you may have some control over the quality of the uploaded photos.
Answer: Google Photos typically optimizes photos for storage, but you can adjust upload size settings in your Google Account. Choose “Original Quality” if you want to maintain the original resolution, but note that this will use more of your Google storage.
- Storage Saver: This option compresses photos to save space. It’s suitable for most users as the quality reduction is usually minimal.
- Original Quality: This uploads photos in their original resolution, preserving all the details. This is best for professional photographers or those who want to print large photos.
13. How Does This Method Compare To Using The Google Photos App Directly?
Using the web interface instead of the app has some trade-offs.
Answer: Using the web interface is ideal for those who don’t want to install the Google Photos app or automatically back up all their photos. However, the app typically offers a smoother and more integrated experience.
| Feature | Web Interface | Google Photos App |
|---|---|---|
| Ease of Use | Slightly less intuitive than the app. | Generally more user-friendly. |
| Automatic Backup | No automatic backup unless you install the app. | Automatically backs up photos if configured. |
| Integration | Limited integration with your phone’s photo library. | Seamless integration with your phone’s photo library. |
| Features | Fewer features compared to the app (e.g., editing, organization). | More comprehensive features including editing, organization, and face recognition. |
| Storage Management | More manual; you need to manage your storage settings within your Google Account. | Automatic storage management options. |
| Network usage control | Requires manual management of uploads, providing better control. | Uses more bandwidth, potentially incurring higher data charges. |
| Quick Access To Photos | Less direct and requires navigating through a web browser. | Instant access through the app with a single tap. |
14. What About Privacy Considerations When Using Shared Albums?
Understanding privacy is crucial when sharing photos with others.
Answer: Only those with the shared album link or those specifically invited can view the photos. However, it’s important to only share the link with trusted individuals, as anyone with the link can potentially share it further.
- Link Sharing: Anyone with the link can access the album, so avoid posting it publicly.
- Invited Members: You can invite specific people via email for more control over access.
- Owner Controls: The album owner can remove members and revoke the sharing link at any time.
15. Can I Download Photos From A Shared Album?
Yes, you can download photos for offline access or archiving.
Answer: Yes, you can download individual photos or entire albums from a Google Shared Album. To download a single photo, open it and select the download option (usually a downward-pointing arrow). To download the entire album, look for a download all option, typically in the album’s settings menu.
- Individual Photo:
- Open the shared album.
- Click on the photo you want to download.
- Look for the download icon (usually three vertical dots or a downward-pointing arrow).
- Click the download icon to save the photo to your device.
- Entire Album:
- Open the shared album.
- Look for the three vertical dots in the upper corner of the screen to open the options menu.
- If available, choose the “Download all” option to download the entire album as a ZIP file.
16. Are There Alternatives To Google Shared Albums?
If you’re not fully committed to Google Photos, several other options are available.
Answer: Yes, alternatives include Apple iCloud Shared Albums, Dropbox, Microsoft OneDrive, and dedicated photo-sharing services like SmugMug and Flickr. Each has its own strengths and weaknesses, so consider your specific needs when choosing.
| Service | Key Features | Pros | Cons |
|---|---|---|---|
| Apple iCloud Shared Albums | Integration with Apple devices, easy sharing with other Apple users. | Seamless for Apple users, simple interface. | Less convenient for non-Apple users. |
| Dropbox | General file storage with photo sharing capabilities. | Widely used, good for various file types. | Not specifically designed for photo sharing. |
| Microsoft OneDrive | Similar to Dropbox, integrated with Microsoft ecosystem. | Integrated with Windows, useful if you’re already a Microsoft user. | Not specifically designed for photo sharing. |
| SmugMug | Paid service focused on professional photographers, offering customizable galleries and e-commerce options. | High-quality display, excellent for professional portfolios. | Paid service, may be overkill for casual users. |
| Flickr | Photo-sharing community with a focus on high-quality images. | Large community, good for discovering and sharing photography. | Interface can be overwhelming for new users. |
| Amazon Photos | Part of Amazon Prime, offers unlimited photo storage for Prime members. | Unlimited storage for Prime members, integration with Amazon devices. | Limited features beyond basic storage. |
| Facebook (Private Albums) | Social media platform with album sharing features. | Easy sharing with Facebook friends, widely used. | Privacy concerns, not ideal for high-resolution photos. |
| Instagram (Close Friends) | Sharing of photos with a select group of close friends. | Great for sharing photos with a small group, ability to restrict which users are viewing the photos | Not ideal for storing large numbers of images |
17. How Do I Optimize Photos For Sharing On Google Shared Albums?
To ensure your photos look their best, consider these optimization tips.
Answer: Optimize photos by resizing them for web use (around 2000 pixels wide), using JPEG format for smaller file sizes, and ensuring correct orientation. This will improve upload speed and viewing experience without significantly sacrificing quality.
- Resize Photos: Reduce the dimensions of your photos to around 2000 pixels on the longest side. This reduces file size without significant loss of detail.
- Use JPEG Format: Save your photos as JPEGs. This format offers a good balance between file size and image quality.
- Correct Orientation: Ensure your photos are correctly oriented before uploading.
- Remove Metadata: To protect your privacy, consider removing EXIF data (location, camera settings) before sharing.
- Compress Images: Use online tools or software to compress images further without noticeable quality loss.
18. What Are The Best Practices For Organizing Photos In A Shared Album?
Organization is key to keeping your shared album user-friendly.
Answer: Encourage contributors to add descriptive captions, organize photos chronologically or by event, and periodically review and remove irrelevant or duplicate photos to maintain a clean and organized album.
- Descriptive Captions: Encourage contributors to add captions describing the photos. This adds context and makes the album more engaging.
- Chronological Order: If possible, arrange photos in chronological order to tell a story.
- Event-Based Organization: Group photos by event or theme.
- Regular Review: Periodically review the album and remove irrelevant or duplicate photos.
- Consistent Naming: If you are uploading from a computer, use consistent naming conventions for your photo files.
- Categorize if Possible: If the album is for a longer period, consider creating sub-categories or folders within the album (if the platform supports it).
19. How Can I Make A Shared Album More Interactive?
Encourage engagement and make the album a fun experience for everyone.
Answer: Encourage members to comment on photos, ask questions, and share anecdotes related to the images. This fosters a sense of community and makes the album more than just a collection of pictures.
- Encourage Comments: Prompt members to leave comments and share their thoughts on the photos.
- Ask Questions: Pose questions related to the photos to spark conversation.
- Share Anecdotes: Encourage members to share stories or memories associated with the photos.
- Use Polls or Surveys: For decision-making (e.g., choosing a cover photo), use polls or surveys within the album.
- Themed Weeks: Introduce themed weeks (e.g., “Throwback Thursday”) to encourage specific types of contributions.
20. What Are The Legal and Ethical Considerations When Sharing Photos?
Be mindful of privacy and copyright laws.
Answer: Obtain consent from individuals before sharing their photos, respect copyright laws when using images taken by others, and be transparent about how the photos will be used and who will have access to them.
- Consent: Always obtain consent from individuals before sharing their photos, especially if they are minors.
- Copyright: Respect copyright laws when using images taken by others. Do not share copyrighted material without permission.
- Transparency: Be transparent about how the photos will be used and who will have access to them.
- Data Protection: Adhere to data protection regulations (e.g., GDPR) when handling personal data.
- Terms of Service: Understand and comply with the terms of service of the photo-sharing platform.
21. How Can I Use Shared Albums For Professional Purposes?
Shared albums can be a valuable tool for collaboration and client communication.
Answer: Use shared albums to share drafts with clients, collaborate with team members on visual projects, and showcase your work to potential employers or customers. Always ensure you have the necessary permissions and licenses for commercial use.
- Client Proofing: Share drafts of photos with clients for feedback and approval.
- Team Collaboration: Collaborate with team members on visual projects by sharing images and collecting feedback.
- Portfolio Sharing: Showcase your work to potential employers or customers.
- Event Photography: Share photos from events with clients or attendees.
- Educational Purposes: Use shared albums for educational purposes, such as sharing examples of different photographic techniques.
22. What Are The Latest Updates To Google Shared Albums?
Stay informed about new features and changes to the platform.
Answer: Google frequently updates its services, including Google Photos. Stay informed about new features by following the Google Photos blog, reading tech news, and participating in Google Photos user communities. Recent updates often include improvements to sharing options, storage management, and AI-powered features.
- Google Photos Blog: Follow the official Google Photos blog for announcements and updates.
- Tech News Sites: Read tech news sites and blogs that cover Google Photos.
- User Communities: Participate in Google Photos user communities and forums.
- Social Media: Follow Google Photos on social media for the latest news and tips.
- Google Support Pages: Check the Google Photos support pages for updated documentation.
23. How To Secure Your Shared Google Album?
To make sure only specific people have access to the images you share, securing your Google Album is a must.
Answer: Keep your shared Google Album secure by regularly reviewing the list of invited members and removing those who should no longer have access. Generate a new, unique link periodically and avoid posting the link publicly on social media or unsecured websites to minimize unauthorized access.
24. How Do Geotagging and Location Services Affect Shared Albums?
Understand how location data is handled when sharing photos.
Answer: Geotagging adds location data to photos, which can be useful for organizing and remembering where they were taken. However, be mindful of privacy concerns when sharing photos with location data, as it can reveal sensitive information about where you live or travel. You can disable location services in your camera settings or remove location data from photos before sharing.
- Privacy Concerns: Be mindful of privacy concerns when sharing photos with location data.
- Disabling Location Services: You can disable location services in your camera settings to prevent photos from being geotagged.
- Removing Location Data: You can remove location data from photos before sharing them.
- Benefits of Geotagging: Geotagging can be useful for organizing and remembering where photos were taken.
- Platform Settings: Check the platform’s settings to control how location data is handled.
25. How Can I Use Google Shared Albums For Travel Photography?
Shared albums are perfect for documenting and sharing your travel adventures.
Answer: Create a shared album for each trip, invite your travel companions to contribute their photos, and add captions describing the locations and experiences. This creates a collaborative travelogue that everyone can enjoy.
- Create Separate Albums: Create a separate shared album for each trip.
- Invite Travel Companions: Invite your travel companions to contribute their photos and videos.
- Add Captions: Add captions describing the locations and experiences.
- Organize by Location: Organize photos by location or itinerary.
- Share with Family and Friends: Share the album with family and friends who couldn’t join the trip.
26. What Is The Difference Between A Shared Album And A Regular Album In Google Photos?
Understand the distinction between these two types of albums.
Answer: A regular album in Google Photos is a personal collection of photos that only you can see, while a shared album is designed for collaboration, allowing multiple people to view and contribute. Shared albums have additional sharing and collaboration features not found in regular albums.
| Feature | Regular Album | Shared Album |
|---|---|---|
| Visibility | Only visible to the album creator. | Visible to invited members or anyone with the sharing link. |
| Collaboration | No collaboration features. | Allows multiple people to contribute photos and videos. |
| Sharing Options | Limited sharing options (e.g., sharing a link to view the album). | Offers more sharing options (e.g., inviting members, creating a shareable link). |
| Editing Permissions | Only the album creator can edit the photos. | No editing permissions for shared members unless granted specifically, maintaining the integrity of original contributions from various sources. |
| Notifications | No notifications for shared activity. | Sends notifications when new photos are added or comments are made. |
| Use Case | Best for personal photo organization and storage. | Best for collaborative projects, events, and sharing with groups. |
27. How Can I Use Google Shared Albums For Family Events?
Shared albums are a great way to collect and share memories from family gatherings.
Answer: Create a shared album for each family event, invite all family members to contribute their photos, and encourage everyone to add captions and comments. This creates a lasting record of the event that everyone can enjoy.
- Create Separate Albums: Create a separate shared album for each family event (e.g., birthdays, holidays, reunions).
- Invite Family Members: Invite all family members to contribute their photos and videos.
- Encourage Captions and Comments: Encourage everyone to add captions and comments to the photos.
- Share Memories: Share memories and stories related to the photos.
- Create a Family Archive: Use shared albums to create a family archive of photos and videos.
28. How Do Different Devices (Android, iOS, Desktops) Affect The Shared Album Experience?
The experience can vary slightly depending on the device you’re using.
Answer: While the core functionality remains the same, the user interface and specific features may vary slightly depending on whether you’re using an Android device, an iOS device, or a desktop computer. Generally, the desktop version offers more advanced features and easier batch uploading, while the mobile versions are more convenient for on-the-go access and sharing.
| Device | User Interface | Features | Convenience |
|---|---|---|---|
| Android | Integrated with the Android operating system, similar to the iOS version. | Offers most of the same features as the iOS version, including automatic backup and sharing options. | Convenient for users with Android devices, seamless integration with the operating system. |
| iOS | User-friendly interface, designed for touch input. | Offers features like automatic backup, face recognition, and easy sharing options. | Convenient for users with iPhones and iPads, seamless integration with the iOS ecosystem. |
| Desktop | Web-based interface, optimized for larger screens and keyboard/mouse input. | Offers more advanced features like batch uploading, editing, and organization. | Convenient for managing large numbers of photos and videos, easier to use with a keyboard and mouse. |
29. Can I Use Shared Albums To Create Collaborative Photo Projects?
Yes, shared albums are a great tool for creative collaborations.
Answer: Use shared albums to collaborate with other photographers on themed projects, create visual stories, or document a shared experience from multiple perspectives. Shared albums make it easy to collect and organize contributions from multiple people.
- Themed Projects: Collaborate with other photographers on themed projects (e.g., “Street Photography,” “Portraits”).
- Visual Stories: Create visual stories by combining photos from multiple contributors.
- Document Shared Experiences: Document a shared experience (e.g., a road trip, a community event) from multiple perspectives.
- Collect Feedback: Collect feedback from collaborators on your photos.
- Showcase Collaborative Work: Showcase collaborative work on your website or social media.
30. What Are The Best Tools For Enhancing Photos Before Uploading Them To A Shared Album?
Improve the quality of your photos before sharing them.
Answer: Use photo editing software like Adobe Lightroom, Adobe Photoshop, or free online tools like Canva or Pixlr to enhance your photos before uploading them. Adjust brightness, contrast, and color balance, and crop and straighten your images to improve their overall appearance.
| Tool | Key Features | Pros | Cons |
|---|---|---|---|
| Adobe Lightroom | Professional-grade photo editing and organization, non-destructive editing, cloud syncing. | Powerful editing tools, excellent organization features, seamless integration with other Adobe products. | Subscription-based, can be overwhelming for beginners. |
| Adobe Photoshop | Industry-standard image editing software, advanced editing and compositing tools. | Comprehensive editing capabilities, suitable for complex image manipulation. | Subscription-based, steep learning curve. |
| Canva | Easy-to-use online design tool, pre-designed templates, drag-and-drop interface. | User-friendly, great for quick edits and creating graphics, free version available. | Limited editing capabilities compared to professional software. |
| Pixlr | Online photo editor, offers both basic and advanced editing tools. | Free to use, offers a wide range of editing tools, no installation required. | Can be ad-supported, less powerful than professional software. |
| GIMP | Free and open-source image editor, offers a wide range of editing tools. | Free to use, offers many of the same features as Photoshop. | Steeper learning curve than some other options, interface can be clunky. |
| Fotor | Online photo editor, offers a variety of editing tools and effects. | Easy to use, offers a wide range of effects and filters, free version available. | Limited editing capabilities compared to professional software. |
| VSCO | Mobile photo editing app, offers a wide range of filters and editing tools. | User-friendly interface, excellent filters, great for mobile editing. | Limited features compared to desktop software, subscription required for full access. |
FAQ Section: How To Add Photos To Shared Google Album
1. Can I add photos to a shared Google Album if I don’t have the Google Photos app installed?
Yes, you can add photos to a shared Google Album even without the Google Photos app. Simply use the shared link in a web browser, sign in to your Google account, and upload the photos directly from your device.
2. What do I need to add photos to a shared Google Album?
You need a Google account and a shared link to the album. Make sure that the Google Photos app is not interfering with the process on your device.
3. How many photos can be added to a shared Google Album?
A Google Shared Album can hold up to 20,000 photos or videos.
4. What happens with the images that I uploaded to the shared album?
The images that you upload to the shared album, are stored in your Google Account within Google Photos.
5. How to remove an image that I uploaded from a shared album?
Open the shared album, select the photo, click the three dots (more options), and choose “Remove from album.”
6. If I don’t have a google account, can I upload the images to the shared album?
A Google Account is essential for adding photos to a shared Google Album.
7. What if the upload button doesn’t appear on the screen?
If you don’t see your photos yet, tap on the “Upload” button – the cloud with the up arrow at the top right.
8. How can I control the quality of photos I upload?
Choose “Original Quality” if you want to maintain the original resolution, but note that this will use more of your Google storage.
9. How secure is the shared Google Album?
Only those with the shared album link or those specifically invited can view the photos.
10. How can I optimize photos for sharing on Google Shared Albums?
Optimize photos by resizing them for web use (around 2000 pixels wide), using JPEG format for smaller file sizes, and ensuring correct orientation.
Ready to dive deeper into the world of photography? Visit dfphoto.net today to explore our comprehensive guides, discover stunning photo collections, and connect with a vibrant community of photographers in the USA. Whether you’re looking to master new techniques, find inspiration for your next project, or simply share your passion with others, dfphoto.net is your ultimate resource. Don’t wait – start your photographic journey with us now Address: 1600 St Michael’s Dr, Santa Fe, NM 87505, United States. Phone: +1 (505) 471-6001.