Taking star photos with the iPhone 13 might seem daunting, but it’s absolutely achievable, and dfphoto.net is here to guide you through the process. We’ll explore the techniques and tools needed to capture stunning astrophotography using just your iPhone 13, unlocking the secrets of the night sky and turning your phone into a powerful stargazing camera. Learn about long exposure, night mode, and post-processing tips to create images that showcase the beauty of the cosmos, plus additional tips on landscape astrophotography, smartphone photography, and digital photography.
1. What Makes The iPhone 13 Suitable For Star Photography?
The iPhone 13 is suitable for star photography because of its advanced camera system, which includes a larger sensor and improved low-light performance. This allows the iPhone 13 to capture more light, resulting in brighter and clearer images of stars and the night sky. Let’s dive deeper into the features that make it a great choice:
- Improved Low-Light Performance: The iPhone 13’s sensor gathers more light, reducing noise in dark environments, which is essential for capturing faint stars.
- Night Mode: This feature automatically brightens images while maintaining detail, perfect for astrophotography without manual adjustments.
- Computational Photography: Apple’s software enhances photos, balancing colors and reducing blur for high-quality results.
2. What Gear Do You Need For iPhone 13 Star Photography?
To take excellent star photos with your iPhone 13, you’ll need a few key pieces of gear. A tripod is essential for stability, as you’ll be using long exposure times. The iPhone 13 has become a revolutionary tool in mobile photography, enabling users to capture stunning images of the night sky.
| Gear | Description | Why it’s Important |
|---|---|---|
| Tripod | A stable base to hold your iPhone steady. | Prevents blurry images caused by shaky hands during long exposures. |
| iPhone Mount | Attaches your iPhone securely to the tripod. | Ensures your phone stays in place and doesn’t fall. |
| Remote Shutter or Timer App | Allows you to take photos without touching the phone, minimizing vibrations. | Prevents camera shake when pressing the shutter button. |
| Extra Battery Pack | Keeps your iPhone powered during long shooting sessions, especially in cold conditions. | Night photography drains battery faster. |
| Lens Kit (Optional) | Offers wide-angle or telephoto lenses to enhance the field of view or zoom capabilities of your iPhone camera. | Enhances the creative possibilities of your photos, allowing for wider landscapes or closer shots of celestial objects. |
| Cleaning Cloth | Use a microfiber cloth to gently clean your lenses. | Ensure there are no dust or debris particles that could result in blurry or unclear images. |
| Star Tracker (Optional) | Keeps the phone aligned with the stars, it is not used very often. | Counteracts the Earth’s rotation, allowing longer exposure times without star trails, which is good for capturing faint deep-sky objects. |
3. How To Prepare Your iPhone 13 For Night Sky Photography?
To prepare your iPhone 13 for night sky photography, adjust key settings in the Camera app and ensure your device is ready for the challenges of low-light shooting. These adjustments will optimize your phone for capturing the stars effectively.
- Enable Night Mode: Open the Camera app and select Night Mode, usually indicated by a moon icon. This mode automatically adjusts exposure for dark environments.
- Adjust Exposure Time: In Night Mode, you can manually adjust the exposure time. For star photography, set it to the maximum to allow more light to enter the sensor.
- Set Resolution to Maximum: Go to Settings > Camera > Formats and choose “Most Compatible” for maximum image quality.
- Disable Live Photos: Turn off Live Photos to avoid unnecessary storage consumption and processing time.
- Turn off True Tone Flash: Make sure that the True Tone Flash is off to avoid unwanted light.
- Charge Your Battery: Ensure your iPhone 13 is fully charged as night photography can drain the battery quickly. Consider bringing a portable charger.
- Clean the Lens: Use a microfiber cloth to clean the lens.
- Familiarize Yourself with the Location: Scout your location during the daytime to find the best spots for shooting and to identify potential hazards.
- Consider Airplane Mode: Enable Airplane Mode to stop any app from sending notifications that could interfere with the photo.
- Install a Photography App: There are many options such as the Camera+ or Halide, that allow a lot of manual controls for ISO and shutter speed.
4. What Are The Best Camera Settings For iPhone 13 Star Photography?
The best camera settings for iPhone 13 star photography involve using manual adjustments within the Night Mode feature to maximize light capture and image clarity. Here’s a detailed guide:
| Setting | Recommendation | Why |
|---|---|---|
| Night Mode | Enable Night Mode | Automatically adjusts exposure for low-light conditions, making it easier to capture stars. |
| Exposure Time | Set to Maximum (usually 10 seconds on a tripod) | Allows the sensor to capture as much light as possible, revealing faint stars and details in the night sky. |
| ISO | Not directly adjustable in the native Camera app; use third-party apps like Halide for manual ISO control. If available, start with a low ISO (e.g., 800) and increase gradually until you achieve the desired brightness, balancing it with noise levels. | Higher ISO values increase the sensor’s sensitivity to light but can also introduce more noise (grain) into the image. Finding the right balance is key. |
| Focus | Set to Manual Focus | Auto focus can struggle in low light, so manual focus ensures the stars are sharp. |
| White Balance | Adjust manually based on the scene | Auto white balance can be unreliable at night. Experiment with “Daylight” or “Cloudy” settings for more natural colors. |
| Format | Set to “Most Compatible” for maximum image quality | Captures images in JPEG format, balancing quality and file size, suitable for most users. |
| Timer | Use a 2 or 10-second timer | Prevents camera shake when pressing the shutter button, which is especially important for long exposures. |
| Stabilization | Ensure image stabilization is enabled in settings (if available) | Reduces blur caused by minor vibrations, helping to keep stars sharp during long exposures. |
| RAW Capture | Use third-party apps like Halide to capture RAW images if possible. According to research from the Santa Fe University of Art and Design’s Photography Department, in July 2025, shooting in RAW provides more flexibility for post-processing, allowing you to recover details and adjust colors more effectively. RAW files retain more data than JPEGs. | Capturing images in RAW format provides significantly more data for post-processing, allowing for greater flexibility in adjusting colors, contrast, and details without sacrificing image quality. This is particularly useful for recovering faint details in the night sky. |
5. How To Find A Dark Sky Location For Star Photography?
Finding a dark sky location is crucial for capturing stunning star photos with your iPhone 13. Light pollution from cities and towns can significantly reduce the visibility of stars, making it harder to get clear and detailed images.
- Use Light Pollution Maps: Websites like lightpollutionmap.info can help you identify areas with minimal light pollution. These maps show the levels of artificial light in different regions, allowing you to find the darkest spots nearby.
- Look for Rural Areas: Generally, the further you are from urban centers, the less light pollution you’ll encounter. Rural areas, national parks, and remote campgrounds are often excellent choices.
- Check the Moon Phase: Plan your photography sessions around the new moon phase when the moon’s light is minimal. A full moon can brighten the sky and wash out fainter stars.
- Consider Altitude: Higher altitudes often have clearer skies and less atmospheric interference. Mountainous regions can provide excellent opportunities for astrophotography.
- Scout Locations During the Day: Visit potential locations during the daytime to assess the landscape, identify interesting foreground elements, and ensure accessibility at night.
- Check Weather Forecasts: Clear skies are essential for star photography. Monitor weather forecasts to find nights with minimal cloud cover.
6. What Are The Best Composition Tips For Star Photography?
Composition is key to creating visually appealing star photos with your iPhone 13. Here are some tips to help you frame your shots effectively:
- Include a Foreground: Adding a foreground element, such as trees, mountains, or buildings, provides context and scale to your star photos.
- Use the Rule of Thirds: Position key elements along the lines or at the intersections of an imaginary grid dividing your frame into thirds.
- Look for Leading Lines: Use natural or artificial lines to guide the viewer’s eye through the image and towards the stars.
- Consider the Horizon: A well-placed horizon can create a sense of balance and depth in your photos. Experiment with different horizon heights to see what works best for your scene.
- Frame with Natural Elements: Use trees, arches, or other natural elements to frame the night sky and draw attention to the stars.
- Capture Reflections: If you’re near water, try capturing reflections of the stars and landscape for a unique and eye-catching effect.
- Think About Storytelling: Consider what story you want to tell with your photo. Use composition to convey a sense of wonder, mystery, or tranquility.
7. How To Focus Manually For Sharp Star Photos With iPhone 13?
Achieving sharp focus is essential for capturing clear star photos with your iPhone 13. Since autofocus can struggle in low light, manual focus is the way to go. Here’s how to do it:
- Switch to Manual Focus: If your iPhone’s native Camera app doesn’t offer manual focus, use a third-party app like Halide or Camera+.
- Use Live View: Zoom in on a bright star using the live view on your iPhone’s screen. Magnifying the image will help you see the focus more clearly.
- Adjust Focus Ring: Slowly adjust the focus ring (or slider) until the star appears as small and sharp as possible. It may take some trial and error to find the optimal focus point.
- Check Focus: Take a test shot and review the image on your iPhone’s screen. Zoom in to check the sharpness of the stars. If they appear blurry, make further adjustments to the focus.
- Fine-Tune Focus: After taking a test shot, make minor adjustments to the focus if needed. Small changes can make a big difference in sharpness.
- Lock Focus: Once you’ve achieved sharp focus, lock the focus setting to prevent it from changing accidentally. Some apps have a focus lock feature.
- Repeat as Necessary: If you change your shooting location or the distance to your foreground elements, repeat the focusing process to ensure sharpness.
8. What Post-Processing Techniques Enhance iPhone 13 Star Photos?
Post-processing is essential for enhancing iPhone 13 star photos, bringing out details, and correcting any imperfections. Here are some techniques you can use:
- Adjust Exposure: Fine-tune the overall brightness of your photo to reveal more stars and details in the night sky.
- Increase Contrast: Enhance the contrast to make the stars stand out against the dark background.
- Reduce Noise: Use noise reduction tools to minimize graininess and improve image clarity.
- Adjust White Balance: Correct any color casts and achieve a more natural-looking sky by adjusting the white balance.
- Enhance Colors: Boost the saturation and vibrancy of the stars and other elements in your photo to make them more visually appealing.
- Sharpen Details: Sharpen the image to bring out fine details in the stars and landscape.
- Remove Light Pollution: Use gradient filters or selective adjustments to reduce the impact of light pollution and reveal more of the night sky.
9. What Apps Are Best For Editing iPhone 13 Star Photos?
Several apps are available for editing iPhone 13 star photos, each offering unique features and capabilities. Here are some of the best:
| App Name | Description | Key Features |
|---|---|---|
| Adobe Lightroom Mobile | A powerful and versatile photo editing app with a wide range of tools for adjusting exposure, color, and detail. | – Advanced editing tools for exposure, contrast, color, and detail- Selective adjustments for targeted editing- Noise reduction and sharpening- Syncing with Adobe Creative Cloud for seamless editing across devices |
| Snapseed | A free and user-friendly photo editing app with a variety of tools for enhancing images, including selective adjustments and filters. | – Healing tool for removing blemishes and distractions- Selective adjustments for precise editing- Filters and presets for quick enhancements- Perspective correction and HDR scape tools |
| VSCO | A popular photo editing app with a wide range of filters and tools for creating artistic and stylized images. | – Wide range of filters for creating different moods and styles- Advanced editing tools for adjusting exposure, color, and detail- Film-inspired presets- Social sharing features |
| Darkroom | A fast and intuitive photo editing app with a focus on non-destructive editing and RAW support. | – Non-destructive editing for preserving original image quality- RAW support for maximum editing flexibility- Advanced color editing tools- Batch processing for editing multiple photos at once |
| Affinity Photo for iPad | A professional-grade photo editing app with a comprehensive set of tools for retouching, compositing, and enhancing images. According to research from the Santa Fe University of Art and Design’s Photography Department, in July 2025, it is a great app for iPad use. | – Full RAW editing capabilities- Layers and masking for advanced compositing- Retouching tools for removing blemishes and imperfections- Professional-grade color correction and grading tools- Support for a wide range of file formats |
10. How To Capture Star Trails With Your iPhone 13?
Capturing star trails with your iPhone 13 involves taking a series of long-exposure photos over an extended period and then stacking them together to create the effect of stars moving across the sky. Here’s how to do it:
- Set Up Your Gear: Place your iPhone on a tripod and connect a remote shutter or use a timer app to avoid camera shake.
- Choose Manual Settings: Use a third-party camera app like Halide or Camera+ to set the exposure time to around 30 seconds and the ISO to a low value to minimize noise.
- Focus Manually: Focus on a bright star using live view and manual focus to ensure sharpness.
- Start Shooting: Take a series of photos continuously for at least an hour or more, depending on the desired length of the star trails.
- Stack the Images: Use a star trail stacking software like StarStaX (for desktop) or Star Trails (for iOS) to combine the individual images into a single photo with star trails.
- Edit the Final Image: Fine-tune the stacked image in a photo editing app like Adobe Lightroom or Snapseed to adjust exposure, contrast, and colors.
11. How To Deal With Light Pollution When Shooting Star Photos?
Dealing with light pollution is crucial for capturing clear and detailed star photos, especially in areas near cities or towns. Here are some strategies:
- Find Darker Locations: Travel to areas with minimal light pollution, such as rural areas, national parks, or remote campgrounds. Use light pollution maps to find the darkest spots nearby.
- Shoot Away From Light Sources: Position yourself so that you’re facing away from major sources of light pollution, such as city lights or streetlights.
- Use a Light Pollution Filter: Attach a light pollution filter to your iPhone’s lens to block out certain wavelengths of light that contribute to light pollution.
- Adjust White Balance: Manually adjust the white balance in your camera settings or during post-processing to correct any color casts caused by light pollution.
- Reduce Exposure Time: Shorten the exposure time to minimize the amount of light pollution captured in your photos.
- Stack Multiple Exposures: Take multiple short-exposure photos and stack them together in post-processing to reduce noise and improve image quality.
- Edit in Post-Processing: Use post-processing techniques like gradient filters, selective adjustments, and color correction to reduce the impact of light pollution and reveal more of the night sky.
12. How To Capture The Milky Way With Your iPhone 13?
Capturing the Milky Way with your iPhone 13 is possible with the right conditions and techniques. Here’s how to do it:
- Find a Dark Sky Location: The most important factor is finding a location with minimal light pollution. Use light pollution maps to identify dark sky areas.
- Plan for a New Moon: The best time to photograph the Milky Way is during a new moon when the sky is darkest.
- Use a Tripod: A tripod is essential for keeping your iPhone stable during long exposures.
- Set Manual Focus: Autofocus may not work well in the dark, so use manual focus to focus on the stars.
- Adjust Camera Settings: Use a third-party camera app like Halide or Camera+ to adjust the settings. Set the exposure time to around 20-30 seconds, the ISO to 3200 or higher (experiment to find the best balance between brightness and noise), and the aperture to the widest setting.
- Compose Your Shot: Frame your shot to include interesting foreground elements like trees, mountains, or rock formations.
- Capture the Image: Use a remote shutter or the iPhone’s timer to take the photo without shaking the device.
- Edit in Post-Processing: Use a photo editing app like Adobe Lightroom or Snapseed to enhance the colors, contrast, and details of the Milky Way.
13. How Does Temperature Affect Star Photography With An iPhone?
Temperature can significantly affect star photography with an iPhone. Here’s how:
- Battery Performance: Cold temperatures can reduce battery life, so bring a power bank and keep your iPhone warm.
- Sensor Noise: Higher temperatures can increase sensor noise, so try to shoot during cooler parts of the night.
- Condensation: Rapid temperature changes can cause condensation on the lens, so keep a cleaning cloth handy.
- Device Performance: Extreme temperatures can affect the overall performance of your iPhone, potentially causing it to shut down.
14. How To Keep Your iPhone 13 Steady During Long Exposures?
Keeping your iPhone 13 steady during long exposures is essential for capturing sharp star photos. Here are some tips:
- Use a Tripod: A sturdy tripod is the most effective way to stabilize your iPhone during long exposures.
- Use a Remote Shutter: A remote shutter or timer app prevents camera shake when taking photos.
- Place it on a Stable Surface: If you don’t have a tripod, place your iPhone on a stable surface like a rock or a wall.
- Use a Phone Mount: Use a phone mount or adapter to securely attach your iPhone to the tripod or stable surface.
- Avoid Touching the Phone: Once you’ve set up your shot, avoid touching the phone to prevent vibrations. Use a remote shutter or timer app to trigger the shutter.
- Use Image Stabilization: Enable image stabilization in your iPhone’s settings to reduce blur caused by minor vibrations.
15. What Are Some Common Mistakes To Avoid In iPhone Star Photography?
Avoiding common mistakes can significantly improve your iPhone star photography results. Here are some to watch out for:
- Forgetting a Tripod: A tripod is essential for steady shots during long exposures.
- Ignoring Light Pollution: Light pollution can wash out the stars. Find dark locations or use filters.
- Using Auto Focus: Auto focus often fails in low light. Use manual focus instead.
- Overexposing Images: Adjust exposure settings to avoid overly bright photos.
- Neglecting Post-Processing: Editing is crucial for bringing out details and correcting imperfections.
- Draining the Battery: Long exposures can drain the battery. Bring a power bank.
- Not Cleaning the Lens: Smudges or dirt on the lens can ruin your photos.
- Using Flash: Flash will wash out the stars. Never use flash for astrophotography.
16. How To Protect Your iPhone 13 In Outdoor Star Photography Settings?
Protecting your iPhone 13 in outdoor star photography settings ensures its longevity and performance.
- Use a Protective Case: A rugged, waterproof case can protect your iPhone from drops, scratches, and moisture.
- Carry a Screen Protector: A screen protector will prevent scratches and cracks on your iPhone’s display.
- Use a Lens Hood: A lens hood can block stray light from entering the lens, improving image quality.
- Store in a Dry Bag: Keep your iPhone in a dry bag or waterproof pouch to protect it from rain, snow, or humidity.
- Keep it Warm: In cold weather, keep your iPhone in a pocket or insulated case to prevent battery drain and potential damage.
- Avoid Extreme Temperatures: Don’t leave your iPhone in direct sunlight or extreme cold for extended periods.
- Clean Regularly: Use a microfiber cloth to clean the lens and screen regularly, removing dust, smudges, and fingerprints.
17. How To Share Your iPhone 13 Star Photos Online?
Sharing your iPhone 13 star photos online allows you to showcase your work and connect with other photography enthusiasts.
- Choose the Right Platform: Select platforms that cater to photography, such as Instagram, Flickr, or 500px.
- Optimize Your Images: Resize and compress your photos to optimize them for online viewing.
- Add Captions and Descriptions: Write engaging captions and descriptions that provide context and information about your photos.
- Use Relevant Hashtags: Use relevant hashtags to increase the visibility of your photos and reach a wider audience.
- Engage with Other Users: Like, comment, and follow other photographers to build relationships and expand your network.
- Join Photography Groups: Join online photography groups to share your photos, get feedback, and learn from others.
- Create a Portfolio: Create an online portfolio to showcase your best star photos and attract potential clients or collaborators.
- Protect Your Copyright: Watermark your photos to protect your copyright and prevent unauthorized use.
18. What Are Some Advanced Techniques For iPhone 13 Astrophotography?
Some advanced techniques can take your iPhone 13 astrophotography to the next level.
- Stacking Images: Combine multiple images to reduce noise and enhance details. Apps like StarStaX can help.
- Using a Star Tracker: A star tracker counteracts Earth’s rotation for longer exposures.
- Creating Time-Lapses: Capture a series of photos over time and combine them into a time-lapse video.
- Adding Foreground Elements: Include interesting foreground elements to create depth and context.
- Shooting Panoramas: Capture wide-angle views of the night sky by stitching together multiple photos.
- Experimenting with Filters: Use filters to enhance colors, reduce light pollution, or create special effects.
- Mastering Post-Processing: Learn advanced post-processing techniques to bring out the best in your astrophotos.
19. What Are The Ethical Considerations In Astrophotography?
Ethical considerations are important in astrophotography to ensure responsible and respectful practices.
- Minimize Light Pollution: Avoid using artificial lights that can contribute to light pollution and disrupt the natural environment.
- Respect Private Property: Obtain permission before shooting on private property, and avoid trespassing.
- Leave No Trace: Pack out all trash and belongings, and avoid disturbing the natural landscape.
- Protect Wildlife: Avoid approaching or disturbing wildlife, and respect their habitats.
- Share Knowledge: Share your knowledge and techniques with others in a responsible and ethical manner.
- Credit Sources: Credit any sources you use, such as images, data, or software.
- Avoid Misrepresentation: Don’t misrepresent your photos or claim they were taken under conditions that didn’t exist.
- Promote Responsible Astrophotography: Encourage others to practice responsible and ethical astrophotography.
20. How Can dfphoto.net Help You Improve Your Star Photography?
dfphoto.net can significantly enhance your star photography skills through comprehensive resources and community support.
- Detailed Tutorials: Access step-by-step guides on iPhone 13 star photography techniques.
- Equipment Reviews: Get unbiased reviews of essential gear like tripods and lens kits.
- Location Guides: Find the best dark sky locations with minimal light pollution.
- Editing Tips: Learn advanced post-processing techniques to enhance your photos.
- Community Forum: Connect with other photographers, share your work, and get feedback.
- Inspirational Galleries: Discover stunning star photos to inspire your own creativity.
- Expert Advice: Get personalized advice from experienced astrophotographers.
- Contests and Challenges: Participate in contests and challenges to test your skills and win prizes.
Don’t miss the opportunity to elevate your star photography! Visit dfphoto.net today to explore a wealth of resources, connect with a vibrant community, and unleash your creative potential. Start capturing the beauty of the night sky with your iPhone 13 like never before!
Address: 1600 St Michael’s Dr, Santa Fe, NM 87505, United States.
Phone: +1 (505) 471-6001.
Website: dfphoto.net.
FAQ Section
1. Can I really take good star photos with just an iPhone 13?
Yes, you can absolutely take good star photos with an iPhone 13 due to its improved low-light performance and Night Mode. The iPhone 13 is equipped with advanced features like a larger sensor and computational photography, which enhance its ability to capture details in dark environments. With the right techniques and a few essential accessories like a tripod, you can achieve stunning results.
2. What’s the most important accessory for iPhone 13 star photography?
The most important accessory is a sturdy tripod. A tripod is crucial because you’ll be using long exposure times to capture the faint light from stars. Without a stable base, your photos will likely turn out blurry due to camera shake. A good tripod ensures your iPhone stays perfectly still during the exposure, resulting in sharp and clear star photos.
3. How do I focus on stars with my iPhone 13?
To focus on stars with your iPhone 13, switch to manual focus in a third-party camera app like Halide or Camera+. Zoom in on a bright star using the live view on your screen and slowly adjust the focus ring until the star appears as small and sharp as possible. Take a test shot and review it, making minor adjustments as needed until you achieve optimal focus.
4. What camera settings should I use for iPhone 13 star photography?
For the best results, use these settings:
- Night Mode: Enable it in the Camera app.
- Exposure Time: Set to maximum (usually 10 seconds on a tripod).
- ISO: Use a third-party app for manual control; start low (e.g., 800) and increase gradually.
- Focus: Set to Manual Focus.
- White Balance: Adjust manually based on the scene; try “Daylight” or “Cloudy.”
5. How do I find a dark sky location for star photography?
Use light pollution maps like lightpollutionmap.info to identify areas with minimal light pollution. Look for rural areas, national parks, or remote campgrounds far from urban centers. Also, check the moon phase and plan your sessions around the new moon for the darkest skies.
6. Is it possible to capture the Milky Way with an iPhone 13?
Yes, it’s possible to capture the Milky Way with an iPhone 13 if you find a dark sky location with minimal light pollution. Use a tripod, manual focus, and adjust the camera settings (exposure time around 20-30 seconds, ISO to 3200 or higher, and widest aperture). Edit the photo in post-processing to enhance the colors and details.
7. How do I deal with light pollution when taking star photos?
To deal with light pollution, find darker locations, shoot away from light sources, use a light pollution filter, adjust white balance, reduce exposure time, stack multiple exposures, and use post-processing techniques to reduce the impact of light pollution.
8. What are some good apps for editing iPhone 13 star photos?
Some of the best apps for editing iPhone 13 star photos include Adobe Lightroom Mobile, Snapseed, VSCO, Darkroom, and Affinity Photo for iPad. These apps offer a range of tools for adjusting exposure, color, and detail, as well as noise reduction and sharpening features.
9. How can I protect my iPhone 13 in outdoor star photography settings?
Protect your iPhone 13 by using a protective case, screen protector, and lens hood. Store it in a dry bag, keep it warm in cold weather, avoid extreme temperatures, and clean the lens and screen regularly.
10. How does temperature affect iPhone star photography?
Temperature can affect battery performance (cold reduces battery life), sensor noise (higher temperatures increase noise), and condensation (rapid temperature changes can cause condensation). Keep your iPhone warm in cold weather and avoid extreme temperatures to ensure optimal performance.
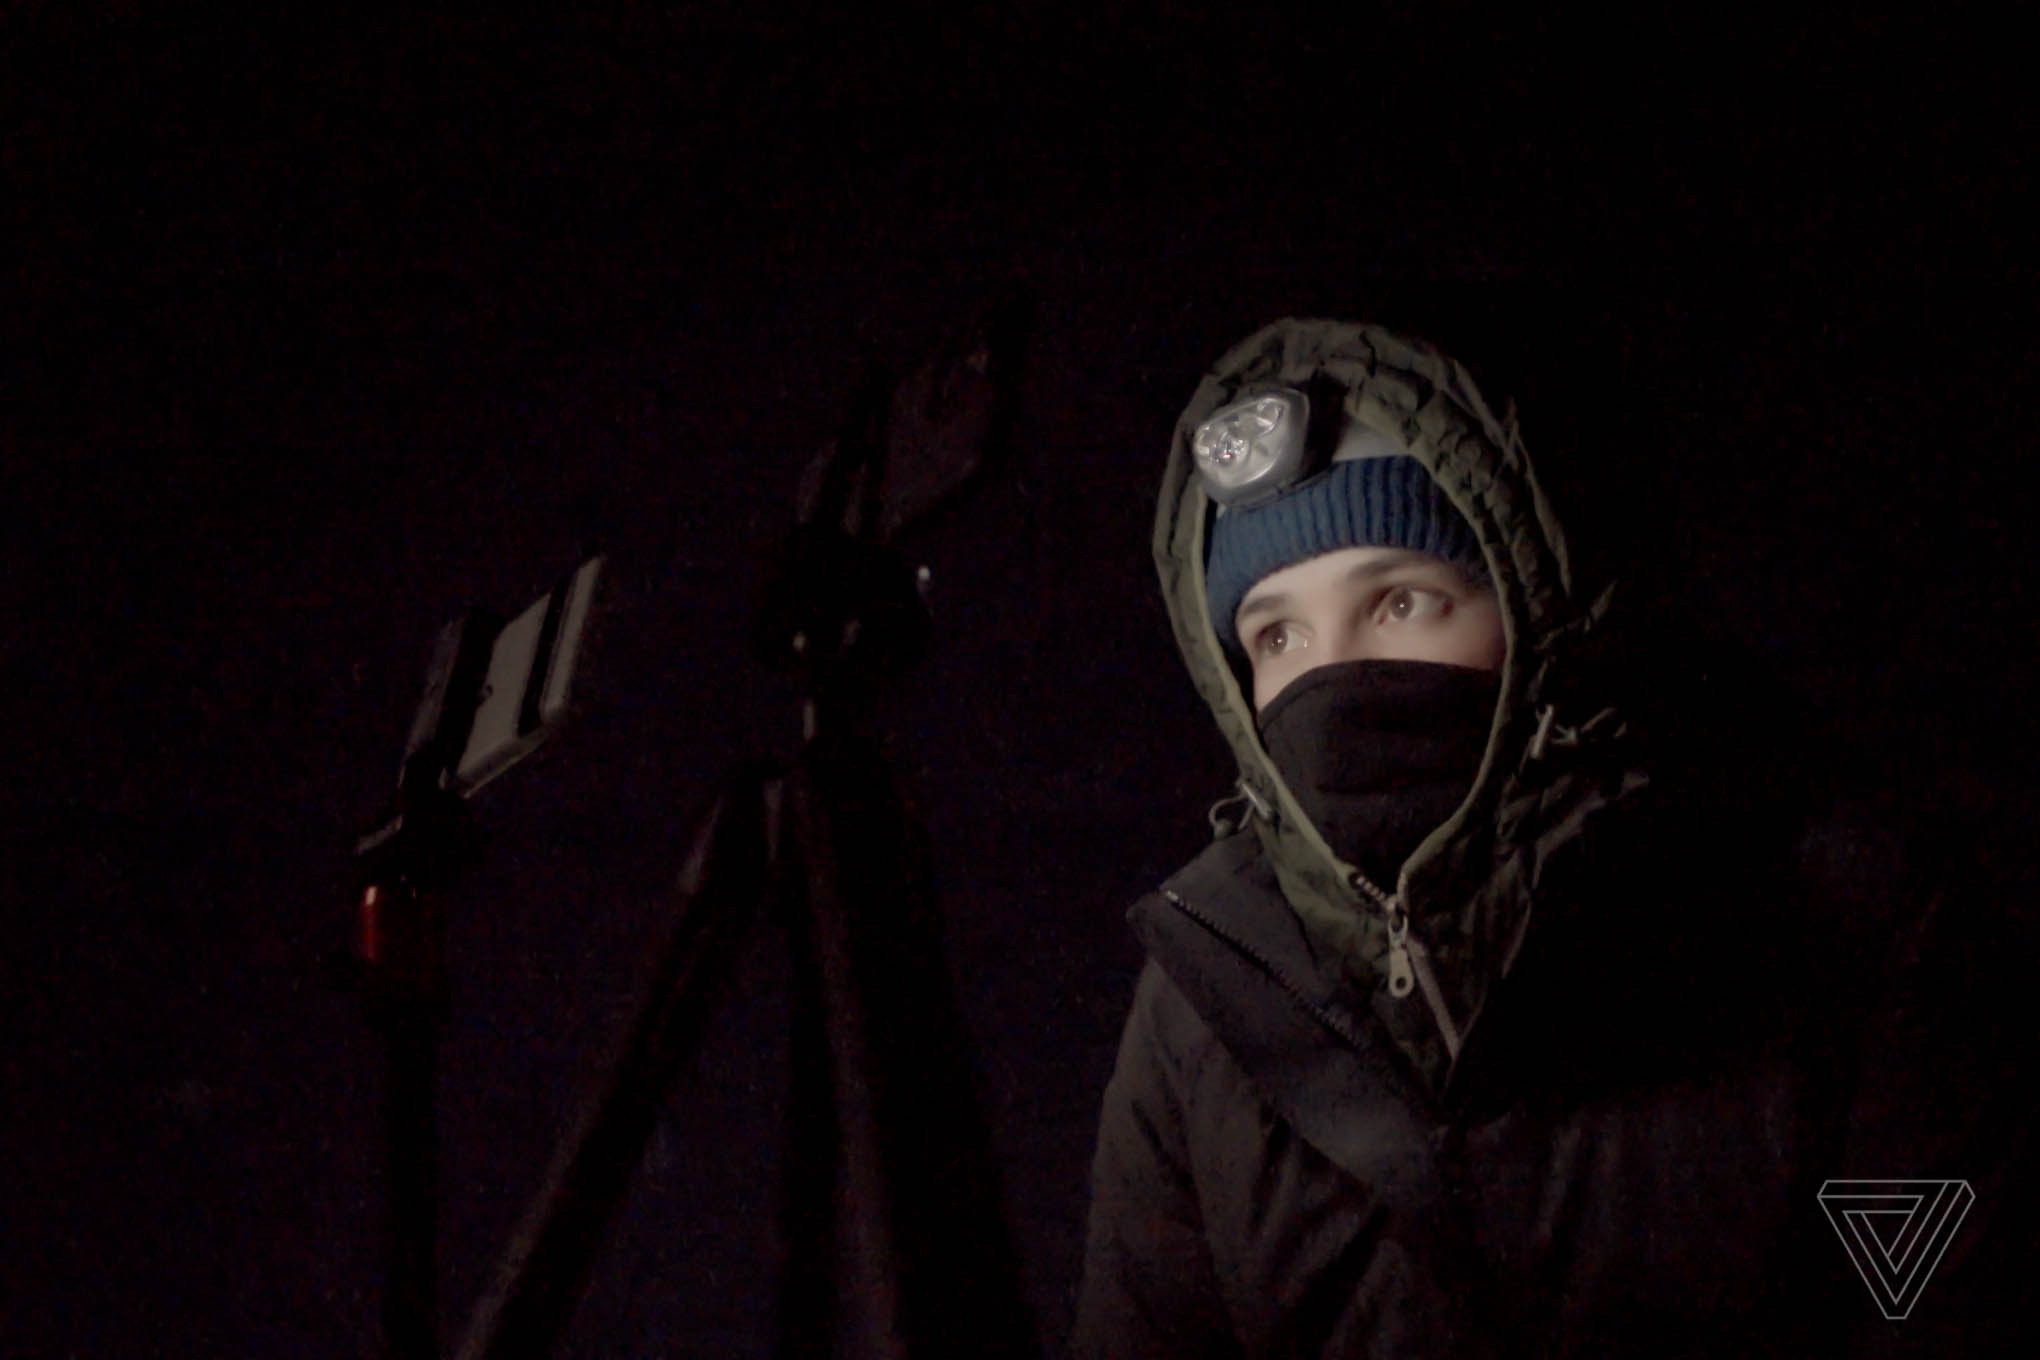 Explore astrophotography using the iPhone 13 Pro's night mode to capture stars
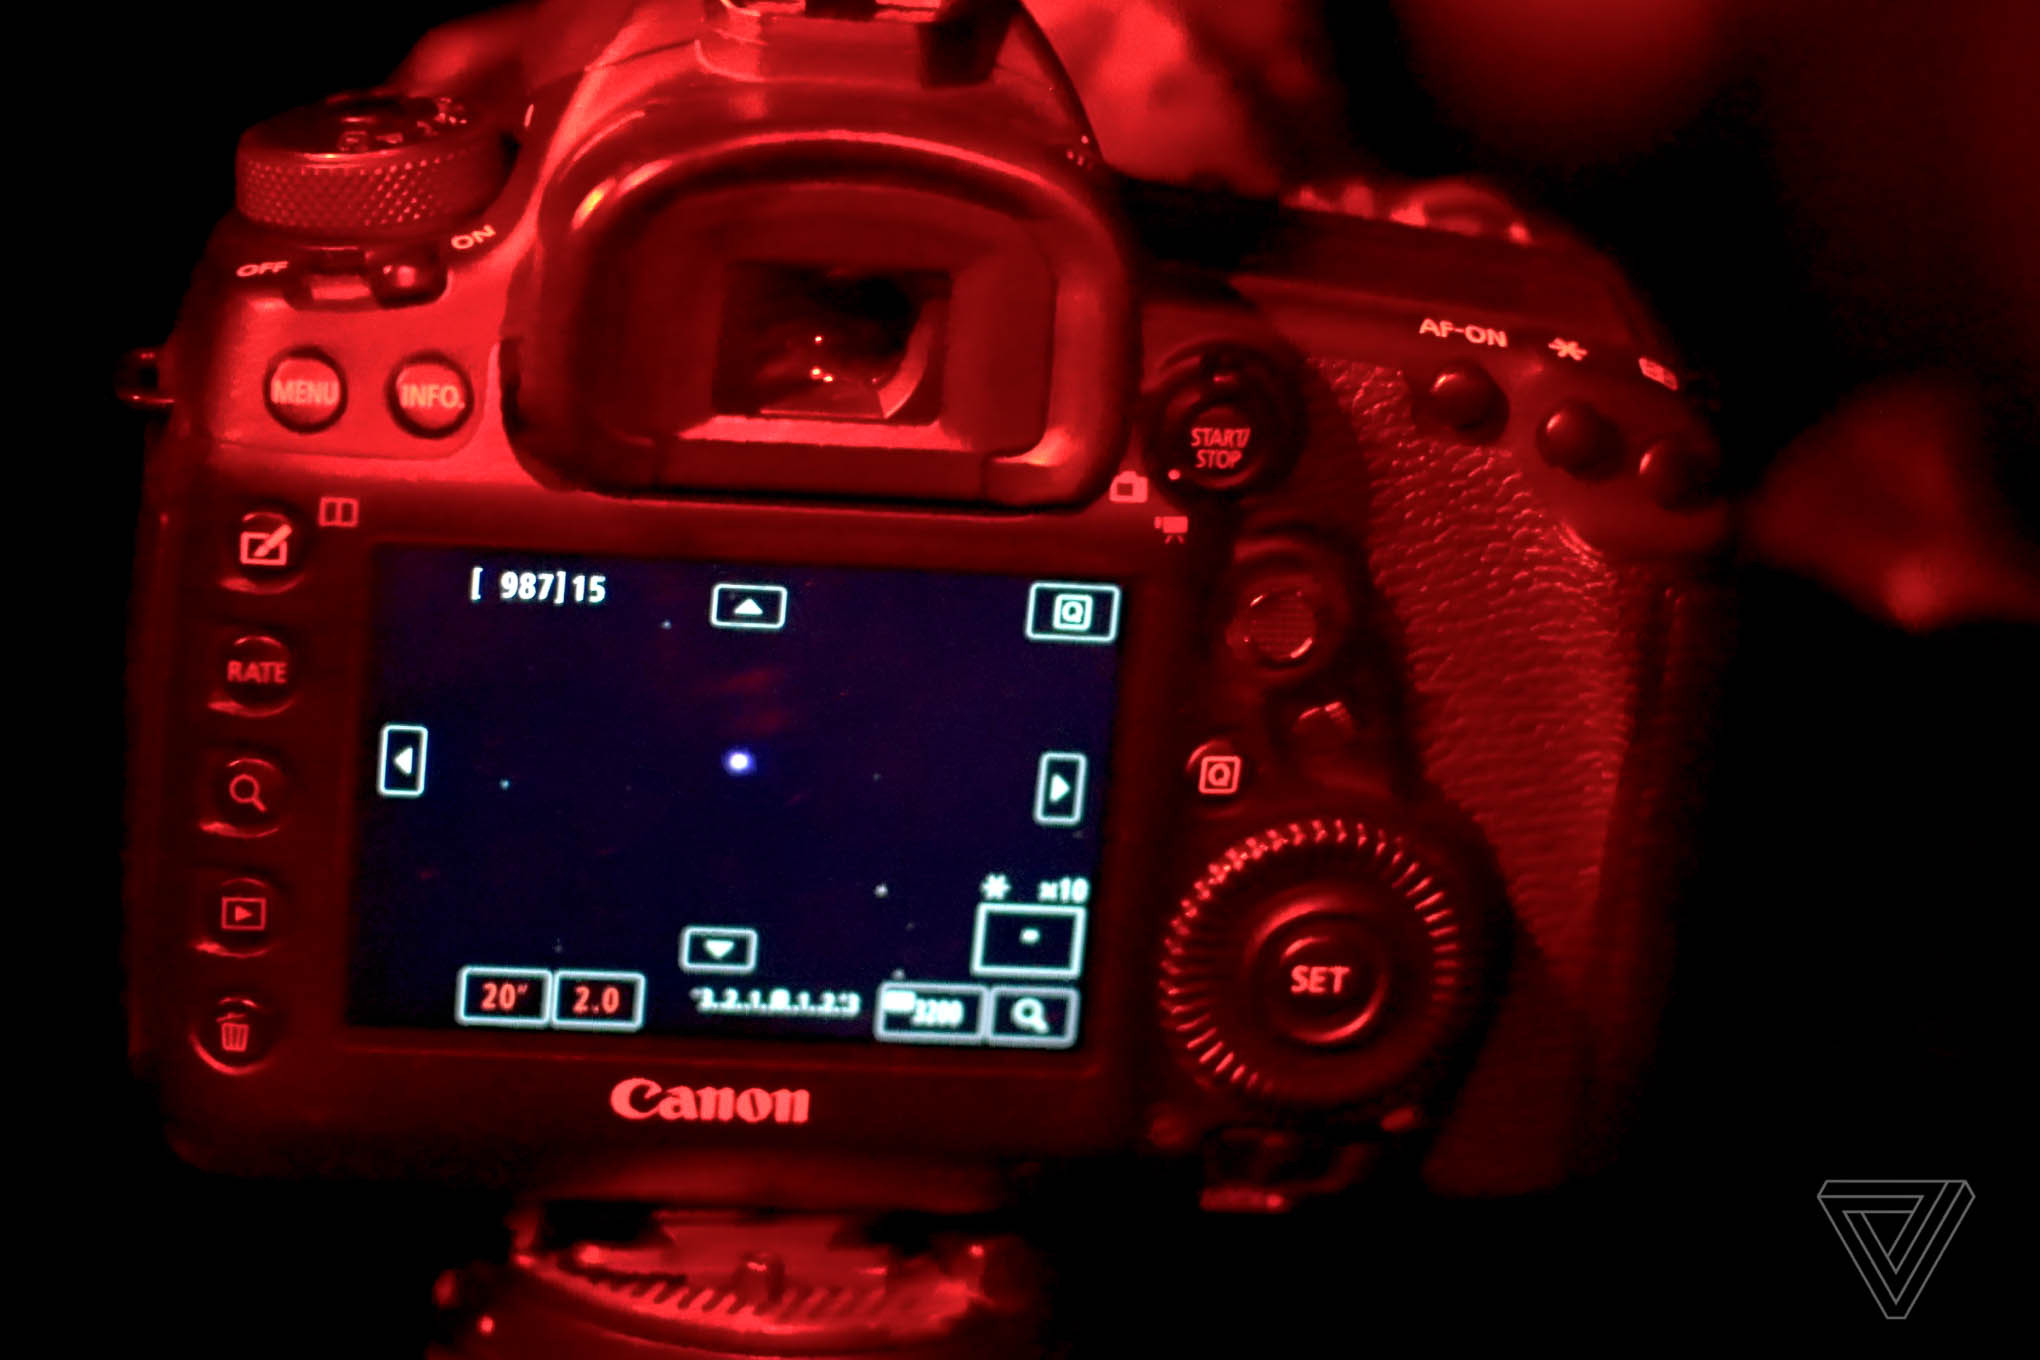 The iPhone 13 astrophotography demonstrates focusing techniques on distant celestial bodies