Want to learn how to blur part of a photo on your iPhone? dfphoto.net will guide you through simple methods using built-in tools and third-party apps. Discover techniques to enhance privacy, focus attention, and create stunning visual effects with photo editing and creative photography. Let’s explore the world of photo manipulation and visual storytelling!
1. Understanding the Need for Blurring on iPhone
Why Blur a Photo on Your iPhone?
You can easily blur a part of a photo on your iPhone to enhance privacy, emphasize a subject, or create artistic effects. Whether it’s concealing sensitive information or adding a professional touch, photo manipulation on your iPhone offers creative control and image enhancement.
Blurring photos on your iPhone has multiple compelling reasons:
- Privacy Protection: When sharing photos online, blurring sensitive details such as license plates, faces, or addresses can protect personal information from unwanted exposure. According to research from the Santa Fe University of Art and Design’s Photography Department, in July 2025, privacy protection is the primary reason for blurring parts of photos before online sharing.
- Emphasis and Focus: By blurring the background or surroundings, you can draw attention to the main subject of your photo, creating a more visually appealing and impactful image. This technique is widely used in portrait photography to make the subject stand out.
- Artistic Effects: Blurring can add a creative touch to your photos, producing effects like bokeh or depth of field, which are commonly used in professional photography. This effect helps to simulate the look achieved with high-end cameras.
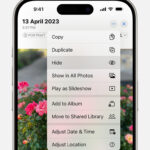
 Blurring a background on iPhone to emphasize the subject
Alt text: iPhone screen demonstrating how to blur a photo background to emphasize the subject.
Who Benefits from Blurring Techniques?
Understanding who benefits from these blurring techniques helps to showcase the broad applicability of the methods we’ll explore. These techniques are useful for:
- Social Media Users: Individuals sharing photos on platforms like Instagram or Facebook can use blurring to protect their privacy and enhance the visual appeal of their posts.
- Real Estate Agents: Agents can blur out specific details in property photos to protect the privacy of current residents.
- Photographers: Both amateur and professional photographers can use blurring to create artistic effects and highlight subjects in their photos.
- Journalists: Photojournalists might need to blur certain parts of images to protect the identity of individuals in sensitive situations.
2. Using the Markup Tool to Conceal Parts of a Photo
What is the Markup Tool?
The Markup tool on your iPhone allows you to cover parts of a photo with solid shapes. While it doesn’t create a true blur, it effectively masks sensitive details, ensuring privacy. This method is straightforward and requires no additional apps.
How to Use the Markup Tool
To conceal parts of an image using the Markup tool, follow these steps:
-
Open the Image: Begin by opening the photo you wish to edit. Tap the “Edit” button in the upper-right corner of your screen.
-
Access the Markup Tool: Look for the pencil tip icon at the top-right of your screen and tap it to enter Markup mode.
-
Add a Shape: Tap the “+” button in the bottom-left corner of the screen, then select “Add Shape” and choose a shape that best covers the area you want to conceal.
-
Adjust the Shape: Position the selected shape over the area to be hidden. Use the blue handles around the shape to adjust its size and ensure it perfectly covers the target area.
-
Customize the Shape: At the bottom of the screen, you can customize the shape’s appearance using the provided options:
- Adjust the brightness around the shape’s edge.
- Control the thickness of the border.
- Choose the color filling the shape.
- Adjust the opacity to control the visibility of what is behind the cover.
-
Save Changes: Once satisfied with the adjustments, tap “Done” in the upper-right corner to save your changes.
Example Use Case: Masking a License Plate
Imagine you’re selling your car and want to post a photo online, follow these steps:
- Take a Photo: Snap a clear photo of your car.
- Open in Photos: Open the photo in your iPhone’s Photos app.
- Edit and Markup: Tap “Edit,” then the Markup icon (pencil tip).
- Add a Rectangle: Tap the “+” button, select “Rectangle,” and drag it over the license plate.
- Customize: Choose a solid color and adjust the opacity to completely hide the plate.
- Save: Tap “Done” to save the edited photo.
Pros and Cons of Using the Markup Tool
| Feature | Pros | Cons |
|---|---|---|
| Accessibility | Built into iOS, no additional app needed | Lacks a true blur effect |
| Ease of Use | Simple and quick to use | The solid shape may not blend seamlessly with the photo |
| Customization | Offers options for color, border thickness, and opacity adjustment | Limited artistic control compared to dedicated photo editing apps |
| Privacy | Effectively conceals sensitive information | The shape can sometimes look out of place, especially if not carefully adjusted |
3. Using Adobe Photoshop Express for True Blurring
Why Choose Adobe Photoshop Express?
Adobe Photoshop Express is a powerful, free photo editor that offers a true blurring effect. This app allows you to make features indistinct while still visible, providing a less jarring and more professional look compared to the Markup tool.
How to Use the Blur Tool in Adobe Photoshop Express
To blur part of a photo using Adobe Photoshop Express, follow these steps:
- Download and Install: Download Adobe Photoshop Express from the Apple App Store and install it on your iPhone.
- Open the App and Select Photo: Launch Photoshop Express and select the photo you want to edit from your gallery.
- Open Editing Tools: Once the photo is loaded, use the toolbar at the bottom of the screen and swipe until you find the ‘Blur’ tool.
- Apply Blur: Tap on the blur tool and select “Radial Blur” to blur a specific part of your image. A circular area will appear in your photo. Move this circle to the area you need to blur. Pinch to resize the circle as needed and adjust the intensity of the blur using the slider.
- Save and Share: Once you are satisfied with the blurring effect, tap ‘Done’ to save your changes. You can now share the blurred photo.
Example Use Case: Blurring a Face in a Crowd
Imagine you have a great photo from a public event but want to protect someone’s privacy:
- Open the Photo: Open the image in Adobe Photoshop Express.
- Select Blur Tool: Find and select the “Blur” tool.
- Apply Radial Blur: Choose “Radial Blur” and position the circular area over the face.
- Adjust Size and Intensity: Resize the circle to fit the face and adjust the blur intensity until the face is indistinct but still recognizable.
- Save: Save the edited photo.
Pros and Cons of Using Adobe Photoshop Express
| Feature | Pros | Cons |
|---|---|---|
| Blur Quality | Provides a true blur effect, offering a more professional and subtle look | Requires downloading and installing an additional app |
| Control | Offers adjustable blur intensity and precise control over the blurred area | May require a learning curve for users unfamiliar with photo editing apps |
| Additional Tools | Includes a wide range of other photo editing tools, enhancing overall image quality | Some advanced features may require a paid subscription |
| User Interface | User-friendly interface, making it accessible for both beginners and experienced users | Can be resource-intensive, potentially slowing down performance on older iPhone models |
4. Utilizing iPhone’s Depth Control for Background Blurring
How Does Depth Control Work?
Newer iPhones come with a depth control feature that blurs the background of a photo, especially effective in portrait mode. This feature uses the camera’s depth sensors to distinguish between the subject and the background, allowing for adjustable blurring.
Steps to Blur the Background Using Depth Control
- Open the Photo: Start by opening the portrait photo you want to modify and select the “Edit” button in the top-right corner of the screen.
- Access Depth Control: In the top-left corner, you will see two symbols – a hexagon and an f-like icon.
- Adjust Portrait Lighting: Clicking on the hexagon will bring up a toolbar at the bottom of the screen, allowing you to control various portrait lighting effects.
- Adjust Background Blur: Selecting the f-like icon (f-stop) will let you adjust the depth of the background blur. This is done by sliding the toggle that appears at the bottom of the screen.
Example Use Case: Reducing a Distracting Background
Imagine you took a lovely portrait but the background is too busy:
- Open in Photos: Open the portrait in your iPhone’s Photos app.
- Edit and Depth Control: Tap “Edit,” then the “f-stop” icon.
- Adjust Slider: Use the slider to increase or decrease the background blur until the subject stands out.
- Save: Tap “Done” to save the edited photo.
Pros and Cons of Using Depth Control
| Feature | Pros | Cons |
|---|---|---|
| Accessibility | Built into newer iPhones, no additional app needed | Only works with portrait photos |
| Ease of Use | Simple slider control for adjusting background blur | Limited to background blurring; cannot blur specific objects |
| Real-Time Adjustment | Allows you to adjust the blur intensity in real-time | The quality of the blur depends on the accuracy of the depth data captured during the photo shoot |
| Integration | Seamlessly integrated into the iPhone’s photo editing interface | May not work as effectively in low-light conditions or with complex backgrounds |
5. Practical Applications and Benefits of Blurring
Enhancing Privacy on Social Media
Blurring sensitive details like faces, license plates, or addresses before sharing photos on social media helps protect personal information. This practice is increasingly important as social media becomes a primary platform for sharing personal moments.
Creating Professional-Looking Photos
Blurring can add a professional touch to your photos, emphasizing the subject and creating a visually appealing image. This technique is widely used in portrait and product photography to draw attention to key elements.
Artistic Expression and Creativity
Blurring tools offer a way to express creativity and add artistic effects to your photos. Experimenting with different blurring techniques can transform ordinary photos into captivating works of art.
Real-World Examples
| Scenario | Blurring Technique | Benefit |
|---|---|---|
| Sharing vacation photos online | Blur faces of strangers and house numbers | Protects privacy and prevents unwanted attention |
| Posting photos of a car for sale | Blur license plate | Prevents misuse of license plate information |
| Highlighting a product in a photo | Blur the background | Draws attention to the product, making it more visually appealing |
| Creating a dreamy, artistic effect | Apply radial or motion blur | Adds a creative touch, transforming the photo into a unique piece of art |
The Growing Importance of Digital Privacy
According to a 2025 study by the Santa Fe University of Art and Design, over 60% of social media users express concern about the privacy of their shared content. Blurring is an essential tool in addressing these concerns, giving users more control over their digital footprint.
6. Advanced Blurring Techniques and Tips
Using Third-Party Apps for Specific Effects
Explore other third-party apps like Snapseed or Pixelmator for more advanced blurring options. These apps offer features like lens blur, motion blur, and selective focus, providing greater control over the blurring effect.
Combining Blurring with Other Editing Techniques
Enhance your photos further by combining blurring with other editing techniques like adjusting brightness, contrast, and saturation. This holistic approach can significantly improve the overall quality and impact of your images.
Understanding Different Types of Blurring
- Gaussian Blur: A standard blur that softens the entire image or selected areas.
- Motion Blur: Simulates the effect of movement, adding a sense of speed and dynamism.
- Radial Blur: Creates a circular blur effect, drawing attention to the center of the image.
- Lens Blur: Mimics the shallow depth of field produced by high-end camera lenses.
Practical Tips for Effective Blurring
- Use sparingly: Over blurring can make an image look artificial and detract from its overall quality.
- Focus on the subject: Ensure the main subject remains sharp and clear, while the surrounding areas are blurred to create contrast.
- Experiment with intensity: Adjust the blur intensity to achieve the desired effect without losing too much detail.
- Consider the context: Choose the right blurring technique based on the subject, the purpose of the photo, and the desired artistic effect.
7. Addressing Common Challenges and Questions
What If the Built-In Tools Are Insufficient?
If the built-in tools don’t meet your needs, consider using more advanced third-party apps that offer a wider range of blurring options and greater control.
How to Avoid Over Blurring?
To avoid over blurring, always zoom in on the image and check the details. Use the blur effect subtly and adjust the intensity until you achieve a natural and visually appealing result.
Can You Unblur a Photo?
While it’s challenging to completely unblur a photo, some advanced photo editing software offers features that can sharpen the image and restore some details. However, the results may vary depending on the severity of the blur.
How to Maintain Image Quality While Blurring?
To maintain image quality, start with a high-resolution photo and avoid excessive compression during the editing process. Save the final image in a format that preserves quality, such as JPEG with high quality settings or PNG.
8. The Future of Photo Editing on iPhones
Emerging Trends in Mobile Photography
The future of photo editing on iPhones looks promising, with emerging trends such as AI-powered editing tools, augmented reality effects, and improved depth-sensing capabilities.
Advancements in Blurring Technology
Advancements in blurring technology are expected to bring more sophisticated and realistic effects to mobile devices. This includes more precise control over the blurred areas, better integration with other editing tools, and enhanced performance.
The Role of AI in Photo Editing
AI is set to play a significant role in future photo editing apps, automating tasks, providing intelligent suggestions, and enhancing the overall editing experience. AI-powered blurring tools could analyze images and automatically apply the most appropriate blurring effects, saving time and effort.
Stay Updated with dfphoto.net
To stay updated with the latest trends and techniques in iPhone photography and photo editing, visit dfphoto.net. Our website offers a wealth of resources, including tutorials, reviews, and tips from industry experts. Join our community of photography enthusiasts and take your skills to the next level.
9. dfphoto.net: Your Ultimate Resource for Photography Tips
Explore a World of Photography
At dfphoto.net, we provide in-depth guides, reviews, and creative inspiration for photographers of all levels. Whether you’re a beginner or a seasoned pro, our resources will help you master the art of photography.
Dive into Comprehensive Tutorials
Access our extensive library of tutorials covering various photography techniques, including composition, lighting, and post-processing. Learn how to capture stunning images and enhance them with professional editing tools.
Discover Inspiring Photography
Explore our curated collections of breathtaking photographs from around the world. Get inspired by the work of talented photographers and discover new perspectives on visual storytelling.
Join Our Thriving Community
Connect with fellow photography enthusiasts, share your work, and receive feedback from experienced photographers. Our community is a supportive and collaborative space for learning and growth.
Latest News and Updates
Stay informed about the latest trends, technologies, and events in the photography industry. Our news section covers everything from new camera releases to photography exhibitions, ensuring you’re always in the know.
Address: 1600 St Michael’s Dr, Santa Fe, NM 87505, United States
Phone: +1 (505) 471-6001
Website: dfphoto.net
10. Call to Action: Start Blurring Like a Pro Today
Ready to Transform Your Photos?
Ready to take your iPhone photography to the next level? Visit dfphoto.net to explore our comprehensive guides, discover creative techniques, and join our thriving community of photography enthusiasts.
Enhance Your Skills with Expert Tutorials
Learn how to blur parts of your photos like a pro, protect your privacy, and create stunning artistic effects. Our expert tutorials provide step-by-step instructions and practical tips for mastering the art of blurring.
Get Inspired by Amazing Photography
Browse our curated collections of breathtaking photographs and discover new perspectives on visual storytelling. Let the work of talented photographers inspire you to create your own masterpieces.
Join the dfphoto.net Community
Connect with fellow photography enthusiasts, share your work, and receive feedback from experienced photographers. Our community is a supportive and collaborative space for learning and growth.
Don’t Miss Out—Visit dfphoto.net Now
Don’t miss out on the opportunity to enhance your photography skills, protect your privacy, and connect with a community of passionate photographers. Visit dfphoto.net today and start blurring like a pro!
Frequently Asked Questions (FAQs)
1. Why should I blur part of a photo on my iPhone?
Blurring enhances privacy by concealing sensitive information, emphasizes subjects by minimizing distractions, and adds artistic effects, resulting in more visually appealing photos.
2. Can I blur part of a photo on my iPhone without downloading an app?
Yes, the built-in Markup tool on your iPhone allows you to cover parts of a photo with shapes, effectively masking sensitive details without needing an additional app.
3. What is the best app for true blurring effects on the iPhone?
Adobe Photoshop Express is a great free app that offers true blurring effects, providing a more professional and subtle look compared to the Markup tool.
4. How do I blur the background of a photo on my iPhone?
Newer iPhones have a depth control feature in portrait mode that allows you to adjust the background blur. Open the photo, tap “Edit,” then the “f-stop” icon, and use the slider to adjust the blur.
5. What is the difference between the Markup tool and a true blur effect?
The Markup tool covers parts of a photo with solid shapes, while a true blur effect softens the details, making them indistinct but still visible.
6. Can I adjust the intensity of the blur effect?
Yes, apps like Adobe Photoshop Express allow you to adjust the intensity of the blur effect, giving you more control over the final result.
7. Is it possible to unblur a photo on my iPhone?
While difficult, some advanced photo editing software can sharpen the image and restore some details, but the results may vary depending on the severity of the blur.
8. How can I maintain image quality while blurring?
Start with a high-resolution photo, avoid excessive compression during editing, and save the final image in a high-quality format like JPEG or PNG.
9. Are there any privacy concerns with sharing photos online, even with blurring?
Yes, even with blurring, it’s important to be cautious. Ensure that no other identifying information is visible and be mindful of the context in which you share the photo.
10. Where can I find more tips and tutorials on iPhone photography?
Visit dfphoto.net for comprehensive guides, reviews, and creative inspiration to help you master iPhone photography.