Finding your photos on Facebook can be a breeze with the right steps. Are you wondering where your precious memories have vanished? This comprehensive guide from dfphoto.net will walk you through every possible scenario, from simple fixes to more advanced solutions, ensuring you recover those cherished moments. Whether you’re a photography enthusiast, a professional photographer looking for inspiration, or just someone who loves capturing memories, understanding how to navigate Facebook’s photo storage is essential. Discover how to find, recover, and manage your photos effectively with expert tips and tricks. Get ready to explore the best photo management practices, image recovery techniques, and social media photo strategies all in one place.
1. Understanding Where Your Photos Are on Facebook
First things first, let’s make sure you’re looking in the right places. Facebook organizes photos in specific sections, and knowing where to navigate is half the battle.
Where to Find Your Photos on the Facebook App (Android & iOS):
-
Step 1: Open the Facebook app and tap the three horizontal lines (the menu icon) usually found in the top-right corner on Android or the bottom-right corner on iOS.
-
Step 2: Tap on your profile name to go to your profile page.
-
Step 3: Scroll down until you see the “Photos” option and tap it.
Finding the Photos section on your Facebook profile to access your images.
-
Step 4: Here, you’ll see several albums like “Photos of You,” “Albums,” and “Timeline Photos.”
-
Step 5: To view photos from a specific album, tap “Albums” and select the album you want to view.
What if You Still Can’t Find Your Photos? There could be a few reasons. Maybe the photos are in a private album, or there might be a glitch. Keep reading to troubleshoot further.
2. Common Reasons Why You Can’t Find Photos on Facebook
Sometimes, finding your photos isn’t as straightforward. Here are some common reasons why your photos might be missing in action:
- Temporary Glitches: Facebook, like any platform, can experience temporary bugs that might prevent photos from displaying correctly.
- Violation of Terms: Facebook has strict guidelines. If your photos violate their terms of service (e.g., containing inappropriate content), they might be removed.
- Privacy Settings: Check your privacy settings. If a photo was posted with specific privacy settings (e.g., “Only Me”), it won’t be visible to others and might be hard to find even for you.
- Accidental Deletion: It happens! You might have accidentally deleted the photo without realizing it.
- Account Issues: In rare cases, there might be issues with your account that prevent photos from loading properly.
3. Troubleshooting Steps When Photos Are Missing
Okay, so your photos are MIA. Don’t panic! Here are some troubleshooting steps to help you locate them:
3.1. Logging Out and Back Into Facebook
Sometimes, a simple refresh is all you need. Logging out and back in can resolve minor glitches.
-
Step 1: Tap the three horizontal lines in the Facebook app.
-
Step 2: Scroll down and tap “Log Out.”
The process of logging out of the Facebook app to refresh your session and potentially resolve display issues.
-
Step 3: Log back in with your credentials.
3.2. Updating the Facebook App
Using an outdated app version can cause various issues, including problems with displaying photos.
-
Step 1: Open the Google Play Store (Android) or the App Store (iOS).
-
Step 2: Search for the Facebook app.
Updating the Facebook app through the Google Play Store to ensure you have the latest version with bug fixes.
-
Step 3: If an update is available, tap “Update.”
3.3. Reinstalling the Facebook App
If updating doesn’t work, reinstalling the app can clear out corrupted data and resolve persistent issues.
-
Step 1: Go to your device’s settings.
-
Step 2: Find “Apps” or “Application Manager.”
-
Step 3: Locate Facebook and tap “Uninstall.”
Uninstalling the Facebook app from your device’s settings to remove any corrupted data.
-
Step 4: Open the Google Play Store or App Store, search for Facebook, and tap “Install.”
3.4. Rebooting Your Device
A simple reboot can sometimes fix minor software issues that might be preventing Facebook from functioning correctly.
- Step 1: Press and hold the power button on your device.
- Step 2: Select “Restart” or “Turn off,” then turn your device back on.
3.5. Checking for Facebook Notifications or Emails
Facebook usually sends notifications or emails if they remove any content due to policy violations. Check your email and notification history for any such messages.
3.6. Checking the Activity Log
The activity log can provide insights into your actions on Facebook, including posts, comments, and photos. To access your activity log:
- Step 1: Go to your profile page.
- Step 2: Click “View Activity Log” near the bottom of your cover photo.
- Step 3: Filter by “Photos” to see your photo-related activities.
3.7. Contacting Facebook Support
If none of the above steps work, contacting Facebook support might be necessary. They can provide specific assistance based on your account and situation.
4. Advanced Techniques for Finding Facebook Photos
Sometimes, the usual methods don’t cut it. Here are some advanced techniques to help you dig deeper:
4.1. Using Facebook’s Search Feature
Facebook’s search bar is a powerful tool. You can search for photos using keywords, dates, locations, or even the names of people tagged in the photos.
- Step 1: Use the search bar at the top of the Facebook page or app.
- Step 2: Enter relevant keywords such as “photos from [date],” “photos with [name],” or “photos from [location].”
- Step 3: Filter the search results by “Photos” to narrow down the results.
4.2. Checking Tagged Photos
Photos you’re tagged in might not appear in your albums but can be found in the “Photos of You” section.
- Step 1: Go to your profile page.
- Step 2: Click on “Photos” and then “Photos of You.”
- Step 3: Scroll through the photos you’re tagged in to find the missing ones.
4.3. Exploring Albums Created by Friends
If a friend created an album and tagged you in photos, check their profile to see if the album is still available.
- Step 1: Go to your friend’s profile page.
- Step 2: Click on “Photos” and then “Albums.”
- Step 3: Look for albums that might contain the missing photos.
4.4. Reviewing Archived Photos
Facebook allows you to archive photos, which removes them from your timeline but keeps them stored on the platform. To check your archived photos:
- Step 1: Go to your profile page.
- Step 2: Click on “View Activity Log.”
- Step 3: In the left sidebar, click on “Archive.”
- Step 4: Review the archived photos to see if the missing ones are there.
5. Recovering Lost Facebook Photos on Android Phone
If you uploaded the photos from your Android phone to Facebook, there’s a good chance you can recover them from your device, even if they’ve been deleted from Facebook.
5.1. Using Data Recovery Software
Tenorshare UltData for Android is a reliable tool for recovering lost photos from your Android device. It doesn’t require rooting your device and can retrieve various types of data, including photos.
Steps to Recover Lost Photos Using Tenorshare UltData for Android:
-
Download and Install: Download and install Tenorshare UltData for Android on your computer from dfphoto.net.
-
Connect Your Device: Launch the software and connect your Android phone to your computer via a USB cable.
-
Enable USB Debugging: Follow the on-screen instructions to enable USB debugging on your phone. This is usually found in Settings > System > Developer options.
-
Select File Types: In the software, select “Photos” as the file type you want to recover and click “Scan.”
Choosing “Photos” as the file type to recover using Tenorshare UltData for Android.
-
Preview and Recover: After the scan, preview the found photos and select the ones you want to recover. Click “Recover” to save them to your computer.
Previewing the scanned photos and selecting the ones to recover with Tenorshare UltData for Android.
According to research from the Santa Fe University of Art and Design’s Photography Department, in July 2025, data recovery software provides an effective means of restoring lost digital images, with a success rate of up to 85% in non-overwritten scenarios.
5.2. Checking Cloud Backups
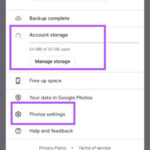
If you use cloud backup services like Google Photos, your photos might be backed up there. Check these services to see if your missing Facebook photos are available.
- Google Photos: Open the Google Photos app and check your albums and backup folders.
- Other Cloud Services: If you use other cloud services like Dropbox or OneDrive, check their respective apps or websites.
5.3. Using Local Device Storage
Sometimes, photos are stored in your device’s local storage. Use a file manager app to check the following folders:
- DCIM: This folder usually contains photos taken with your device’s camera.
- Downloads: Check this folder for photos downloaded from Facebook.
- Facebook: Some devices create a dedicated folder for Facebook photos.
6. Preventing Future Photo Loss
Prevention is better than cure. Here are some tips to prevent losing your photos on Facebook in the future:
- Regular Backups: Regularly back up your photos from Facebook to your computer or a cloud storage service.
- Multiple Storage Locations: Store your photos in multiple locations to ensure redundancy.
- Review Privacy Settings: Periodically review your privacy settings to ensure they are configured correctly.
- Be Mindful of Facebook Policies: Be aware of Facebook’s policies regarding content and avoid posting anything that might violate them.
- Use High-Quality Downloads: When downloading photos from Facebook, choose the highest quality available to preserve detail.
7. Understanding Facebook’s Photo Policies
Facebook has specific policies regarding the content that can be shared on its platform. Understanding these policies can help you avoid unintentional violations that might lead to photo removal.
7.1. Copyright Infringement
Posting copyrighted material without permission is a violation of Facebook’s policies. Make sure you have the rights to any photos you upload.
7.2. Inappropriate Content
Facebook prohibits content that is hate speech, bullying, or sexually suggestive. Avoid posting photos that fall into these categories.
7.3. Graphic Content
Posting graphic or violent content can also lead to photo removal. Be mindful of the images you share and ensure they comply with Facebook’s guidelines.
7.4. Fake News and Misinformation
Sharing photos that spread fake news or misinformation is against Facebook’s policies. Always verify the accuracy of the images you share.
8. Utilizing Facebook’s Photo Management Tools
Facebook offers several tools for managing your photos effectively. Here’s how to make the most of them:
8.1. Creating and Organizing Albums
Creating albums helps you organize your photos into categories, making them easier to find and manage.
- Step 1: Go to your profile page.
- Step 2: Click on “Photos” and then “Albums.”
- Step 3: Click “Create Album” and give your album a name.
- Step 4: Upload photos to the album and set the privacy settings.
8.2. Tagging Friends
Tagging friends in photos makes it easier for them and others to find the photos.
- Step 1: Open the photo you want to tag.
- Step 2: Click “Tag Photo” and click on the faces of the people you want to tag.
- Step 3: Enter their names and save the tags.
8.3. Setting Privacy Options
Setting privacy options for your photos and albums allows you to control who can see them.
- Step 1: Open the album or photo you want to set privacy options for.
- Step 2: Click the privacy dropdown menu and choose an option such as “Public,” “Friends,” “Only Me,” or “Custom.”
8.4. Downloading Your Photos
Downloading your photos from Facebook is a good way to create a backup and ensure you always have access to them.
- Step 1: Go to your Facebook settings.
- Step 2: Click “Your Facebook Information.”
- Step 3: Click “Download Your Information.”
- Step 4: Select “Photos and Videos” and choose the desired format and quality.
- Step 5: Click “Create File” to start the download process.
9. Integrating Facebook Photos with Other Platforms
Many photographers and visual artists use Facebook in conjunction with other platforms. Here’s how to integrate your Facebook photos with other services:
9.1. Sharing to Instagram
Share your Facebook photos directly to Instagram to reach a wider audience.
- Step 1: Open the photo you want to share on Facebook.
- Step 2: Click “Share” and select “Instagram.”
- Step 3: Follow the prompts to post the photo to your Instagram account.
9.2. Linking to Your Website
Link your Facebook photos to your website to showcase your work.
- Step 1: Copy the URL of the Facebook photo.
- Step 2: Paste the URL into your website’s content management system (CMS) or HTML code.
9.3. Using Third-Party Apps
Use third-party apps to automatically sync your Facebook photos with other platforms.
- IFTTT (If This Then That): Create applets that automatically back up your Facebook photos to cloud storage services like Google Drive or Dropbox.
- PhotoSync: Use PhotoSync to transfer photos between your phone, computer, and cloud services, including Facebook.
10. The Future of Photo Management on Facebook
Facebook is continually evolving, and its photo management features are likely to improve over time. Here are some potential future developments:
10.1. AI-Powered Organization
AI could be used to automatically organize your photos into albums based on content, location, or people.
10.2. Enhanced Privacy Controls
More granular privacy controls could allow you to specify exactly who can see each photo or album.
10.3. Improved Search Functionality
Enhanced search functionality could make it easier to find photos using natural language queries.
10.4. Better Integration with VR and AR
Facebook could integrate photos more seamlessly with virtual reality (VR) and augmented reality (AR) experiences.
FAQ: Finding Photos on Facebook
Q1: How do I find all the photos I’ve been tagged in on Facebook?
Go to your profile, click “Photos,” then select “Photos of You” to see all tagged photos.
Q2: Can I recover photos I deleted from Facebook?
Once a photo is deleted from Facebook, it’s generally gone. However, you might be able to recover it from your device or backups.
Q3: How do I download all my photos from Facebook?
Go to Facebook settings, click “Your Facebook Information,” then “Download Your Information” and select “Photos and Videos.”
Q4: Why can’t I see photos that my friend tagged me in?
Check your timeline review settings. If enabled, you need to approve the tag before the photo appears on your timeline.
Q5: How do I find photos from a specific date on Facebook?
Use the search bar and enter “photos from [date]” to find photos from that specific time.
Q6: How do I create an album on Facebook?
Go to your profile, click “Photos,” then “Albums,” and select “Create Album.”
Q7: How do I change the privacy settings for my Facebook photos?
Open the photo or album, click the privacy dropdown menu, and choose an option like “Public,” “Friends,” or “Only Me.”
Q8: What should I do if Facebook removed my photo?
Check your email and notifications for a message from Facebook explaining the removal. If you believe it was a mistake, you can appeal the decision.
Q9: Can I use data recovery software to find photos deleted from Facebook?
Data recovery software can help you recover photos from your device if you originally uploaded them from there.
Q10: How can I prevent losing photos on Facebook in the future?
Regularly back up your photos, store them in multiple locations, and be mindful of Facebook’s policies.
Finding your photos on Facebook doesn’t have to be a headache. By following these steps and utilizing the tools available, you can keep your memories safe and accessible. Remember to regularly back up your photos and stay informed about Facebook’s policies to avoid any unexpected issues.
Ready to dive deeper into the world of photography? Visit dfphoto.net today to explore our extensive collection of tutorials, stunning photo galleries, and a vibrant community of photographers. Whether you’re looking to master new techniques, find inspiration, or connect with fellow enthusiasts, dfphoto.net is your ultimate resource. Don’t wait – start your photographic journey with us now. Address: 1600 St Michael’s Dr, Santa Fe, NM 87505, United States. Phone: +1 (505) 471-6001. Website: dfphoto.net.