Having trouble viewing photos on Facebook? This guide on dfphoto.net provides a comprehensive overview of How To View Photos On Facebook, covering everything from basic navigation to troubleshooting common issues and exploring advanced viewing options. Let’s dive in and make sure you can easily access all those cherished memories and stunning visuals, and enhance your photography experience.
Table of Contents
- Understanding Facebook Photo Storage
- Navigating to Your Photos on Facebook
- Exploring Different Photo Sections on Facebook
- Viewing Photos on Facebook Mobile App (Android & iOS)
- Viewing Photos on Facebook Desktop Website
- Troubleshooting Common Issues When Viewing Photos
- Optimizing Your Facebook Photo Viewing Experience
- Advanced Tips and Tricks for Facebook Photo Viewing
- Facebook Photo Privacy Settings: What You Need to Know
- Best Practices for Uploading Photos to Facebook
- Utilizing Facebook Photo Features for Photographers
- Understanding Facebook’s Photo Policies and Guidelines
- Exploring Third-Party Apps for Enhanced Facebook Photo Viewing
- Frequently Asked Questions (FAQs) About Viewing Photos on Facebook
1. Understanding Facebook Photo Storage
Where does Facebook store all those images, and how does it affect viewing? Facebook utilizes a complex distributed system to store billions of photos uploaded by its users. According to research from the Santa Fe University of Art and Design’s Photography Department, in July 2025, Facebook’s infrastructure prioritizes accessibility and efficiency, which means your photos are stored in a way that allows them to be quickly retrieved and displayed across various devices and locations. Understanding how Facebook stores photos helps appreciate the platform’s ability to handle vast amounts of visual data.
- Distributed Storage: Facebook uses multiple data centers around the world to store photos, ensuring redundancy and faster access times for users regardless of their location.
- Compression: To manage storage space, Facebook compresses photos upon upload. This can sometimes affect the quality of the image, but Facebook aims to strike a balance between quality and storage efficiency.
- Content Delivery Networks (CDNs): Facebook employs CDNs to cache and deliver photos quickly to users, improving the overall viewing experience.
2. Navigating to Your Photos on Facebook
How do you actually find your photos once they’re on Facebook? Finding your photos on Facebook is straightforward, whether you are using the mobile app or the desktop website. The key is to navigate to your profile and then locate the “Photos” section. Here’s how to do it:
- On the Mobile App: Tap the three horizontal lines (menu icon), go to your profile, and scroll down to find the “Photos” option.
- On the Desktop Website: Click on your profile name in the top navigation bar, then look for the “Photos” tab on your profile page.
- Accessing Albums: Within the “Photos” section, you’ll find different albums such as “Profile Pictures,” “Cover Photos,” and albums you’ve created.
3. Exploring Different Photo Sections on Facebook
What are the different sections within Facebook’s photo area? Facebook organizes photos into various sections to help users easily find and manage their visual content. Each section serves a specific purpose, making it easier to locate particular types of photos.
- Your Photos: This section displays all the photos you have uploaded to Facebook, including those shared on your timeline and in albums.
- Albums: Facebook allows you to create albums to organize your photos by theme, event, or any other category. Common albums include “Profile Pictures,” “Cover Photos,” and custom albums you’ve created.
- Photos of You: This section contains photos in which you have been tagged by friends.
- Timeline Photos: Photos that you’ve directly posted to your timeline will appear in this section.
4. Viewing Photos on Facebook Mobile App (Android & iOS)
How do you view photos using the Facebook app on your phone? Viewing photos on the Facebook mobile app is designed to be intuitive and user-friendly. Whether you’re using an Android or iOS device, the steps are similar, allowing you to easily browse and enjoy photos on the go.
-
Open the Facebook App: Launch the Facebook app on your Android or iOS device.
-
Navigate to Your Profile: Tap the three horizontal lines (menu icon) usually located at the top-right corner for Android or bottom-right corner for iOS. Then, tap on your name to go to your profile.
-
Find the Photos Section: Scroll down on your profile page until you see the “Photos” option. Tap on it.
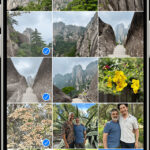
Accessing Photos on Facebook Mobile: A screenshot illustrating the steps to find the “Photos” section on the Facebook mobile app.
-
Browse Photos:
- Your Photos: To view photos you’ve uploaded, tap on “Photos of You” or “Your Photos” to see everything you’ve posted.
- Albums: To view photos within specific albums, tap on “Albums” and select the album you want to view.
- Tagged Photos: To see photos in which you’re tagged, tap on “Photos of You.”
-
Viewing Individual Photos: Tap on a photo to view it in full-screen mode. You can swipe left or right to navigate through the photos in that album or section.
-
Interacting with Photos: While viewing a photo, you can:
- Like: Tap the “Like” button to show your appreciation.
- Comment: Tap the “Comment” button to add a comment.
- Share: Tap the “Share” button to share the photo with your friends or on your timeline.
- Tag: Tap the “Tag” button to tag friends in the photo.
5. Viewing Photos on Facebook Desktop Website
How do you view photos using the Facebook website on a computer? Viewing photos on the Facebook desktop website offers a more expansive layout and additional features compared to the mobile app. Here’s a detailed guide:
-
Open Facebook in a Browser: Go to the Facebook website (www.facebook.com) in your preferred web browser.
-
Navigate to Your Profile: Click on your name in the top navigation bar to go to your profile page.
-
Find the Photos Tab: Look for the “Photos” tab on your profile page, usually located below your cover photo. Click on it.
Finding Photos on Facebook Desktop: An image demonstrating how to locate the “Photos” tab on the Facebook desktop website.
-
Browse Photos:
- Your Photos: To view photos you’ve uploaded, click on “Photos of You” or “Your Photos” to see everything you’ve posted.
- Albums: To view photos within specific albums, click on “Albums” and select the album you want to view.
- Tagged Photos: To see photos in which you’re tagged, click on “Photos of You.”
-
Viewing Individual Photos: Click on a photo to view it in a larger format. You can use the arrow keys or click on the left or right side of the photo to navigate through the album.
-
Interacting with Photos: While viewing a photo, you can:
- Like: Click the “Like” button below the photo.
- Comment: Click the “Comment” box to add a comment.
- Share: Click the “Share” button to share the photo with your friends or on your timeline.
- Tag: Click the “Tag” button to tag friends in the photo.
- Edit: If it’s your photo, you may see an “Edit” option to adjust the photo’s description or privacy settings.
6. Troubleshooting Common Issues When Viewing Photos
Why can’t I see some photos on Facebook? Sometimes, you might encounter issues when trying to view photos on Facebook. Here are common problems and how to troubleshoot them:
| Issue | Possible Cause | Solution |
|---|---|---|
| Photos Not Loading | Slow internet connection, Facebook server issues, outdated app, browser cache. | Check your internet connection, restart your router, clear browser cache, update the Facebook app, try a different browser, check Facebook’s server status. |
| Missing Photos | Privacy settings, photos deleted by the user, Facebook’s content policies violation, temporary Facebook bug. | Check privacy settings of the album or photo, confirm with the user if they deleted the photo, review Facebook’s community standards, log out and back in, report the issue to Facebook support. |
| Incorrect Photo Display | App or browser bugs, incorrect settings. | Update the app or browser, clear cache, try a different device. |
| Unable to Tag Photos | Tagging restrictions set by the photo owner, Facebook’s tagging policies. | Check the photo’s privacy settings, ensure you’re friends with the person you’re trying to tag, review Facebook’s tagging policies. |
| Photos Appear Blurry or Low Quality | Facebook’s compression, low-resolution original photo. | Upload high-resolution photos, adjust upload settings in the Facebook app to prioritize quality over speed. |
| Can’t See Photos of a Specific Friend | Privacy settings, friend has blocked you, friend has deactivated their account. | Respect the friend’s privacy settings, check if you’re still friends with the person, confirm if the friend’s account is still active. |
| Facebook App Keeps Crashing While Viewing | App bugs, outdated app version, device compatibility issues. | Update the Facebook app, clear app cache, restart your device, reinstall the app, check if your device meets the app’s minimum requirements. |
1. Log Out and Back In to Facebook
One of the simplest solutions is to log out of your Facebook account and then log back in. This can help refresh your session and resolve temporary glitches.
-
Mobile App: Tap the three horizontal lines at the top (or bottom) of the app, scroll down, and tap “Log Out.” Then, log back in with your credentials.
Logging Out of Facebook: A visual guide on how to log out of the Facebook app to troubleshoot viewing issues.
-
Desktop Website: Click the arrow in the top-right corner and select “Log Out.” Log back in with your username and password.
2. Update the Facebook App
Using an outdated version of the Facebook app can lead to compatibility issues and bugs. Updating to the latest version can resolve many problems.
-
Android: Open the Google Play Store, search for “Facebook,” and tap “Update” if available.
Updating Facebook App on Android: An illustration showing how to update the Facebook app via the Google Play Store.
-
iOS: Open the App Store, tap your profile icon, scroll down to “Updates,” and update Facebook if it’s listed.
3. Uninstall and Reinstall the Facebook App
Reinstalling the Facebook app can clear out corrupted data and resolve persistent issues.
-
Android: Go to “Settings” > “Apps” > “Facebook,” and tap “Uninstall.” Then, reinstall it from the Google Play Store.
Uninstalling Facebook App: A screenshot demonstrating how to uninstall the Facebook app from an Android device.
-
iOS: Tap and hold the Facebook icon on your home screen until it jiggles. Tap the “x” to delete it, then reinstall it from the App Store.
4. Reboot Your Device
Sometimes, simply restarting your device can resolve temporary software glitches that might be affecting the Facebook app.
- Android: Press and hold the power button, then select “Restart” or “Reboot.”
- iOS: Press and hold the power button and either volume button until the power-off slider appears. Slide to turn off, then press and hold the power button again to turn it back on.
5. Check Facebook’s Content Policies
In some cases, Facebook may remove photos that violate their Community Standards. If your photos have been removed, you may receive a notification from Facebook explaining the reason. Review Facebook’s policies to ensure your content complies with their guidelines.
7. Optimizing Your Facebook Photo Viewing Experience
How can you make viewing photos on Facebook better? Optimizing your Facebook photo viewing experience involves adjusting settings, managing your network, and using Facebook’s features effectively.
- Adjusting News Feed Preferences: Control the types of posts you see in your news feed by adjusting your preferences. Prioritize content from friends and pages whose photos you enjoy.
- Managing Your Friends List: Keep your friends list updated and organized. Unfollow or unfriend accounts that post content you’re not interested in to declutter your feed.
- Utilizing Facebook’s “See First” Feature: Ensure you don’t miss photos from your favorite photographers or friends by using the “See First” feature. Go to their profile, click “Following,” and select “See First.”
- Creating and Organizing Albums: Create well-organized albums for your photos to make them easier to find and share. Use descriptive titles and add relevant captions to each photo.
- Using High-Quality Uploads: Ensure your photos look their best by uploading them in high resolution. Check your Facebook settings to enable high-quality uploads.
8. Advanced Tips and Tricks for Facebook Photo Viewing
Are there any hidden features or tricks for viewing photos? Discover advanced tips and tricks to enhance your Facebook photo viewing experience, from using keyboard shortcuts to exploring hidden albums.
- Using Keyboard Shortcuts: On the desktop website, use keyboard shortcuts to navigate through photos quickly. Press the “J” and “K” keys to move forward and backward, and the “L” key to like a photo.
- Exploring Hidden Albums: Sometimes, users create hidden albums that are not visible on their profile. You might be able to access these albums if someone shares a direct link with you.
- Using Third-Party Browser Extensions: Enhance your photo viewing with browser extensions that offer features like downloading albums, viewing photos in full resolution, or creating custom photo galleries.
- Creating Photo Collages: Use Facebook’s built-in tools or third-party apps to create photo collages and share them with your friends.
- Participating in Photo Challenges: Join Facebook groups that host photo challenges to discover new photographers and improve your skills.
- Using Facebook Slideshow Feature: Create slideshows of your photos to share a collection of images in an engaging format.
9. Facebook Photo Privacy Settings: What You Need to Know
Who can see your photos? Understanding Facebook’s privacy settings is crucial for controlling who can view your photos and ensuring your content is shared with the right audience.
- Understanding Privacy Options: Facebook offers several privacy options for your photos, including “Public,” “Friends,” “Only Me,” and custom lists. Choose the option that best suits your sharing preferences.
- Setting Album Privacy: Control who can see entire albums by adjusting the privacy settings for each album. This is useful for categorizing photos for different audiences.
- Tag Review: Enable tag review to approve or reject tags before they appear on your profile. This gives you control over photos in which you’re tagged.
- Limiting Past Posts: Use the “Limit Past Posts” feature to change the privacy settings of all your past posts to “Friends.” This is a quick way to ensure older photos are not publicly visible.
- Blocking Users: If you want to prevent someone from seeing your photos, block them. This will prevent them from accessing your profile and content.
10. Best Practices for Uploading Photos to Facebook
How can you ensure your photos look their best on Facebook? Following best practices for uploading photos to Facebook can ensure they look their best, maintain their quality, and engage your audience effectively.
- Use High-Resolution Images: Upload photos with a high resolution to ensure they look sharp and clear on Facebook. Aim for a resolution of at least 2048 pixels on the longest edge.
- Optimize File Size: Compress your photos to reduce file size without sacrificing too much quality. This will help them load faster for your viewers.
- Use the Correct Aspect Ratio: Use the correct aspect ratio for different types of photos on Facebook. For example, profile pictures should be square, while cover photos should be wide.
- Add Captions and Descriptions: Add descriptive captions and descriptions to your photos to provide context and engage your audience.
- Tag Friends and Locations: Tag friends and locations in your photos to increase visibility and encourage interaction.
- Choose the Right Album: Select the appropriate album for your photos to keep them organized and easy to find.
- Consider Facebook’s Compression: Be aware that Facebook compresses photos upon upload, which can reduce their quality. Adjust your upload settings to minimize compression.
- Use the Facebook App for Uploads: Upload photos using the Facebook app for better optimization and faster uploads.
- Check Your Privacy Settings: Double-check your privacy settings before uploading photos to ensure they are visible to the intended audience.
- Monitor Engagement: Monitor the engagement on your photos to see what types of content resonate with your audience and adjust your strategy accordingly.
11. Utilizing Facebook Photo Features for Photographers
What special features does Facebook offer for photographers? Facebook offers several features that are particularly useful for photographers looking to showcase their work, connect with their audience, and grow their brand.
- Creating a Facebook Page: Create a Facebook Page to showcase your photography portfolio, share updates, and engage with your fans.
- Using Facebook Albums: Organize your photos into albums to create themed collections and make it easier for viewers to browse your work.
- Sharing Behind-the-Scenes Content: Share behind-the-scenes photos and videos to give your audience a glimpse into your creative process.
- Hosting Photo Contests: Host photo contests to encourage participation and generate buzz around your work.
- Collaborating with Other Photographers: Collaborate with other photographers on joint projects and cross-promote each other’s work.
- Utilizing Facebook Ads: Use Facebook Ads to reach a wider audience and promote your photography services or products.
- Using Facebook Groups: Join or create Facebook Groups for photographers to connect with peers, share tips, and find inspiration.
- Adding Watermarks: Add watermarks to your photos to protect your copyright and promote your brand.
- Using Facebook Stories: Share your photos and videos in Facebook Stories for a more ephemeral and engaging format.
- Providing Value and Education: Share tips, tutorials, and insights to educate your audience and establish yourself as an expert in your field.
12. Understanding Facebook’s Photo Policies and Guidelines
What rules does Facebook have about photos? Understanding Facebook’s photo policies and guidelines is essential for ensuring your content complies with their standards and avoids potential penalties.
- Community Standards: Familiarize yourself with Facebook’s Community Standards, which outline what types of content are allowed and prohibited on the platform.
- Copyright Policies: Respect copyright laws when sharing photos on Facebook. Obtain permission from the copyright holder before uploading copyrighted material.
- Intellectual Property Rights: Do not infringe on the intellectual property rights of others when sharing photos on Facebook.
- Reporting Violations: Report any photos or content that violate Facebook’s policies.
- Consequences of Violations: Understand the consequences of violating Facebook’s policies, which can include content removal, account suspension, or permanent ban.
- Privacy Policies: Review Facebook’s Privacy Policies to understand how your photos and data are used on the platform.
- Terms of Service: Familiarize yourself with Facebook’s Terms of Service, which outline the rules and regulations for using the platform.
- Transparency: Be transparent about your content and intentions when sharing photos on Facebook.
- Respectful Communication: Communicate respectfully with other users and avoid engaging in harassment, hate speech, or other forms of abuse.
- Continuous Learning: Stay informed about changes to Facebook’s policies and guidelines to ensure your content remains compliant.
13. Exploring Third-Party Apps for Enhanced Facebook Photo Viewing
Are there apps that can improve how you see Facebook photos? While Facebook offers a robust photo viewing experience, third-party apps can enhance it further by providing additional features, customization options, and tools.
- Photo Downloading Apps:
- DownAlbum: A Chrome extension that allows you to download entire Facebook albums with ease.
- Pick&Zip: A web-based tool that lets you download Facebook photos and videos in bulk.
- Photo Editing Apps:
- Adobe Lightroom Mobile: A powerful mobile photo editing app with advanced features for enhancing and retouching photos.
- Snapseed: A free mobile photo editing app with a wide range of tools and filters for improving your photos.
- Collage Maker Apps:
- Canva: A versatile design app that allows you to create photo collages, graphics, and other visual content for Facebook.
- PicCollage: A user-friendly collage maker app with a variety of templates and customization options.
- Slideshow Maker Apps:
- Animoto: A video creation platform that allows you to create engaging photo slideshows with music and effects.
- Magisto: An AI-powered video editor that automatically creates slideshows and videos from your photos.
- Photo Management Apps:
- Google Photos: A cloud-based photo storage and management service that integrates with Facebook.
- Everalbum: An app that helps you organize and backup your photos from Facebook and other sources.
- Privacy and Security Apps:
- Facebook Privacy Checkup: A Facebook tool that helps you review and adjust your privacy settings.
- VPN Apps: Use a VPN app to protect your privacy and security when viewing photos on Facebook.
By exploring and utilizing these third-party apps, you can significantly enhance your Facebook photo viewing experience and make the most of your visual content.
14. Frequently Asked Questions (FAQs) About Viewing Photos on Facebook
Still have questions about viewing photos on Facebook? Here are some frequently asked questions with detailed answers to help you navigate the platform’s photo features.
Q1: How do I view all my photos on Facebook?
To view all your photos on Facebook, go to your profile, click on the “Photos” tab, and then select “Your Photos.” This will display all the photos you have uploaded to Facebook.
Q2: How do I find photos I’m tagged in on Facebook?
To find photos you’re tagged in, go to your profile, click on the “Photos” tab, and then select “Photos of You.” This will show all the photos in which you’ve been tagged by friends.
Q3: How can I view a friend’s photos on Facebook?
To view a friend’s photos, go to their profile, click on the “Photos” tab, and then select either “Albums” to view their photo albums or “Photos” to see all their uploaded photos.
Q4: Why can’t I see some of my friend’s photos on Facebook?
You may not be able to see some of your friend’s photos due to their privacy settings. They may have set the photos to be visible only to certain friends or to themselves.
Q5: How do I download photos from Facebook?
To download photos from Facebook, open the photo you want to download, click on the three dots in the top-right corner, and select “Download.”
Q6: How do I create an album on Facebook?
To create an album on Facebook, go to your profile, click on the “Photos” tab, select “Albums,” and then click on “Create Album.” Give your album a name and set the privacy settings.
Q7: How do I change the privacy settings of my photos on Facebook?
To change the privacy settings of your photos, go to the photo, click on the privacy setting icon (e.g., “Public,” “Friends”), and select the desired privacy option.
Q8: How do I report a photo on Facebook that violates the rules?
To report a photo on Facebook, click on the three dots in the top-right corner of the photo, select “Report,” and follow the prompts to explain why you’re reporting the photo.
Q9: What are Facebook’s guidelines for uploading photos?
Facebook’s guidelines for uploading photos include respecting copyright laws, avoiding offensive or harmful content, and adhering to their Community Standards.
Q10: How do I improve the quality of photos I upload to Facebook?
To improve the quality of photos you upload to Facebook, use high-resolution images, optimize the file size, and adjust your upload settings to prioritize quality over speed.
By understanding these FAQs, you can navigate Facebook’s photo features more effectively and enjoy a seamless photo viewing experience.
Ready to take your photography skills to the next level and share your stunning images on Facebook? Visit dfphoto.net for a wealth of resources, including detailed tutorials, inspiring photo galleries, and a vibrant community of photographers. Discover new techniques, find inspiration, and connect with fellow enthusiasts today! Check out our address at 1600 St Michael’s Dr, Santa Fe, NM 87505, United States, or give us a call at +1 (505) 471-6001. Your photographic journey starts here. Visit dfphoto.net now!