Can’t find hidden photos on iPhone? dfphoto.net is here to help you recover those precious memories! We’ll guide you through every possible solution, ensuring you don’t miss out on any photos or videos. Let’s explore the possibilities with iOS settings, iCloud storage, and photo management techniques, and unlock those hidden treasures, secure your images and optimize your photo library.
1. Why Can’t I Find My Hidden Photos on My iPhone?
You can’t find hidden photos on your iPhone usually because the Hidden album is disabled, iCloud Photos isn’t syncing, or you’re looking in the wrong library. Sometimes, photos might be accidentally deleted or stored in a Shared Library. Understanding these reasons will set the stage for a successful retrieval process.
1.1. Hidden Album Visibility
Is the Hidden album enabled in your Photos app? With iOS 14 and later, Apple introduced an option to hide the Hidden album itself. According to Apple Support, toggling this setting off can make it seem like your hidden photos have vanished. Ensuring the Hidden album is visible is the first step to accessing those images.
1.2. iCloud Photos Syncing Issues
Are your photos synced across all your devices with iCloud? If iCloud Photos is not turned on or experiencing syncing issues, photos taken on one device may not appear on another. Apple’s iCloud service is designed to keep your photo library consistent across devices, but occasional hiccups can occur.
1.3. Accidental Deletion and the Recently Deleted Album
Could you have accidentally deleted the photos? When you delete photos or videos, they’re moved to the Recently Deleted album, where they stay for 30 days before permanent deletion. According to Apple’s guidelines, this album acts as a safety net, giving you a chance to recover mistakenly deleted media.
1.4. iCloud Shared Photo Library Confusion
Are you using iCloud Shared Photo Library? With iOS 16.1 and later, Apple introduced the Shared Library feature, which allows you to share photos with up to five other people. Make sure you’re viewing the correct library—Personal, Shared, or Both—to find your photos.
1.5. Apple Account Login Inconsistencies
Are you signed in with the same Apple ID on all your devices? Photos and videos stay up to date on all your devices only if you’re signed in to iCloud with the same Apple Account on every device. Inconsistencies in Apple ID usage can lead to photos appearing on one device but not another.
2. How Do I Unhide Photos on My iPhone?
To unhide photos on your iPhone, go to Photos, tap Albums, scroll down to Utilities, and select Hidden. Use Face ID or Touch ID to unlock, select the photo or video, tap the More button (three dots), and choose Unhide. This action moves the selected items back into your main photo library, making them visible in your albums and moments.
2.1. Step-by-Step Guide to Unhiding Photos
- Open the Photos App: Launch the Photos app on your iPhone.
- Navigate to Albums: Tap the “Albums” tab at the bottom of the screen.
- Scroll to Utilities: Scroll down to the “Utilities” section.
- Select Hidden: Tap on the “Hidden” album.
- Unlock the Album: Use Face ID, Touch ID, or your passcode to unlock the album.
- Choose Photos or Videos: Select the photo or video you want to unhide.
- Tap the More Button: Tap the More button (three dots) at the bottom-right corner of the screen.
- Select Unhide: Tap “Unhide.”
2.2. What Happens After You Unhide Photos?
Once you unhide photos, they return to your main photo library and appear in chronological order based on their capture date. They will also reappear in any albums they were previously added to.
2.3. Why Can’t I See the Hidden Album?
If you can’t see the Hidden album, it might be hidden itself. To make it visible:
- Open Settings: Launch the Settings app on your iPhone.
- Scroll to Photos: Scroll down and tap on “Photos.”
- Toggle Show Hidden Album: Make sure the “Show Hidden Album” toggle is turned on.
2.4. Using iCloud Photos to Sync Hidden Status
If you use iCloud Photos, the hidden status of your photos syncs across all your devices. According to Apple Support, hiding a photo on your iPhone will also hide it on your iPad and Mac, provided iCloud Photos is enabled.
2.5. Alternative Methods to Manage Hidden Photos
Besides unhiding, consider using other methods to manage your private photos, such as third-party apps that offer password protection or encrypted storage. Some users prefer these options for an extra layer of security.
3. How to Recover Recently Deleted Photos on iPhone
To recover recently deleted photos on your iPhone, open the Photos app, go to the Albums tab, and scroll down to Utilities. Tap Recently Deleted, use Face ID or Touch ID to unlock the album, select the photos you want to recover, and tap Recover. According to Apple Support, photos stay in this album for 30 days before being permanently deleted.
3.1. Step-by-Step Guide to Recovering Deleted Photos
- Open the Photos App: Launch the Photos app on your iPhone.
- Navigate to Albums: Tap the “Albums” tab at the bottom of the screen.
- Scroll to Utilities: Scroll down to the “Utilities” section.
- Select Recently Deleted: Tap on the “Recently Deleted” album.
- Unlock the Album: Use Face ID, Touch ID, or your passcode to unlock the album.
- Choose Photos or Videos: Select the photo or video you want to recover.
- Tap Recover: Tap the “Recover” button at the bottom-right corner of the screen.
- Confirm Recovery: Confirm that you want to recover the photos or videos.
3.2. Understanding the 30-Day Limit
Photos and videos in the Recently Deleted album are stored for 30 days. After this period, they are permanently deleted and cannot be recovered. According to Apple’s guidelines, this is a safety measure to ensure that deleted items are eventually removed from your storage.
3.3. What If Photos Are Permanently Deleted?
If photos are permanently deleted from the Recently Deleted album, recovery becomes more challenging. In such cases, consider these options:
- Check iCloud Backup: If you have an iCloud backup, you might be able to restore your iPhone from that backup.
- Use Third-Party Recovery Software: Some third-party data recovery tools claim to recover permanently deleted photos, but their success rate varies.
3.4. Preventing Accidental Deletion
To prevent accidental deletion, consider these tips:
- Review Before Deleting: Always review photos carefully before deleting them.
- Use the Hidden Album: For photos you want to keep but not see regularly, use the Hidden album instead of deleting them.
- Enable iCloud Backup: Regularly back up your iPhone to iCloud to ensure you have a recent copy of your photos.
3.5. How to Empty the Recently Deleted Album
If you want to permanently delete photos before the 30-day period, you can empty the Recently Deleted album:
- Open the Photos App: Launch the Photos app on your iPhone.
- Navigate to Albums: Tap the “Albums” tab at the bottom of the screen.
- Scroll to Utilities: Scroll down to the “Utilities” section.
- Select Recently Deleted: Tap on the “Recently Deleted” album.
- Unlock the Album: Use Face ID, Touch ID, or your passcode to unlock the album.
- Tap Delete All: Tap the “Delete All” button at the top-left corner of the screen.
- Confirm Deletion: Confirm that you want to permanently delete all items in the album.
4. How to Check if iCloud Photos is Turned On
To check if iCloud Photos is turned on, go to Settings, tap your name at the top, then select iCloud. Tap Photos and ensure the “Sync this iPhone” (or “iCloud Photos” on older iOS versions) toggle is enabled. According to Apple Support, this setting ensures your photos and videos are securely stored in iCloud and accessible on all your devices.
4.1. Step-by-Step Guide to Checking iCloud Photos Status
- Open Settings: Launch the Settings app on your iPhone.
- Tap Your Name: Tap your name at the top of the screen.
- Select iCloud: Tap on “iCloud.”
- Tap Photos: Tap on “Photos.”
- Check the Toggle: Ensure the “Sync this iPhone” (or “iCloud Photos” on older iOS versions) toggle is turned on.
4.2. What Happens When iCloud Photos is Enabled?
When iCloud Photos is enabled, all your photos and videos are automatically uploaded and stored in iCloud. According to Apple’s documentation, this ensures that your media is backed up and accessible on all your devices signed in with the same Apple ID.
4.3. Troubleshooting iCloud Photos Sync Issues
If iCloud Photos is enabled but not syncing, try these troubleshooting steps:
- Check Internet Connection: Make sure your iPhone is connected to a stable Wi-Fi network.
- Sign Out and Back In: Sign out of your Apple ID and sign back in.
- Restart Your iPhone: Restart your iPhone to refresh the connection.
- Check iCloud Storage: Ensure you have enough available storage in your iCloud account.
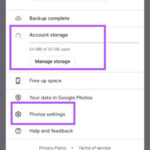
4.4. Managing iCloud Storage
To manage your iCloud storage:
- Open Settings: Launch the Settings app on your iPhone.
- Tap Your Name: Tap your name at the top of the screen.
- Select iCloud: Tap on “iCloud.”
- Tap Manage Storage: Tap on “Manage Storage.”
- Review and Delete: Review your storage usage and delete unnecessary files or purchase more storage.
4.5. Benefits of Using iCloud Photos
Using iCloud Photos offers several benefits:
- Automatic Backup: Your photos and videos are automatically backed up to iCloud.
- Accessibility: Access your photos on all your devices.
- Storage Optimization: Save space on your iPhone by storing full-resolution photos in iCloud and keeping optimized versions on your device.
- Sharing: Easily share photos and videos with family and friends.
5. How to Check Your iCloud Shared Photo Library
To check your iCloud Shared Photo Library, open the Photos app, tap the profile button in the upper-right corner, and choose the appropriate library view—Personal Library, Shared Library, or Both Libraries. According to Apple Support, this feature, available in iOS 16.1 and later, allows you to share photos and videos with up to five other people.
5.1. Step-by-Step Guide to Switching Library Views
- Open the Photos App: Launch the Photos app on your iPhone.
- Tap the Profile Button: Tap the profile button in the upper-right corner.
- Choose Library View: Select “Personal Library,” “Shared Library,” or “Both Libraries.”
5.2. Understanding the Different Library Views
- Personal Library: Shows only your personal photos and videos.
- Shared Library: Shows only the photos and videos shared with the Shared Library.
- Both Libraries: Shows both your personal and shared photos and videos.
5.3. Identifying Photos in the Shared Library
Photos in the Shared Library are marked with a Shared Library icon, while photos in the Personal Library are marked with a Personal Library icon. These icons help you distinguish between the two libraries.
5.4. How to Add Photos to the Shared Library
To add photos to the Shared Library:
- Select Photos: Select the photos you want to add.
- Tap the More Button: Tap the More button (three dots).
- Choose Move to Shared Library: Select “Move to Shared Library.”
5.5. Managing Participants in the Shared Library
To manage participants in the Shared Library:
- Open Settings: Launch the Settings app on your iPhone.
- Tap Photos: Tap on “Photos.”
- Tap Shared Library: Tap on “Shared Library.”
- Manage Participants: Add or remove participants as needed.
6. How to Ensure You Are Signed In With the Same Apple Account
To ensure you are signed in with the same Apple Account, go to Settings and check the name and email address displayed at the top. According to Apple Support, this email address is your Apple ID and should be consistent across all your devices to ensure seamless syncing of photos, videos, and other data.
6.1. Step-by-Step Guide to Checking Your Apple ID
- Open Settings: Launch the Settings app on your iPhone.
- Check at the Top: Look at the top of the screen. Your name and email address should be displayed.
6.2. What to Do If You Are Not Signed In Correctly
If you are not signed in with the correct Apple ID:
- Sign Out: Scroll down and tap “Sign Out.”
- Enter Password: Enter your Apple ID password to confirm.
- Sign In: Sign in with the correct Apple ID and password.
6.3. Why Using the Same Apple ID Matters
Using the same Apple ID on all your devices ensures that your data, including photos, videos, contacts, and notes, is synced seamlessly. According to Apple’s documentation, this is essential for maintaining a consistent experience across all your devices.
6.4. Managing Multiple Apple IDs
If you have multiple Apple IDs, it’s important to consolidate them or ensure you are using the correct one for iCloud services. Using different Apple IDs for different services can lead to confusion and data syncing issues.
6.5. Resetting Your Apple ID Password
If you forgot your Apple ID password:
- Go to Apple ID Website: Go to the Apple ID website (appleid.apple.com).
- Click Forgot Password: Click “Forgot Password.”
- Follow Instructions: Follow the on-screen instructions to reset your password.
7. Third-Party Apps for Recovering Hidden or Deleted Photos
If you still can’t find your hidden or deleted photos, consider using third-party apps like Dr.Fone, iMobie PhoneRescue, or EaseUS MobiSaver. These apps scan your iPhone for recoverable data. Keep in mind that success rates vary and using these apps may require a paid subscription. Always read reviews and check the app’s reputation before installing.
7.1. Overview of Popular Recovery Apps
- Dr.Fone: Offers a comprehensive suite of tools for data recovery, including photos, videos, and messages.
- iMobie PhoneRescue: Specializes in recovering lost data from iOS devices and iCloud backups.
- EaseUS MobiSaver: Provides an easy-to-use interface for scanning and recovering data.
7.2. How to Use Recovery Apps
- Download and Install: Download and install the recovery app on your computer.
- Connect Your iPhone: Connect your iPhone to your computer using a USB cable.
- Scan Your iPhone: Launch the app and scan your iPhone for recoverable data.
- Preview and Recover: Preview the recoverable photos and videos, and select the ones you want to recover.
- Save to Computer: Save the recovered files to your computer.
7.3. Limitations and Considerations
- Success Rate: The success rate of recovery apps varies depending on the extent of data overwriting.
- Paid Subscriptions: Most recovery apps require a paid subscription to unlock full functionality.
- Security: Always download apps from reputable sources to avoid malware or security risks.
7.4. Alternative Data Management Strategies
To minimize the need for recovery apps, consider these data management strategies:
- Regular Backups: Regularly back up your iPhone to iCloud or your computer.
- Careful Deletion: Review photos carefully before deleting them.
- Cloud Storage: Use cloud storage services like Google Photos or Dropbox for additional backup.
7.5. Ethical Considerations
When using recovery apps, ensure you are only recovering your own data and not attempting to access someone else’s private information. Respect privacy and adhere to ethical guidelines.
8. How to Prevent Losing Photos in the Future
To prevent losing photos in the future, enable iCloud Photos, regularly back up your iPhone, be careful when deleting photos, and organize your photo library. These practices will ensure your photos are safe, accessible, and well-managed.
8.1. Enable iCloud Photos
Enable iCloud Photos to automatically back up your photos and videos to iCloud. This ensures that your media is safe even if your iPhone is lost, stolen, or damaged.
8.2. Regular Backups
Regularly back up your iPhone to iCloud or your computer. Backups create a complete copy of your iPhone’s data, including photos, videos, contacts, and settings.
8.3. Careful Deletion
Review photos carefully before deleting them. Avoid deleting photos accidentally by taking your time and confirming your selections.
8.4. Organize Your Photo Library
Organize your photo library using albums, folders, and metadata. This makes it easier to find and manage your photos, reducing the risk of losing them.
8.5. Use Multiple Storage Solutions
Use multiple storage solutions, such as iCloud, Google Photos, and a local hard drive, to create redundancy. This ensures that your photos are safe even if one storage solution fails.
9. dfphoto.net: Your Resource for Photo Management and Recovery
At dfphoto.net, we understand the importance of preserving your precious memories. If you’re still struggling to find your hidden photos or have questions about photo management, visit our website for more detailed guides, tips, and resources. Explore techniques, discover inspiration, and connect with a vibrant community of photography enthusiasts.
9.1. Comprehensive Guides and Tutorials
dfphoto.net offers comprehensive guides and tutorials on photo management, recovery, and organization. Our resources cover a wide range of topics, from basic tips to advanced techniques.
9.2. Community Support and Forums
Connect with a vibrant community of photography enthusiasts on our forums. Share your experiences, ask questions, and get advice from fellow photographers.
9.3. Expert Advice and Tips
Get expert advice and tips from our team of experienced photographers and photo management professionals. Learn how to optimize your photo library, prevent data loss, and recover lost photos.
9.4. Latest News and Updates
Stay up-to-date with the latest news and updates in the world of photography and photo management. Discover new apps, tools, and techniques that can help you preserve your memories.
9.5. Contact Us
Have questions or need assistance? Contact us at dfphoto.net. Our team is here to help you find your hidden photos and manage your photo library effectively. Address: 1600 St Michael’s Dr, Santa Fe, NM 87505, United States. Phone: +1 (505) 471-6001.
![]() iPhone showing the Shared Library icon
iPhone showing the Shared Library icon
10. FAQ: Frequently Asked Questions About Finding Hidden Photos on iPhone
10.1. Where is the Hidden Album on my iPhone?
The Hidden album is located in the Utilities section of the Albums tab in the Photos app. If you don’t see it, make sure “Show Hidden Album” is enabled in Settings > Photos.
10.2. How do I unhide multiple photos at once?
In the Hidden album, tap “Select” in the upper-right corner, choose all the photos you want to unhide, tap the More button, and then tap “Unhide.”
10.3. What happens when I hide a photo on my iPhone?
When you hide a photo, it’s moved from your main photo library to the Hidden album. It won’t appear in your moments, collections, or years views.
10.4. Can I password-protect the Hidden album?
The Hidden album is protected by Face ID, Touch ID, or your passcode. There’s no separate password protection for this album.
10.5. How long do photos stay in the Recently Deleted album?
Photos stay in the Recently Deleted album for 30 days. After 30 days, they are permanently deleted.
10.6. Can I recover photos deleted from the Recently Deleted album?
Once photos are deleted from the Recently Deleted album, they cannot be recovered using the iPhone’s built-in features. You may need to use third-party recovery software.
10.7. How do I enable iCloud Photos?
To enable iCloud Photos, go to Settings > Your Name > iCloud > Photos, and toggle on “Sync this iPhone.”
10.8. What if my photos are not syncing to iCloud?
Make sure you have a stable Wi-Fi connection, are signed in with the same Apple ID on all devices, and have enough available storage in your iCloud account.
10.9. How do I switch between Personal and Shared Libraries?
In the Photos app, tap the profile button in the upper-right corner and choose the library view you want to see—Personal Library, Shared Library, or Both Libraries.
10.10. Is it safe to use third-party photo recovery apps?
Use caution when using third-party photo recovery apps. Download apps only from reputable sources, read reviews, and be aware of potential security risks.
11. Call to Action: Rediscover Your Memories Today
Ready to unlock those hidden memories and master your iPhone photography? Visit dfphoto.net today for detailed guides, expert tips, and a vibrant community of photography enthusiasts. Explore techniques, discover inspiration, and connect with fellow photographers who share your passion. Don’t let those precious moments stay hidden—start your journey with dfphoto.net now and bring your photos to light!