Sending photos as JPEG attachments is simple, enhancing the viewing experience while maintaining image quality. This comprehensive guide from dfphoto.net will show you exactly how to send photos as JPEG attachments, explore different methods across various devices and platforms, and optimize your images for sharing. Discover tips for photographers and enthusiasts to send their visual stories perfectly.
1. Why Send Photos as JPEG Attachments?
Sending photos as JPEG attachments instead of embedding them in the email body offers several advantages, ensuring that recipients receive the image in its intended format and quality. Understanding these benefits helps photographers and enthusiasts share their visual stories with precision.
- Preserves Image Quality: JPEGs are a widely supported format that balances image quality with file size. Sending a photo as a JPEG attachment ensures the recipient receives a file that retains a good level of detail without being excessively large.
- Guaranteed Compatibility: JPEG is a universal format, making it accessible across virtually all devices and operating systems. This eliminates compatibility issues, ensuring that anyone can view the photo regardless of their technology.
- Avoids Alterations: When photos are embedded in the body of an email, they may be automatically resized or compressed by the email client, potentially reducing their quality. Sending as an attachment prevents these unwanted alterations.
- Easy Saving and Downloading: Attachments are straightforward to save and download, allowing recipients to easily store the photo on their device for later use, editing, or printing.
- Professional Appearance: Sending photos as attachments is often perceived as more professional, particularly in business contexts or when sharing images with clients.
2. Understanding JPEG and Its Role in Photography
JPEG (Joint Photographic Experts Group) is a commonly used method of lossy compression for digital images, particularly for those produced by digital photography. Understanding its attributes is essential for photographers aiming to send high-quality images efficiently.
- Compression Efficiency: JPEG is known for its ability to significantly reduce file size, which is crucial for easy sharing and storage.
- Lossy Compression: It achieves file size reduction by selectively discarding some image data, which can result in a loss of quality if compressed too heavily.
- Widely Supported: JPEG’s universal compatibility makes it accessible on nearly all devices and platforms.
- Ideal for Photographs: JPEG is particularly effective for compressing photographs and complex images with smooth variations of tone and color.
- Adjustable Quality Settings: When saving a JPEG, users can adjust the quality settings to balance file size and image fidelity.
3. How to Send a Photo as a JPEG Attachment on iPhone or iPad
Sending photos as JPEG attachments from an iPhone or iPad is straightforward, ensuring your images arrive as intended. Here’s how to do it:
-
Using the Mail App:
- Open the Photos app and select the photo you want to send.
- Tap the share icon (a square with an arrow pointing upward).
- Choose the Mail app from the share options.
- A new email will open with your photo embedded in the body. To send it as an attachment, long-press on the image within the email.
- Select “Insert” from the options that appear. This action converts the embedded image into an attachment.
- Enter the recipient’s email address, add a subject, and any message you wish to include.
- Tap the send button.
-
Using the Files App:
- Save the photo to the Files app if it’s not already there.
- Open the Files app and locate your photo.
- Long-press on the photo to bring up a menu.
- Select “Share” from the menu.
- Choose the Mail app. The photo will be attached to the email.
- Enter the recipient’s email address, subject, and message, then send.
-
Adjusting Image Size Before Sending:
- Before sharing, you can adjust the image size to reduce the file size. After tapping the share icon, select “Mail.”
- Before composing the email, the Mail app will present size options like Small, Medium, Large, and Actual Size.
- Choose an appropriate size based on your needs. For general sharing, “Medium” or “Large” usually suffices.
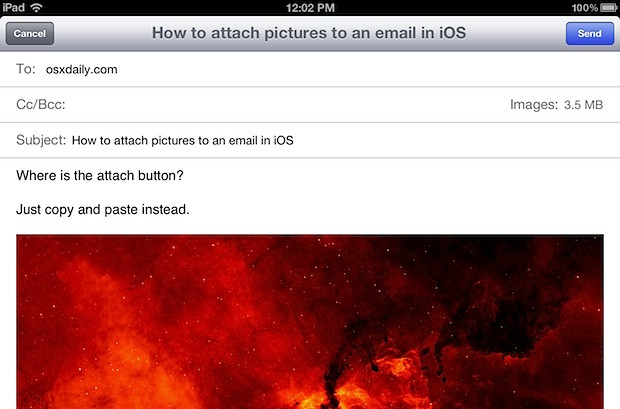 Sending a JPEG as an attachment via iPhone mail app with insert option
4. Sending Photos as JPEG Attachments on Android Devices
Android devices offer several ways to send photos as JPEG attachments, ensuring compatibility and maintaining image quality. Here are some common methods:
-
Using the Gmail App:
- Open the Photos app and select the photo you want to send.
- Tap the share icon.
- Choose Gmail from the list of apps.
- In the Gmail compose window, the photo will be attached to the email.
- Enter the recipient’s email address, add a subject, and message.
- Tap the send button.
-
From Within Gmail:
- Open the Gmail app and start composing a new email.
- Tap the attachment icon (paperclip).
- Select “Attach file” and navigate to the photo in your gallery or file manager.
- Select the photo, which will be added as an attachment.
- Enter the recipient’s email address, subject, and message, then send.
-
Using File Manager:
- Open your file manager app (e.g., Files, ES File Explorer).
- Navigate to the photo you want to send.
- Long-press on the photo to select it.
- Tap the share icon.
- Choose Gmail or your preferred email app. The photo will be attached to a new email.
- Enter the necessary details and send the email.
-
Adjusting Image Size (If Available):
- Some Android devices allow you to resize images before sending them via email.
- After selecting the share option, look for a resize or compression option.
- Choose a smaller size to reduce the file size if needed.
5. Sending Photos as JPEG Attachments on Windows and macOS
Sending photos as JPEG attachments on desktop operating systems like Windows and macOS is simple and provides additional control over file management.
-
Using Windows:
-
From File Explorer:
- Open File Explorer and navigate to the folder containing the photo.
- Right-click on the photo you want to send.
- Select “Send to” and then choose “Mail recipient.”
- This will open your default email client with the photo attached.
- Enter the recipient’s email address, subject, and message, then send.
-
From Email Client:
- Open your email client (e.g., Outlook, Mail).
- Start composing a new email.
- Click the “Attach File” icon (usually a paperclip).
- Navigate to the photo in File Explorer and select it.
- The photo will be attached to the email.
- Enter the recipient’s email address, subject, and message, then send.
-
-
Using macOS:
-
From Finder:
- Open Finder and locate the photo you want to send.
- Right-click (or Ctrl-click) on the photo.
- Select “Share” and then choose “Mail.”
- This will open the Mail app with the photo attached.
- Enter the recipient’s email address, subject, and message, then send.
-
From Mail App:
- Open the Mail app and start composing a new email.
- Click the “Attach” icon (usually a paperclip).
- Navigate to the photo in Finder and select it.
- The photo will be attached to the email.
- Enter the recipient’s email address, subject, and message, then send.
-
-
Compressing Files (Both Windows and macOS):
- To reduce the file size of a JPEG, you can compress it into a ZIP file.
- Windows: Right-click on the photo, select “Send to,” and then choose “Compressed (zipped) folder.”
- macOS: Right-click (or Ctrl-click) on the photo, select “Compress.”
- Attach the ZIP file to your email instead of the JPEG file.
6. Optimizing JPEG Images for Emailing
Optimizing JPEG images for emailing ensures that they are of acceptable quality without being too large, making them easier to send and download.
-
Resizing Images:
- Why: Reducing the dimensions of an image can significantly decrease its file size without noticeably affecting its quality, especially when viewed on smaller screens.
- How: Use photo editing software like Adobe Photoshop, GIMP, or online tools to resize the image to a smaller resolution (e.g., 1024×768 pixels for general use).
-
Adjusting Quality Settings:
- Why: JPEG compression involves a trade-off between file size and image quality. Lowering the quality setting reduces the file size but may introduce visible artifacts.
- How: When saving a JPEG in photo editing software, adjust the quality slider. A setting of 60-80% typically provides a good balance between quality and size.
-
Using Compression Tools:
- Why: Compression tools can further reduce the file size of JPEG images without significant loss of quality.
- How: Use online tools like TinyPNG or ImageOptim to compress JPEG files. These tools use algorithms to remove unnecessary data from the image.
-
Converting to JPEG if Necessary:
- Why: If your image is in a different format (e.g., PNG, TIFF), converting it to JPEG can significantly reduce its file size.
- How: Use photo editing software to open the image and save it as a JPEG file.
-
Batch Processing:
- Why: If you have multiple images to send, batch processing can save time by applying the same optimization settings to all files at once.
- How: Use photo editing software like Adobe Lightroom or batch processing tools to resize, compress, and convert multiple images simultaneously.
-
Checking File Size:
- Why: Before sending, always check the file size of your JPEG images to ensure they meet any size restrictions imposed by your email provider or recipient.
- How: In File Explorer (Windows) or Finder (macOS), right-click on the file and select “Properties” or “Get Info” to view the file size.
7. Email Client Settings That Affect Image Attachments
Email client settings can significantly affect how image attachments are handled. Understanding these settings can help ensure your photos are sent and received as intended.
-
Image Resizing Options:
- Problem: Some email clients automatically resize images before sending, which can reduce their quality.
- Solution: Check your email client settings for options related to image resizing. Disable automatic resizing or choose the “Original Size” option to send images at their original dimensions.
-
Attachment Size Limits:
- Problem: Email providers often impose limits on the size of attachments. Exceeding these limits can prevent your email from being sent or received.
- Solution: Be aware of the attachment size limits of your email provider. If your images are too large, compress them or use a file sharing service.
-
Display Settings:
- Problem: The way an email client displays attachments can vary. Some clients embed images in the body of the email, while others show them as separate attachments.
- Solution: Understand how your email client handles attachments. If you prefer to send images as attachments, ensure that the settings are configured accordingly.
-
File Format Conversion:
- Problem: Some email clients may automatically convert image formats, which can affect their quality or compatibility.
- Solution: Check if your email client has options for file format conversion. Disable automatic conversion to ensure that images are sent in their original format.
-
Security Settings:
- Problem: Security settings can sometimes block or alter attachments, especially if they are perceived as potentially harmful.
- Solution: Review your security settings to ensure that image attachments are not being blocked or altered. Adjust the settings if necessary, but be mindful of the security implications.
-
Email Format (HTML vs. Plain Text):
- Problem: Sending emails in HTML format can sometimes cause images to be embedded in the body of the email, rather than sent as attachments.
- Solution: If you prefer to send images as attachments, consider using plain text format for your emails. This can prevent images from being embedded.
8. Troubleshooting Common Issues When Sending JPEG Attachments
Encountering issues when sending JPEG attachments can be frustrating. Here are some common problems and how to troubleshoot them:
-
Images Embedded in Email Body:
- Problem: Instead of appearing as attachments, images are displayed within the email body.
- Solution:
- Check Email Client Settings: Some email clients have settings that automatically embed images. Look for options to disable this feature or to send images as attachments by default.
- Use “Insert” Option: In some email clients, you can right-click on the image in the email body and select “Insert as Attachment” or a similar option.
- Send as Plain Text: Sending the email in plain text format can prevent images from being embedded.
-
File Size Too Large:
- Problem: The email fails to send because the attachment exceeds the maximum file size limit.
- Solution:
- Compress Images: Reduce the file size of the JPEG images by compressing them using photo editing software or online tools.
- Resize Images: Decrease the dimensions of the images to reduce their file size.
- Use File Sharing Services: Upload the images to a file sharing service like Google Drive, Dropbox, or WeTransfer, and send a link to the recipient.
-
Recipient Cannot Open the Image:
- Problem: The recipient is unable to open the JPEG attachment.
- Solution:
- Check File Format: Ensure that the file is indeed a JPEG and that the file extension is “.jpg” or “.jpeg.”
- Resend the File: The file may have been corrupted during transmission. Try resending the file.
- Use a Different Email Client: The recipient’s email client may have compatibility issues. Ask them to try opening the file with a different email client or image viewer.
-
Image Quality Degraded:
- Problem: The image quality is noticeably reduced after sending.
- Solution:
- Adjust Quality Settings: When saving the JPEG, use a higher quality setting to minimize compression artifacts.
- Avoid Resizing: If possible, send the image at its original dimensions to preserve its quality.
- Use Lossless Compression: Consider using a lossless compression format like PNG or TIFF for images where quality is critical.
-
Attachments Blocked by Security Settings:
- Problem: The recipient’s security settings may be blocking the attachment.
- Solution:
- Notify the Recipient: Inform the recipient that they may need to adjust their security settings to receive the attachment.
- Use a File Sharing Service: Upload the image to a file sharing service and send a link, as these services are often less likely to be blocked by security settings.
-
Email Client Issues:
- Problem: The email client itself may be causing issues with attachments.
- Solution:
- Update Email Client: Ensure that you are using the latest version of your email client, as updates often include bug fixes and performance improvements.
- Try a Different Email Client: If the issue persists, try sending the image using a different email client to see if the problem is with the software.
9. Alternative Methods for Sharing Photos
While email attachments are a common way to share photos, several alternative methods offer unique advantages in terms of file size, quality, and collaboration.
-
Cloud Storage Services:
- Overview: Cloud storage services like Google Drive, Dropbox, and OneDrive allow you to upload photos and share them via a link.
- Advantages:
- Large File Sizes: Supports sharing of large files without email attachment limits.
- Collaboration: Enables multiple people to access, view, and download the photos.
- Organization: Provides tools for organizing photos into folders and albums.
- How to Use:
- Upload photos to the cloud storage service.
- Create a shareable link.
- Send the link to the recipient(s).
-
File Transfer Services:
- Overview: File transfer services like WeTransfer and SendAnywhere are designed specifically for sending large files quickly and easily.
- Advantages:
- No Account Required: Often do not require the sender or recipient to have an account.
- Large File Sizes: Supports very large files, often up to several gigabytes.
- Temporary Storage: Files are typically stored temporarily, ensuring privacy.
- How to Use:
- Visit the file transfer service website.
- Upload the photos.
- Enter the recipient’s email address.
- Send the files.
-
Social Media Platforms:
- Overview: Social media platforms like Facebook, Instagram, and Flickr allow you to share photos with a wide audience.
- Advantages:
- Wide Reach: Ideal for sharing photos with friends, family, or followers.
- Engagement: Enables interaction through likes, comments, and shares.
- Mobile-Friendly: Easy to use on mobile devices.
- How to Use:
- Upload photos to the social media platform.
- Adjust privacy settings as needed.
- Share the photos with your network.
-
Photo Sharing Websites:
- Overview: Photo sharing websites like Flickr and 500px are designed for photographers to showcase their work and connect with other creatives.
- Advantages:
- High-Quality Display: Supports high-resolution images and professional display options.
- Community: Provides a platform for photographers to share their work, receive feedback, and discover new talent.
- How to Use:
- Create an account on the photo sharing website.
- Upload your photos.
- Organize your photos into albums and collections.
- Share your photos with the community.
-
Dedicated Photo Sharing Apps:
- Overview: Dedicated photo sharing apps like AirDrop (for Apple devices) and Google Photos offer seamless ways to share photos between devices.
- Advantages:
- Direct Transfer: Allows direct transfer of photos between devices without the need for email or cloud storage.
- High-Speed: Transfers files quickly, especially over Wi-Fi or Bluetooth.
- Convenience: Simplifies the sharing process, especially for frequent photo sharing.
- How to Use:
- Enable AirDrop or Google Photos sharing on your device.
- Select the photos you want to share.
- Choose the recipient device.
- Transfer the photos.
-
External Storage Devices:
- Overview: Using external storage devices like USB drives or SD cards to physically transfer photos is a reliable option for sharing large files.
- Advantages:
- Offline Sharing: Does not require an internet connection.
- Large File Sizes: Can handle very large files without compression or quality loss.
- Security: Provides a secure way to transfer sensitive photos.
- How to Use:
- Copy the photos to the external storage device.
- Physically transfer the device to the recipient.
- The recipient can then copy the photos to their device.
10. The Future of Image Sharing: Trends and Technologies
The future of image sharing is being shaped by emerging trends and technologies that promise to make the process even more seamless, efficient, and secure.
-
Advancements in Compression Technology:
- Trend: New compression algorithms are being developed to reduce file sizes without significant loss of quality.
- Impact:
- Better Image Quality: Allows for higher-quality images to be shared more easily.
- Faster Transfer Speeds: Reduces the amount of data that needs to be transmitted, resulting in faster transfer speeds.
- Examples:
- AVIF (AV1 Image File Format): A modern image format that offers better compression than JPEG while maintaining similar image quality.
- WebP: An image format developed by Google that provides superior lossless and lossy compression for images on the web.
-
Improved Cloud Integration:
- Trend: Cloud storage services are becoming more tightly integrated with operating systems and applications.
- Impact:
- Seamless Sharing: Makes it easier to share photos directly from the cloud without the need to download and re-upload them.
- Real-Time Collaboration: Enables multiple people to collaborate on photo projects in real-time.
- Examples:
- Integration with Adobe Creative Cloud: Allows users to access and share photos directly from Adobe Photoshop and Lightroom.
- Integration with Microsoft OneDrive: Enables users to share photos directly from Windows File Explorer and Microsoft Office applications.
-
Enhanced Security Measures:
- Trend: Security is becoming an increasingly important consideration in image sharing, with new measures being developed to protect against unauthorized access and misuse.
- Impact:
- Data Encryption: Ensures that photos are encrypted during transmission and storage, protecting them from being intercepted or accessed by unauthorized parties.
- Watermarking: Allows photographers to add watermarks to their images to protect their copyright and prevent unauthorized use.
- Examples:
- End-to-End Encryption: Ensures that only the sender and recipient can access the photos.
- Blockchain Technology: Provides a secure and transparent way to track the ownership and usage of digital images.
-
Artificial Intelligence (AI) in Image Sharing:
- Trend: AI is being used to automate and enhance various aspects of image sharing, from organizing and tagging photos to optimizing them for different platforms.
- Impact:
- Automated Tagging: Automatically tags photos with relevant keywords, making them easier to search and organize.
- Smart Optimization: Automatically optimizes photos for different devices and platforms, ensuring that they look their best regardless of where they are viewed.
- Examples:
- Google Photos: Uses AI to automatically organize and tag photos based on their content.
- Adobe Sensei: Uses AI to enhance and optimize images in Adobe Photoshop and Lightroom.
-
Decentralized Image Sharing:
- Trend: Decentralized image sharing platforms are emerging as an alternative to traditional centralized services, offering greater control and privacy.
- Impact:
- User Control: Gives users more control over their photos and how they are shared.
- Privacy: Protects user privacy by eliminating the need to rely on centralized servers.
- Examples:
- IPFS (InterPlanetary File System): A decentralized storage network that allows users to store and share photos without relying on a central server.
- Blockstack: A decentralized computing platform that enables developers to build privacy-focused photo sharing applications.
FAQ: Sending Photos as JPEG Attachments
Here are some frequently asked questions about sending photos as JPEG attachments:
-
Why is my photo showing up in the email body instead of as an attachment?
Your email client may be set to embed images by default. Check your email settings for options to send images as attachments. You might also try right-clicking the image within the email and selecting “Insert as Attachment.”
-
How do I reduce the size of a JPEG before emailing it?
Use photo editing software to resize the image to smaller dimensions or adjust the quality settings to a lower percentage. Online tools like TinyPNG can also compress JPEG files without significant quality loss.
-
What is the maximum file size for email attachments?
The maximum file size varies by email provider. Generally, it ranges from 10MB to 25MB. Check your provider’s specific limits to avoid delivery issues.
-
Can I send multiple photos as JPEG attachments in one email?
Yes, you can attach multiple JPEG files to a single email. However, be mindful of the total file size limit to ensure the email is sent successfully.
-
How do I ensure the recipient can open the JPEG attachment?
JPEG is a universally compatible format, so most devices and email clients should be able to open it. If the recipient has trouble, ensure they have an image viewer installed or try resending the file.
-
Is it better to zip a JPEG before emailing it?
Zipping a JPEG typically doesn’t reduce its file size much, as JPEGs are already compressed. However, zipping can be useful for sending multiple files as a single attachment.
-
Will sending a JPEG as an attachment reduce its quality?
If the JPEG is already compressed, sending it as an attachment shouldn’t further reduce its quality. However, some email clients might automatically resize images, so check your settings to avoid this.
-
How do I send a photo as an attachment from my iPhone?
In the Photos app, select the photo, tap the share icon, choose Mail, then long-press the image in the email body and select “Insert” to make it an attachment.
-
What are the alternative methods for sharing photos besides email attachments?
Alternatives include cloud storage services (Google Drive, Dropbox), file transfer services (WeTransfer), social media platforms, and dedicated photo sharing apps.
-
How do I maintain the original quality of a photo when sending it as an attachment?
Avoid resizing or compressing the photo before sending. If possible, send it at its original dimensions and quality settings. Using a file sharing service can also help preserve quality.
Conclusion
Mastering how to send a photo as a JPEG attachment is essential for photographers and anyone who wants to share images effectively. By understanding the different methods, optimizing your images, and troubleshooting common issues, you can ensure your photos are delivered in the best possible quality. Visit dfphoto.net for more tips, tutorials, and inspiration to elevate your photography skills.
Ready to take your photography to the next level? Explore dfphoto.net for in-depth guides, stunning photo collections, and a vibrant community of fellow photography enthusiasts. Discover new techniques, find inspiration, and connect with like-minded individuals. Visit us today at 1600 St Michael’s Dr, Santa Fe, NM 87505, United States, call +1 (505) 471-6001, or visit our website dfphoto.net and start your journey towards photographic excellence!