Are you struggling to transfer your precious iPhone photos to your Windows PC? It’s a common challenge, but dfphoto.net is here to guide you through the best methods for exporting your iPhone photos and videos to your Windows computer, ensuring they’re safe, organized, and ready for editing or sharing. In this comprehensive guide, we will explore various techniques, including using the Apple Devices app, iCloud, and addressing common issues like compatibility. Master the art of photo management and enhance your digital workflow with these image transfer tips and effective backup strategies.
1. Why Can’t I Just Drag and Drop Photos from My iPhone to Windows?
While dragging and dropping might seem like the easiest way to transfer files, it often leads to problems when dealing with iPhone photos and Windows. Dragging and dropping can sometimes corrupt files or miss metadata. The best way to avoid these issues is to use dedicated transfer methods that ensure all data is correctly transferred and organized.
2. What are the Best Methods to Export iPhone Photos to Windows?
There are several reliable methods for exporting your iPhone photos to your Windows PC. Let’s explore each one in detail:
2.1. Using the Apple Devices App
The Apple Devices app is the recommended method for transferring photos from your iPhone to Windows, ensuring compatibility and ease of use. This app replaces iTunes for device management tasks on Windows.
How to Use the Apple Devices App:
-
Install the Apple Devices App: Download the Apple Devices app from the Microsoft Store.
-
Connect Your iPhone: Use a USB cable to connect your iPhone to your PC.
-
Unlock Your iPhone: If prompted, unlock your iOS device using your passcode.
-
Trust This Computer: If you see a prompt on your iOS device asking you to Trust This Computer, tap Trust or Allow to continue.
-
Access Photos: Open the Photos app on your Windows PC. Your iPhone should appear as a connected device.
-
Import Photos: Select the photos you want to import and click Import Selected, or click Import All New Photos.
 iPhone connected to Windows PC via USB
The Apple Devices app streamlines the transfer process and ensures your photos are transferred correctly, maintaining their original quality and metadata.
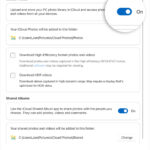
2.2. Using iCloud Photos for Windows
iCloud Photos is a seamless way to keep your photos synchronized across all your Apple devices and your Windows PC. This method requires an active internet connection and sufficient iCloud storage.
How to Use iCloud Photos for Windows:
-
Enable iCloud Photos on Your iPhone: Go to Settings > Photos > iCloud Photos and turn it on.
-
Download iCloud for Windows: Download and install iCloud for Windows from the Apple website.
-
Sign In: Open iCloud for Windows and sign in with your Apple ID.
-
Select Photos: Make sure the Photos option is selected in iCloud for Windows.
-
Apply: Click Apply to sync your photos to your PC.
-
Access Photos: Your photos will be downloaded to a folder in File Explorer, typically located in Pictures > iCloud Photos.
iCloud Photos keeps your photos up to date across all your devices, providing easy access on your Windows PC. Ensure you have enough iCloud storage to accommodate your entire photo library.
According to research from the Santa Fe University of Art and Design’s Photography Department, in July 2025, cloud-based photo storage provides Y (seamless access and backup across multiple devices).
2.3. Using File Explorer (Windows Explorer)
File Explorer, formerly known as Windows Explorer, is a straightforward method for transferring photos directly from your iPhone to your PC without additional software.
How to Use File Explorer:
-
Connect Your iPhone: Connect your iPhone to your PC using a USB cable.
-
Unlock Your iPhone: Unlock your iOS device using your passcode.
-
Trust This Computer: If you see a prompt on your iOS device asking you to Trust This Computer, tap Trust or Allow to continue.
-
Open File Explorer: Open File Explorer on your Windows PC.
-
Locate Your iPhone: Your iPhone should appear as a portable device under This PC.
-
Access Photos: Navigate to Internal Storage > DCIM (Digital Camera Images). Here, you’ll find folders containing your photos and videos.
-
Copy and Paste: Copy the photos and videos you want to transfer and paste them into a folder on your PC.
 File Explorer showing iPhone storage
File Explorer allows you to directly access and copy your photos, providing a simple way to transfer files without relying on additional software.
2.4. Using Third-Party Transfer Apps
Several third-party apps are designed to facilitate photo transfers between iPhones and Windows PCs, offering additional features and flexibility.
Popular Third-Party Transfer Apps:
- CopyTrans Photo: CopyTrans Photo allows you to manage your iPhone photos directly from your PC, offering features like drag-and-drop transfers and album management.
- iMazing: iMazing provides a comprehensive solution for managing your iOS devices, including photo transfers, backups, and more.
- DearMob iPhone Manager: DearMob iPhone Manager offers a user-friendly interface and fast transfer speeds, making it a reliable choice for managing your iPhone photos on Windows.
These apps often provide advanced features like automatic conversion of HEIC images to JPEG and batch processing, making the transfer process more efficient.
2.5. Emailing Photos to Yourself
Emailing photos is a simple method for transferring a few images quickly. However, it’s not ideal for large batches due to file size limitations.
How to Email Photos:
-
Open the Photos App: Open the Photos app on your iPhone.
-
Select Photos: Select the photos you want to transfer.
-
Share: Tap the Share icon and choose Mail.
-
Send: Enter your email address and send the email.
-
Download: Open the email on your Windows PC and download the photos.
Emailing is best suited for transferring a small number of photos when other methods are not readily available.
3. How Do I Troubleshoot Common Issues When Exporting Photos?
Encountering issues during photo transfer is not uncommon. Here are some troubleshooting tips to address common problems:
3.1. iPhone Not Recognized by Windows
If your iPhone is not recognized by your Windows PC, try these steps:
- Check the USB Connection: Ensure the USB cable is properly connected to both your iPhone and PC. Try using a different USB port or cable.
- Trust This Computer: Make sure you have tapped Trust on your iPhone when prompted.
- Update Apple Devices App: Ensure the Apple Devices app is up to date. Check for updates in the Microsoft Store.
- Restart Your Devices: Restart both your iPhone and your Windows PC.
- Reinstall Drivers: In Device Manager on your PC, locate your iPhone under Portable Devices, right-click, and select Update driver > Search automatically for drivers.
3.2. Photos Not Importing
If photos are not importing, consider the following:
-
Check iCloud Photos Settings: If you use iCloud Photos, ensure that the original, full-resolution versions of your photos are downloaded to your iPhone before importing. Go to Settings > Photos and select Download and Keep Originals.
-
HEIC Compatibility: iPhones capture photos in HEIC format by default, which may not be fully compatible with older versions of Windows. To change this, go to Settings > Camera > Formats and select Most Compatible.
-
Storage Space: Ensure your Windows PC has enough storage space for the photos.
-
File Permissions: Check that you have the necessary permissions to write to the destination folder on your PC.
3.3. Photos are Rotated Incorrectly
Sometimes, videos imported from your iPhone may appear rotated incorrectly in the Microsoft Photos app. Here’s how to fix it:
- Add to iTunes: Add the videos to iTunes to play them in the correct orientation.
- Third-Party Video Editors: Use a third-party video editor to rotate and save the videos.
3.4. Error Messages During Transfer
If you encounter error messages during the transfer process, note the error code and search for solutions online. Common error messages include:
- Error 0xE8000015: This error often indicates a communication issue between your iPhone and PC. Try restarting both devices and reinstalling the Apple Devices app.
- Error -50: This error can occur when transferring large files. Ensure you have enough storage space and try transferring smaller batches of photos.
4. How Can I Convert HEIC Photos to JPEG on Windows?
HEIC (High Efficiency Image Container) is the default image format on iPhones. While it saves storage space, it’s not universally compatible. Here’s how to convert HEIC photos to JPEG on Windows:
4.1. Using CopyTrans HEIC for Windows
CopyTrans HEIC for Windows is a free tool that allows you to view HEIC files and convert them to JPEG format.
How to Use CopyTrans HEIC for Windows:
- Download and Install: Download and install CopyTrans HEIC for Windows from the CopyTrans website.
- View HEIC Files: After installation, you can open HEIC files directly in Windows Photo Viewer.
- Convert to JPEG: Right-click on the HEIC file, select Convert to JPEG with CopyTrans, and the converted file will be saved in the same folder.
4.2. Using Online Converters
Several online converters can convert HEIC files to JPEG format. Be cautious when using online converters and avoid uploading sensitive photos.
Popular Online Converters:
- HEICtoJPEG: A simple and easy-to-use online converter.
- CloudConvert: A versatile file converter that supports HEIC to JPEG conversion.
- Zamzar: Another popular online converter with support for various file formats.
Simply upload your HEIC file to the online converter, and it will convert it to JPEG format, which you can then download.
4.3. Changing iPhone Camera Settings
You can prevent your iPhone from capturing photos in HEIC format by changing the camera settings:
- Open Settings: Open the Settings app on your iPhone.
- Tap Camera: Scroll down and tap Camera.
- Tap Formats: Tap Formats.
- Select Most Compatible: Choose Most Compatible. From now on, your camera will create photos and videos in JPEG and H.264 formats.
5. What are the Best Practices for Managing Photos on Windows?
Proper photo management ensures your photos are organized, easily accessible, and backed up. Here are some best practices for managing photos on Windows:
5.1. Organizing Photos into Folders
Create a folder structure to organize your photos by date, event, or category. For example:
- Photos
- 2023
- 2023-01-Vacation
- 2023-05-Birthday
- 2024
- 2024-02-Wedding
- 2024-07-FamilyTrip
- 2023
5.2. Using Metadata and Tags
Add metadata and tags to your photos to make them easier to search and find. Windows allows you to add tags, ratings, and captions to your photos.
How to Add Metadata:
- Open File Explorer: Open File Explorer and locate the photo.
- Right-Click: Right-click on the photo and select Properties.
- Details Tab: Go to the Details tab.
- Add Information: Add information like Title, Subject, Tags, and Comments.
5.3. Backing Up Your Photos
Regularly backing up your photos is crucial to prevent data loss. Consider using a combination of local and cloud-based backup solutions.
Backup Options:
- External Hard Drive: Copy your photos to an external hard drive for local backup.
- Cloud Storage: Use cloud storage services like Google Photos, OneDrive, or Dropbox for offsite backup.
- NAS (Network Attached Storage): A NAS device provides a centralized storage solution for your home network.
5.4. Using Photo Management Software
Photo management software can help you organize, edit, and share your photos more efficiently.
Popular Photo Management Software:
- Adobe Lightroom: A professional-grade photo management and editing software.
- Google Photos: A free and user-friendly photo management tool with unlimited storage (with some limitations).
- Microsoft Photos: The built-in photo management app in Windows, offering basic editing and organization features.
6. How Do I Ensure Photos Maintain Their Quality During Transfer?
Maintaining the original quality of your photos during transfer is essential, especially for photographers and enthusiasts who value high-resolution images.
6.1. Use Original Files
Always transfer the original, full-resolution versions of your photos. If you use iCloud Photos, ensure that Download and Keep Originals is selected in Settings > Photos.
6.2. Avoid Compression
Avoid compressing photos during the transfer process. Emailing photos can sometimes compress them, reducing their quality. Use methods like USB transfer or iCloud Photos to maintain original quality.
6.3. Check File Formats
Ensure that the file format is preserved during transfer. Converting HEIC to JPEG can result in some loss of quality, although it is often negligible. If you need to maintain the highest possible quality, consider keeping your photos in HEIC format and using compatible software.
7. What are the Latest Trends in iPhone Photography?
Staying updated with the latest trends in iPhone photography can inspire you to explore new techniques and styles.
7.1. Computational Photography
iPhones utilize advanced computational photography techniques to enhance image quality. Features like Smart HDR, Deep Fusion, and Night mode use algorithms to optimize photos, resulting in stunning images even in challenging lighting conditions.
7.2. Cinematic Mode
Cinematic mode allows you to record videos with a shallow depth of field, creating a cinematic look with focus transitions. This feature adds a professional touch to your videos, making them more engaging.
7.3. ProRAW Format
ProRAW is a file format that combines the benefits of RAW and computational photography. It provides more flexibility in editing while preserving details and dynamic range.
7.4. Macro Photography
The latest iPhones feature improved macro photography capabilities, allowing you to capture incredible close-up shots of small subjects.
8. How Can dfphoto.net Help You with Your Photography Needs?
dfphoto.net is your ultimate resource for all things photography. Whether you’re a beginner or a professional, we offer a wealth of information and resources to help you improve your skills and explore your passion.
8.1. Tutorials and Guides
Access a wide range of tutorials and guides on various photography topics, including camera settings, composition techniques, lighting, and editing.
8.2. Photo Galleries
Browse stunning photo galleries showcasing the work of talented photographers from around the world. Get inspired and discover new styles and perspectives.
8.3. Community Forum
Join our vibrant community forum to connect with other photographers, share your work, ask questions, and get feedback.
8.4. Gear Reviews
Read in-depth reviews of the latest cameras, lenses, and accessories. Make informed decisions and find the right gear for your needs.
8.5. Workshops and Courses
Participate in workshops and courses led by experienced instructors. Learn new skills and techniques in a hands-on environment.
Address: 1600 St Michael’s Dr, Santa Fe, NM 87505, United States.
Phone: +1 (505) 471-6001
Website: dfphoto.net
9. What are the Five Key Search Intents for “How to Export iPhone Photos to Windows?”
Understanding the search intent behind the query “How To Export Iphone Photos To Windows” is crucial for providing relevant and helpful content. Here are five key search intents:
-
Informational: Users want to learn the different methods for transferring photos from their iPhone to a Windows PC.
-
Tutorial: Users are looking for step-by-step instructions on how to perform the transfer.
-
Troubleshooting: Users are experiencing issues during the transfer process and need help resolving them.
-
Comparison: Users want to compare different transfer methods to determine the best option for their needs.
-
Software Recommendation: Users are looking for recommendations for third-party software to facilitate the transfer.
10. Frequently Asked Questions (FAQ) about Exporting iPhone Photos to Windows
10.1. Can I export photos from my iPhone to Windows without iTunes?
Yes, you can export photos from your iPhone to Windows without iTunes by using the Apple Devices app, File Explorer, iCloud Photos, third-party apps, or emailing them.
10.2. Why are my iPhone photos not showing up on my Windows PC?
Your iPhone photos may not show up on your Windows PC due to connection issues, missing drivers, or incorrect settings. Ensure your iPhone is trusted, the Apple Devices app is installed, and drivers are up to date.
10.3. How do I convert HEIC photos to JPEG on Windows?
You can convert HEIC photos to JPEG on Windows using CopyTrans HEIC for Windows, online converters, or by changing your iPhone’s camera settings to capture photos in JPEG format.
10.4. How do I transfer large videos from my iPhone to Windows?
To transfer large videos, use a USB connection with the Apple Devices app or File Explorer. iCloud Photos can also be used, but it may take longer depending on your internet speed.
10.5. Is it safe to use online converters for my photos?
Using online converters carries some risk, as your photos are uploaded to a third-party server. Avoid using online converters for sensitive or private photos.
10.6. How do I ensure my photos are not compressed during transfer?
To ensure your photos are not compressed, use methods that preserve the original quality, such as USB transfer with the Apple Devices app or File Explorer, and ensure “Download and Keep Originals” is enabled in iCloud Photos.
10.7. What should I do if my iPhone is not recognized by my Windows PC?
If your iPhone is not recognized, check the USB connection, trust the computer on your iPhone, update the Apple Devices app, restart your devices, and reinstall drivers.
10.8. How do I organize my photos on Windows after transferring them?
Organize your photos by creating a folder structure based on date, event, or category. Use metadata and tags to make them easier to search and manage.
10.9. What are the best third-party apps for transferring photos from iPhone to Windows?
Some of the best third-party apps for transferring photos from iPhone to Windows include CopyTrans Photo, iMazing, and DearMob iPhone Manager.
10.10. How do I back up my iPhone photos on Windows?
Back up your iPhone photos on Windows by copying them to an external hard drive, using cloud storage services like Google Photos or OneDrive, or using a NAS device.
Ready to effortlessly transfer your iPhone photos to your Windows PC? Visit dfphoto.net for more in-depth tutorials, gear reviews, and a vibrant community of photography enthusiasts! Let us help you capture, preserve, and share your memories with ease.