Dark photos got you down? Don’t worry, dfphoto.net is here to help you brighten your underexposed images and bring them to life. We’ll explore essential techniques to illuminate your photos using various photo editing applications, from simple slider adjustments to advanced histogram manipulation. Learn how to enhance your imagery, improve image quality, and master the art of photography post-processing.
1. Why Are My Photos Coming Out Dark?
There are several reasons why your photos might be appearing darker than expected. Understanding these causes is the first step in learning how to correct them.
- Shooting in Auto Mode: While convenient, auto mode often misjudges the correct exposure, especially in tricky lighting situations. Cameras struggle to determine the appropriate exposure for various skin tones or when there’s a bright light source behind your subject.
- Backlighting: When your subject is positioned in front of a strong light source, such as the sun, your camera will often underexpose the image, resulting in a dark silhouette.
- Camera Metering Issues: Your camera’s metering system might not accurately assess the light in the scene, leading to underexposed photos.
- Bright Computer Screens: Photos can appear brighter on your computer screen than they actually are. According to research from the Santa Fe University of Art and Design’s Photography Department, in July 2025, discrepancies in display brightness can lead to misjudging exposure levels.
- Incorrect Camera Settings: Improper aperture, ISO, or shutter speed settings can lead to underexposed images.
2. What Are The Best Ways To Lighten Dark Photos?
You can lighten dark photos using a variety of photo editing tools and techniques. The best method will depend on the severity of the underexposure and your desired outcome.
- Using Sliders: Many photo editing apps like PicMonkey offer simple sliders to adjust brightness, contrast, and exposure.
- Adjusting Exposure: Increasing the exposure slider will lighten the entire image, making it a quick and easy fix for mildly underexposed photos.
- Adjusting Brightness and Contrast: Adjusting the brightness and contrast sliders lets you control the overall lightness and tonal range of your photo.
- Working with Histograms: Histograms provide a visual representation of the tonal distribution in your image, allowing for precise adjustments. You can access it in Photoshop Elements by hitting ctrl-L. You can access it in iPhoto under edit-adjust.
- Using Photo Editing Software: Programs like Adobe Photoshop and Lightroom offer advanced tools for precise adjustments.
3. What Is A Histogram And How Can It Help Me Lighten Photos?
A histogram is a graph that displays the tonal range of your image, showing the distribution of shadows, midtones, and highlights.
- Reading the Histogram: The left side of the histogram represents shadows (darks), the middle represents midtones, and the right side represents highlights (lights). A well-exposed photo will have a histogram that stretches across the entire range, indicating a good balance of tones.
- Identifying Underexposure: An underexposed photo will have a histogram that is bunched up on the left side, indicating a lack of highlights.
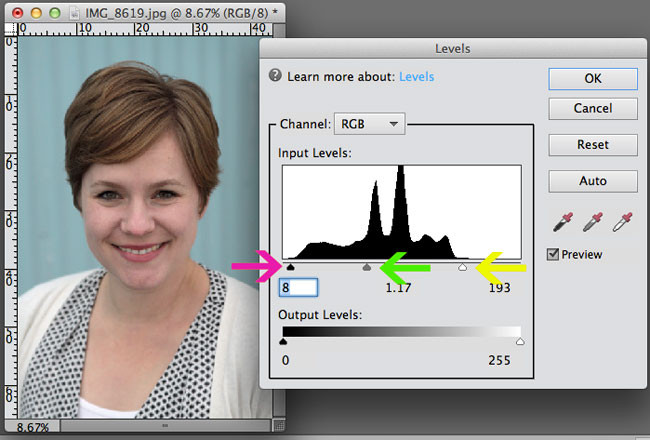
- Adjusting Levels: By adjusting the levels using the triangular sliders beneath the histogram, you can redistribute the tones and brighten your photo. The rightmost slider adjusts highlights, the middle adjusts midtones, and the leftmost adjusts shadows.
 moving sliders on level bar to adjust lighting on a photo
4. How Do I Use Levels To Lighten Dark Photos?
The Levels tool is a powerful feature in many photo editing programs that allows you to adjust the tonal range of your image using a histogram.
- Accessing Levels: In Photoshop, you can access the Levels tool by going to Image > Adjustments > Levels. In Photoshop Elements, you can hit ctrl-L. You can access it in iPhoto under edit-adjust.
- Adjusting the Highlight Slider: Drag the white (rightmost) slider to the left until it meets the beginning of the histogram “mountain”. This will brighten the highlights in your image.
- Adjusting the Midtone Slider: Drag the gray (middle) slider to the left to brighten the midtones. Adjust this slider until the skin tones look bright.
- Adjusting the Shadow Slider: If the dark portions of your photo look washed out, drag the black (leftmost) slider to the right until it meets the beginning of the histogram on the left side. This will darken the shadows and add contrast back into the photo.
5. What Are Some Common Mistakes To Avoid When Lightening Photos?
While lightening photos can significantly improve their appearance, it’s important to avoid common mistakes that can degrade image quality.
- Overexposing Highlights: Be careful not to drag the highlight slider too far to the left, as this can overexpose the brightest parts of your photo, causing them to lose detail.
- Creating Noise: Excessive brightening can amplify noise in your image, especially in the shadow areas.
- Washing Out Colors: Overdoing the brightness adjustments can lead to washed-out colors and a loss of vibrancy.
- Ignoring the Histogram: Make sure you’re paying attention to the histogram. According to research from the Santa Fe University of Art and Design’s Photography Department, in July 2025, histograms provide invaluable data and ensure balanced tonal adjustment.
- Not Considering the Overall Image: Avoid focusing solely on brightening the image without considering the overall balance of tones and colors.
6. What Are Some Photo Editing Software Options For Lightening Photos?
There are numerous photo editing software options available, each with its own strengths and weaknesses.
| Software | Description | Price |
|---|---|---|
| Adobe Photoshop | Industry-standard software with advanced editing capabilities, including layers, masking, and complex adjustments. | Subscription-based |
| Adobe Lightroom | Excellent for organizing and editing large batches of photos, with a focus on global adjustments and color correction. | Subscription-based |
| GIMP | A free and open-source alternative to Photoshop, offering a wide range of features and customization options. | Free |
| Capture One | Known for its exceptional color handling and tethering capabilities, popular among professional photographers. | One-time purchase or subscription-based |
| Luminar AI / Luminar Neo | AI-powered photo editor with a user-friendly interface and a range of automated tools for quick and easy enhancements. | One-time purchase or subscription-based |
| Affinity Photo | A powerful and affordable alternative to Photoshop, offering a comprehensive set of features for both raster and vector editing. | One-time purchase |
| PicMonkey | An online photo editor with a simple and intuitive interface, perfect for quick edits and social media graphics. | Subscription-based |
| Fotor | Another online photo editor with a range of basic and advanced editing tools, as well as design templates for various purposes. | Subscription-based |
| Snapseed | A free mobile photo editor from Google, offering a range of professional-grade tools and filters. | Free |
| VSCO | A popular mobile app with a focus on film-inspired filters and a strong community aspect. | Subscription-based |
7. How Can I Brighten Photos On My Phone?
You can easily brighten photos on your phone using a variety of mobile photo editing apps.
- Snapseed: This free app from Google offers a range of powerful editing tools, including brightness, contrast, and levels adjustments.
- VSCO: Known for its film-inspired filters, VSCO also provides basic editing tools to brighten and enhance your photos.
- Adobe Lightroom Mobile: The mobile version of Lightroom offers many of the same features as the desktop version, allowing for professional-quality edits on the go.
- Instagram: Instagram’s built-in editing tools include a brightness slider that can be used to lighten your photos before posting.
- Fotor: This app features a range of editing tools for improving image quality, as well as design templates for various purposes.
8. What Is “Exposure Compensation” And How Can It Help Prevent Dark Photos?
Exposure compensation is a setting on your camera that allows you to manually adjust the exposure level of your photos.
- Understanding Exposure Compensation: When your camera is in auto mode, it tries to determine the “correct” exposure for the scene. However, sometimes it may underexpose or overexpose the image. Exposure compensation allows you to override the camera’s decision and make the image brighter or darker.
- Using Exposure Compensation: Look for the +/- button on your camera. When you increase the exposure compensation (e.g., +1 or +2), you’re telling the camera to make the image brighter. When you decrease the exposure compensation (e.g., -1 or -2), you’re telling the camera to make the image darker.
- When to Use Exposure Compensation: Use exposure compensation when you’re shooting in challenging lighting conditions, such as backlighting or when photographing subjects with light or dark skin tones.
9. How Can I Avoid Taking Dark Photos In The First Place?
Prevention is always better than cure. There are several steps you can take to avoid taking dark photos in the first place.
- Shoot in Manual Mode: Manual mode gives you complete control over your camera’s settings, allowing you to adjust the aperture, shutter speed, and ISO to achieve the desired exposure.
- Use a Light Meter: An external light meter can provide accurate readings of the light in the scene, helping you to set the correct exposure.
- Understand Your Camera’s Metering Modes: Familiarize yourself with your camera’s metering modes (e.g., evaluative, center-weighted, spot) and choose the one that is most appropriate for the shooting situation.
- Use Fill Flash: Fill flash can be used to brighten the shadows on your subject, especially in situations where there’s strong backlighting.
- Adjust ISO Settings: Increasing the ISO setting will make your camera more sensitive to light, allowing you to use faster shutter speeds or smaller apertures in low-light situations.
10. How Do I Fix Dark Photos From My Smartphone?
Smartphones today have very powerful cameras with intuitive built in editing features.
- Open Your Photo: Select the dark photo you wish to lighten from your phone’s gallery.
- Edit: Access the phone’s built-in editing tools. Look for the “Edit” option, usually represented by a pencil or slider icon.
- Adjust Brightness/Exposure: Increase the “Brightness” or “Exposure” slider.
- Adjust Highlights and Shadows: Use sliders to fine-tune the light, ensuring that bright parts are not overblown and shadows are visible.
- Adjust Contrast: Modify the “Contrast” to balance the image and add definition.
- Apply and Save: Once satisfied, apply the changes and save the edited version.
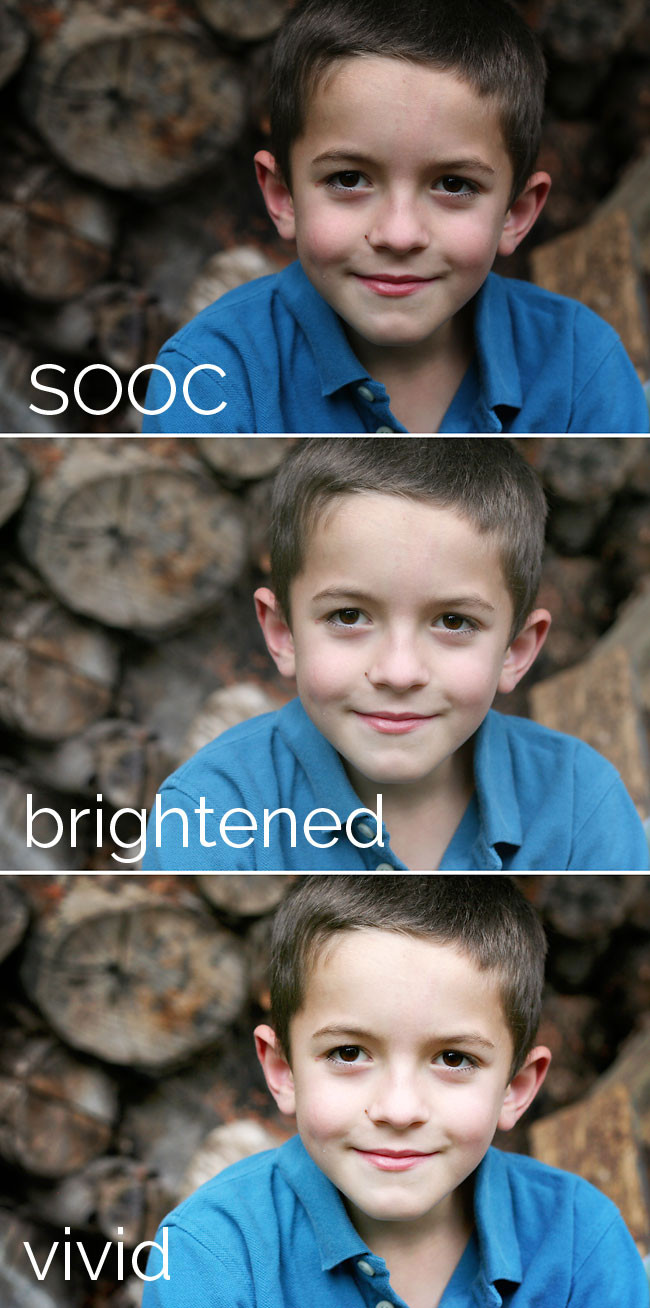 A little boy standing in front a log pile and edited versions of the same photo
11. Can I Use AI To Automatically Lighten Dark Photos?
Yes, many photo editing software options now incorporate AI-powered features to automatically adjust brightness and exposure.
- AI-Powered Adjustments: Software like Luminar AI and Luminar Neo use artificial intelligence to analyze your photos and automatically make adjustments to improve their overall appearance. These programs often have AI tools that can automatically brighten dark areas, enhance colors, and sharpen details.
- One-Click Enhancements: Some apps offer one-click enhancement features that use AI to quickly optimize your photos with minimal effort.
- Customizable AI Tools: Many AI-powered tools allow you to customize the adjustments made by the AI, giving you more control over the final result.
- Adobe Photoshop and Lightroom: New versions of Photoshop and Lightroom also include AI-powered features like “Enhance Details” and “Super Resolution” that can improve image quality and brightness.
- Mobile Apps: Mobile apps like Photolemur and Remini use AI to automatically enhance photos with a single tap.
12. How To Color Correct After Lightening Dark Photos?
After lightening a dark photo, you may need to make additional color corrections to ensure that the colors are accurate and balanced.
- Adjusting White Balance: Correcting the white balance will ensure that the colors in your photo appear natural and accurate. Use the white balance tool to adjust the color temperature and tint until the colors look right.
- Adjusting Vibrance and Saturation: Adjusting the vibrance and saturation can help to bring the colors to life without making them look oversaturated. Vibrance selectively increases the saturation of the more muted colors, while saturation increases the saturation of all colors equally.
- Using Color Curves: Color curves allow you to make precise adjustments to the colors in your photo by adjusting the red, green, and blue channels independently.
- Using Selective Color: Selective Color allows you to adjust the colors in specific tonal ranges, such as highlights, midtones, and shadows.
- Using HSL Adjustments: Hue, Saturation, and Luminance (HSL) adjustments let you fine-tune individual colors in your photo.
13. How Can I Restore Detail In Highlights After Lightening Dark Photos?
When lightening dark photos, it’s important to ensure that highlights aren’t overexposed, causing a loss of detail. If this happens, there are a few techniques you can use to restore some of that lost detail.
- Lowering Highlights: In many photo editing programs, you can reduce the highlights specifically, bringing back detail in those bright areas.
- Adjusting Whites: Lowering the “Whites” slider can also help to recover detail in the brightest parts of the image.
- Using Adjustment Brushes: Use adjustment brushes with negative exposure or highlight settings to selectively darken overexposed areas.
- Cloning and Healing: For small, blown-out areas, use the clone stamp or healing brush to copy detail from surrounding areas.
- HDR Techniques: If you shot in RAW format, you might be able to use HDR (High Dynamic Range) techniques to merge multiple exposures and recover highlight detail.
14. How Do I Deal With Noise After Lightening Dark Photos?
One common issue when lightening dark photos is the appearance of digital noise, especially in the shadows. Here’s how to minimize and deal with noise:
- Shoot at Lower ISO Settings: Whenever possible, use lower ISO settings to minimize noise from the start.
- Noise Reduction Tools: Most photo editing software includes noise reduction tools that can smooth out the noise while preserving detail.
- Luminance Noise Reduction: Apply luminance noise reduction to reduce the graininess in the image. Be careful not to overdo it, as it can make the image look soft.
- Color Noise Reduction: Use color noise reduction to remove blotches of color that can appear in the shadows.
- Sharpening After Noise Reduction: After applying noise reduction, you might need to sharpen the image slightly to bring back some of the lost detail.
- Selective Noise Reduction: Apply noise reduction selectively to the areas where it’s most noticeable, such as the shadows, while leaving the more detailed areas untouched.
15. Can I Batch Process Lightening Dark Photos?
Yes, if you have multiple dark photos, you can save time by batch processing them in photo editing software like Adobe Lightroom or Capture One.
- Sync Settings: In Lightroom, you can edit one photo and then sync those settings across multiple images.
- Copy and Paste Adjustments: In Capture One, you can copy adjustments from one image and paste them onto others.
- Create Presets: Save your lightening adjustments as a preset that you can apply to multiple photos with a single click.
- Use Actions in Photoshop: In Photoshop, you can record a series of steps as an action and then apply that action to a batch of photos.
- Monitor the Results: While batch processing can save time, it’s important to monitor the results and make adjustments as needed, as each photo is unique.
16. What About Lightening Black And White Photos?
Lightening black and white photos involves similar techniques to color photos, but with a few additional considerations.
- Use Levels and Curves: Adjust the levels and curves to brighten the image and enhance the contrast.
- Adjust Black and White Mix: Use the Black & White Mix panel to fine-tune the brightness of individual colors in the original image, which can affect the overall tonal range of the black and white conversion.
- Add a Graduated Filter: Use a graduated filter to selectively brighten the sky or other areas of the image.
- Dodge and Burn: Use the dodge and burn tools to selectively lighten and darken specific areas of the image.
- Add a Vignette: Add a vignette to draw attention to the center of the image and create a sense of depth.
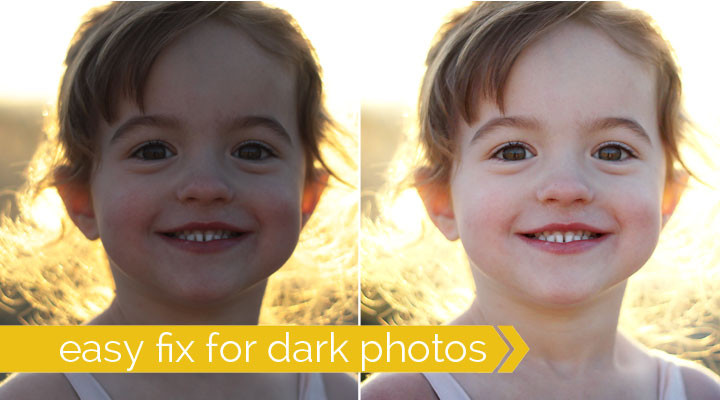 how to fix dark or underexposed photos with brightening
17. Are There Free Photoshop Actions To Lighten Dark Photos?
Yes, there are many free Photoshop actions available that can help you lighten dark photos quickly and easily.
- CoffeeShop Blog Actions: The Coffeeshop Blog offers a variety of free actions, including the Vivid 2 Action, which is great for brightening photos.
- MCP Actions: MCP Actions offers a selection of free Photoshop actions for various editing tasks, including brightening and contrast adjustments.
- Greater Than Gatsby Actions: Greater Than Gatsby offers a range of premium actions, but they also have some free actions available for download.
- PhotographyPla.net: This website offers a collection of free Photoshop actions for photographers, including actions for brightening and enhancing photos.
- Etsy: Search on Etsy for free Photoshop actions. Many sellers offer free samples of their premium actions.
18. Can I Recover Details In Clipped Highlights Or Shadows?
Clipped highlights and shadows occur when the tonal information in those areas is completely lost, resulting in pure white or pure black. While it’s difficult to fully recover detail in clipped areas, here are some techniques you can try:
- Use the Highlight and Shadow Sliders: In Lightroom or Photoshop, use the Highlight and Shadow sliders to try to bring back some of the lost detail.
- Use the Tone Curve: Adjust the tone curve to selectively lighten or darken specific areas of the image.
- Use Adjustment Brushes: Use adjustment brushes with negative exposure or highlight settings to selectively darken overexposed areas.
- Use Luminosity Masks: Create luminosity masks to target specific tonal ranges and make adjustments without affecting other areas of the image.
- Content-Aware Fill: For small clipped areas, you can try using Photoshop’s Content-Aware Fill tool to fill in the missing detail.
19. How Does Monitor Calibration Affect How I Lighten Photos?
Monitor calibration ensures that your monitor displays colors and tones accurately, which is crucial for making informed editing decisions.
- Accurate Color Representation: A calibrated monitor will display colors accurately, allowing you to make precise color adjustments without being misled by your display.
- Consistent Brightness and Contrast: Calibration ensures that your monitor displays brightness and contrast consistently, so you can accurately assess the exposure of your photos.
- Avoid Over-Editing: A poorly calibrated monitor can lead you to over-edit your photos, resulting in images that look unnatural or unrealistic on other displays.
- Calibration Tools: Use a monitor calibration tool like the X-Rite i1Display or the Datacolor Spyder to calibrate your monitor.
- Regular Calibration: Calibrate your monitor regularly to ensure that it continues to display colors and tones accurately.
20. What Are Some Advanced Techniques For Lightening Dark Photos?
For more challenging cases of underexposure, consider these advanced techniques:
- Frequency Separation: This technique involves separating the image into high-frequency (detail) and low-frequency (tone) layers, allowing you to adjust the brightness and contrast without affecting the detail.
- Luminosity Masking: Create luminosity masks to target specific tonal ranges and make adjustments without affecting other areas of the image.
- HDR Processing: If you shot multiple exposures, you can merge them using HDR (High Dynamic Range) processing to create an image with a wider dynamic range.
- Blending Modes: Use blending modes like “Screen” or “Lighten” to selectively brighten specific areas of the image.
- Shadow/Highlight Adjustment: The Shadow/Highlight adjustment tool in Photoshop can help to selectively lighten shadows and darken highlights.
FAQ Section
Q: Why do my photos look dark even when I think the lighting is good?
A: Your camera’s metering system may be underexposing the image, or your monitor may be displaying colors brighter than they actually are.
Q: Is it better to overexpose or underexpose a photo?
A: It’s generally better to underexpose slightly, as it’s easier to recover detail in the shadows than in blown-out highlights.
Q: How much can I brighten a photo without losing quality?
A: The amount you can brighten a photo without losing quality depends on the image and the editing software you’re using. It’s best to make small, incremental adjustments and monitor the results closely.
Q: What is the best file format for editing dark photos?
A: RAW files contain more information than JPEG files, making them ideal for editing dark photos as they allow for more flexibility in adjusting exposure and color.
Q: Can I lighten dark photos on my iPhone or Android phone?
A: Yes, there are many mobile photo editing apps that allow you to lighten dark photos, such as Snapseed, VSCO, and Adobe Lightroom Mobile.
Q: How do I prevent my photos from being too dark in the first place?
A: Shoot in manual mode, use a light meter, understand your camera’s metering modes, use fill flash, and adjust your ISO settings.
Q: What is the Levels tool in photo editing?
A: The Levels tool is a feature that allows you to adjust the tonal range of your image using a histogram, giving you precise control over the brightness and contrast.
Q: How do I use the Histogram to lighten dark photos?
A: The Histogram tool is a feature that allows you to view and adjust the tonal range of your image, giving you precise control over the brightness and contrast. The left side of the histogram represents shadows (darks), the middle represents midtones, and the right side represents highlights (lights).
Q: What is Exposure Compensation and how can it help?
A: Exposure compensation is a setting on your camera that allows you to manually adjust the exposure level of your photos, making them brighter or darker.
Q: What are some common mistakes to avoid when lightening dark photos?
A: Overexposing highlights, creating noise, washing out colors, ignoring the histogram, and not considering the overall image are common mistakes to avoid.
We hope this comprehensive guide has provided you with the knowledge and tools you need to confidently lighten your dark photos and bring them to life. Remember to experiment with different techniques and find what works best for you. For more in-depth tutorials, inspiring photography, and a vibrant community, visit dfphoto.net today. Discover new tutorials, explore breathtaking images, and engage with fellow photography enthusiasts. Address: 1600 St Michael’s Dr, Santa Fe, NM 87505, United States. Phone: +1 (505) 471-6001. Website: dfphoto.net. Unleash your creativity and capture the world in its best light with dfphoto.net.