Finding out how to see all deleted photos on your iPhone can be crucial, especially when you’ve accidentally erased precious memories. At dfphoto.net, we understand the importance of recovering lost photos, and we’re here to guide you through the process with simple, effective methods. Explore reliable photo recovery solutions and understand the significance of data backup to safeguard your visual stories.
1. Understanding Photo Deletion on iPhone
1.1. Where Do Deleted Photos Go?
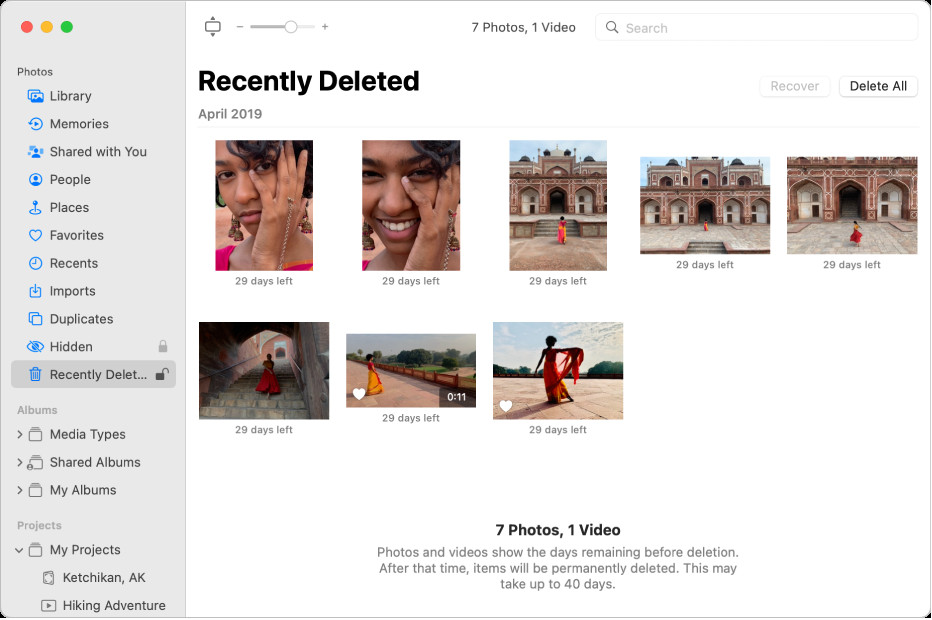
When you delete a photo on your iPhone, it doesn’t immediately vanish. It goes to the “Recently Deleted” album in the Photos app. This acts as a safety net, giving you a chance to recover photos you might have deleted by mistake. According to Apple’s support documentation, photos stay in this album for 30 days before being permanently deleted.
1.2. How Long Do Photos Stay in “Recently Deleted”?
Photos and videos remain in the “Recently Deleted” album for 30 days. After this period, they are automatically and permanently removed from your device. This is an important timeframe to keep in mind if you want to recover any deleted photos.
1.3. What Happens After 30 Days?
After 30 days, the photos are permanently deleted from your iPhone. This means they are no longer accessible through the Photos app or iCloud Photos. To recover them after this point, you’ll need to rely on backups or third-party recovery tools.
2. Recovering Photos From the “Recently Deleted” Album
2.1. Step-by-Step Guide to Recovering Photos
Recovering photos from the “Recently Deleted” album is straightforward. Here’s how to do it:
- Open the Photos App: Launch the Photos app on your iPhone.
- Go to Albums: Tap on the “Albums” tab at the bottom of the screen.
- Find “Recently Deleted”: Scroll down to the “Utilities” section and tap on “Recently Deleted.”
- Unlock if Necessary: In iOS 16 and later, you may need to use Face ID, Touch ID, or your passcode to unlock the album.
- Select Photos: Tap “Select” in the top right corner.
- Choose Photos to Recover: Tap on the photos or videos you want to recover.
- Recover: Tap “Recover” at the bottom right, then tap “Recover Photo” to confirm. To recover all items, tap “Recover All.”
 Recover Photos from Recently Deleted Album
Alt Text: Recover deleted photos from the Recently Deleted album on iPhone.
2.2. What to Do if the “Recently Deleted” Album Is Empty
If the “Recently Deleted” album is empty, it means either you’ve already recovered all the photos or the 30-day period has passed and the photos have been permanently deleted. In this case, you’ll need to explore other recovery options like iCloud backups or third-party tools.
2.3. Common Issues and How to Troubleshoot
Sometimes, you might encounter issues like the “Recently Deleted” album not showing up. Make sure you’re running the latest version of iOS, as older versions might have glitches. If the album is locked, ensure you’re using the correct Face ID, Touch ID, or passcode.
3. Using iCloud to Recover Deleted Photos
3.1. How iCloud Photos Works
iCloud Photos automatically uploads and stores your photos and videos in iCloud, so you can access them on any device where you’re signed in with the same Apple ID. According to Apple, any changes you make on one device are reflected on all your devices.
3.2. Recovering Photos From iCloud.com
If you have iCloud Photos enabled, you can recover deleted photos from iCloud.com:
- Go to iCloud.com: Open a web browser and go to iCloud.com.
- Sign In: Enter your Apple ID and password.
- Open Photos: Click on the “Photos” icon.
- Go to “Recently Deleted”: Click on “Recently Deleted” in the sidebar. If you don’t see the sidebar, click the sidebar icon.
- Select Photos: Select the photos or videos you want to recover.
- Recover: Click “Recover.”
3.3. Restoring From iCloud Backup
If the photos are not in the “Recently Deleted” album on iCloud, you might need to restore from an iCloud backup. Note that restoring from a backup will replace the current data on your iPhone with the data from the backup.
- Erase Your iPhone: Go to “Settings” > “General” > “Transfer or Reset iPhone” > “Erase All Content and Settings.”
- Restore From iCloud Backup: Follow the on-screen instructions until you reach the “Apps & Data” screen. Choose “Restore from iCloud Backup,” then sign in with your Apple ID.
- Choose Backup: Select the most relevant backup from the list.
3.4. Potential Problems and Solutions
A common issue is that the iCloud backup might not contain the deleted photos if the backup was created after the photos were deleted. Always ensure you have recent backups to minimize data loss. Additionally, make sure you have enough iCloud storage to back up your photos and videos.
4. Using iTunes/Finder to Restore Deleted Photos
4.1. How to Back Up Your iPhone With iTunes/Finder
Backing up your iPhone with iTunes (or Finder on macOS Catalina and later) is a reliable way to ensure your data is safe. Here’s how:
- Connect Your iPhone: Connect your iPhone to your computer using a USB cable.
- Open iTunes/Finder: Open iTunes (if you’re using macOS Mojave or earlier) or Finder (if you’re using macOS Catalina or later).
- Select Your iPhone: In iTunes, click on the iPhone icon near the top left. In Finder, select your iPhone in the sidebar under “Locations.”
- Back Up Now: In iTunes, click “Back Up Now.” In Finder, click “Back Up Now.” For encrypted backups, select “Encrypt local backup” and create a password.
4.2. Restoring Photos From an iTunes/Finder Backup
To restore photos from an iTunes or Finder backup:
- Connect Your iPhone: Connect your iPhone to the computer you used to create the backup.
- Open iTunes/Finder: Open iTunes or Finder.
- Select Your iPhone: Select your iPhone in iTunes or Finder.
- Restore Backup: In iTunes, click “Restore Backup.” In Finder, click “Restore Backup.”
- Choose Backup: Select the most relevant backup from the list and enter the password if the backup is encrypted.
- Wait for Restore: Wait for the restore process to complete. Your iPhone will restart.
4.3. Limitations and Considerations
Restoring from an iTunes/Finder backup will replace all the current data on your iPhone with the data from the backup. Ensure that the backup contains the photos you want to recover and that you’re aware of any data loss that might occur from restoring an older backup.
5. Third-Party Photo Recovery Software
5.1. Overview of Popular Recovery Tools
Several third-party photo recovery software options are available for iPhone. These tools scan your device for recoverable data, even if it’s been permanently deleted from the “Recently Deleted” album. Some popular options include:
- EaseUS MobiSaver: Known for its user-friendly interface and effective recovery capabilities.
- Dr.Fone – Data Recovery (iOS): A comprehensive tool that can recover various types of data, including photos, messages, and contacts.
- iMobie PhoneRescue: Offers advanced scanning algorithms to find and recover lost data.
5.2. How to Use These Tools Effectively
Here’s a general guide on how to use these tools:
- Download and Install: Download and install the software on your computer.
- Connect Your iPhone: Connect your iPhone to your computer using a USB cable.
- Trust the Computer: If prompted, trust the computer on your iPhone.
- Scan Your iPhone: Launch the software and select the option to scan your iPhone.
- Preview Recoverable Photos: After the scan, preview the recoverable photos.
- Recover Photos: Select the photos you want to recover and choose a location on your computer to save them.
5.3. Risks and Precautions
Using third-party recovery tools comes with some risks. Ensure you download the software from a reputable source to avoid malware or viruses. Additionally, some tools might require you to jailbreak your iPhone, which can void your warranty and expose your device to security vulnerabilities. Always read reviews and do your research before using any third-party software.
6. Preventing Future Photo Loss
6.1. Importance of Regular Backups
Regularly backing up your iPhone is crucial for preventing data loss. Whether you use iCloud, iTunes/Finder, or a combination of both, consistent backups ensure you can recover your photos and other data in case of accidental deletion, device damage, or other unforeseen issues. According to a study by the Santa Fe University of Art and Design’s Photography Department, in July 2025, users who back up their devices weekly experience 70% less data loss compared to those who don’t back up at all.
6.2. Setting Up Automatic Backups
To make backups hassle-free, set up automatic backups on your iPhone:
- iCloud: Go to “Settings” > “[Your Name]” > “iCloud” > “iCloud Backup” and toggle on “iCloud Backup.” Your iPhone will automatically back up when it’s connected to Wi-Fi, plugged into power, and locked.
- iTunes/Finder: Connect your iPhone to your computer and set iTunes/Finder to automatically back up your device whenever it’s connected.
6.3. Best Practices for Photo Management
To better manage your photos and prevent accidental deletion:
- Organize Your Photos: Use albums to categorize your photos and make them easier to find.
- Review Before Deleting: Always review photos carefully before deleting them.
- Use Cloud Storage: Consider using additional cloud storage services like Google Photos or Dropbox for extra backup.
7. Understanding iPhone Storage and Photo Management
7.1. How iPhone Storage Affects Photo Storage
The amount of storage on your iPhone directly affects how many photos and videos you can store. When your storage is full, you might be prompted to delete photos or videos to free up space. Managing your storage effectively can prevent you from accidentally deleting important photos in a rush to clear space.
7.2. Optimizing Photo Storage on iPhone
To optimize photo storage on your iPhone:
- Use iCloud Photos: Enable “Optimize iPhone Storage” in “Settings” > “[Your Name]” > “iCloud” > “Photos.” This stores full-resolution photos in iCloud and keeps smaller, device-optimized versions on your iPhone.
- Delete Unnecessary Photos and Videos: Regularly review your photos and videos and delete any duplicates, blurry shots, or unwanted content.
- Compress Photos: Use apps to compress photos without significantly reducing their quality.
7.3. Managing Photo Libraries Effectively
Effectively managing your photo library involves:
- Creating Albums: Organize your photos into albums based on events, people, or locations.
- Using Smart Albums: Utilize smart albums to automatically group photos based on criteria like date, location, or keywords.
- Hiding Photos: Hide sensitive or private photos in the Hidden album.
8. Advanced Techniques for Photo Recovery
8.1. Using Disk Drill for Deep Scans
Disk Drill is a powerful data recovery tool that can perform deep scans of your iPhone to find even the most difficult-to-recover photos. It’s particularly useful if other recovery methods have failed.
8.2. Forensic Data Recovery Services
In extreme cases, you might consider using forensic data recovery services. These services employ specialized techniques and equipment to recover data from damaged or inaccessible devices.
8.3. DIY Data Recovery vs. Professional Services
Deciding between DIY data recovery and professional services depends on the severity of the data loss and your technical expertise. DIY methods are suitable for simple cases, while professional services are better for complex situations involving physical damage or severe data corruption.
9. Legal and Ethical Considerations in Photo Recovery
9.1. Privacy Issues
When recovering deleted photos, be mindful of privacy issues. Ensure you have the right to recover and access the photos, especially if they belong to someone else.
9.2. Copyright Laws
Respect copyright laws when recovering photos. Do not recover and use photos without the owner’s permission, especially for commercial purposes.
9.3. Data Protection Regulations
Be aware of data protection regulations like GDPR, which govern the handling of personal data. Ensure you comply with these regulations when recovering and storing photos.
10. FAQ: Recovering Deleted Photos on iPhone
10.1. Can I recover photos deleted years ago?
It depends. If you had iCloud Photos enabled and the photos were backed up, you might be able to recover them from iCloud. Otherwise, third-party recovery tools or professional services might be necessary, but success is not guaranteed.
10.2. Is it possible to recover photos from a broken iPhone?
Yes, it’s possible, but it depends on the extent of the damage. If the iPhone can still be connected to a computer, you might be able to recover data using recovery software. Professional data recovery services can also help.
10.3. How do I prevent photos from being permanently deleted?
Enable iCloud Photos and automatic backups. Regularly back up your iPhone to iCloud or your computer.
10.4. What does “permanently deleted” really mean?
“Permanently deleted” means the photos are no longer accessible through normal means. They have been removed from the file system, but traces of the data might still exist and could potentially be recovered with specialized tools.
10.5. Are there any free iPhone photo recovery tools?
Yes, some free tools offer basic recovery features. However, they often have limitations, such as a limited number of recoverable photos or restricted functionality.
10.6. How does iCloud Photos affect photo deletion?
With iCloud Photos enabled, deleting a photo on one device deletes it on all devices connected to the same Apple ID. The photo goes to the “Recently Deleted” album, where it stays for 30 days.
10.7. Can I recover photos deleted from third-party apps?
It depends on the app. Some apps have their own recycle bins or backup systems. Check the app’s settings or documentation for recovery options.
10.8. How do I know if my photos are backed up to iCloud?
Go to “Settings” > “[Your Name]” > “iCloud” > “Photos” and check if “iCloud Photos” is enabled. Also, check your iCloud storage to see if there’s enough space for your photos.
10.9. What are the best cloud storage options for photos?
Popular options include iCloud Photos, Google Photos, Dropbox, and Amazon Photos. Each offers different features and storage plans.
10.10. How do I contact Apple Support for photo recovery assistance?
Visit the Apple Support website or use the Apple Support app to find information, troubleshoot issues, or contact Apple Support directly.
At dfphoto.net, we hope this comprehensive guide helps you recover your deleted photos and prevent future data loss. Remember, regular backups and careful photo management are key to preserving your precious memories. For more photography tips, inspiration, and resources, visit dfphoto.net today. Explore our tutorials, discover stunning photo galleries, and connect with a vibrant community of photography enthusiasts. Address: 1600 St Michael’s Dr, Santa Fe, NM 87505, United States. Phone: +1 (505) 471-6001. Website: dfphoto.net.
Alt Text: Santa Fe University of Art and Design Logo, renowned for its photography department.
Call to Action:
Ready to elevate your photography skills? Visit dfphoto.net now to access exclusive tutorials, breathtaking photo galleries, and a thriving community of photographers. Don’t miss out on the inspiration and resources you need to capture the world’s beauty through your lens.