Deleting photos from Shutterfly can be a straightforward process, but it’s essential to understand the different methods and potential pitfalls. At dfphoto.net, we’re dedicated to providing clear, comprehensive guides to help you manage your digital memories effectively, enhancing your photography and visual arts experience. We’ll walk you through deleting individual images, entire albums, and even projects, ensuring you maintain control over your photo collection and leverage the platform’s capabilities to their fullest. Let’s dive into the steps to ensure you can curate your Shutterfly account with ease and precision. We aim to cover all aspects, from removing images to handling common errors, to give you expert-level tips.
1. Understanding Shutterfly’s Photo Storage
Shutterfly offers unlimited photo storage, which is excellent for preserving memories. However, managing this vast collection requires understanding how photos are organized and stored within the platform. Knowing the difference between albums, projects, and the general photo library will help you efficiently delete and organize your images.
1.1. Albums vs. Projects
Albums are primarily for organizing photos, whereas projects involve creating tangible items like photo books, cards, or prints. Deleting a photo from an album removes it from that specific collection but doesn’t necessarily delete it from your overall Shutterfly account. Deleting a photo from a project, on the other hand, removes it from that specific item.
1.2. The Importance of Organization
Maintaining a well-organized Shutterfly account simplifies the deletion process. Regularly reviewing and categorizing your photos into albums can save time when you need to remove unwanted images. Consider creating albums based on events, dates, or themes to streamline your photo management.
2. Step-by-Step Guide to Deleting Photos from Shutterfly
Deleting photos from Shutterfly can be done in several ways, depending on where the photo is located. Whether you’re removing a single image or clearing out an entire album, here’s how to do it.
2.1. Deleting Individual Photos
To delete a single photo from Shutterfly:
- Log into Your Account: Start by logging into your Shutterfly account on their website.
- Navigate to Your Photos: Click on “My Photos” to access your photo library.
- Select the Photo: Browse through your albums or library to find the photo you want to delete and click on it.
- Open the Photo: This will open the selected photo in a larger view.
- Find the Delete Option: Look for the “Options” or “More Options” button, usually represented by three dots. Click on it.
- Select Delete: From the dropdown menu, select “Delete.”
- Confirm Deletion: A confirmation message will appear asking if you’re sure you want to delete the photo. Click “Delete” to confirm.
2.2. Deleting Photos from an Album
Deleting photos from an album is slightly different from deleting individual photos. Here’s how:
- Go to “My Photos”: Log into your account and navigate to the “My Photos” section.
- Open the Album: Find the album containing the photos you want to delete and open it.
- Select Photos: Hover over each photo you wish to remove. A checkmark will appear in the corner. Click the checkmark to select the photo. You can select multiple photos at once.
- Find the Delete Option: Once you’ve selected all the photos, look for the “Options” or “Actions” button at the top of the album.
- Delete Selected: Click on “Delete” (or “Remove from Album”). A confirmation message will appear.
- Confirm: Click “Delete” to remove the photos from the album.
2.3. Deleting Entire Albums
If you want to delete an entire album, follow these steps:
- Navigate to “My Photos”: Log into your Shutterfly account and go to the “My Photos” section.
- Find the Album: Locate the album you want to delete.
- Open Album Options: Hover over the album. An “Options” or “More Options” button (usually three dots) will appear. Click on it.
- Select Delete Album: From the dropdown menu, select “Delete Album.”
- Confirm Deletion: A confirmation message will appear, warning you that this action will delete the entire album and all photos within it. Click “Delete” to confirm.
2.4. Deleting Photos from Projects
Deleting photos from a project, such as a photo book, requires a different approach:
- Go to “My Projects”: Log into your account and navigate to the “My Projects” section.
- Open the Project: Find the project from which you want to delete photos and open it.
- Edit the Project: Click on the “Edit” button to enter the project editor.
- Select the Photo: Navigate to the page containing the photo you want to delete.
- Delete the Photo: Click on the photo to select it. A “Delete” icon (usually a trash can) should appear. Click on the “Delete” icon.
- Confirm Deletion: A confirmation message may appear. Click “Yes” or “Delete” to confirm.
- Save Changes: After deleting the photo, make sure to save your changes to the project.
2.5. Using the Shutterfly App
The Shutterfly app offers a convenient way to manage and delete photos from your mobile device. Here’s how to do it:
- Open the App: Launch the Shutterfly app on your smartphone or tablet.
- Log In: Enter your account credentials to log in.
- Navigate to Photos: Tap on the “Photos” or “My Photos” section.
- Select a Photo: Browse through your albums or library to find the photo you want to delete and tap on it.
- Open Options: Look for the “Options” or “More Options” icon (usually three dots) and tap on it.
- Delete Photo: Select “Delete” from the menu.
- Confirm: Confirm that you want to delete the photo.
2.6. Deleting Multiple Photos at Once
To delete multiple photos simultaneously:
- Go to “My Photos”: Log into your Shutterfly account and navigate to “My Photos.”
- Select the Album: Open the album containing the photos you wish to delete.
- Enable Selection: Look for an option like “Select Photos” or a similar button that allows you to select multiple items.
- Select Photos: Click on each photo you want to delete. A checkmark or similar indicator will appear on the selected photos.
- Delete Selected: Once you’ve selected all the photos, look for the “Delete” button.
- Confirm Deletion: A confirmation message will appear. Confirm that you want to delete the selected photos.
 Deleting photos from Shutterfly using the delete button
3. Common Issues and How to Troubleshoot Them
Sometimes, deleting photos from Shutterfly doesn’t go as planned. Here are some common issues and how to resolve them.
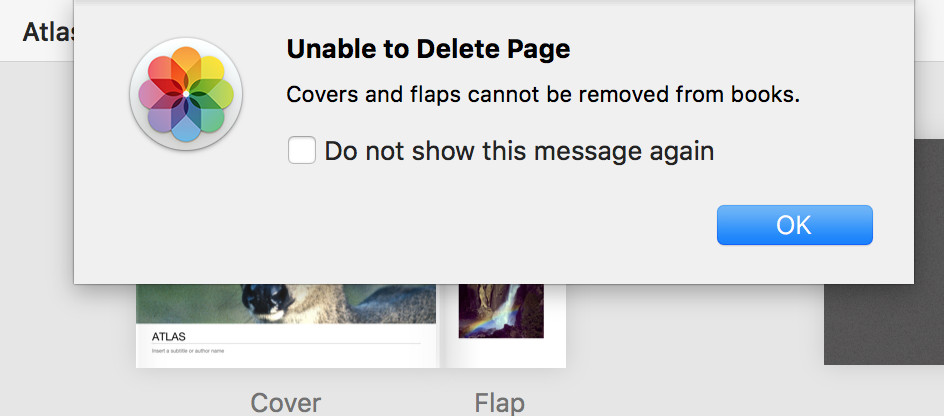
3.1. “Unable to Delete Page: Covers and Flaps Cannot Be Removed from Books”
This error typically occurs when you’re trying to delete a photo from the cover or flap of a photo book while in the “All Pages” view. To fix this:
- Enter Individual Page View: Double-click on the page to enlarge it and enter the individual page view.
- Select and Delete: Now you should be able to select and delete individual photos from the cover or flap.
3.2. Photos Not Deleting
If photos aren’t deleting, try the following:
- Refresh the Page: Sometimes, the issue is simply a temporary glitch. Refreshing the page can resolve it.
- Clear Cache and Cookies: Clear your browser’s cache and cookies to ensure there are no conflicting cached files.
- Try a Different Browser: If the problem persists, try using a different web browser.
- Contact Support: If none of the above solutions work, contact Shutterfly’s customer support for assistance.
3.3. Accidental Deletion
If you accidentally delete a photo, Shutterfly typically keeps deleted photos in aRecently Deleted” or “Trash” section for a certain period.
- Check “Recently Deleted”: Navigate to your account settings or photo library to find the “Recently Deleted” or “Trash” section.
- Restore Photos: Select the accidentally deleted photos and restore them to your library.
- Act Quickly: Keep in mind that photos in the “Recently Deleted” section are usually permanently deleted after a certain timeframe, so act quickly to restore them.
4. Best Practices for Managing Your Shutterfly Account
Effectively managing your Shutterfly account involves more than just deleting photos. Here are some best practices to keep your account organized and optimized.
4.1. Regular Photo Purges
Set aside time regularly to review and delete unwanted photos. This prevents your account from becoming cluttered and makes it easier to find the photos you need.
4.2. Organizing Photos into Albums
Categorize your photos into albums based on events, dates, or themes. This not only makes it easier to find photos but also simplifies the deletion process when you want to remove a group of related images.
4.3. Backing Up Your Photos
While Shutterfly offers unlimited storage, it’s always a good idea to have a backup of your photos. Use external hard drives, cloud storage services, or other backup solutions to ensure your memories are safe.
4.4. Reviewing Projects Regularly
Regularly review your photo projects, such as photo books and cards, to ensure they are up-to-date and accurate. Delete any projects that are no longer needed to keep your account tidy.
5. Understanding Shutterfly’s Terms of Service Regarding Photo Deletion
Familiarize yourself with Shutterfly’s terms of service regarding photo deletion. Understanding their policies can help you avoid any surprises or misunderstandings.
5.1. Data Retention Policies
Shutterfly may have specific data retention policies that dictate how long they keep deleted photos on their servers. Be aware of these policies, especially if you’re concerned about privacy or data security.
5.2. Account Termination
If you decide to terminate your Shutterfly account, understand what happens to your photos. Shutterfly will typically delete all your photos and projects upon account termination, so make sure to back up any important images before closing your account.
6. How Deleting Photos Impacts Your Shutterfly Projects
Deleting photos from your Shutterfly account can impact existing projects. Here’s what you need to know.
6.1. Projects with Deleted Photos
If you delete a photo that is used in a Shutterfly project, such as a photo book or card, the photo will be removed from the project. This can result in blank spaces or missing images in your project.
6.2. Updating Projects After Deletion
After deleting photos, review and update any affected projects to replace the missing images. This ensures that your projects remain complete and visually appealing.
6.3. Avoiding Project Disruptions
To avoid disruptions to your projects, consider creating a separate album for photos used in projects. This way, you can avoid accidentally deleting photos that are essential to your creations.
7. Alternative Photo Storage and Management Options
If Shutterfly doesn’t fully meet your needs, several alternative photo storage and management options are available.
7.1. Cloud Storage Services
Cloud storage services like Google Photos, Amazon Photos, and Dropbox offer convenient ways to store and manage your photos. These services often provide automatic backup, organization tools, and sharing options.
7.2. External Hard Drives
External hard drives provide a physical storage solution for your photos. They offer large storage capacities and can be used to create backups of your entire photo library.
7.3. Photo Management Software
Photo management software like Adobe Lightroom and Capture One provide advanced tools for organizing, editing, and managing your photos. These programs are ideal for photographers and visual artists who need precise control over their images.
8. Advanced Tips for Organizing Your Digital Photos
Beyond the basics, here are some advanced tips for organizing your digital photos and making the deletion process even smoother.
8.1. Using Metadata
Utilize metadata, such as tags, captions, and keywords, to add detailed information to your photos. This makes it easier to search for and categorize images, streamlining the deletion process.
8.2. Implementing a Naming Convention
Establish a consistent naming convention for your photo files. This makes it easier to identify and organize photos based on dates, events, or themes.
8.3. Creating Smart Albums
Many photo management programs offer smart album features, which automatically organize photos based on specific criteria. This can save time and effort when managing large photo libraries.
9. The Benefits of Regularly Managing Your Photo Collection
Regularly managing your photo collection offers numerous benefits, both practical and emotional.
9.1. Saving Time and Effort
An organized photo collection saves time and effort when you need to find specific images. Whether you’re creating a photo book, sharing photos with friends, or simply reminiscing, a well-managed library makes the process easier and more enjoyable.
9.2. Preserving Memories
Organizing and backing up your photos ensures that your memories are preserved for years to come. This is especially important for irreplaceable photos of loved ones, special events, and significant moments in your life.
9.3. Enhancing Creativity
A well-organized photo collection can inspire creativity and help you discover new ways to use your images. Whether you’re a photographer, visual artist, or simply someone who enjoys taking photos, a tidy library can unlock new possibilities.
10. FAQs About Deleting Photos from Shutterfly
Here are some frequently asked questions about deleting photos from Shutterfly.
10.1. Can I recover deleted photos from Shutterfly?
Yes, Shutterfly typically keeps deleted photos in a “Recently Deleted” or “Trash” section for a limited time. You can recover photos from this section before they are permanently deleted.
10.2. How do I delete multiple photos at once on Shutterfly?
To delete multiple photos at once, go to “My Photos,” open the album, enable selection, select the photos, and click “Delete.”
10.3. What happens to my projects if I delete photos?
If you delete a photo used in a project, it will be removed from the project. Review and update your projects to replace any missing images.
10.4. How do I delete an entire album on Shutterfly?
To delete an entire album, go to “My Photos,” hover over the album, open album options, select “Delete Album,” and confirm the deletion.
10.5. Is there a way to back up my Shutterfly photos?
Yes, while Shutterfly offers unlimited storage, it’s recommended to back up your photos to external hard drives or cloud storage services.
10.6. What should I do if I encounter an error while deleting photos?
If you encounter an error, try refreshing the page, clearing your browser’s cache and cookies, or contacting Shutterfly’s customer support.
10.7. How long does Shutterfly keep deleted photos?
Shutterfly’s data retention policies may vary, but deleted photos are typically kept in a “Recently Deleted” section for a limited time before being permanently removed.
10.8. Can I delete photos from the Shutterfly app?
Yes, you can delete photos from the Shutterfly app by navigating to “Photos,” selecting the photo, opening options, and selecting “Delete.”
10.9. What are the best practices for managing my Shutterfly account?
Best practices include regular photo purges, organizing photos into albums, backing up your photos, and reviewing projects regularly.
10.10. How do I avoid accidentally deleting photos used in projects?
Create a separate album for photos used in projects to avoid accidentally deleting them from your main library.
We at dfphoto.net hope this guide has provided you with a comprehensive understanding of how to delete photos from Shutterfly and manage your account effectively. Proper photo management not only saves you time but also ensures that your cherished memories are preserved and easily accessible.
Conclusion: Mastering Photo Management on Shutterfly
Mastering photo management on Shutterfly is essential for anyone looking to preserve and share their visual memories effectively. By understanding the platform’s features, following best practices, and troubleshooting common issues, you can maintain a well-organized and clutter-free account. Remember, regular photo purges, smart organization, and reliable backups are key to ensuring your photos remain accessible and safe.
At dfphoto.net, we are committed to providing you with the knowledge and resources you need to enhance your photography and visual arts journey. Whether you’re a seasoned photographer or just starting out, our guides, tips, and community are here to support you every step of the way.
Ready to take your photography skills to the next level? Explore our extensive collection of tutorials, gear reviews, and inspirational content at dfphoto.net. Join our community of passionate photographers and visual artists and start creating your best work today. Visit dfphoto.net and discover a world of photographic possibilities! Address: 1600 St Michael’s Dr, Santa Fe, NM 87505, United States. Phone: +1 (505) 471-6001.