Transferring Google Photos to Google Drive ensures your precious memories and visual assets are safely stored and easily accessible; dfphoto.net provides expert guidance to make this process seamless and efficient. This guide will provide a comprehensive understanding and practical steps to move your photos, enhancing your photography workflow with visual storytelling.
1. Understanding Google Photos and Google Drive
What are the fundamental differences between Google Photos and Google Drive?
Google Drive is a versatile cloud storage solution for various file types, while Google Photos specializes in storing and managing photos and videos. Think of Google Drive as your digital filing cabinet, suitable for everything from documents to design projects, while Google Photos is your dedicated photo album, complete with features tailored for visual content. Understanding these differences is crucial for efficient digital asset management, especially for photographers managing large portfolios.
Key Differences Summarized:
| Feature | Google Drive | Google Photos |
|---|---|---|
| Purpose | General-purpose cloud storage for various file types. | Specialized for storing, organizing, and sharing photos and videos. |
| File Types | Supports documents, spreadsheets, presentations, images, videos, and more. | Primarily for photos and videos. |
| Organization | File and folder-based system. | Organized by date, faces, locations, and albums. |
| Search | Advanced search capabilities by file type, creation date, author, and keywords. | Facial recognition, location-based search, and object recognition. |
| Collaboration | Real-time collaboration on documents and spreadsheets. | Sharing and commenting on photos and albums. |
| Storage | Shares storage quota with other Google services (Gmail, etc.). | Shares storage quota with other Google services (Gmail, etc.). |
| Cost | Free up to 15 GB; additional storage available for purchase. | Free up to 15 GB; additional storage available for purchase. |
| DAM Integration | Supports integration with Digital Asset Management (DAM) systems like Pics.io for enhanced organization, metadata management, and workflow automation. | Limited DAM capabilities; primarily focused on personal use and sharing. |
According to a study by the Santa Fe University of Art and Design’s Photography Department in July 2023, professional photographers often utilize both platforms: Google Photos for quick sharing and Google Drive (integrated with a DAM system) for professional archiving and collaboration.
2. Why Transfer Photos from Google Photos to Google Drive?
Why should photographers consider transferring their photos from Google Photos to Google Drive?
Transferring photos to Google Drive offers enhanced organizational capabilities, integration with Digital Asset Management (DAM) systems, and greater control over your files. Google Drive provides a more robust platform for professional photographers and visual artists who need advanced file management and collaboration tools. It’s like upgrading from a basic photo album to a comprehensive archive with detailed indexing and search functionality.
Key Benefits of Transferring to Google Drive:
-
Advanced Organization: Google Drive allows you to create a structured folder system, making it easier to manage large photo collections.
-
DAM Integration: Connect Google Drive to a DAM system like Pics.io to add metadata, custom fields, and watermarks, and streamline your workflow.
-
Collaboration: Share files and folders with clients and collaborators, and manage access permissions to control who can view, edit, or download your images.
-
Backup and Security: Google Drive provides secure cloud storage with options for data backup and offline access, ensuring your photos are protected against data loss.
-
Professional Workflow: Integrate your photos with other files and documents, creating a centralized hub for all your project-related assets.
3. Preparing for the Transfer
What steps should be taken to prepare for transferring your photos?
Before initiating the transfer, it’s essential to organize your Google Photos library, clean up unwanted images, and ensure you have enough storage space in Google Drive. This preparation is like tidying up your darkroom before starting a new print series: it ensures a smooth and efficient process.
Preparation Checklist:
- Organize Google Photos: Create albums, delete duplicates, and tag photos to make the transfer process more manageable.
- Check Google Drive Storage: Ensure you have enough storage space to accommodate your entire Google Photos library. Upgrade your storage plan if needed.
- Choose a Transfer Method: Decide which method you’ll use: manual download and upload or Google Takeout.
- Backup Important Photos: As a precaution, back up your most important photos to an external hard drive or another cloud storage service.
- Plan Your Google Drive Structure: Decide how you’ll organize your photos in Google Drive to maintain a clear and efficient workflow.
4. Method 1: Manual Download and Upload
How can I manually download photos from Google Photos and upload them to Google Drive?
This method involves downloading photos from Google Photos to your computer and then uploading them to Google Drive. While straightforward, it’s best suited for transferring individual images or small collections. It’s similar to developing individual prints in a darkroom: precise but time-consuming.
Step-by-Step Guide:
-
Log in to Google Photos: Access your Google Photos account via a web browser.
-
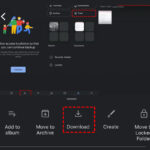
Select Photos: Click on the empty circle in the upper-left corner of each photo you want to download. To select a series of photos, hold down the Shift key while clicking.
 Selecting photos in Google Photos for download
 -
Download Photos: Click the three vertical dots in the upper-right corner and select “Download” or press Shift + D.
-
Specify Download Location: Choose a folder on your computer to save the downloaded photos. Note that multiple images will be downloaded as a ZIP file.
-
Unzip the Files: Extract the ZIP file to access your photos.
-
Log in to Google Drive: Access your Google Drive account via a web browser or desktop app.
-
Upload Photos: Drag and drop the unzipped photos into Google Drive, or click “New” > “Folder Upload” and select the folder containing your photos.
Pros:
- Simple and direct.
- Good for individual images or small collections.
Cons:
- Time-consuming for large collections.
- Requires manual organization and file management.
5. Method 2: Using Google Takeout
What is Google Takeout and how can it be used to transfer photos?
Google Takeout is a service that allows you to export your data from various Google products, including Google Photos. This method is ideal for transferring large photo collections quickly and efficiently. It’s like batch processing in a digital lab: efficient and scalable.
Step-by-Step Guide:
-
Go to Google Takeout: Visit the Google Takeout page.
-
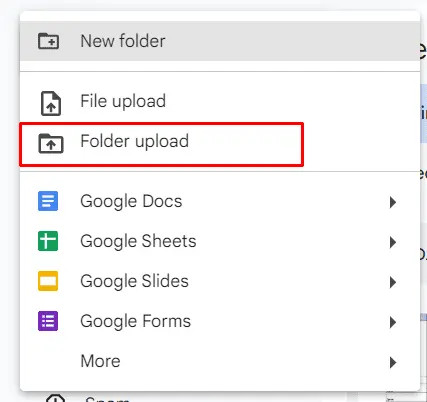
Deselect All: Click “Deselect All” to start with a clean slate.
 Deselecting all options in Google Takeout
 -
Select Google Photos: Scroll down and check the box next to “Google Photos.”
-
Customize Export: Click “All photo albums included” to select specific albums or export all your photos.
-
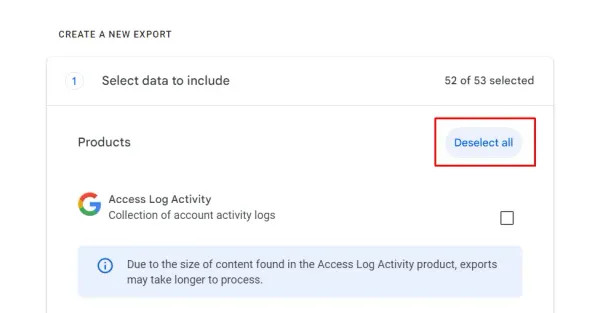
Choose Export Settings: Scroll to the bottom and click “Next Step.”
 Selecting export settings in Google Takeout
 -
Select Destination: Choose “Add to Drive” as your destination.
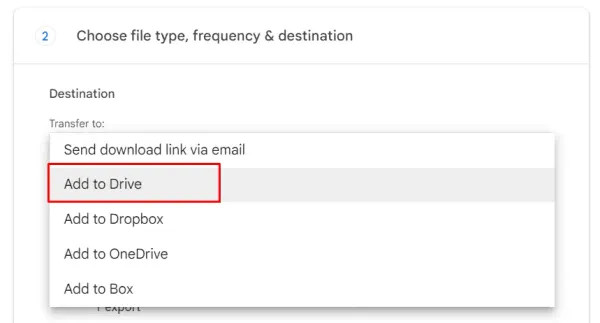 Choosing Google Drive as the destination in Google Takeout
 -
Configure Export Frequency and File Type: Select the file type (.zip) and maximum size (e.g., 10 GB). If your collection exceeds the maximum size, it will be split into multiple archives.
-
Create Export: Click “Create Export.” Google will process your request and notify you when the export is complete.
-
Access Your Photos in Google Drive: Once the export is complete, you’ll find the archived files in the “My Drive” section of Google Drive.
 Accessing exported photos in Google Drive
Pros:
- Efficient for large photo collections.
- Direct transfer to Google Drive without manual downloading.
Cons:
- May take several hours or days to complete, depending on the size of your library.
- Photos are saved in ZIP archives, requiring extraction.
6. Organizing Your Photos in Google Drive
How can I efficiently organize my photos in Google Drive after the transfer?
Organizing your photos in Google Drive is crucial for efficient access and management. Implement a clear folder structure, use descriptive filenames, and leverage metadata to enhance searchability. It’s similar to cataloging prints in a physical archive: methodical and essential for retrieval.
Organization Tips:
-
Create a Folder Structure: Design a logical folder structure based on date, event, project, or subject. For example:
Photos20232023-01-Vacation2023-05-Wedding
20242024-03-Landscape2024-07-Portraits
-
Use Descriptive Filenames: Rename your photos with descriptive filenames that include the date, location, and subject. For example:
2024-07-15_SantaFe_Portrait.jpg. -
Add Metadata: Use Google Drive’s description field to add metadata such as keywords, captions, and copyright information.
-
Color-Code Folders: Use color-coding to visually distinguish between different types of folders. For example, red for urgent projects, green for completed projects.
-
Use Labels: Apply labels to files and folders to create virtual links between related items in different locations.
7. Enhancing Google Drive with a DAM System
What are the benefits of integrating a Digital Asset Management (DAM) system with Google Drive?
Integrating a DAM system like Pics.io with Google Drive supercharges your photo management capabilities. A DAM system provides advanced features such as metadata management, version control, workflow automation, and collaboration tools. It’s like transforming your darkroom into a state-of-the-art digital lab.
Key Benefits of DAM Integration:
- Metadata Management: Add and edit metadata to your photos, making them easier to find and organize.
- Version Control: Track changes to your photos and revert to previous versions if needed.
- Workflow Automation: Automate repetitive tasks such as resizing, watermarking, and converting files.
- Collaboration Tools: Share files and folders with clients and collaborators, and manage access permissions.
- Advanced Search: Search for photos using advanced criteria such as keywords, metadata, and custom fields.
- Centralized Asset Library: Create a centralized library for all your digital assets, accessible from anywhere.
According to a 2024 survey by Popular Photography, photographers who use DAM systems report a 30% increase in efficiency and a 20% reduction in time spent searching for files.
8. Step-by-Step Guide to Integrating Pics.io with Google Drive
How can I integrate Pics.io with Google Drive to enhance my photo management workflow?
Pics.io is a powerful DAM system that integrates seamlessly with Google Drive, providing advanced features for managing your photos.
Integration Steps:
-
Sign Up for Pics.io: Create an account at Pics.io.
-
Connect Google Drive: Connect your Google Drive account to Pics.io during the setup process.
-
Import Your Photos: Import your photos from Google Drive into Pics.io.
-
Organize Your Photos: Use Pics.io’s features to organize your photos, add metadata, and create collections.
-
Customize Your Workflow: Configure Pics.io to automate tasks such as resizing, watermarking, and converting files.
-
Collaborate with Others: Invite clients and collaborators to access your photo library and manage permissions.
Pics.io Features for Photographers:
- Custom Metadata Fields: Add custom metadata fields to your photos to capture specific information relevant to your workflow.
- Watermarking: Add watermarks to your photos to protect your copyright.
- Version Control: Track changes to your photos and revert to previous versions if needed.
- Approval Workflow: Set up an approval workflow to ensure that all photos meet your quality standards.
- Brand Portal: Create a branded portal for sharing your photos with clients and collaborators.
9. Optimizing Google Drive Storage
How can I efficiently manage and optimize my Google Drive storage space?
Managing your Google Drive storage space is crucial to avoid running out of room and ensure optimal performance. Regularly clean up unwanted files, compress large images, and take advantage of Google Drive’s storage management tools. It’s like maintaining your camera equipment: regular maintenance ensures peak performance.
Storage Optimization Tips:
- Delete Unwanted Files: Regularly delete old or unnecessary files from Google Drive.
- Compress Large Images: Compress large images to reduce their file size without sacrificing too much quality.
- Convert Files to Google Docs Format: Convert Microsoft Office files to Google Docs format to save storage space. Google Docs files don’t count towards your storage quota.
- Empty the Trash: Empty the trash folder to permanently delete files and free up storage space.
- Review Large Files: Use Google Drive’s storage management tool to identify and review large files that are taking up the most space.
- Upgrade Your Storage Plan: If you consistently run out of storage space, consider upgrading to a larger storage plan.
10. Best Practices for Photo Management in Google Drive
What are the best practices for managing your photos in Google Drive to ensure efficiency and security?
Following best practices for photo management in Google Drive ensures that your photos are organized, accessible, and secure. Implement a consistent naming convention, use metadata, and regularly back up your files. It’s like following a recipe in the darkroom: precision and consistency yield the best results.
Best Practices:
- Consistent Naming Convention: Use a consistent naming convention for your photos to make them easier to find and organize.
- Metadata: Add metadata to your photos to capture important information such as date, location, and subject.
- Backup: Regularly back up your Google Drive files to an external hard drive or another cloud storage service.
- Permissions: Manage access permissions to control who can view, edit, or download your photos.
- Security: Enable two-factor authentication to protect your Google account from unauthorized access.
- Regular Audits: Conduct regular audits of your photo library to ensure that it is well-organized and up-to-date.
FAQ: Transferring Google Photos to Google Drive
1. Can I automatically transfer new photos from Google Photos to Google Drive?
No, Google Photos and Google Drive do not automatically sync new photos. You need to manually transfer them using one of the methods described above.
2. Will transferring photos to Google Drive delete them from Google Photos?
No, transferring photos to Google Drive does not delete them from Google Photos. The photos will remain in both locations until you manually delete them.
3. How long does it take to transfer photos using Google Takeout?
The transfer time depends on the size of your photo library and Google’s server load. It can take anywhere from a few hours to several days.
4. Can I transfer specific albums from Google Photos to Google Drive?
Yes, when using Google Takeout, you can select specific albums to transfer instead of exporting all your photos.
5. What happens if my Google Drive storage is full during the transfer?
The transfer will be paused until you free up enough storage space in Google Drive or upgrade to a larger storage plan.
6. Will the photo quality be affected when transferring from Google Photos to Google Drive?
No, transferring photos to Google Drive does not affect their quality. The photos will be stored in their original resolution.
7. Can I use Google Takeout to transfer videos as well?
Yes, Google Takeout can be used to transfer both photos and videos from Google Photos to Google Drive.
8. Is it safe to use third-party apps to transfer photos between Google Photos and Google Drive?
It’s generally not recommended to use third-party apps, as they may pose security risks. Stick to the official methods provided by Google.
9. How do I access my Google Drive files offline?
You can enable offline access for specific files and folders in Google Drive by right-clicking on them and selecting “Available offline.”
10. Can I share my Google Drive photos with others?
Yes, you can share your Google Drive photos with others by creating a shareable link or inviting specific people to access the files and folders.
Conclusion
Transferring Google Photos to Google Drive provides enhanced control over your visual assets, enabling advanced organization, DAM integration, and professional workflow capabilities. Whether you choose the manual method or leverage Google Takeout, dfphoto.net is here to guide you every step of the way. By implementing the best practices outlined in this guide, you can ensure your precious memories and professional work are securely stored and easily accessible.
Ready to take your photo management to the next level? Visit dfphoto.net to explore more tutorials, discover inspiring photography, and connect with a vibrant community of photographers. Elevate your skills, find your inspiration, and share your vision with the world. Join us at 1600 St Michael’s Dr, Santa Fe, NM 87505, United States or call us at +1 (505) 471-6001. Visit our website dfphoto.net today!