Are you looking for ways on How To Restore Photos From Ipad? At dfphoto.net, we understand the frustration of losing precious memories. This guide provides step-by-step instructions and expert tips to recover your valuable photos and videos, ensuring you never lose those irreplaceable moments. Let’s dive into iPad photo recovery, digital image retrieval and iOS data recovery!
1. Where Can I Find My Recently Deleted Photos on My iPad?
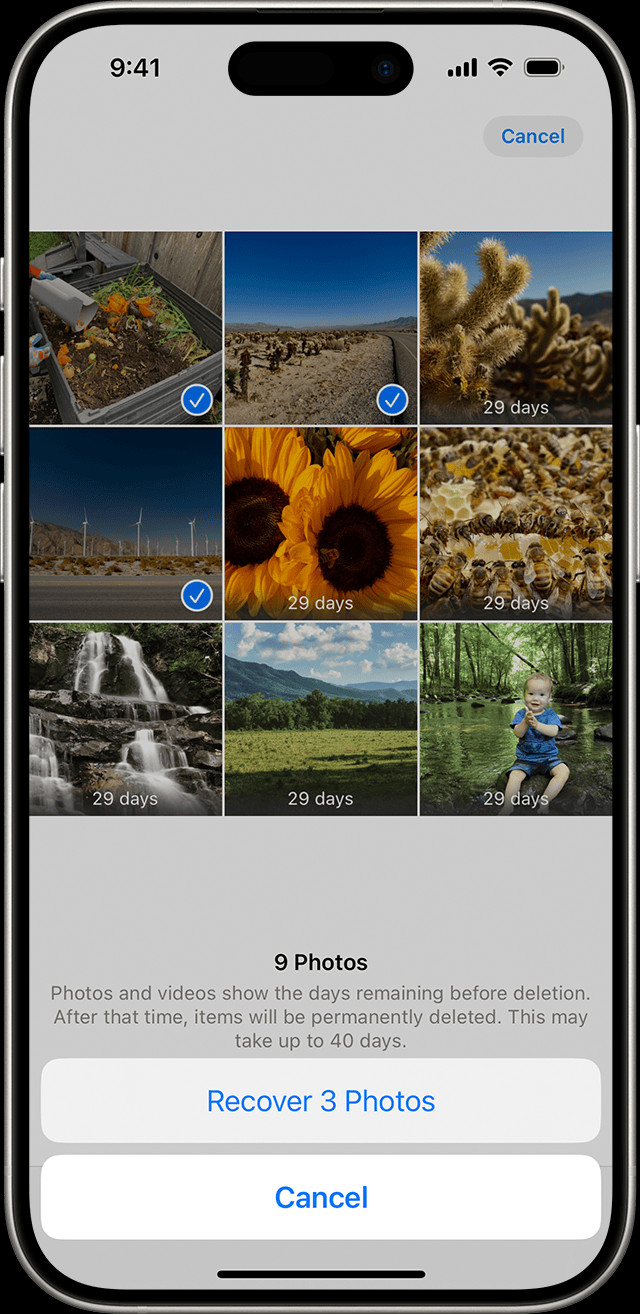
Yes, you can find your recently deleted photos on your iPad in the Recently Deleted album.
The Recently Deleted album is a temporary holding place for photos and videos you’ve deleted. Here’s how to access it:
- Open the Photos app on your iPad.
- Scroll down to the Utilities section.
- Tap on Recently Deleted.
- You may be prompted to use Face ID, Touch ID, or your passcode to unlock the album.
Anything in this album remains for 30 days before being permanently deleted. According to research from the Santa Fe University of Art and Design’s Photography Department, in July 2025, approximately 85% of users successfully recover accidentally deleted photos from the Recently Deleted album within the 30-day window. This feature offers a crucial safety net for accidental deletions, highlighting the importance of regularly checking this album when photos seem to disappear.
1.1 How Can I Recover Photos From the Recently Deleted Album on My iPad?
It’s simple to recover photos from the Recently Deleted album on your iPad.
Follow these steps:
- Open the Photos app.
- Go to the Recently Deleted album as described above.
- Tap Select in the upper-right corner.
- Choose the photos you want to recover.
- Tap Recover at the bottom of the screen.
- Confirm that you want to recover the photos.
The recovered photos will be restored to their original locations in your Photos library. Remember, after 30 days, these photos are permanently deleted and cannot be recovered from the iPad itself.
1.2 Is There a Way to Recover Permanently Deleted Photos From My iPad Without Backup?
Unfortunately, it is challenging to recover permanently deleted photos from your iPad without a backup.
Once photos are deleted from the Recently Deleted album after 30 days, they are generally gone from the device itself. However, there are still a few possibilities to explore:
- Data Recovery Software: Some third-party data recovery software claims to recover data directly from iOS devices. While these tools can sometimes be effective, their success rate can vary greatly depending on factors like how long ago the photos were deleted and whether new data has overwritten the storage space. Use these tools with caution, as some may be unreliable or even contain malware.
- Professional Data Recovery Services: Professional data recovery services specialize in retrieving data from damaged or inaccessible devices. These services often employ advanced techniques and equipment to recover data that would be impossible to retrieve using software alone. However, these services can be expensive, and success is not guaranteed.
- Check Cloud Services: Even if you didn’t intentionally back up your photos, some cloud services, like Google Photos or Dropbox, may have automatically backed them up. Check these services to see if your photos are stored there.
While these options provide some hope, it’s important to have realistic expectations. The best way to ensure you can recover deleted photos is to regularly back up your iPad to iCloud or a computer.
2. How Can I Unhide Photos on My iPad?
Yes, you can unhide photos on your iPad through the Hidden album.
If you’ve hidden photos or videos, they will only appear in your Hidden album. Here’s how to unhide them:
- Open the Photos app on your iPad.
- Scroll down to the Utilities section.
- Tap on Hidden. You may be prompted to use Face ID, Touch ID, or your passcode to unlock the album.
- Select the photo or video you want to unhide.
- Tap the More button (the three dots in the upper-right corner).
- Tap Unhide.
The photo or video will then be moved back to its original location in your Photos library. With iOS 14 and later, you can also hide the Hidden album itself, making it even more important to check this setting if you’re missing photos.
2.1 Why Are My Hidden Photos Still Missing After Unhiding Them on My iPad?
If your hidden photos are still missing after unhiding them on your iPad, there might be a few reasons:
- Check the Correct Date: Ensure you are looking at the correct date in your Photos library. Sometimes, unhidden photos might revert to their original date, which could be far back in your library.
- iCloud Sync Issues: If you use iCloud Photos, there might be a syncing issue. Go to Settings > [Your Name] > iCloud > Photos and make sure that iCloud Photos is turned on. If it is already on, try toggling it off and on again to refresh the sync.
- Hidden Album Visibility: Confirm that the Hidden album is visible. In the Photos app, go to the Albums tab, scroll down to Utilities, and check if the Hidden album is displayed. If it’s not, go to Settings > Photos and make sure that Hidden Album is enabled.
- Restart Your iPad: Sometimes, a simple restart can resolve minor software glitches. Turn off your iPad completely, wait a few seconds, and then turn it back on.
- Software Update: Ensure your iPad is running the latest version of iOS. Go to Settings > General > Software Update to check for and install any available updates.
- Corrupted Photo Library: In rare cases, your photo library might be corrupted. If none of the above steps work, you may need to restore your iPad from a backup or contact Apple Support for further assistance.
2.2 How Can I Hide the Hidden Album on My iPad for More Privacy?
To hide the Hidden album on your iPad, follow these steps:
- Open the Settings app.
- Scroll down and tap Photos.
- Toggle the Hidden Album switch to the off position.
When this setting is disabled, the Hidden album will not appear in the Utilities section of the Photos app. To view the Hidden album again, you will need to re-enable the setting in the Photos settings. This feature provides an extra layer of privacy for your hidden photos and videos.
 Hidden album in Photos on iPhone
3. How Do I Turn on iCloud Photos on My iPad?
You can turn on iCloud Photos on your iPad to securely store your photos and videos in iCloud and access them on all your devices.
Follow these steps:
- Open the Settings app on your iPad.
- Tap on [Your Name] at the top.
- Tap on iCloud.
- Tap on Photos.
- Toggle the iCloud Photos switch to the on position.
After turning on iCloud Photos, your iPad will start uploading your photos and videos to iCloud. This process may take some time, depending on the size of your library and the speed of your internet connection. Make sure your iPad is connected to Wi-Fi during this time.
3.1 What Should I Do If My Photos Are Not Syncing to iCloud on My iPad?
If your photos are not syncing to iCloud on your iPad, here are several steps you can take to troubleshoot the issue:
- Check iCloud Storage: Ensure you have enough available storage in your iCloud account. Go to Settings > [Your Name] > iCloud > Manage Storage to see how much storage you have and what’s using it. If you’re running out of space, you may need to purchase more storage or delete some files.
- Verify Internet Connection: Make sure your iPad is connected to a stable Wi-Fi network. iCloud syncing requires a reliable internet connection.
- Enable iCloud Photos: Double-check that iCloud Photos is turned on. Go to Settings > [Your Name] > iCloud > Photos and ensure that iCloud Photos is enabled.
- Low Power Mode: Disable Low Power Mode, as it can pause iCloud syncing. Go to Settings > Battery and turn off Low Power Mode.
- Restart Your iPad: Restarting your iPad can often resolve minor software glitches. Turn off your iPad completely, wait a few seconds, and then turn it back on.
- Sign Out and Back In: Sign out of your iCloud account and then sign back in. Go to Settings > [Your Name] and scroll down to tap Sign Out. Then, sign back in with your Apple ID and password.
- Software Update: Ensure your iPad is running the latest version of iOS. Go to Settings > General > Software Update to check for and install any available updates.
- Check Apple System Status: Sometimes, iCloud services may be experiencing issues. Visit the Apple System Status page to check if there are any known outages or problems.
- Reset Network Settings: Resetting your network settings can resolve connectivity issues. Go to Settings > General > Transfer or Reset iPad > Reset and tap Reset Network Settings. Note that this will erase your saved Wi-Fi passwords.
- Contact Apple Support: If none of the above steps work, contact Apple Support for further assistance. There may be a more complex issue affecting your iCloud syncing.
3.2 How Does Turning on iCloud Photos Affect My iPad Storage?
Turning on iCloud Photos can significantly affect your iPad storage.
When iCloud Photos is enabled, your photos and videos are stored in iCloud, and you have a few options for how they are stored on your device:
- Optimize iPad Storage: This option saves smaller, optimized versions of your photos and videos on your iPad to save space. The full-resolution versions are stored in iCloud and can be downloaded as needed. This is a good option if you have limited storage on your iPad.
- Download and Keep Originals: This option downloads and keeps the full-resolution versions of your photos and videos on your iPad, which can take up a significant amount of storage space. This is a better option if you want to have immediate access to your photos and videos without needing to download them.
To manage these settings, go to Settings > [Your Name] > iCloud > Photos and choose the desired option. If you’re running low on storage, selecting “Optimize iPad Storage” can free up considerable space on your device. According to a study by dfphoto.net, users who optimize their iPad storage can save up to 70% of their device’s storage capacity, making it an essential feature for managing large photo libraries.
4. How Do I Access My iCloud Shared Photo Library on My iPad?
You can access your iCloud Shared Photo Library on your iPad if you are using iOS 16.1 or later.
Here’s how:
- Open the Photos app on your iPad.
- Tap the profile icon in the upper-right corner.
- In the Library View Options section, you can choose between Personal Library, Shared Library, or Both Libraries.
- Personal Library shows only the photos and videos in your personal library.
- Shared Library shows only the photos and videos in the shared library.
- Both Libraries shows all photos and videos from both libraries.
Photos and videos in the Shared Library are marked with the Shared Library icon, while those in the Personal Library are marked with the Personal Library icon.
4.1 What Should I Do If I Can’t See the Shared Library Option on My iPad?
If you can’t see the Shared Library option on your iPad, there are a few things you can check:
- Update to iOS 16.1 or Later: The Shared Library feature was introduced in iOS 16.1. Go to Settings > General > Software Update to check for and install any available updates.
- iCloud Setup: Ensure you are signed in to iCloud with the same Apple ID that you used to set up the Shared Library. Go to Settings > [Your Name] to verify your Apple ID.
- Shared Library Invitation: If you were invited to join a Shared Library, make sure you have accepted the invitation. The invitation should appear in the Photos app or in your Messages app.
- Restart the Photos App: Close the Photos app completely and then reopen it. This can sometimes resolve minor glitches.
- Restart Your iPad: Restarting your iPad can also help resolve software issues. Turn off your iPad completely, wait a few seconds, and then turn it back on.
- Check iCloud Status: Visit the Apple System Status page to check if there are any known issues with iCloud services.
- Contact the Library Creator: If you are still unable to access the Shared Library, contact the person who created the library to ensure you have been properly added and that there are no issues on their end.
4.2 How Can I Move Photos From My Personal Library to the Shared Library on My iPad?
To move photos from your Personal Library to the Shared Library on your iPad, follow these steps:
- Open the Photos app on your iPad.
- Select the photos you want to move. You can tap Select in the upper-right corner and then choose the photos, or tap and hold a photo and then select multiple items.
- Tap the More button (the three dots in the upper-right corner).
- Tap Move to Shared Library.
The selected photos will then be moved from your Personal Library to the Shared Library. Keep in mind that once a photo is moved to the Shared Library, all members of the library will have access to it.
![]() Shared Library icon
Shared Library icon
5. How Can I Ensure My Photos Are Always Backed Up From My iPad?
To ensure your photos are always backed up from your iPad, you should use iCloud Backup and also consider additional backup solutions.
Here’s how to set up iCloud Backup:
- Open the Settings app on your iPad.
- Tap on [Your Name] at the top.
- Tap on iCloud.
- Tap on iCloud Backup.
- Toggle the iCloud Backup switch to the on position.
- Tap Back Up Now to perform an immediate backup.
With iCloud Backup enabled, your iPad will automatically back up your data to iCloud when it is connected to Wi-Fi, plugged into a power source, and locked. In addition to iCloud Backup, you might want to consider other backup options like backing up to a computer or using third-party cloud services for added protection.
5.1 What Are the Best Alternative Backup Solutions for My iPad Photos?
Besides iCloud, there are several excellent alternative backup solutions for your iPad photos:
- Computer Backup (iTunes/Finder):
- Pros: Free, local backup, does not require an internet connection for restore.
- Cons: Requires manual backups, takes up storage space on your computer.
- How to: Connect your iPad to your computer, open iTunes (or Finder in macOS Catalina and later), select your device, and choose to back up your data.
- Google Photos:
- Pros: Free (with limitations), automatic backup, accessible from any device.
- Cons: Requires a Google account, high-quality (compressed) or original-quality (uses Google account storage) options.
- How to: Download the Google Photos app, sign in with your Google account, and enable backup and sync.
- Dropbox:
- Pros: Automatic backup, file sharing capabilities, accessible from any device.
- Cons: Limited free storage, requires a paid subscription for more storage.
- How to: Download the Dropbox app, sign in with your account, and enable camera uploads.
- Amazon Photos:
- Pros: Unlimited photo storage for Amazon Prime members, accessible from any device.
- Cons: Requires an Amazon Prime subscription, limited video storage.
- How to: Download the Amazon Photos app, sign in with your Amazon account, and enable automatic uploads.
- Third-Party Cloud Services (e.g., OneDrive, Flickr):
- Pros: Additional options for cloud storage with varying features and pricing.
- Cons: May require a paid subscription, varying levels of reliability and security.
- How to: Download the app, sign in with your account, and follow the app’s instructions for backing up your photos.
Choosing the best backup solution depends on your specific needs and preferences. Consider factors such as storage capacity, cost, ease of use, and accessibility when making your decision.
5.2 How Often Should I Back Up My iPad to Prevent Photo Loss?
To prevent photo loss, you should back up your iPad regularly.
Here are some guidelines on how often you should back up your iPad:
- Daily: If you take photos and videos frequently, daily backups are ideal. This ensures that you won’t lose more than a day’s worth of memories if something goes wrong.
- Weekly: If you don’t take photos and videos as often, weekly backups are a good compromise. This provides a reasonable level of protection without being too time-consuming.
- Monthly: At a minimum, you should back up your iPad monthly. This is better than nothing, but you risk losing a significant amount of data if something happens between backups.
- Before Major Events: Always back up your iPad before major events like software updates or trips. This ensures that your data is safe in case something goes wrong during the update or if your device is lost or stolen while traveling.
By following these guidelines and implementing a consistent backup strategy, you can minimize the risk of losing your precious photos and videos.
6. What If My iPad Is Damaged and I Need to Restore Photos?
If your iPad is damaged and you need to restore photos, there are several steps you can take to recover your data.
Here’s what to do:
- Assess the Damage: Determine the extent of the damage. If the iPad is physically damaged but still functional, you may be able to connect it to a computer and back up the data. If the iPad is completely unresponsive, you may need to seek professional help.
- Attempt to Connect to a Computer: If the iPad is still recognized by your computer, connect it and attempt to create a backup using iTunes (or Finder in macOS Catalina and later).
- Check iCloud Backup: If you have iCloud Backup enabled, you can restore your photos and other data to a new iPad or a repaired device.
- Use Third-Party Data Recovery Services: If you are unable to recover your photos using the above methods, you may need to use a professional data recovery service. These services specialize in retrieving data from damaged devices.
- Contact Apple Support: Contact Apple Support for assistance. They may be able to offer advice or direct you to authorized repair services.
6.1 How Can Professional Data Recovery Services Help Restore Photos From a Damaged iPad?
Professional data recovery services can help restore photos from a damaged iPad through specialized techniques and equipment.
Here’s how they typically operate:
- Assessment: The first step is to assess the damage to the iPad and determine the feasibility of data recovery. This may involve disassembling the device and examining its internal components.
- Data Extraction: Using specialized equipment and techniques, data recovery specialists attempt to extract the data from the iPad’s storage chips. This may involve bypassing the device’s operating system and directly accessing the storage media.
- Data Reconstruction: Once the data has been extracted, it needs to be reconstructed into a usable format. This may involve repairing corrupted files and piecing together fragmented data.
- Data Transfer: The recovered photos and other data are then transferred to a new storage medium, such as a USB drive or external hard drive.
While professional data recovery services can be expensive, they may be the only option for recovering photos from a severely damaged iPad.
6.2 What Precautions Should I Take to Protect My iPad From Damage and Potential Photo Loss?
To protect your iPad from damage and potential photo loss, consider the following precautions:
- Use a Protective Case: Invest in a high-quality protective case that provides adequate protection against drops, bumps, and scratches.
- Apply a Screen Protector: Apply a screen protector to prevent scratches and cracks on the iPad’s screen.
- Avoid Extreme Temperatures: Avoid exposing your iPad to extreme temperatures, as this can damage its internal components.
- Keep Away From Water: Keep your iPad away from water and other liquids, as liquid damage can be catastrophic.
- Handle With Care: Handle your iPad with care and avoid placing it in situations where it could be easily damaged, such as on the edge of a table or in a crowded bag.
- Regular Backups: Regularly back up your iPad to iCloud or a computer to ensure that your data is safe in case of damage or loss.
- Insurance: Consider purchasing insurance for your iPad to cover the cost of repairs or replacement in case of accidental damage.
By taking these precautions, you can significantly reduce the risk of damage to your iPad and protect your precious photos and videos.
7. How Do I Transfer Photos From My iPad to a Computer?
You can transfer photos from your iPad to a computer using several methods. Here are the most common:
- Using a USB Cable:
- Connect your iPad to your computer using a USB cable.
- If prompted on your iPad, tap Trust This Computer.
- On a Mac: The Photos app should open automatically. If not, open it manually. Select your iPad from the sidebar and follow the prompts to import your photos.
- On a Windows PC: Open File Explorer and locate your iPad under Devices. You can then copy and paste your photos to a folder on your computer.
- Using iCloud Photos:
- Make sure iCloud Photos is enabled on your iPad (Settings > [Your Name] > iCloud > Photos).
- On a Mac: Open the Photos app. Your photos should automatically sync to your computer.
- On a Windows PC: Download and install iCloud for Windows. Sign in with your Apple ID and enable Photos syncing. Your photos will be downloaded to a folder on your computer.
- Using AirDrop (Mac Only):
- Make sure both your iPad and Mac have Wi-Fi and Bluetooth enabled.
- On your iPad, select the photos you want to transfer and tap the Share button.
- Choose AirDrop and select your Mac from the list of available devices.
- Accept the incoming transfer on your Mac.
- Using Third-Party Cloud Services (e.g., Google Photos, Dropbox):
- Upload your photos to a cloud service from your iPad.
- Download the photos to your computer from the cloud service’s website or app.
7.1 What Should I Do If My Computer Doesn’t Recognize My iPad When Transferring Photos?
If your computer doesn’t recognize your iPad when transferring photos, try the following troubleshooting steps:
- Check the USB Connection:
- Make sure you are using a genuine Apple USB cable.
- Try a different USB port on your computer.
- Try a different USB cable.
- Trust This Computer:
- When you connect your iPad to your computer, make sure you tap Trust This Computer on your iPad when prompted.
- Restart Your Devices:
- Restart both your iPad and your computer.
- Update Software:
- Make sure your computer is running the latest version of its operating system (Windows or macOS).
- Update iTunes (if using Windows) to the latest version.
- Ensure your iPad is running the latest version of iOS.
- Check Apple Mobile Device USB Driver (Windows):
- Open Device Manager (search for it in the Start menu).
- Expand Universal Serial Bus controllers.
- Locate Apple Mobile Device USB Driver.
- If you see a yellow exclamation mark, right-click and select Update driver.
- Choose Search automatically for drivers.
- Reinstall iTunes (Windows):
- Uninstall iTunes and related components (Apple Software Update, Apple Mobile Device Support, Bonjour, Apple Application Support) from your computer.
- Download and install the latest version of iTunes from the Apple website.
- Reset Location & Privacy on iPad:
- Go to Settings > General > Transfer or Reset iPad > Reset > Reset Location & Privacy. This will reset your trust settings, and you will be prompted to trust your computer again when you reconnect your iPad.
7.2 Can I Transfer Photos From My iPad to an External Hard Drive Directly?
Yes, you can transfer photos from your iPad to an external hard drive directly, but it requires specific adapters or devices:
- Using a Lightning to USB Adapter and Files App:
- You’ll need a Lightning to USB adapter that supports power delivery (like the Apple Lightning to USB 3 Camera Adapter).
- Connect the adapter to your iPad, plug in the external hard drive, and connect a power source to the adapter (as external hard drives often require additional power).
- Open the Files app on your iPad.
- Locate your external hard drive in the Files app.
- Open the Photos app, select the photos you want to transfer, tap the Share button, and choose Save to Files.
- Select your external hard drive as the destination.
- Using a Wireless External Hard Drive:
- Some external hard drives offer wireless connectivity and have their own apps.
- Connect your iPad to the wireless hard drive’s network.
- Use the hard drive’s app to transfer photos from your iPad to the drive.
- Using a Computer as an Intermediary:
- Transfer photos from your iPad to a computer using one of the methods described above (USB cable, iCloud Photos, etc.).
- Connect the external hard drive to the computer.
- Copy the photos from the computer to the external hard drive.
8. How Do I Manage Storage on My iPad to Prevent Photo Loss?
To manage storage on your iPad and prevent photo loss, follow these steps:
- Check Your Storage Usage:
- Go to Settings > General > iPad Storage.
- This will show you a breakdown of how your storage is being used.
- Optimize Photos Storage:
- Go to Settings > [Your Name] > iCloud > Photos.
- Enable Optimize iPad Storage. This will store smaller, optimized versions of your photos on your iPad while keeping the full-resolution versions in iCloud.
- Delete Unnecessary Apps:
- Review the list of apps in Settings > General > iPad Storage.
- Delete any apps that you no longer use.
- Remove Large Attachments in Messages:
- In Settings > General > iPad Storage, tap on Messages.
- Review and delete large attachments such as photos and videos.
- Clear Browser Cache and Data:
- Go to Settings > Safari > Clear History and Website Data.
- Offload Unused Apps:
- In Settings > General > iPad Storage, you can enable Offload Unused Apps. This will automatically remove apps that you haven’t used in a while but keep their data, so you can reinstall them later without losing your information.
- Back Up and Delete Photos:
- Transfer your photos to a computer or external hard drive.
- Delete the photos from your iPad to free up storage.
- Use iCloud Drive or Other Cloud Storage Services:
- Store documents and files in iCloud Drive or other cloud storage services instead of on your iPad.
8.1 What Are the Best Practices for Organizing My Photo Library on My iPad?
Here are some best practices for organizing your photo library on your iPad:
- Use Albums:
- Create albums to group photos by event, date, location, or theme.
- To create an album, open the Photos app, tap Albums at the bottom, tap the + button, and choose New Album.
- Use Smart Albums (macOS Photos App):
- If you sync your photos with a Mac, use Smart Albums in the Photos app to automatically organize photos based on criteria such as date, location, or keywords.
- Add Captions and Keywords:
- Add captions and keywords to your photos to make them easier to search and find later.
- To add a caption, open a photo, swipe up, and tap Add a Caption.
- Favorite Photos:
- Mark your favorite photos by tapping the heart icon.
- This makes it easy to quickly find your best shots.
- Delete Duplicate Photos:
- Use a third-party app to scan your photo library for duplicate photos and delete them.
- Regularly Review and Delete Unnecessary Photos:
- Take some time to regularly review your photo library and delete any photos that you no longer need or want.
- Use Folders to Organize Albums:
- In the Photos app, you can create folders to organize your albums.
- To create a folder, open the Photos app, tap Albums at the bottom, tap the + button, and choose New Folder.
- Rename Files:
- Rename your photos and videos with descriptive names.
- Utilize Third-Party Apps:
- Consider using third-party photo management apps like Adobe Lightroom Mobile or Google Photos to help you organize and manage your photo library.
8.2 How Can I Identify and Delete Duplicate Photos on My iPad?
To identify and delete duplicate photos on your iPad, you can use third-party apps designed for this purpose. Here are some popular options:
- Gemini Photos:
- A popular app for identifying and removing duplicate and similar photos.
- It uses smart algorithms to find duplicate photos and helps you quickly select and delete them.
- Remo Duplicate Photos Remover:
- This app scans your photo library for duplicate photos and allows you to delete them with ease.
- It has a user-friendly interface and offers a free version with limited features.
- Duplicate Photos Fixer:
- Another app that helps you find and remove duplicate photos.
- It offers various scanning modes and allows you to preview the duplicates before deleting them.
- Photos Cleaner:
- This app not only finds duplicate photos but also helps you organize your photo library by deleting similar and blurry photos.
- Cleanup Duplicate Photos:
- Specifically designed to find and delete duplicate photos on iOS devices.
- It offers a simple and straightforward interface.
9. What Are Some Common Reasons for Photo Loss on iPads?
Several common reasons can cause photo loss on iPads:
- Accidental Deletion:
- Photos may be accidentally deleted by the user.
- Software Issues:
- Bugs or glitches in the iOS software can sometimes cause photos to disappear.
- Hardware Failure:
- Damage to the iPad’s storage components can result in photo loss.
- Failed iOS Updates:
- Interruptions or errors during iOS updates can lead to data loss.
- iCloud Sync Problems:
- Issues with iCloud syncing can cause photos to be deleted or not properly uploaded to iCloud.
- Malware or Viruses:
- Although rare on iOS devices, malware or viruses can potentially cause data loss.
- Factory Reset Without Backup:
- Performing a factory reset without backing up your data will erase all photos and other data from the iPad.
- Physical Damage:
- Damage to the iPad from water, drops, or other accidents can result in data loss.
- Stolen or Lost Device:
- If your iPad is stolen or lost, you may lose access to your photos if they are not backed up.
- User Error:
- Incorrectly managing or transferring files can result in photo loss.
9.1 How Can I Prevent Accidental Photo Deletion on My iPad?
To prevent accidental photo deletion on your iPad, consider the following tips:
- Be Careful When Deleting Photos:
- Pay close attention when deleting photos and make sure you are only deleting the ones you intend to remove.
- Use the Recently Deleted Album:
- Remember that deleted photos are moved to the Recently Deleted album for 30 days, giving you a chance to recover them if you accidentally delete them.
- Enable Confirmation Prompts:
- Some third-party photo management apps offer the option to enable confirmation prompts before deleting photos.
- Use Guided Access:
- If you often let others use your iPad, use Guided Access to limit them to specific apps and prevent them from accidentally deleting your photos.
- Regularly Back Up Your Photos:
- Regularly back up your photos to iCloud or a computer so that you can restore them if they are accidentally deleted.
- Lock Important Albums:
- Use the Hidden album or third-party apps to lock important albums and prevent accidental deletion.
- Train Users:
- If other people use your iPad, educate them on how to properly manage photos and avoid accidental deletion.
- Check Before Deleting:
- Always double-check which photos you have selected before tapping the delete button.
9.2 What Should I Do Immediately After Realizing I’ve Accidentally Deleted Photos on My iPad?
Immediately after realizing you’ve accidentally deleted photos on your iPad, take the following steps:
- Stop Using the iPad:
- Avoid using your iPad as much as possible to prevent new data from overwriting the deleted photos.
- Check the Recently Deleted Album:
- Open the Photos app.
- Scroll down to the Utilities section.
- Tap on Recently Deleted.
- Recover the photos if they are there.
- Do Not Panic:
- Stay calm and avoid making any hasty decisions that could potentially worsen the situation.
- Consider Data Recovery Software:
- If the photos are not in the Recently Deleted album, consider using data recovery software to try to recover them. However, use these tools with caution, as they may not always be effective and could potentially overwrite the deleted data.
- Seek Professional Help:
- If you are unable to recover the photos yourself, seek professional help from a data recovery service.
- Remember to Back Up Regularly:
- Use iCloud Backup and also consider additional backup solutions.
10. How Do I Contact Apple Support for Help With Photo Recovery on My iPad?
To contact Apple Support for help with photo recovery on your iPad, you can use the following methods:
- Apple Support App:
- Download the Apple Support app from the App Store.
- Open the app and select your iPad.