Scaling images in Photoshop, whether enlarging or reducing size, is a fundamental skill for any image editor. This guide provides a clear, step-by-step process on How To Scale Photos In Photoshop without significant quality loss. While Photoshop offers powerful resizing capabilities, understanding the best practices ensures optimal results.
Understanding Image Size and Resolution
Before diving into the steps, it’s crucial to grasp the concepts of image size and resolution. Image size refers to the physical dimensions of an image (usually measured in inches or pixels), while resolution determines the detail level (measured in pixels per inch or PPI). Scaling an image involves changing either its size or resolution, or both.
Step-by-Step Guide to Scaling Images in Photoshop
1. Open Your Image in Photoshop: Launch Photoshop and open the image you want to scale by going to File > Open.
2. Access the Image Size Dialog Box: Navigate to Image > Image Size. This will open a dialog box containing all the necessary settings for scaling your image.
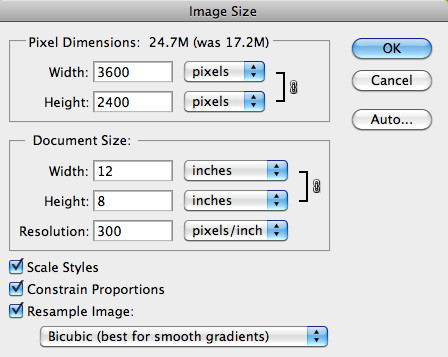
 The Image Size dialog box in Photoshop
3. Adjust Dimensions, Resolution, or Both:
- Scaling by Dimensions: You can directly input new values for width and height, measured in pixels, inches, centimeters, or other units. Photoshop will automatically adjust the other dimension proportionally if the “Constrain Proportions” option (link icon) is checked. This prevents distortion.
- Scaling by Resolution: Changing the resolution affects the image’s detail level. Increasing resolution for printing purposes may require resampling (discussed in the next step).
- Scaling for Print: For print projects, ensure the resolution is set to at least 300 PPI for optimal clarity. You can adjust the document size to your desired print dimensions while maintaining the high resolution.
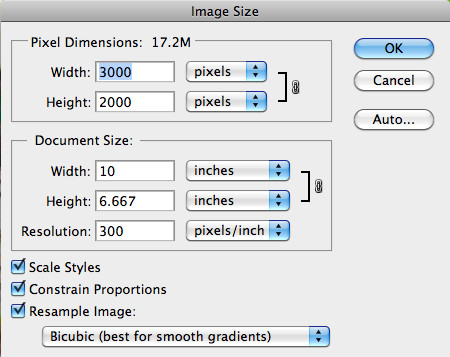
 Adjusting the dimensions in the Image Size dialog box
4. Choose the Right Resampling Method: Resampling occurs when you change the pixel dimensions of an image. Photoshop needs to add or remove pixels to accommodate the new size. Selecting the appropriate resampling method is critical for preserving image quality.
- Bicubic Smoother (Enlargement): Ideal for upscaling images, as it creates new pixels based on the average of surrounding pixels, resulting in a smoother enlargement.
- Bicubic Sharper (Reduction): Best for downscaling, as it enhances sharpness in the reduced image.
- Nearest Neighbor: A fast but less precise method that simply duplicates or eliminates pixels. Avoid this for significant scaling.
5. Preview Your Changes: Before finalizing the scaling, preview the changes in the dialog box. This allows you to assess the impact on image quality and make adjustments as needed.
6. Apply the Changes: Once you are satisfied with the preview, click “OK” to apply the scaling to your image.
 Final image size and dimensions after scaling
Best Practices for Scaling Images
- Avoid Excessive Enlargement: While Photoshop can enlarge images, significant upscaling can lead to noticeable quality loss. It’s generally better to start with a high-resolution image.
- Sharpen After Scaling: After resizing, especially when downscaling, consider sharpening the image using Photoshop’s sharpening tools to restore some detail.
- Save a Copy: Always work on a copy of your original image to preserve the original file in case you need to revert to it.
By following these steps and best practices, you can effectively scale photos in Photoshop while maintaining optimal image quality. Remember to experiment with different settings and resampling methods to achieve the desired results for your specific image and purpose.