Overlapping images on your iPhone is easier than you think, thanks to the powerful Shortcuts app. This guide provides a comprehensive walkthrough on how to achieve this, eliminating the need for third-party photo editing apps. Whether you’re creating memes, social media graphics, or simply enhancing your photos, this tutorial will equip you with the necessary skills. Learn how to harness the power of iOS Shortcuts to seamlessly blend images directly on your iPhone.
Utilizing iOS Shortcuts for Image Overlay
Apple’s Shortcuts app, available on iOS 13 and later, allows for the automation of complex tasks, including photo manipulation. By creating a custom shortcut, you can effortlessly overlay one image onto another without leaving your Camera Roll. This functionality, coupled with iOS 16’s “Lift Subject from Background” feature, opens up a world of creative possibilities.
Setting Up the Shortcut: A Detailed Walkthrough
Before you can begin overlaying images, you’ll need to set up the shortcut. While this requires a few initial steps, the process is straightforward and well worth the effort.
1. Creating a New Shortcut
- Open the Shortcuts app on your iPhone.
- Tap the “+” icon in the top right corner to create a new shortcut.
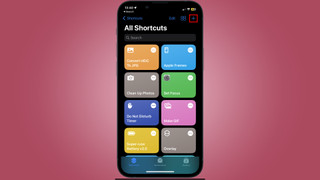 Image showing how you Open shortcuts and add a new shortcut
2. Enabling Share Sheet Access
- Tap the “i” icon in the shortcut’s toolbar.
- Toggle on “Show in Share Sheet” to enable quick access to the shortcut from your Photos app.
- Click “Done”.
 Image showing how you turn on share sheet
3. Specifying Input File Formats
- On the shortcut page, tap “Any” or “Images and more.”
- Deselect all media types except “Images” and “Media”.
- Click “Done”.
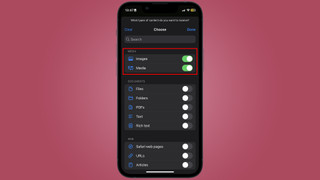 Image showing how to select file formats
4. Adding Select Photos Actions
- Tap “Add Action” or click the search bar at the bottom.
- Search for “Select Photos” and add this action twice. This allows you to choose both the base image and the overlay image.
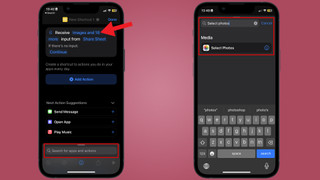 Image showing how you add the select photos action
5. Incorporating the Overlay Image Action
- Search for and add the “Overlay Image” action.
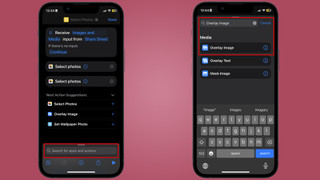 Image showing how you add the overlay to photos shortcut
6. Defining Image Variables
- Tap the first “Images” variable within the “Overlay Image” action and choose “Select Variable.”
- Select the “Photos” label associated with your first “Select Photos” action. This designates the base image.
- Repeat this process for the second “Images” variable, selecting the “Photos” label from the second “Select Photos” action. This designates the overlay image.
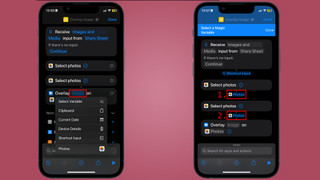 Image showing how you select the variables fdor the shortcut
7. Saving the Result
- Search for and add the “Save to Photo Album” action.
 Image showing how you add save to photos shortcut
8. Naming Your Shortcut
- Tap the shortcut’s name and rename it to something descriptive, like “Overlay Images”.
 Image showing how you rename your shortcut
Using the Shortcut
- Open the Photos app and select the two images you want to overlay.
- Tap the Share button.
- Choose your newly created “Overlay Images” shortcut.
- Select the images in the desired order: the first selection will be the overlay, the second will be the base.
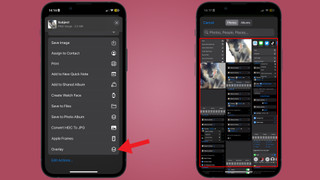 Image showing how you run the shortcut in photo reel
- Adjust the size and position of the overlay image.
- Tap “Done” to save the composite image to your Camera Roll.
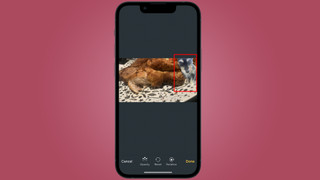 Image showing how you resize and reframe your images
Conclusion
Mastering this technique empowers you to create unique visuals directly on your iPhone. While the initial setup might seem involved, the resulting convenience and creative freedom are undeniable. With this newfound knowledge, you can transform your photos into captivating visuals without relying on complex software.