Creating GIFs from videos is a well-known trick to capture funny moments, share reactions, or create engaging content for social media. But what if you want to make a GIF from a Live Photo on your iPhone? Good news! It’s absolutely doable, and even easier than you might think. Both GIFs and Live Photos capture motion, and converting between them opens up a world of creative possibilities for iPhone users.
If you’re wondering how to make a Live Photo a GIF, you’re in the right place. This guide will walk you through several straightforward methods to transform your iPhone Live Photos into shareable GIFs. We’ll cover built-in iPhone features, popular apps, and online tools to ensure you find the perfect way to bring your Live Photos to life as GIFs.
Understanding GIFs and Live Photos: Key Differences
Before diving into the conversion process, it’s helpful to understand the core differences between GIFs and Live Photos. While both capture motion, they serve different purposes and have distinct characteristics in terms of format, compatibility, and functionality. Knowing these differences will help you appreciate the conversion process and choose the right format for your needs.
GIF, which stands for Graphics Interchange Format, is an image file format that supports both static and animated images. GIFs are celebrated for their universal compatibility across almost all platforms and devices. This widespread support makes them incredibly easy to share and view, regardless of the operating system or browser.
Live Photos, on the other hand, are a unique Apple feature. They cleverly combine a standard high-resolution photo with a short, 3-second video clip – capturing 1.5 seconds both before and after you press the shutter button. Live Photos are saved in Apple’s HEIC/HEIF format, which, while efficient, is not as universally compatible as GIF, primarily being designed for the Apple ecosystem.
Here’s a table summarizing the key differences:
| Feature | GIFs | Live Photos |
|---|---|---|
| Format | Universally compatible | Primarily for Apple devices |
| Motion | Continuous loop | Fixed 3-second motion |
| Sound | Silent | Sound included |
| Editing | Easily editable with numerous tools | Limited editing options within Photos app |
| Sharing | Shareable on virtually any platform | Best shared within the Apple ecosystem |
| Creation | Created from image sequences or videos | Automatically captured by iPhone camera |
| File Size | Optimized for small size, but can be large | Smaller than equivalent GIFs in some cases |
Step-by-Step Guide: How to Make a GIF from a Live Photo
Now that you have a clearer understanding of GIFs and Live Photos, let’s explore the practical methods to convert your Live Photos into GIFs. We will cover four effective approaches, catering to different preferences and needs: using iPhone Shortcuts, applying the Bounce effect, leveraging the GIPHY app, and utilizing a dedicated Live Photo converter app.
Method 1: Using iPhone Shortcuts to Convert Live Photo to GIF
For iPhone users, the Shortcuts app offers a powerful and direct way to convert Live Photos to GIFs without relying on external apps. This built-in tool is efficient and user-friendly. Here’s how to use it:
Step 1: Access and Set Up the “Make GIF” Shortcut
- Ensure the Shortcuts app is installed on your iPhone. It usually comes pre-installed; if not, you can download it free from the App Store.
- Open the Shortcuts app and navigate to the Gallery tab located at the bottom right.
- In the search bar at the top, type “Make GIF”.
- You should see a shortcut named “Make GIF”. Tap the “+” icon next to it to add this shortcut to your collection.
Step 2: Run the “Make GIF” Shortcut
- Go back to the main Shortcuts screen, where you’ll now see the “Make GIF” shortcut.
- Tap on the “Make GIF” shortcut to run it.
- The shortcut will prompt you to select a Live Photo. Choose the Live Photo you wish to convert to a GIF from your photo library.
- Once selected, the shortcut will automatically process the Live Photo and convert it into a GIF.
Step 3: Save and Share Your GIF
- After the GIF is created, a preview screen will appear. Tap “Done” in the bottom-right corner of this preview.
- The GIF is now automatically saved to your Photos app, typically in your “Recents” album or a dedicated “GIFs” album if you have one.
- From your Photos app, you can easily share the GIF via social media platforms, messaging apps, email, or any other platform that supports GIF format.
 Choose bounce
This method is incredibly convenient for iPhone users, providing a quick, built-in solution to create GIFs from Live Photos with just a few taps, leveraging the power of the Shortcuts app.
Method 2: Applying the “Bounce” Effect to Create a GIF-like Loop
Another simple way to make a Live Photo resemble a GIF is by using the “Bounce” effect directly within the iPhone Photos app. This method is incredibly quick and perfect for creating fun, looping animations from your Live Photos. Here’s how:
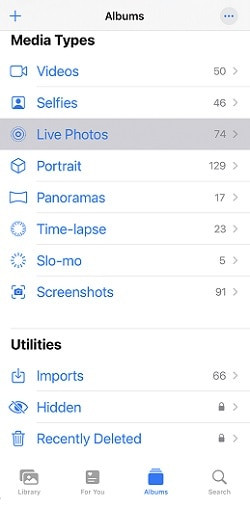
Step 1: Locate Your Live Photo
- Open the Photos app on your iPhone.
- Tap on the Albums tab at the bottom.
- Scroll down to the “Media Types” section and select Live Photos.
- Choose the specific Live Photo you want to turn into a GIF-like animation.
Step 2: Apply the “Bounce” Effect
- Once you’ve opened your chosen Live Photo, look for the “Live” label in the top left corner. Tap on this label.
- A dropdown menu will appear with options: “Live,” “Loop,” and “Bounce”. Select “Bounce”.
- Selecting “Bounce” will make your Live Photo play forward and then backward in a continuous loop, mimicking the animation of a GIF.
Step 3: Save and Share (as Video)
- The “Bounce” effect is applied instantly. Your Live Photo now plays as a looping animation every time you view it.
- While this effect doesn’t technically convert it to a GIF file, it creates a GIF-like visual experience.
- To share this as a GIF-like animation on platforms that may not support Live Photos, you can share it as a video. When you share the photo, it will often be shared as a looping video, effectively behaving like a GIF.
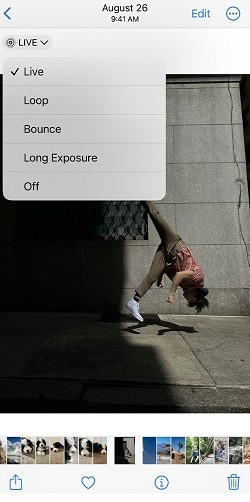 Choose bounce effect in Live Photo options
This method is the quickest and easiest way to get a GIF-like result from a Live Photo directly on your iPhone without any additional apps. It’s ideal for simple, looping animations for personal use and quick shares.
Method 3: Converting Live Photos to GIFs with GIPHY
GIPHY is a massively popular platform for GIFs, and their app also provides a user-friendly way to convert Live Photos into GIFs. If you don’t already have it, download the GIPHY app from the App Store. This method is fun and allows for some creative customization of your GIFs. Here’s a step-by-step guide:
Step 1: Launch GIPHY and Start a New GIF Creation
- Install and open the GIPHY app on your iPhone.
- Tap the “+” button usually located at the bottom of the screen to start creating a new GIF.
Step 2: Access and Select Your Live Photo
- Tap on the “Library” button within the GIPHY creation interface. This will give you access to your iPhone’s photo library.
- Navigate to “Live Photos” and choose the Live Photo that you want to convert into a GIF.
Step 3: Edit and Customize Your GIF (Optional)
- GIPHY provides various editing tools to enhance your GIF. You can add text overlays, stickers, filters, and more to personalize your GIF.
- Experiment with these tools to make your GIF more engaging and fun.
- Once you are satisfied with your edits, tap the “Next” button to proceed.
Step 4: Save Your GIF
- On the final screen, you’ll see options to “Save as GIF” or “Save as Video”.
- To save your Live Photo as a GIF, make sure to select or tap on the “Save GIF” option.
- The GIPHY app will convert your Live Photo to a GIF and save it to your Camera Roll. It might also upload it to your GIPHY account if you are logged in.
- You can now access the GIF from your Photos app and share it across various social media and messaging platforms.
 Open GIPHY app and create GIF from Live Photo
 Select Live Photo from library in GIPHY app
 Save GIF option in GIPHY app after editing Live Photo
Using GIPHY is a great option if you want to not only convert Live Photos to GIFs but also add a creative touch with text, stickers, and other fun elements, making your GIFs more personalized and shareable.
Method 4: Using a Live Photo Converter App
For a more dedicated conversion process, you can use a specialized app like Live Photo Converter. These apps are designed specifically for converting Live Photos to various formats, including GIFs, and often offer additional customization options. A popular choice is simply named “Live Photo Converter” in the App Store.
However, it’s worth noting that some free versions of these apps might have limitations, such as watermarks on the output GIFs or ads within the app. Premium versions often remove these limitations and may offer enhanced features. Here’s how to use a typical Live Photo converter app:
Step 1: Install and Open Live Photo Converter
- Download and install a Live Photo Converter app from the App Store.
- Launch the app on your iPhone.
Step 2: Upload Your Live Photo
- In the app, look for an option to upload or import a Live Photo. This is usually a prominent button or icon on the main screen.
- Select the Live Photo you want to convert from your iPhone’s photo library.
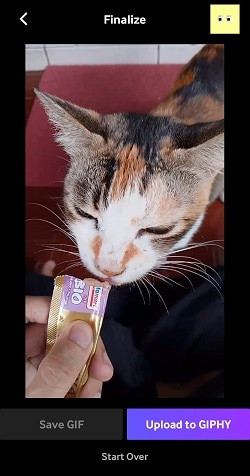
Step 3: Select GIF Format and Adjust Settings
- Choose GIF as the output format. The app interface will typically have format options clearly displayed.
- Some apps allow you to adjust settings like GIF speed or loop style. Adjust these to your preference if available.
Step 4: Convert and Save/Share Your GIF
- Initiate the conversion process. There’s usually a “Convert” or “Save” button to start the conversion.
- Once converted, you’ll typically have the option to save the GIF to your Camera Roll or share it directly to social media platforms.
- Check your Photos app to ensure the GIF has been saved correctly.
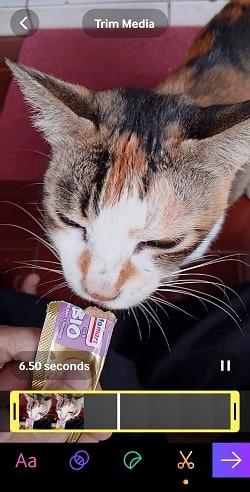
 Trim duration setting in Live Photo Converter app
Using a dedicated Live Photo converter app is a solid choice for straightforward conversion, especially if you need batch conversions or specific output settings. Just be mindful of potential watermarks or ads in free versions.
Bonus Tip: Animate Your Photos Further
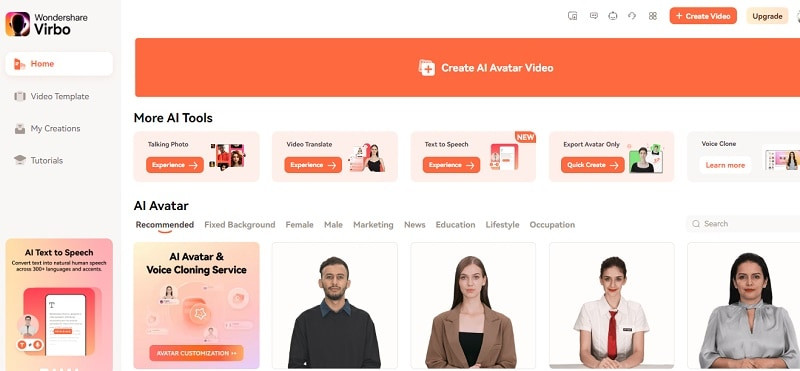
Beyond just converting Live Photos to GIFs, you can also explore more advanced photo animation techniques. For example, you can make your photos talk using innovative tools like Wondershare Virbo.
Virbo’s Talking Photo feature allows you to bring still photos to life by syncing them with spoken words or text. You can record your own voice directly within the tool or input text, and Virbo will animate the photo to match the audio. This opens up fun possibilities for creating personalized memes, greetings, or unique social media content.
To make a talking photo with Virbo, follow these simple steps:
Step 1: Visit Wondershare Virbo Online Tool
- Go to the Wondershare Virbo online tool in your web browser.
- Select the “Talking Photo” feature, prominently displayed on the homepage. Alternatively, you can download the Virbo app for mobile convenience.
Make Photo Talk Online Try in App Free Free Download
 Choose Talking Photo feature on Virbo
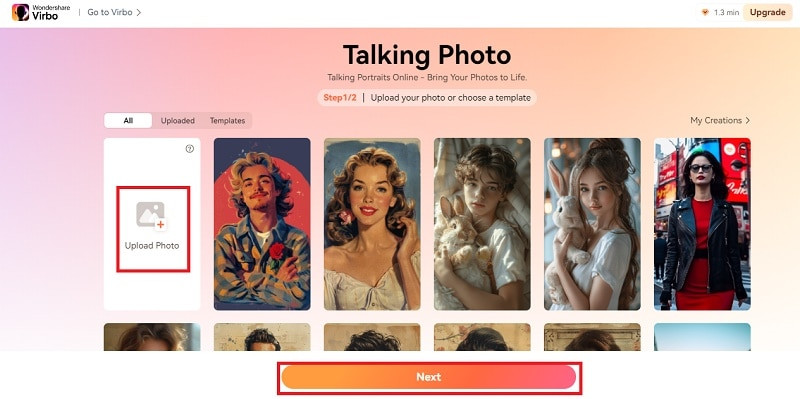
Step 2: Upload Your Photo
- In the Talking Photo interface, click on the “Upload Photo” button.
- Choose the photo you want to animate from your files and upload it to Virbo.
- Once uploaded, click on your photo and select “Next”.
 Upload picture to Virbo Talking Photo
Step 3: Input Text or Audio and Customize
- Enter the text you want your photo to “speak” in the “Input Text” tab.
- Alternatively, you can upload an audio file in the “Audio Script” tab for more personalized voiceovers.
- Customize voice settings like language, speed, pitch, and volume. You can also add background music or subtitles for enhanced engagement.
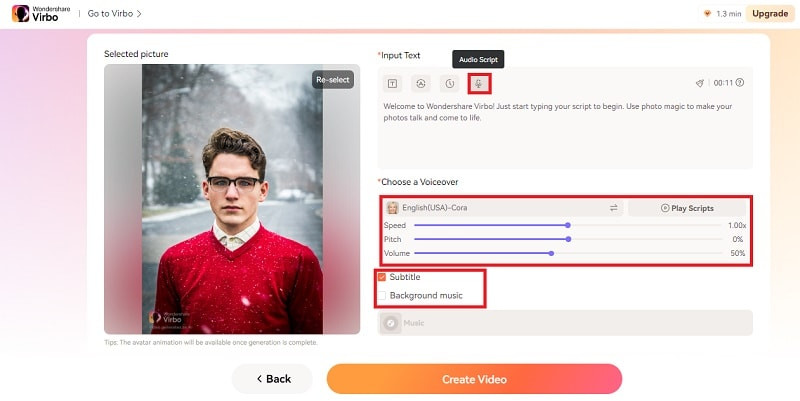 Write text and set voiceover in Virbo Talking Photo
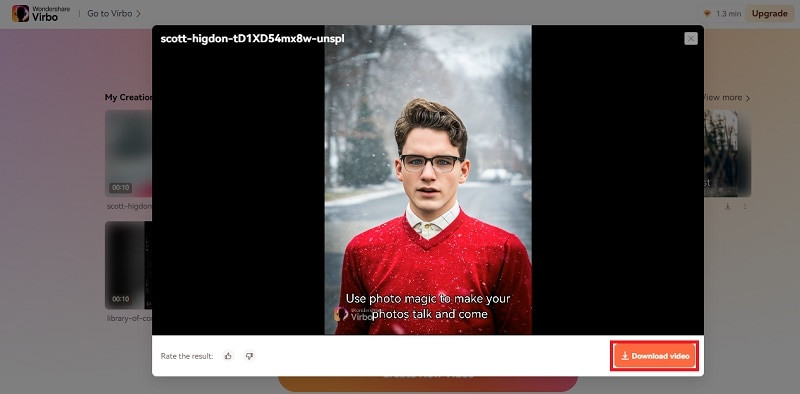
Step 4: Create and Download Your Talking Photo Video
- After finalizing your text and voice settings, click the “Create Video” button.
- Virbo will process your request and generate your talking photo video in moments.
- Find your animated photo in the “My Creations” section. Preview it and then click “Download Video” to save it to your device.
 Create video with Virbo Talking Photo and download
Make Photo Talk Online Try in App Free Free Download
With Wondershare Virbo, you can take your photo animations to the next level, creating talking photos that are sure to grab attention and add a unique touch to your digital content.
Conclusion
Converting Live Photos to GIFs is a fantastic way to share animated moments captured on your iPhone across various platforms. Whether you choose the convenience of iPhone Shortcuts, the simplicity of the Bounce effect, the creative tools of GIPHY, or a dedicated converter app, you now have multiple methods at your fingertips to easily create GIFs from your Live Photos.
By understanding the differences between GIFs and Live Photos and mastering these conversion techniques, you can enhance your digital communication and content creation. And with bonus tools like Wondershare Virbo, you can further animate your photos in exciting new ways, making your visual content even more dynamic and engaging.
Make Photo Talk Online Try in App Free Free Download