Google Photos is a popular cloud storage platform for photos and videos. However, with Google’s storage policy changes, automatic backups can quickly consume your free 15GB allowance. This guide provides step-by-step instructions on How To Stop Backup In Google Photos on Android and iPhone devices, helping you manage your storage effectively.
 manage-settings-google-photos-android
Why Disable Google Photos Automatic Backup?
Google Photos previously offered unlimited storage for high-quality photos. However, since June 1, 2021, all uploaded photos, regardless of quality, count towards your 15GB Google account storage limit. With automatic backups enabled, this limit can be reached quickly. Disabling this feature allows you to control which photos are backed up, conserving valuable storage space.
Stopping Google Photos Backup on Android
Disabling automatic backups on Android is straightforward:
- Open Google Photos: Launch the Google Photos app on your Android device.
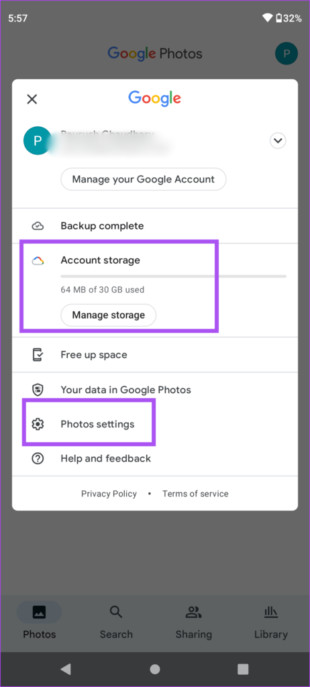
- Access Settings: Tap your profile picture in the top-right corner. Select either “Manage Storage” or “Photo settings”.
- Disable Backup & Sync: Tap on “Back up and sync” and toggle the switch to the off position.
After completing these steps, new photos will no longer be backed up to Google Photos. Existing photos in the cloud will remain unless manually deleted. New photos will only be stored locally on your device.
Stopping Google Photos Backup on iPhone
The process for iPhone is similar:
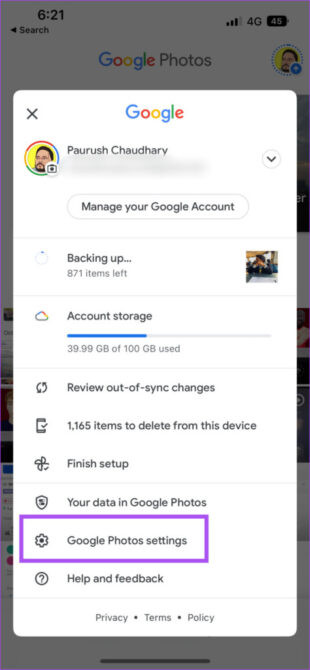
- Open Google Photos: Open the Google Photos app on your iPhone.
- Access Settings: Tap your profile picture in the top-right corner. Then, select “Google Photos Settings”.
- Disable Backup & Sync: Tap “Backup and Sync” and toggle the switch off.
 google-photos-settings
This will prevent future photos from being uploaded. Already backed-up photos will remain in your Google Photos account and can be deleted manually.
Alternative Backup Solutions: AirDroid Personal
For more control over your backups, consider using dedicated backup software like AirDroid Personal. This tool offers features like:
- Flexible Backup Options: Manual and automatic backup modes.
- Lossless Quality: Back up photos and videos in their original quality.
- High-Speed Transfer: Quick transfer speeds between your phone and computer.
Connecting devices using AirDroid Personal for backup.
To use AirDroid Personal for backups:
- Download and Install: Download and install AirDroid Personal on your computer and phone. Sign in using the same account.
- Connect Devices: Open the desktop app and click the “Transfer” icon. Select your phone under “My devices”.
- Initiate Backup: Select the “Backup” tab and click “Backup”. Choose the backup folder, destination, and click “Done”. Enable automatic backup if desired.
Conclusion
Managing your Google Photos storage is crucial for maximizing your free allocation. By following these steps, you can easily stop automatic backups and take control of your photo storage. Consider exploring alternative backup solutions like AirDroid Personal for enhanced features and flexibility.