Many people store hundreds, even thousands, of photos and videos in Google Photos. While Google Photos offers convenient cloud storage, downloading your entire library to a computer can seem daunting. This guide provides step-by-step instructions on how to download all your photos from Google Photos to your PC or Mac.
Why Download Your Google Photos Library?
Google Photos is a reliable platform with cross-platform support and robust security. However, maintaining a local backup of your photos and videos offers several advantages:
- Offline Access: View your photos anytime, anywhere, even without internet access. This is particularly useful for travel or areas with limited connectivity.
- Account Security: Safeguard your memories in case of account lockout or unexpected issues with your Google account.
- Data Control: Have full control over your personal data and ensure its long-term preservation.
Downloading All Photos Using Google Takeout
The fastest way to download your entire Google Photos library is through Google Takeout. This service allows you to export various Google data, including photos, videos, emails, and more.
Step-by-Step Guide:
- Go to takeout.google.com: Sign in to your Google account.
- Deselect All: Under the “Select data to include” tab, click “Deselect all.”
- Select Google Photos: Scroll down and check the box next to “Google Photos.” This selects your entire photo and video library. If you only want specific albums, click “All photo albums included” to choose individual albums or years. Click “OK” after making your selections. Then, click “Next step.”
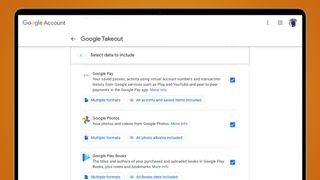 Selecting Google Photos in Google Takeout
 - Choose Export Options:
- Delivery Method: Select how you want to receive the download link (email or direct transfer to another cloud service like Dropbox, OneDrive, or Box).
- Frequency: Choose a one-time export or set up periodic exports.
- File Type and Size: Select “.zip” as the file type and choose a maximum file size (e.g., 1GB). Larger exports will be split into multiple files.
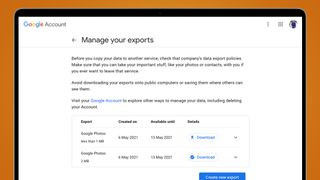 Choosing export options in Google Takeout
- Create Export: Click “Create export.” Google will then start creating a copy of your Google Photos library. The process duration depends on the library size.
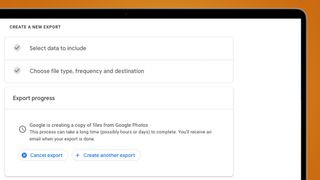 Creating the export in Google Takeout
 - Download Your Files: Check your email for a download notification. Click “Download your files” to start the download process. The download links are typically valid for one week.
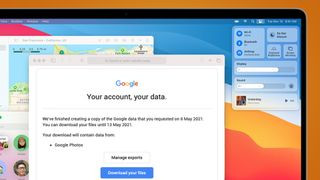 Email notification from Google Takeout
Downloading Individual Photos or Albums
While Google Takeout is ideal for downloading everything, you can also download individual photos or entire albums directly from Google Photos.
Downloading Individual Photos:
- Open Google Photos and select the desired photo.
- Click the three dots in the top right corner.
- Select “Download.”
Downloading Multiple Photos:
- In Google Photos, hover over a photo and click the checkmark to select it.
- Select additional photos by clicking on them. Hold Shift to select a range of photos.
- Click the three vertical dots in the top right corner.
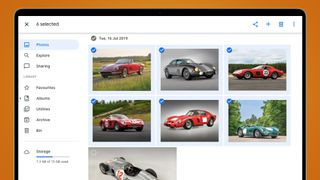 Selecting multiple photos in Google Photos
 - Click “Download.” The selected photos will be downloaded as a zip file.
Downloading Albums:
- In Google Photos, go to the “Albums” tab and select “View all albums.”
- Click on the desired album.
- Click the three dots in the top right corner.
- Select “Download all.” The album’s contents will be downloaded as a zip file.
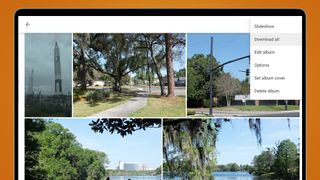 Downloading a Google Photos album
Conclusion
Downloading your Google Photos library provides peace of mind and ensures access to your cherished memories regardless of internet connectivity. Choose the method that best suits your needs, whether downloading everything at once using Google Takeout or selectively downloading individual photos or albums. Having a local backup is a crucial step in safeguarding your precious photos and videos.