You’ve filled out your passport application, but how do you attach the photo? Using tape or glue? Definitely not! Stapling is the way to go, but doing it correctly is crucial for your application’s success. This guide provides a clear, step-by-step process on how to staple a passport photo to your application, ensuring it meets all official requirements.
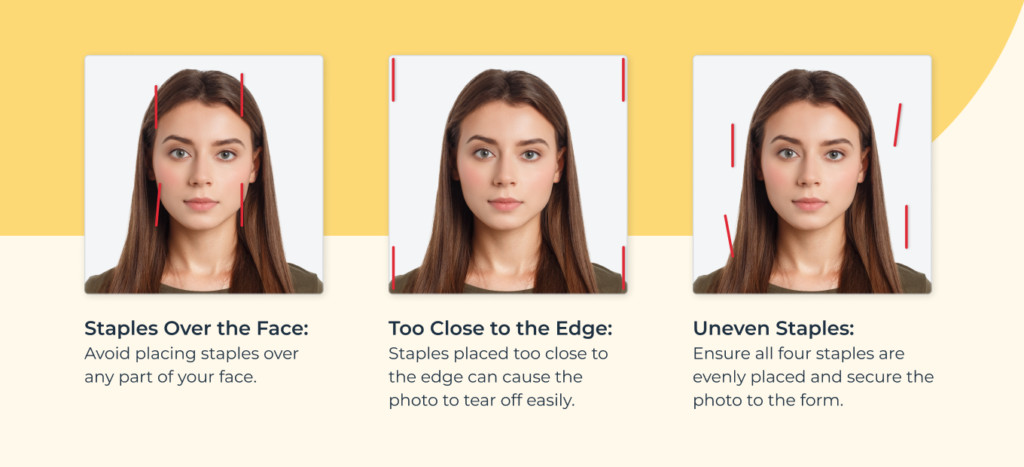 Three examples of incorrectly stapled passport photos.
Understanding Passport Photo Attachment Requirements
When renewing your passport by mail using Form DS-82, you must attach your photo using staples. However, if you’re applying for a first-time passport in person, the passport agent will handle this for you. Before stapling, ensure your photo meets all the official requirements regarding size, background, and pose.
Step-by-Step Guide: How to Staple Your Passport Photo
Correctly stapling your passport photo is essential. Follow these simple steps to ensure your application is processed smoothly:
-
Locate the Designated Area: On Form DS-82, find the box marked “Place Photo Here.” This box usually has dotted lines to guide you in aligning your photo.
-
Position Your Photo: Carefully place your photo within the designated area, ensuring it aligns with the dotted lines. The image should fit entirely within the box without being cut off.
 A person correctly positioning a photo on a passport application.
-
Use Four Staples: You must use four staples, one in each corner of the photo. This secures the photo firmly to the application and prevents it from shifting during processing.
-
Staple Placement: Place the staples close to the edges of the photo without obscuring any part of your face. Avoid stapling through any crucial facial features.
 Close up of a correctly stapled passport photo.
-
Avoid Shadows: Ensure the staples don’t cast shadows on your face. Shadows can obscure details and potentially lead to application rejection.
-
Verify Stability: Gently check that the photo is securely attached and doesn’t move. A loose photo can get damaged or lost during processing.
Common Mistakes to Avoid
- Using Tape or Glue: Never use tape or glue to attach your passport photo. Only staples are accepted.
- Insufficient Staples: Using fewer than four staples can result in a loose photo.
- Obscuring Facial Features: Avoid placing staples over any part of your face.
- Casting Shadows: Ensure staples don’t cast shadows that darken your facial features.
What If I Forget to Staple My Photo?
Forgetting to staple your photo can lead to application rejection. If you apply in person, a passport agent might staple it for you. However, relying on this is risky. Always double-check your application before submitting it.
Ensuring a Compliant Passport Photo
Getting a compliant passport photo is the first step. Use a reputable passport photo service or app to ensure your photo meets all official requirements. A compliant photo, correctly stapled, will significantly increase the chances of your application being processed without delays. Remember, only one photo is required for passport renewals.
Conclusion
Attaching your passport photo correctly is a simple yet crucial step in the application process. By following this guide, you can ensure your photo is securely affixed and meets all requirements, leading to a smoother and more efficient passport application experience. Remember to always double-check your application before submission to avoid unnecessary delays or rejections.