We all know the feeling. Your Android phone is brimming with precious photos – from unforgettable vacation memories to everyday moments you want to cherish. But what happens when your phone storage gets full, or you need to edit those photos on a larger screen, or simply want to back them up safely on your computer? Knowing how to transfer photos from Android to computer becomes essential.
Luckily, moving your photos from your Android device to your computer is easier than you might think. You don’t need to be a tech expert to master this skill. This guide will walk you through several proven and straightforward methods to transfer pictures from your Android to your PC without any hassle and while maintaining the original quality of your precious memories.
Let’s explore the most effective solutions to seamlessly transfer your photos from your Android phone to your computer.
Part 1: Transfer Photos from Android to Computer Using a USB Cable
The USB cable method is often the first and most intuitive approach for many users when considering how to transfer photos from Android to computer. It’s a direct, reliable, and widely accessible method. Almost everyone has a USB cable at home, and computers universally support USB connections.
The primary advantage of using a USB connection is its consistent and secure data transfer. It’s a physical connection, minimizing the risk of interruptions or data loss during the transfer process. However, it’s worth noting that transferring large amounts of data via USB can sometimes be slower compared to wireless methods. Additionally, this method is dependent on a functioning USB port on your computer and a compatible cable.
Here’s a step-by-step guide on how to transfer pictures from phone to computer with USB:
Step 1.
Start by connecting your Android phone to your computer using a reliable USB cable. Ideally, use the original cable that came with your phone for optimal compatibility and transfer speed.
Step 2.
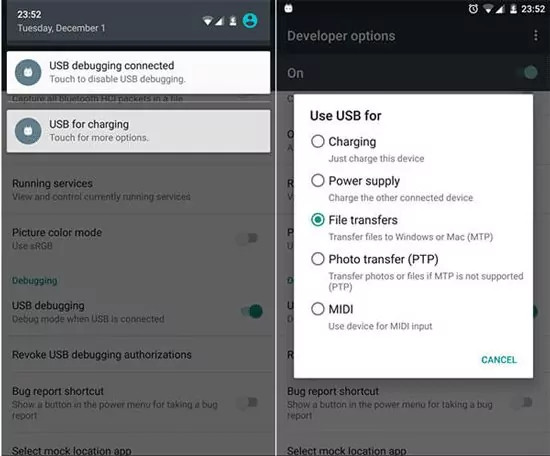
Once connected, look at your Android phone’s notification panel. You should see a notification related to the USB connection. Tap on this notification and select the option that says “File transfers” or sometimes “MTP” (Media Transfer Protocol). This allows your computer to access your phone’s files.
 Transfer Photos from Phone to Computer
Step 3.
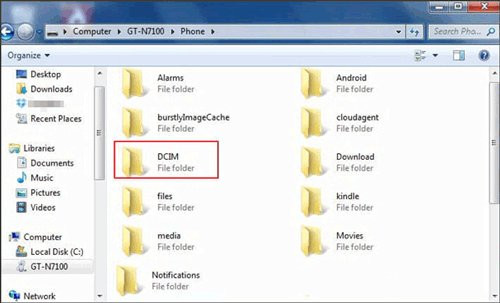
Now, navigate to your computer and open File Explorer (on Windows) or Finder (on Mac). You should see your Android phone listed as a device, typically with your phone’s name. Click on your device’s name to access its internal storage. Inside, locate the “DCIM” folder. DCIM stands for “Digital Camera Images,” and this is where most Android phones store photos taken with the camera.
 Transfer Photos from Phone to Computer
Step 4.
Open the DCIM folder, and you will see subfolders like “Camera,” “Screenshots,” etc., depending on your phone model and apps. Browse through these folders to find the photos you want to transfer. Select the desired photos and then drag and drop them to a location on your computer, or copy and paste them. You can create a new folder on your desktop or in your Pictures library to organize your transferred photos.
Part 2: Alternative Methods to Transfer Photos from Android to Computer
While USB is a dependable method, there are several other ways to transfer photos from your Android phone to your computer, offering flexibility and convenience, especially for wireless transfers.
**1. Utilizing the Built-in Microsoft Photos App
If you are a Windows 10 or Windows 11 user, you have a powerful built-in tool at your disposal: the Microsoft Photos app. This native application provides a seamless way to import photos and videos from your Android phone to your PC. It’s particularly efficient when dealing with a large number of photos, streamlining the process of moving your visual memories from phone to computer.
Here’s how to transfer photos from your Android phone to your Windows PC using the Photos app:
Step 1.
Connect your Android phone to your Windows PC using a USB cable, just as you would for the standard USB transfer method.
Step 2.
Once connected, open the Microsoft Photos app. You can find it in the Start Menu by searching for “Photos.”
Windows Start Menu showing the Photos app icon, ready to open for importing photos from an Android phone.
Step 3.
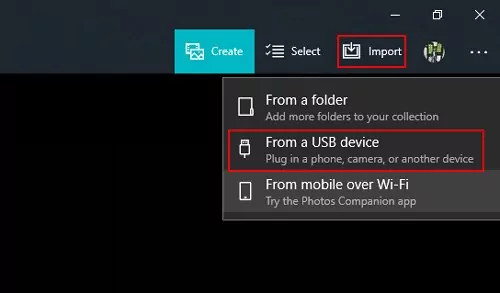
In the Photos app, look for the “Import” button, usually located in the top-right corner of the window. Click on “Import,” and then choose “From a connected device” or “From a USB device” from the dropdown menu.
 Transfer Photos from Phone to Computer
Step 4.
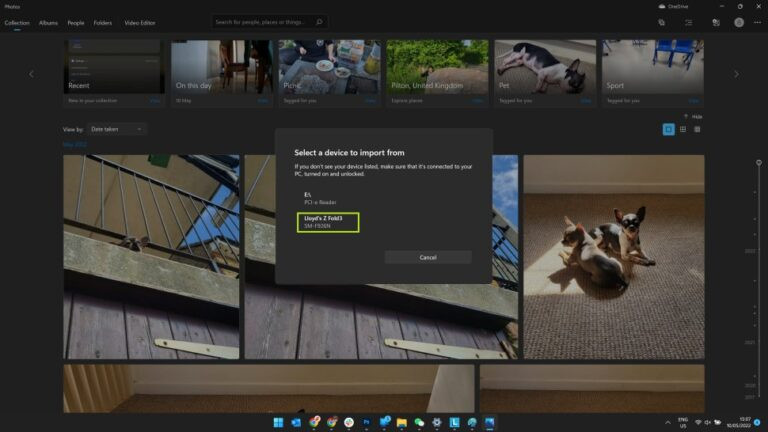
The Photos app will detect your connected Android device. Select your device name when prompted. The app will then automatically start scanning your phone for photos and videos.
 Microsoft Photos app displaying connected devices, prompting user to select their Android phone for photo import.
Step 5.
After the scan is complete, the Photos app will display all the photos and videos found on your Android phone. You can preview them, select individual photos you want to transfer, or click “Select all” to import everything.
Microsoft Photos app displaying scanned photos and videos from Android, allowing users to select specific items or ‘Select all’ for transfer.
Step 6.
Before starting the import, you can change the destination folder where your photos will be saved on your PC. Click on “Change destination” to choose a specific location. Once you’re satisfied with your selections and destination, click “Import” to begin the photo transfer process.
Microsoft Photos app showing import options, including ‘Change destination’ to select a folder for saving imported photos on the computer.
**2. Transferring Photos from Android to PC Using Google Photos
For users seeking a wireless and universally accessible method, Google Photos offers an excellent solution for how to transfer photos from phone to computer. This method leverages cloud storage, allowing you to seamlessly access your photos on any device with an internet connection.
To use Google Photos, you’ll need the Google Photos app installed on your Android phone and a Google account. Make sure you are logged in with the same Google account on both your phone and your computer for seamless synchronization.
Here are the steps to transfer photos from Android to PC using Google Photos:
Step 1.
Launch the Google Photos app on your Android phone. Ensure that backup and sync are enabled. This feature automatically uploads your photos to your Google Photos account in the cloud. If it’s not already set up, go to the app’s settings and turn on “Backup & sync.”
Step 2.
If backup and sync is already enabled, your new photos should automatically upload. To manually upload specific photos, select the photos you want to transfer within the Google Photos app. Then, tap the “Upload” icon (usually a cloud icon with an upward arrow) to immediately upload them to Google Photos.
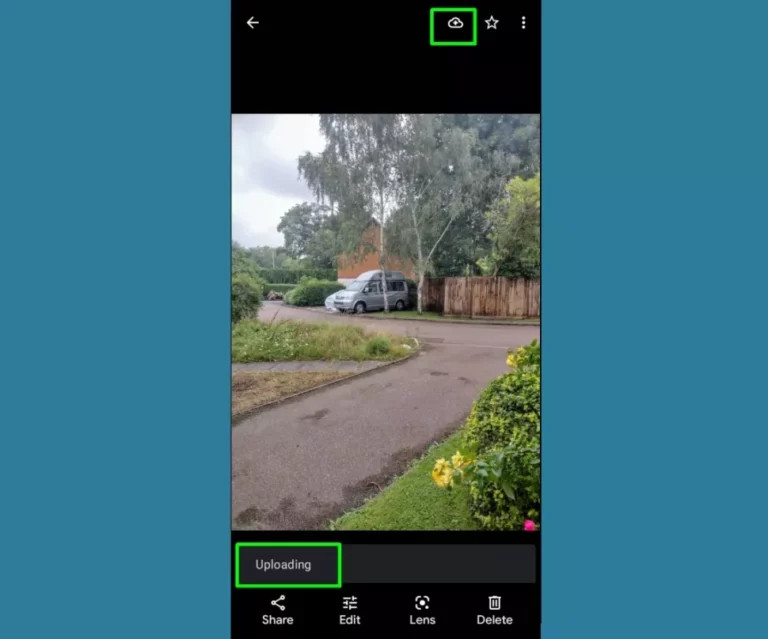 Google Photos app on Android displaying the ‘Upload’ icon for manually backing up selected photos to the cloud.
For users who don’t see the cloud icon, tap the three-line menu button (hamburger menu) in the top-left or top-right corner of the app. Then, find and enable “Back up now” to initiate the photo upload.
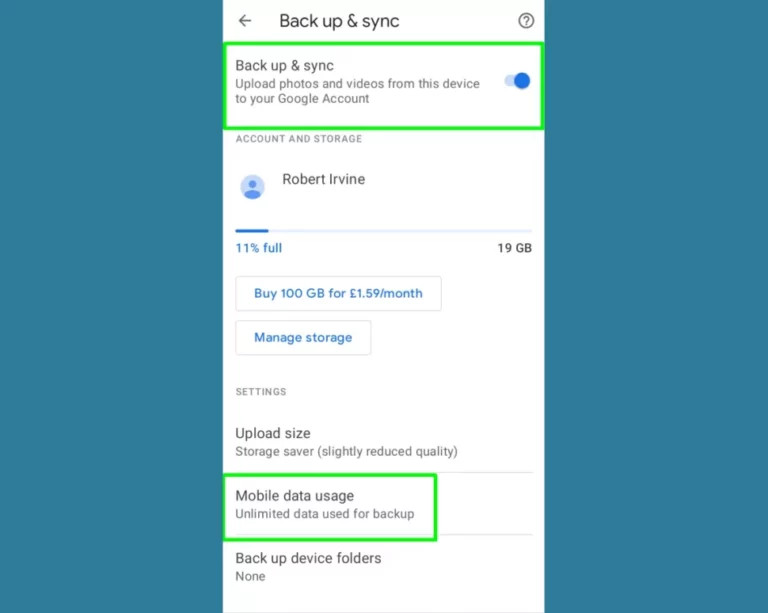 Google Photos app menu showing ‘Backup & sync’ option to ensure photos are being uploaded and synced to the cloud.
Step 3.
On your computer, open a web browser and go to photos.google.com. Log in with the same Google account you use on your Android phone. You should see all your synced photos in the Google Photos web interface.
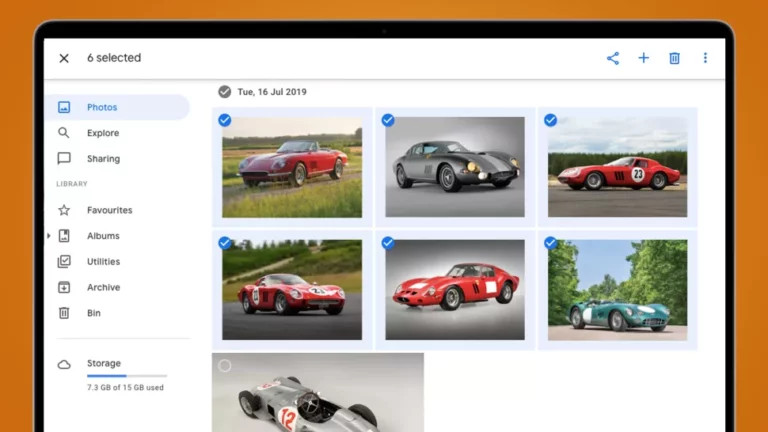 Google Photos website interface displaying synced photos from Android, ready for download to a computer.
Step 4.
Select the photos you want to download to your computer. You can select multiple photos by holding down the Shift key (or Ctrl/Cmd key) while clicking. Once you’ve selected all the desired photos, click the three-dot icon (More options) usually located at the top right, and choose “Download.” Your selected photos will be downloaded to your computer, typically in a zip file if you selected multiple images.
**3. Transfer Photos from Android to PC Using Bluetooth
While perhaps not the fastest method, Bluetooth still provides a wireless option to transfer photos android phone to computer, especially useful for transferring a small number of photos when other methods are not readily available. Bluetooth is a standard feature on most smartphones and many computers, making it a universally accessible option.
Keep in mind that Bluetooth transfer speeds are generally slower compared to Wi-Fi or USB. Also, ensure that your computer is equipped with Bluetooth functionality before attempting this method.
Here’s how to transfer photos from Android to PC via Bluetooth:
Step 1.
First, enable Bluetooth on your computer. On Windows, go to Settings > Devices > Bluetooth & other devices, and toggle Bluetooth to “On.” On macOS, go to System Preferences > Bluetooth and turn Bluetooth on.
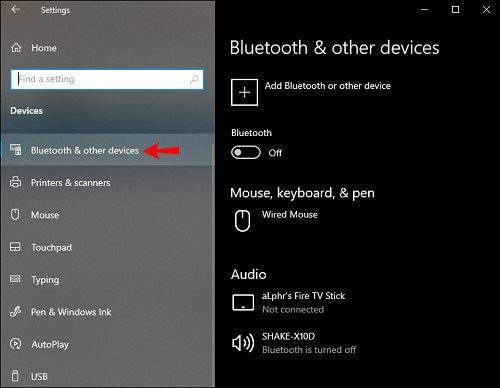 enable-bluetooth
Step 2.
Enable Bluetooth on your Android phone. Typically, you can do this through the Quick Settings panel (swipe down from the top of the screen) or in the Settings app under “Connections” or “Bluetooth.” Pair your Android phone with your computer. Your computer should appear in the list of available devices on your phone. Select your computer’s name to initiate pairing. You may need to confirm a pairing code on both devices.
Step 3.
Once both devices are successfully paired, go to your phone’s Gallery app or Photos app and select the photos you want to transfer. Tap the “Share” icon (usually looks like three connected dots or an upward-pointing arrow).
Step 4.
From the share options, tap the Bluetooth icon. Your paired computer should appear in the list of Bluetooth devices. Select your computer’s name. On your computer, you will receive a notification asking you to accept the incoming file transfer. Accept the notification to begin transferring the photos. The photos will be saved in the default Bluetooth receiving folder on your computer, which you can usually configure in Bluetooth settings.
**4. Transferring Photos via Email
Email has been a long-standing method for sharing files, and it remains a viable option for transferring photos from your phone to your computer, particularly when you only need to send a few images. Almost every smartphone and computer user has email access, making it a universally accessible method.
However, email services typically have file size limits for attachments, often around 20-25MB. This method is best suited for transferring a small number of photos, not large batches or videos.
The process is straightforward:
Simply select the photos you want to transfer from your Android phone’s Gallery or Photos app. Use the share option and choose your email app (like Gmail, Outlook, etc.). Compose an email to yourself or another email address you can access on your computer. Attach the selected photos to the email. Send the email. Then, open your email account on your computer, locate the email you sent, and download the attached photos to your desired location on your PC.
Part 3: The Most Efficient Method: Using AirDroid Personal
For users seeking the most efficient and feature-rich method to transfer photos and manage their Android phone from a computer, AirDroid Personal stands out as a powerful solution. AirDroid Personal is a versatile app that not only facilitates fast and seamless file transfer between Android and computers (Windows, Mac, Linux) but also offers a suite of other functionalities, including remote access, screen mirroring, and SMS & call management.
AirDroid Personal excels in providing a user-friendly interface and high-speed, lossless data transfer, even when your phone and computer are on different networks. It supports transferring various file types beyond photos, including videos, documents, and more.
Here are some of the advanced features that make AirDroid Personal a top choice:
Advanced Features of AirDroid Personal
- Cross-Platform Data Transfer: Seamlessly transfer files between Android, Windows, Mac, Linux, and iOS devices.
- Comprehensive File Type Support: Supports transferring photos, videos, documents, APKs, and all other file types.
- Lightning-Fast Transfer Speed: Offers significantly faster transfer speeds compared to Bluetooth and often faster than cloud-based solutions, especially for large files.
- Android Screen Mirroring on PC: Mirror your Android screen to your computer for presentations, gaming, or app control.
- Manage Android SMS and Calls from Desktop: Send and receive SMS messages and make or answer calls directly from your computer.
- Remote File Management: Intuitively manage files on your Android device directly from your computer, including deleting, renaming, and organizing files.
- Remote Camera Access: Use your Android phone’s camera remotely as a security monitoring device.
Get Free App
Using AirDroid Personal to transfer photos is remarkably simple, even for those less familiar with technical applications. Here’s a step-by-step guide on how to transfer pictures from an Android phone to a computer using AirDroid Personal:
Step 1.
Download and install both the AirDroid Personal Desktop Client on your computer and the AirDroid Personal mobile app on your Android phone. Create an AirDroid account and log in with the same account on both the desktop client and the mobile app.
AirDroid Personal desktop client login screen, prompting users to sign in with their AirDroid account for device connection.
Step 2.
Once logged in on both devices, the AirDroid app on your phone should recognize your computer under “My Devices.” Tap on your computer’s name listed under “My Devices” in the AirDroid mobile app.
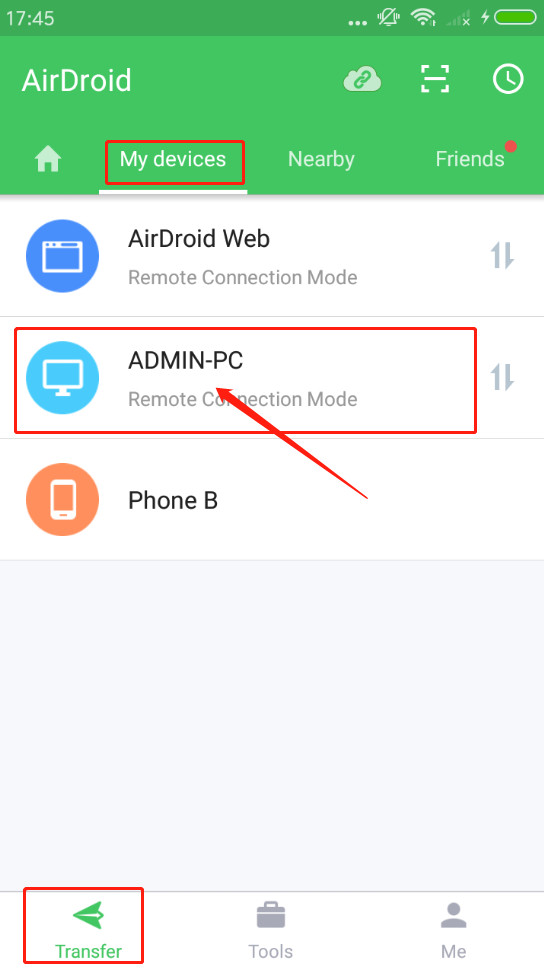 connect-devices
Step 3.
Within the chat-like interface that opens after selecting your computer, tap the attachment icon (usually a plus sign or a paperclip icon). Choose “Files” from the options. Then, navigate to the folder containing the photos you want to transfer, select the photos, and tap “Send.” The photos will be instantly transferred to your computer.
 send-photos
AirDroid Personal automatically saves received files in a designated folder on your computer. You can customize this download location within the AirDroid Personal Desktop Client settings.
To change the default download folder:
Step 1.
Open the AirDroid Personal Desktop Client and go to its settings. This is usually accessible through a gear icon or a menu option like “Settings” or “Preferences.”
Step 2.
Look for an option related to file transfer or download settings. You should find a setting labeled something like “Save received files to” or “Download path.” Click on “Browse” or “Change” to select your desired output folder on your computer. Confirm your selection, and AirDroid will now save all received files, including your transferred photos, to this new location.
 select-output-folder
Final Thoughts
You now have a comprehensive understanding of how to transfer photos from Android to computer using various effective methods. From the simplicity of USB cables to the versatility of cloud services and the power of dedicated apps like AirDroid Personal, you can choose the method that best suits your needs and preferences.
For ease of use, speed, and a range of advanced features, AirDroid Personal is highly recommended, offering a robust solution for not just photo transfer, but also broader Android device management from your computer. However, for basic and quick transfers, methods like USB or Google Photos are also excellent choices. Ultimately, the best method is the one that you find most convenient and efficient for your workflow.
FAQs
1. How do I transfer pics from my Android to my computer quickly?
Charudatta
For the fastest transfer of photos from your Android to your computer, using a USB 3.0 cable or higher is a good option for a direct connection. For wireless transfer, AirDroid Personal offers very fast speeds, often exceeding Bluetooth and even some cloud-based transfers.
2. What is the most reliable way to transfer my pics from Android to my computer?
Charudatta
The most reliable method is generally using a USB cable. It provides a direct, physical connection, minimizing the chances of transfer interruptions. For a reliable wireless solution, AirDroid Personal is also highly dependable due to its stable connection and direct device-to-device transfer capabilities.