Want to know how to layer photos on your iPhone? You’re in luck! Thanks to the power of Apple’s iOS Shortcuts app, it’s easier than ever to overlay images directly on your phone. No need for complicated desktop software or even third-party apps anymore for simple photo layering tasks.
iPhones are renowned for their user-friendly interface and powerful capabilities, largely driven by Apple’s intuitive operating system. The Shortcuts app, introduced in iOS 13, takes this a step further by allowing users to create custom commands that automate complex actions. One incredibly useful application of Shortcuts is the ability to quickly and efficiently overlay one image onto another, right on your iPhone.
Forget the days of relying on dedicated photo editing apps just to superimpose photos. With this simple shortcut, combined with features like iOS 16’s “Lift Subject from Background,” you have a fantastic tool at your fingertips for creating social media content, memes, or just fun photo edits on the go.
Setting up the shortcut requires a few initial steps, but once configured, you’ll have this handy feature ready whenever you need it. Below is your comprehensive step-by-step guide on how to download, set up, and use this shortcut to layer photos on your iPhone.
Step-by-Step Guide to Overlaying Photos on iPhone
To get started with layering images, you’ll need to create a custom shortcut. Here’s how:
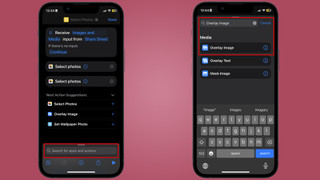
1. Create a New Shortcut in the Shortcuts App
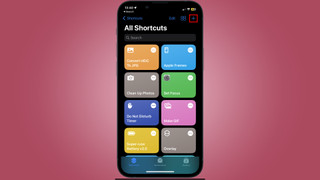 Opening Shortcuts App and Creating a New Shortcut
(Image: © Future)
First, ensure your iPhone is running iOS 13 or later. The Shortcuts app usually comes pre-installed. If you can’t find it, you can easily download or reinstall it from the App Store.
Once you’ve located and opened the Shortcuts app, tap the ‘+’ icon located in the top right corner of the screen. This will initiate the creation of a brand new shortcut for you to customize.
2. Enable Share Sheet Functionality
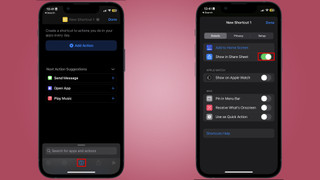 Turning on the Share Sheet Option in Shortcuts
(Image: © Future)
Next, you need to make this shortcut accessible from your photos. Tap the ‘i’ icon, which you’ll find in the toolbar at the bottom of the screen. This action will open the shortcut settings page.
Within the settings, find the option labeled ‘Show in Share Sheet’ and toggle it to the ‘on’ position.
Enabling the Share Sheet option is crucial as it allows your iPhone to send image data directly to the shortcut from your Photos app, providing quick and convenient access to your new image overlay tool. After toggling it on, simply press ‘Done’.
3. Specify Input File Format
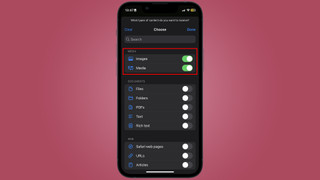 Selecting Image File Format for Shortcut Input
(Image: © Future)
After returning to the new shortcut creation screen, you’ll notice an action has been automatically added. This action is designed to receive media from the Share Sheet.
Tap on the area that says ‘Any’ or ‘Images and more’. This will open a list of media formats. To ensure the shortcut only processes images, turn off all media format options except for ‘Images’ and ‘Media’. This ensures that the shortcut will only activate when you share images, streamlining the process. Once you’ve selected the correct formats, tap ‘Done’.
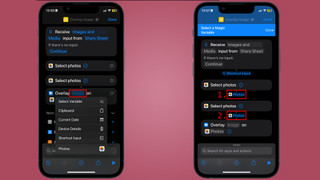
4. Add Two “Select Photos” Actions
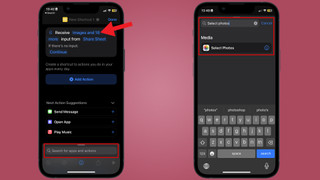 Adding "Select Photos" Actions in Shortcuts Workflow
(Image: © Future)
Now, let’s add the actions that will allow you to choose the photos you want to layer. From the shortcut editing screen, tap ‘Add Action’ or directly use the search bar located at the bottom.
Type ‘Select Photos’ into the search bar and select the corresponding action. This action allows you to pick an image from your photo library. You’ll need two of these actions. Follow the same steps again to add a second ‘Select Photos’ action to your shortcut workflow.
5. Integrate the “Overlay Image” Action
 Adding "Overlay Image" Action to the Shortcut
(Image: © Future)
It’s time to add the core action that performs the image layering. Again, tap ‘Add Action’ or use the search bar. This time, type ‘Overlay Image’ in the search bar.
Select the ‘Overlay Image’ action from the search results. This action is the heart of the shortcut, as it will handle the process of combining your chosen images.
6. Assign Image Variables for Overlay
 Selecting Variables for Image Input in Overlay Action
(Image: © Future)
Now you need to tell the ‘Overlay Image’ action which photos to use. Within the ‘Overlay Image’ action box, tap the first ‘Images’ variable. From the menu that appears, choose ‘Select Variable’.
A blue bar will appear at the top of your screen saying ‘Select a Magic Variable.’ Tap on the first ‘Photos’ label that appears directly after your first ‘Select Photos’ action in the workflow. This assigns the output of the first ‘Select Photos’ action as the base image for the overlay.
Repeat this process for the second ‘Images’ variable in the ‘Overlay Image’ action. This time, tap the second ‘Photos’ label that follows your second ‘Select Photos’ action. This assigns the second selected photo as the overlay image, which will be placed on top of the base image.
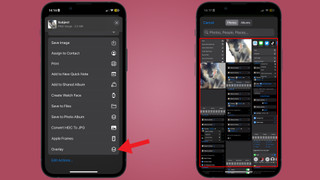
7. Add “Save to Photo Album” Action
 Adding "Save to Photo Album" Action to Save the Layered Image
(Image: © Future)
Almost there! The final step in the shortcut setup is to add an action that saves your newly layered image. Tap the search bar one last time and search for ‘Save to Photo Album’. Click on the corresponding action to add it to your shortcut workflow.
This action will automatically save the final layered image to your iPhone’s Camera Roll, making it easy to access and share.
8. Rename Your Shortcut for Easy Access
 Renaming the Shortcut for Share Sheet Visibility
(Image: © Future)
To make your shortcut easily identifiable in the Share Sheet, rename it. Tap on the current name of your shortcut at the top of the screen (it likely defaults to something like ‘New Shortcut’). Choose ‘Rename’ from the options.
Give your shortcut a descriptive and easily recognizable name, such as ‘Overlay Photos’ or ‘Layer Images’. This name will appear in your Share Sheet, so make it something you’ll quickly understand.
9. Test Your New Shortcut in Photos
 Running the Shortcut from the Photos App Share Sheet
(Image: © Future)
Now for the fun part – testing your shortcut! Open your Photos app and select the two photos you want to overlay. Tap the Share Sheet button (the square icon with an upward-pointing arrow). Scroll through your Share Sheet options and find the shortcut you just created (e.g., ‘Overlay Photos’). Tap on it.
You’ll be prompted to select your first photo. This photo will be the base image – the one that appears in the background. After selecting the first image, you’ll be prompted to select your second photo. This will be the overlay image, placed on top of the first. Remember, the order you select them in matters!
For more advanced overlays, like isolating a subject, use iOS 16’s ‘Lift Subject from Background’ feature. Simply press and hold on the subject of a photo, tap ‘Share’, and save the lifted subject as a separate image. You can then use this isolated image as your overlay.
10. Adjust and Finalize Your Overlay
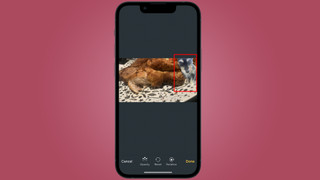 Resizing and Repositioning the Overlay Image in the Editor
(Image: © Future)
After selecting your two images, you’ll be taken to a simple image editor. Here, you can resize and reposition your overlay image on top of the base image using pinch and drag gestures.
Once you’re satisfied with the placement and size, tap ‘Done’ in the top right corner. The final layered image will be saved directly to your Camera Roll, ready to be shared or used as you wish.
Final Thoughts on iPhone Photo Layering
Congratulations! You’ve successfully set up a shortcut to easily layer photos on your iPhone. While the initial setup might seem a bit intricate, especially for those new to the Shortcuts app, it’s a straightforward process. Once completed, you have a powerful tool for quick image overlays directly on your phone.
It might seem surprising that this functionality isn’t a built-in feature of iOS, especially given how useful it is for quick edits. While Shortcuts are powerful, they can occasionally be less seamless than native iOS features. However, having this capability through Shortcuts is definitely better than not having it at all.
If you find the Shortcuts method a bit too involved, or if you need more advanced layering and editing features, there are many excellent iPhone photo editing apps available that offer more comprehensive tools.
For users who prefer editing on a larger screen or utilize dedicated cameras alongside their iPhones, exploring free photo editors for PC and Mac or learning to edit images in Google Photos are also valuable alternatives.
Get More Photography Tips & Tricks
Stay updated with daily insights, creative inspiration, and exclusive deals directly in your inbox.
Sign up for our newsletter to receive the latest in photography news, reviews, expert opinions, top tech deals, and much more.