Food photography has a rich history, dating back to the earliest days of photography itself. From still-life images of fruits in daguerreotypes to the mouth-watering spreads in today’s food magazines, cookbooks, and online blogs, capturing delicious-looking dishes has always been a popular subject.
In the digital age, compelling food photography is more crucial than ever. For ecommerce businesses, enticing visuals of food products are essential for building brand recognition and driving sales. A beautifully lit photo of crusty focaccia can perfectly complement an advertisement for olive oil, while a vibrant image of spicy Sichuan noodles can instantly increase the appeal of chili crisp condiments.
So, what are the secrets to taking food photos that truly make viewers crave a bite? While professional equipment like DSLR or mirrorless cameras can be beneficial, you don’t need to break the bank to achieve stunning results. Whether you are a marketing professional, an entrepreneur promoting your food business, a small business owner showcasing your menu, or simply a food enthusiast, mastering a few fundamental photography techniques will empower you to capture captivating food photos.
How to Take Food Photos
Capturing truly great food photos requires more than just pointing and shooting. Whether you’re using a smartphone for quick snaps or a high-end camera for professional-quality images, certain core principles are key to success.
1. Choose the Right Background
Selecting an appropriate background is crucial for directing attention to your food subject. A seamless backdrop, such as paper or fabric, immediately focuses the viewer’s eye on the dish itself. Alternatively, incorporating tableware, linens, and carefully chosen props can enrich the image and subtly communicate your brand’s aesthetic and the story behind your food products to potential customers.
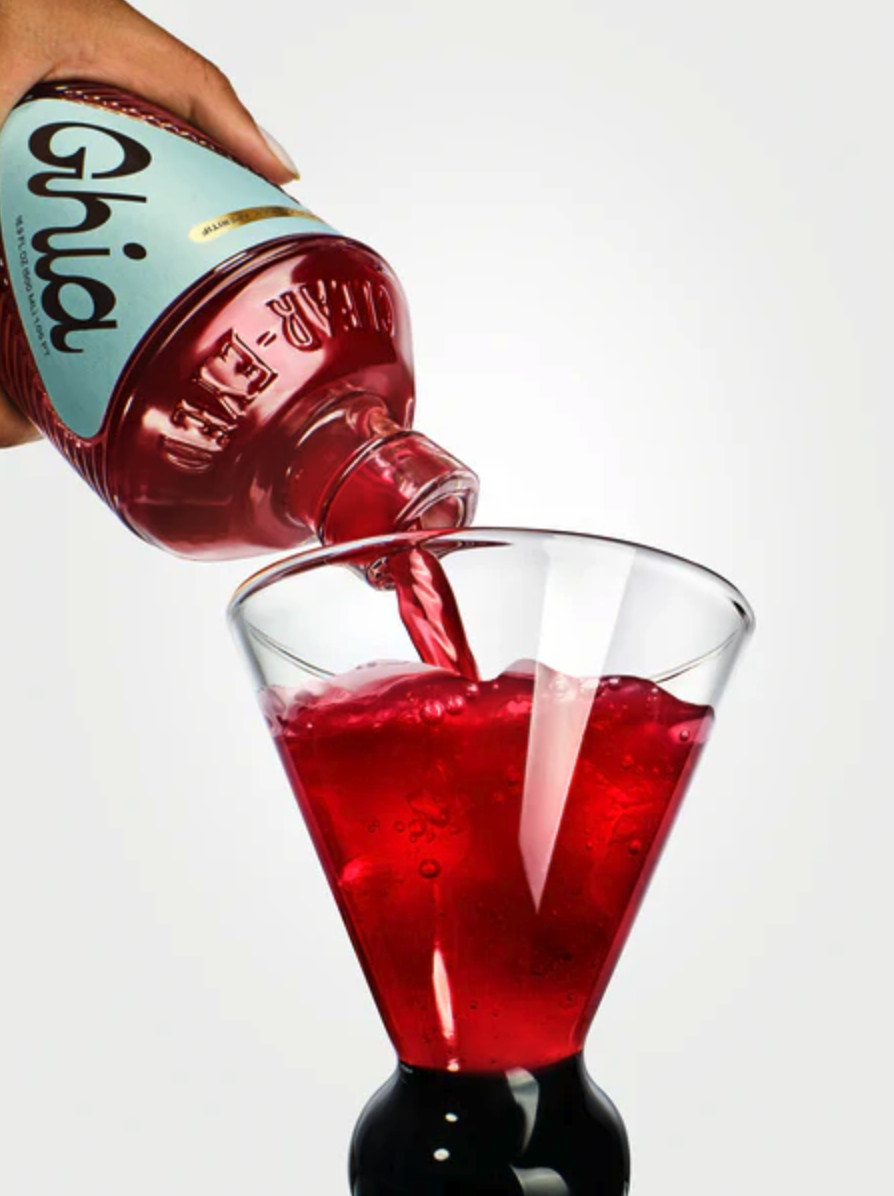 Ghia aperitif food photography with white background to highlight the drink's vibrant red color. Tips for choosing background in food photography.
For example, Ghia, a non-alcoholic aperitif brand, effectively used a clean, white background to photograph their vibrant red drink in a stemless glass. According to founder Melanie Masarin on the Shopify Masters podcast, this choice was deliberate: “We wanted to do a glass that felt like it was luxurious, but also very approachable.” The simple background highlights the product and its sophisticated yet accessible appeal.
2. Master Lighting Techniques
Lighting is a powerful tool in food photography. It can dramatically enhance the textures of your dishes, establish the desired mood, and eliminate distracting shadows. Soft light, diffused and even, creates a gentle and pleasing illumination, while hard light can produce dramatic, sharp shadows. To minimize harsh shadows, opt for a large, soft light source such as a window with diffused light or a softbox, a common lighting modifier. Alternatively, shooting outdoors in natural, indirect light often yields beautiful results.
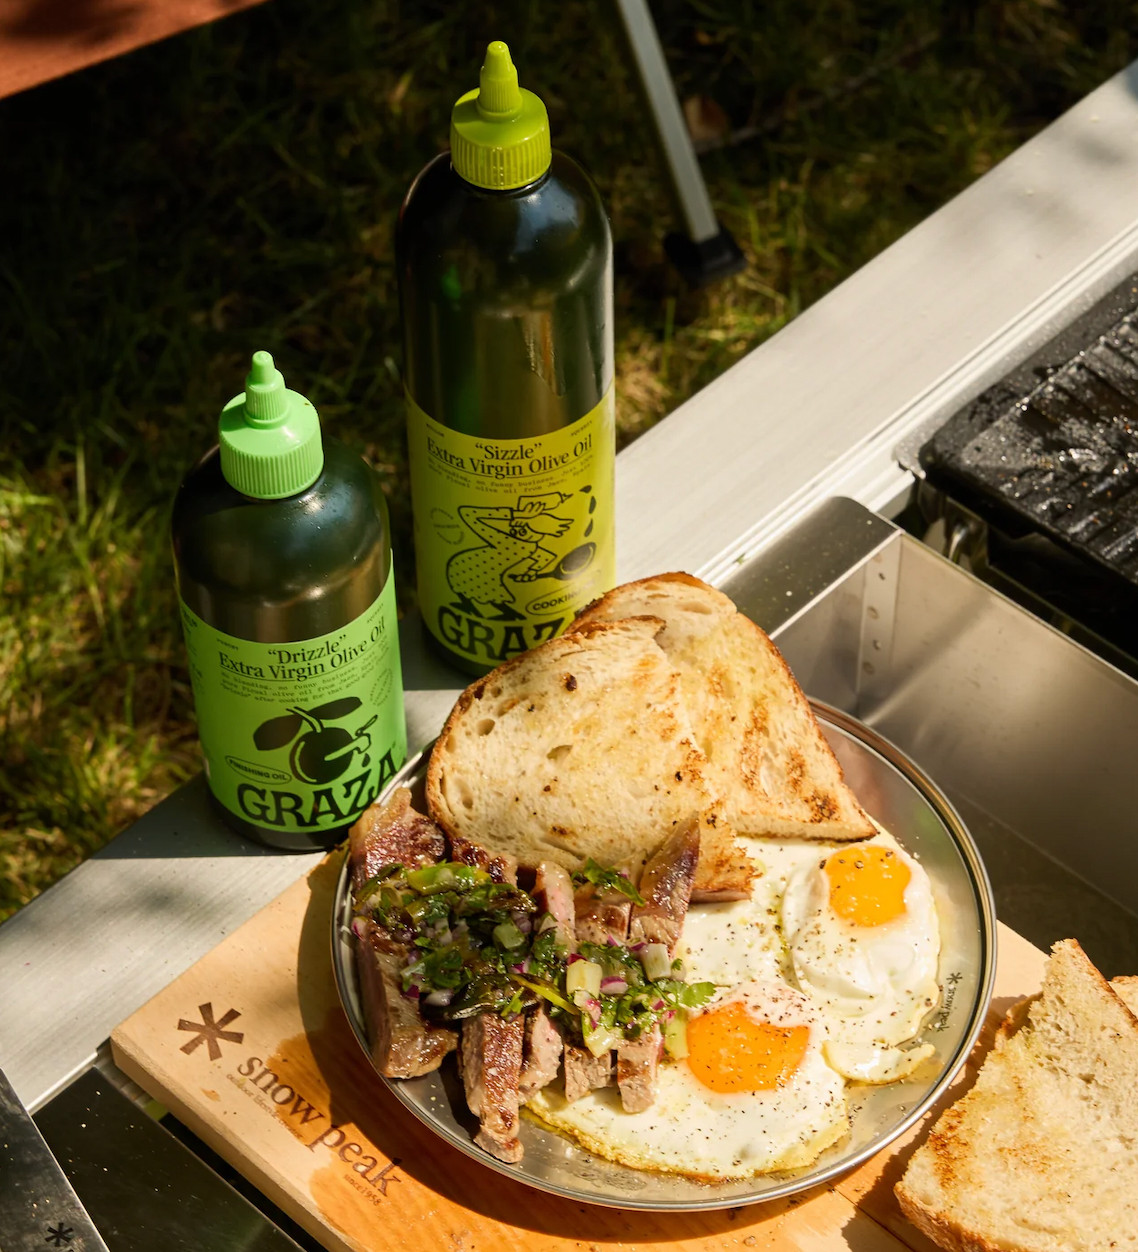 Graza steak and eggs food photography using natural side lighting to enhance texture and visual appeal. Example of effective natural lighting in food photography.
Consider Graza’s photo of steak and eggs with chimichurri. This image utilizes natural light from the side, which beautifully accentuates the textures of the steak, eggs, and sauce, making the dish look incredibly appetizing.
Different lighting directions can enhance various types of food and compositions. Top lighting, directly from above, is ideal for flat lays of plated dishes or entire tablescapes. Simple front lighting is often effective for social media posts where clarity and straightforward appeal are desired. Side lighting, as seen in the Graza example, can add depth and drama, especially when highlighting individual ingredients or product features.
3. Perfect Your Composition
Overcrowding your frame with too many elements can divert attention from the food itself. While placing the main dish directly in the center might seem intuitive, it doesn’t always result in the most visually engaging image. Employ the rule of thirds to create more dynamic compositions. Imagine dividing your frame into nine equal rectangles using two horizontal and two vertical lines. Positioning your main subject along these lines or at their intersections naturally draws the viewer’s eye and creates a more balanced and interesting image.
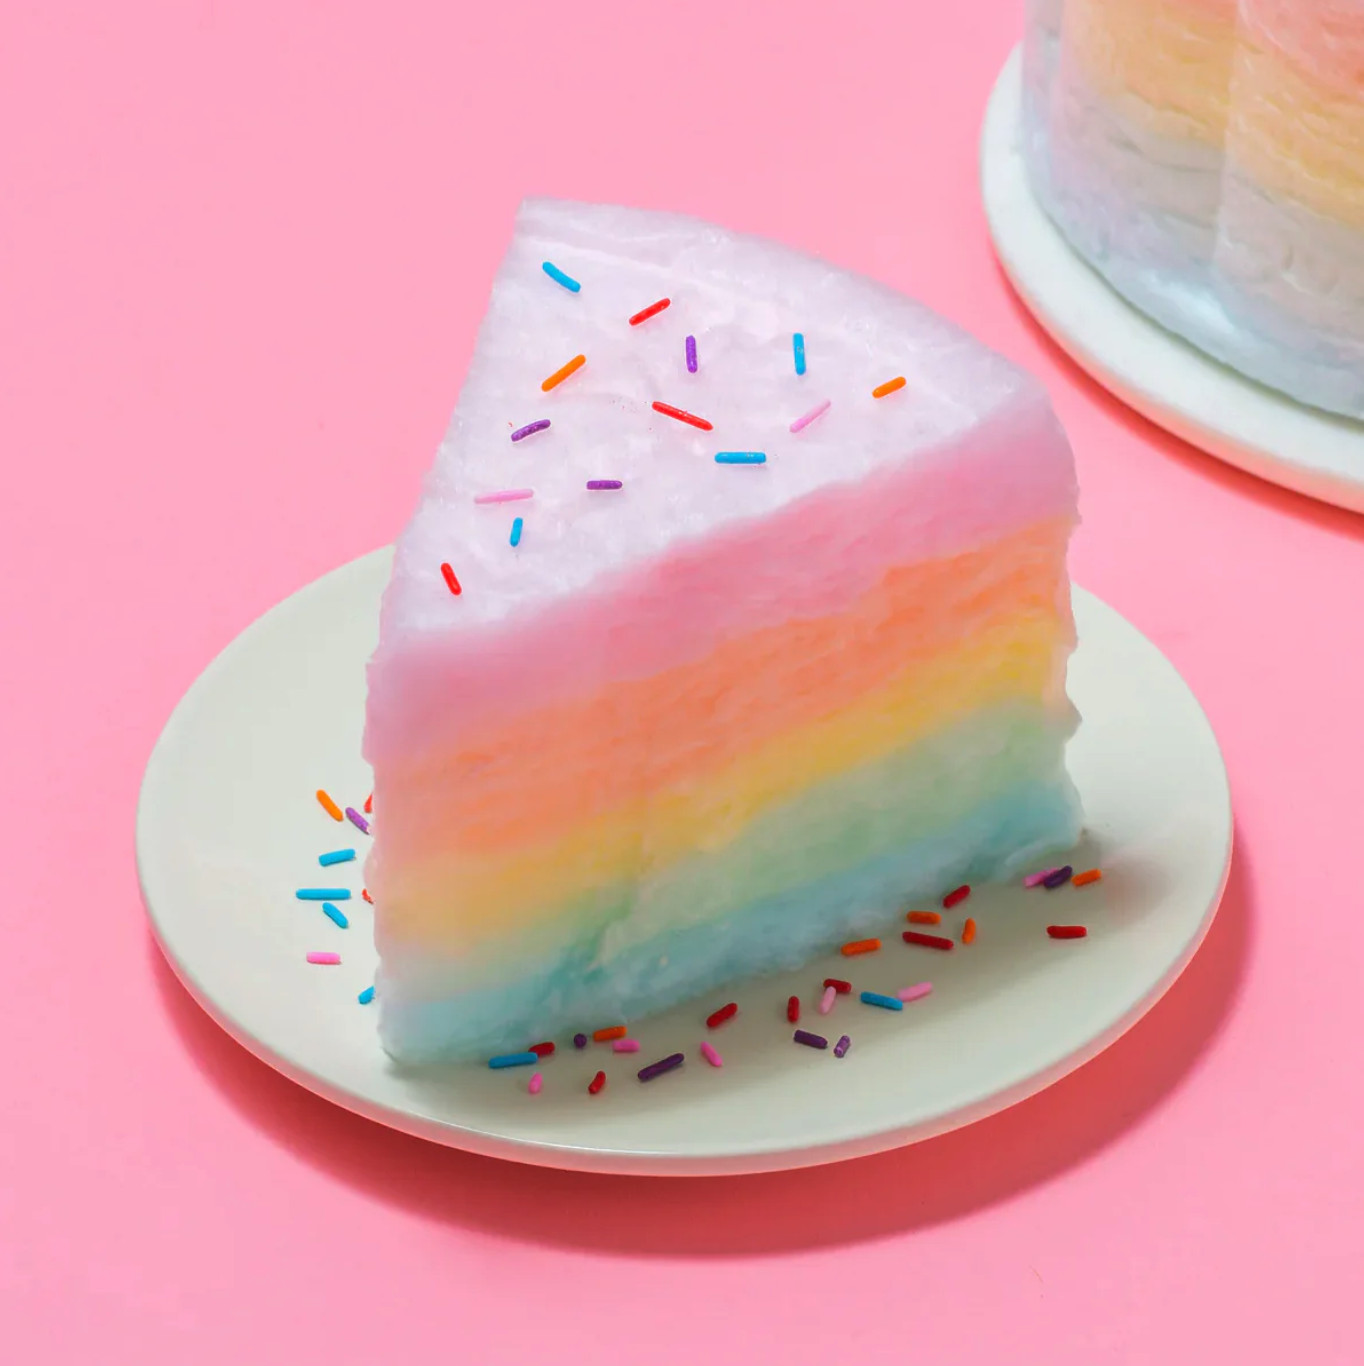 Floof cotton candy cake side angle food photography showcasing colorful layers and dimension. Example of using side angle for food photography composition.
Different dishes benefit from different angles. Experiment to discover the most flattering perspective for your food. For instance, a side shot of Floof’s cotton candy cake effectively captures the vibrant, colorful layers of the dessert, adding a sense of dimension and visual intrigue that a top-down shot might miss.
4. Stabilize Your Camera for Sharpness
Camera stability is paramount for capturing crisp, clear food photos. Even slight camera shake can result in blurry images, especially when focusing on fine details. Using a tripod or camera stand is essential to prevent blur and ensure sharpness. Clarity is particularly important when photographing foods with intricate textures, such as tea cakes dusted with powdered sugar or the crispy crust of fried tofu. For precise adjustments, consider a tripod with a geared head, like the Manfrotto 405, which allows for meticulous pan and tilt movements. A camera stand also offers versatility in capturing different angles by facilitating easy vertical and horizontal adjustments.
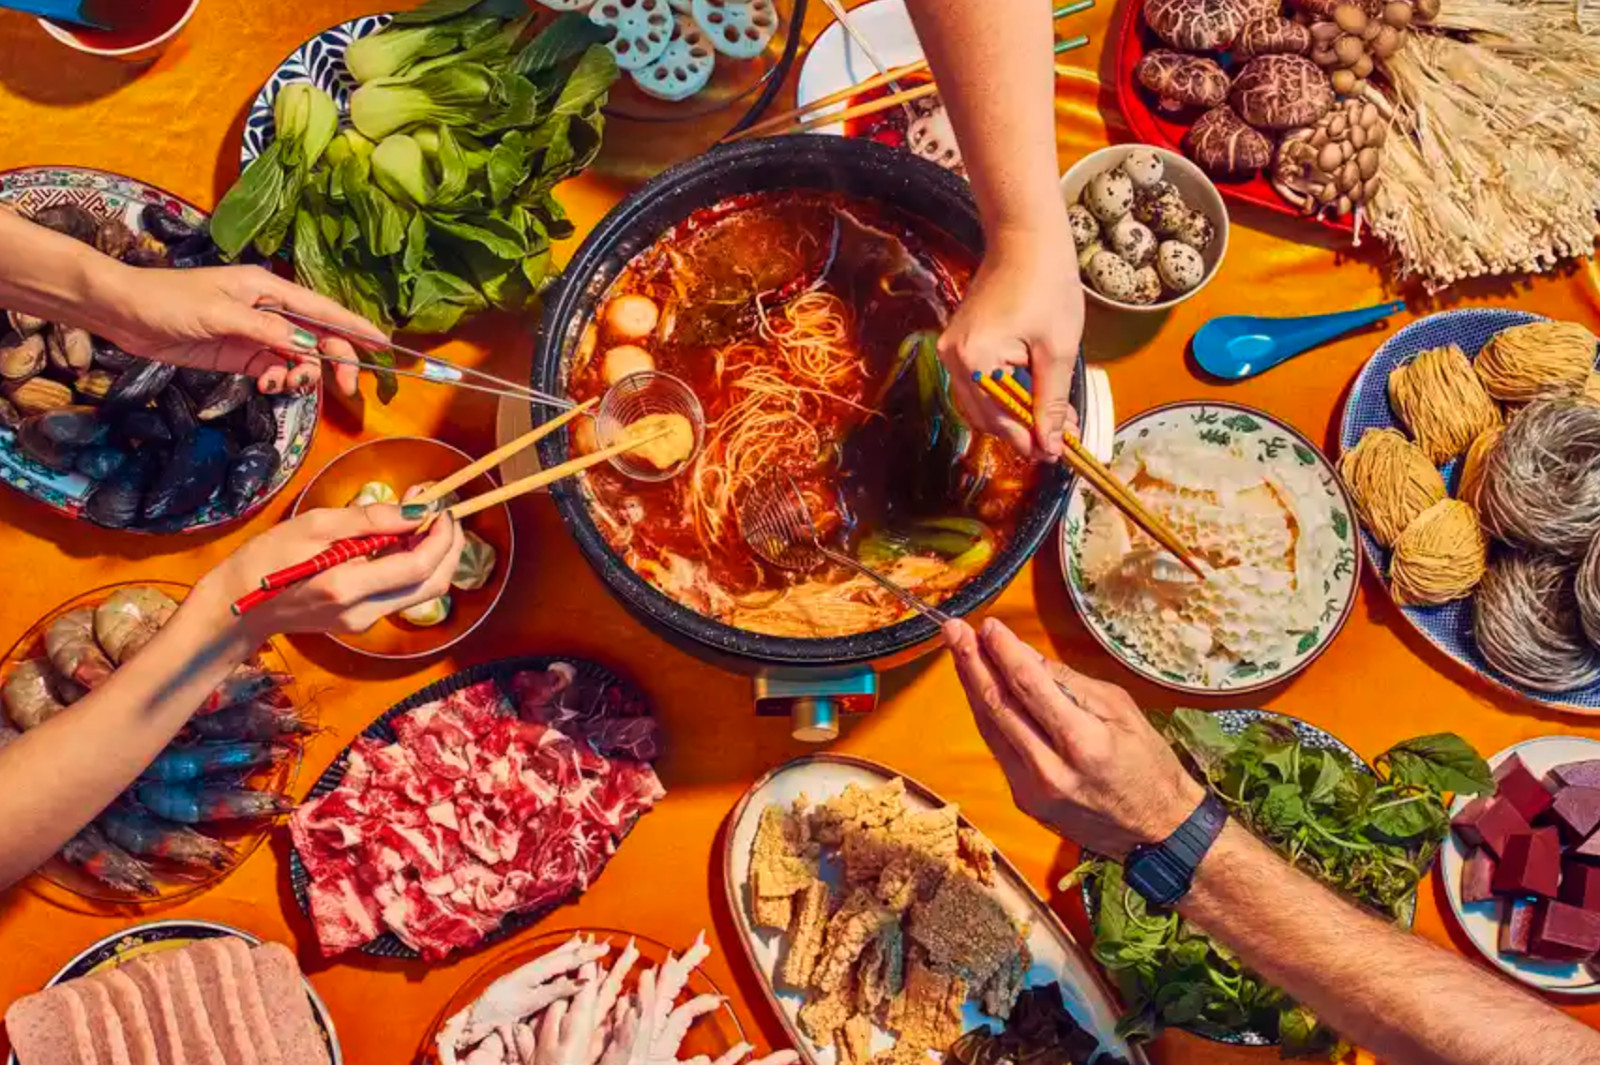 Fly by Jing hot pot overhead food photography emphasizing colors and textures. Example of using overhead shot for food photography and camera stabilization equipment.
Fly by Jing’s overhead shot of their hot pot beautifully showcases the diverse colors and textures of the ingredients. Food photographers frequently utilize overhead rigs or boom arms to securely position cameras for overhead shots like this, ensuring stability and sharpness.
5 Essential Food Photography Tips
For major brands, food photography often involves a dedicated creative team, including an art director, food stylist, prop stylist, food photographer, and digital technician. However, small business owners and independent creators often handle these roles themselves. Here are five valuable tips to enhance your food photography skills:
1. Experiment with Different Lenses
Lenses significantly impact the look and feel of your images. Macro lenses, with their longer focal length and higher magnification capabilities compared to standard lenses, excel at capturing extreme close-up shots. This is incredibly useful for emphasizing specific ingredients, intricate textures, or minute details that make your food unique and appealing.
Probe lenses, such as the Laowa 24mm f/14 2x macro probe, offer unique perspectives with their long, slender barrels, allowing you to capture angles that are otherwise unattainable. For example, you could use a probe lens to shoot directly through the center of a donut, creating a truly distinctive and eye-catching image.
2. Utilize Light Filters and Modifiers
Controlling and shaping light is key to professional-looking food photography. Soften harsh light sources by placing diffusion materials between the light and your subject. Professional photographers often employ diffusions like LEE Filters’ Opal Frost, but in a pinch, even a simple bedsheet can serve as an effective diffuser.
To add visual flair and interest, consider using a North Star filter. This type of filter creates multiple streaks of light radiating from a point light source, adding a dazzling effect to elements like cocktail glasses or candle flames, enhancing the overall ambiance of your food scene. Light modifiers like nets and flags are also valuable tools for selectively blocking or softening light in specific areas of your composition, giving you precise control over shadows and highlights.
3. Master Focus Stacking for Depth
Focus stacking is a powerful technique that uses software to combine multiple images, each with a different area in focus, into a single composite image with significantly increased depth of field. This technique is particularly beneficial in macro food photography, especially for extreme close-ups where achieving complete focus on all elements in a single shot can be virtually impossible due to shallow depth of field.
Professional cameras with large sensors and shallow depth of field are well-suited for focus stacking. Smartphone users can also explore this technique using focus stacking apps like FocusStacker on iOS, allowing for greater control over sharpness and detail in their food photos.
4. Employ a Color Checker for Accuracy
Appetizing colors are paramount in food photography. However, accurately capturing true-to-life colors can be challenging. A color checker, such as the X-Rite ColorChecker Passport, is a valuable tool for ensuring color accuracy. This tool resembles an eyeshadow palette, featuring small squares of color, each with a precisely calibrated, measurable value. By including a color checker in your initial shot, you provide a reference point for color correction during the editing process, allowing you to faithfully reproduce the vibrant colors of your food. X-Rite offers plugins for Capture One and Adobe Lightroom that can read these color patches and calibrate your camera for accurate color representation.
5. Monitor Your Images on a Larger Screen
Tethering your camera to a computer via USB offers a significant advantage: a larger screen for immediate image review during your photoshoot. Software like Adobe Lightroom and Capture One supports tethered shooting for major camera brands. These programs also facilitate direct image transfer to your computer, eliminating the need for manual import and freeing up memory card space. Viewing your images instantly on a larger screen allows you to identify any issues with composition, lighting, or focus and make necessary adjustments right away, streamlining your workflow and ensuring optimal results.
What Settings Should I Use for Food Photography?
Manual mode is highly recommended for food photography as it provides consistent results from shot to shot by giving you full control over aperture, shutter speed, ISO, and white balance. If you are using a smartphone and want more control than automatic settings offer, apps like Halide can provide manual control over some of these key settings.
Aperture
Aperture controls the amount of light entering the camera lens and reaching the sensor. It’s adjusted by opening or closing the aperture ring of your lens. A wider aperture opening allows more light to pass through and is represented by a lower f-stop number (e.g., f/2.8). The f-stop value directly affects depth of field – the area of your image that appears in focus. A low f-stop value creates a shallow depth of field, blurring the background and foreground and isolating the subject. A high f-stop value (e.g., f/22) results in a greater depth of field, keeping more of the image sharp from front to back.
Stopping down your lens (increasing the f-stop number) increases the depth of field, bringing more of the scene into focus. However, excessively high f-stop values can lead to diffraction, a phenomenon where light waves bend as they pass through the lens, resulting in a slight decrease in overall sharpness and fine detail. For food photography with a full-frame DSLR, a mid-range aperture like f/11 often provides an excellent balance, delivering sharp images with a pleasing depth of field that keeps both the foreground and background reasonably clear while maintaining fine details.
Shutter Speed
Shutter speed is the duration your camera’s sensor is exposed to light. A slower shutter speed (e.g., 1/15th of a second) allows more light to enter the camera, which is beneficial in low-light situations but can also introduce motion blur if there is movement in the scene or camera shake. When shooting with natural light, especially indoors, you may need to use slower shutter speeds. Conversely, a faster shutter speed (e.g., 1/1,000th of a second) freezes motion, ideal for capturing action shots like pouring liquids or showcasing the bubbles in a drink.
When using flash, consult your camera’s manual to determine the flash sync speed (often around 1/200th of a second). Using a shutter speed faster than the sync speed can reduce the amount of ambient light in your photo, such as window light or overhead lighting, giving you greater control over the light from your flash. To maximize control over light shape and direction when using flash for food photography, try to minimize ambient light as much as possible.
ISO
ISO setting controls your camera sensor’s sensitivity to light. A lower ISO value (e.g., ISO 100) makes the sensor less sensitive to light, resulting in the least amount of digital noise (grain) in your images. Low ISO is ideal for brightly lit scenes, such as outdoor photography or when using flash. Digital noise appears as random discolored specks in your image, which can degrade color quality and obscure shadow detail.
A higher ISO value (e.g., ISO 3200) increases the sensor’s light sensitivity, allowing you to shoot in darker conditions but also increasing digital noise. For food photography, it’s generally best to use the lowest ISO setting possible for the given lighting conditions to minimize noise and maximize image quality. Refer to your camera manual to find its native ISO range (often between ISO 100 and 200), as this setting typically yields the best image quality.
White Balance
Different light sources have varying color temperatures, measured in Kelvin (K). This color temperature affects the white balance of your images, influencing how colors are rendered. For instance, an incandescent light bulb has a warm, yellowish color temperature around 2700K, while daylight on a cloudy day has a cooler, bluish color temperature around 6000K. Your camera’s white balance settings allow you to adjust for these different light temperatures, ensuring accurate color reproduction. You can usually find preset white balance options in your camera menu, such as “Daylight,” “Cloudy,” “Incandescent,” and “Fluorescent,” or you can manually set the Kelvin value for precise control.
Avoid mixing light sources with significantly different color temperatures (e.g., warm incandescent light and cool daylight) in the same scene, as this can create color balance challenges in post-processing. If you plan to use daylight or flash, turn off any artificial lighting to maintain consistent color temperature and simplify white balance adjustments.
Read More
How to Take Food Photos FAQ
How do you take good pictures of food?
The key to taking great food photos involves three essential steps: First, plate your food attractively, paying attention to visual appeal and presentation. Second, find beautiful natural lighting, ideally diffused and indirect. And third, ensure your camera is stable by using a tripod or stable surface to prevent blur.
How do you take food pictures without shadows?
To minimize shadows in food photography, avoid direct sunlight, which creates harsh, defined shadows. Position a large, soft light source close to your subject. Shooting outdoors in open shade or near a window with soft, diffused light will yield the best results for shadow-free food photos.
What camera settings should I use for food photography?
For optimal food photography results, use a low ISO setting to minimize digital noise and maintain image clarity. Select a mid-range aperture, such as f/11, to achieve a good depth of field and maximize sharpness. Adjust your shutter speed based on the available light; faster speeds for bright light, slower speeds for lower light. For maximum flexibility in editing and color correction, capture your food photographs in RAW format.
