Getting ready for an international trip or need to renew your passport? One crucial step is getting a compliant passport photo. Traditionally, this meant a trip to a photo booth or pharmacy. But what if you could take a passport photo yourself, using the device you already have in your pocket? Yes, you absolutely can take a passport photo with your iPhone, and achieve professional-quality results right at home.
This comprehensive guide will walk you through each step of taking a passport photo using your iPhone. We’ll cover everything from understanding official guidelines to optimizing your iPhone camera settings and ensuring your final photo is perfect and ready for your passport application. Forget the stress and expense of external photo services – learn how to confidently take your own passport photo with your iPhone.
Pressed for time and want a guaranteed perfect result? Consider using a dedicated passport photo app for iPhone for a seamless experience.
 Example of a compliant UK passport photo taken using an iPhone and the PhotoAiD app, showcasing convenience and quality.
6 Simple Steps to Capture Your Passport Photo with an iPhone
Taking a passport photo with your iPhone is surprisingly straightforward. It breaks down into just six key steps, transforming a simple snapshot into a photograph that meets all official passport requirements. Let’s explore each step in detail:
- Understand the Passport Photo Requirements
- Optimize Your iPhone Camera Settings
- Select the Ideal Photo Location
- Prepare Yourself for the Photo Session
- Capture Your Passport Photo
- Edit and Finalize Your Photo
Let’s delve into each of these steps to ensure you capture a perfect passport photo with your iPhone.
Step 1: Know the Official Passport Photo Requirements
Before you even pick up your iPhone, the most critical step is to familiarize yourself with the official passport photo guidelines. Treat this as your essential checklist. While taking photos at home offers convenience, adherence to these regulations is non-negotiable for passport acceptance. Here are the key UK passport photo requirements that your iPhone photo must satisfy:
| Rule | Description |
|---|---|
| Size | Must be 35mm wide by 45mm tall. |
| Digital Dimensions & File Size | Minimum dimensions are 600 pixels by 750 pixels. File size must be between 50KB and 10MB. |
| Head Size | Your head, measured from the crown to the bottom of your chin, should measure between 29mm and 34mm. |
| Background | The background must be a plain, uniform light grey or cream colour. Avoid patterned backgrounds, shadows, or any visible objects. |
| Photo Quality | Photos must be in colour, sharply focused, and correctly exposed with good lighting. No pixelation, glare, or shadows are permitted on your face. Portrait mode is not allowed as it can blur the background and edges. |
| Digital Alterations | Digital enhancements or alterations are strictly forbidden. This includes removing red-eye, blemishes, or changing skin tone. Photos must accurately represent your natural appearance. |
| Facial Expression | Eyes must be fully open and clearly visible, mouth closed, and a neutral expression maintained. No smiling, frowning, or raised eyebrows. Face the camera directly. |
| Photo Composition | The photograph should include your head and upper shoulders. There should also be some clear space (white space) between the top of your head and the upper edge of the photo. |
| Headwear | Head coverings are only permitted for documented religious or medical reasons. All hair accessories and non-essential prescription glasses should be removed (unless medically necessary and documented). |
| Resolution | A high resolution of at least 300 DPI (dots per inch) is required for printed photos. |
| Recency | The photo must have been taken within the last month to accurately reflect your current appearance. |
Important Note: When taking your photo with an iPhone, ensure you capture your upper body and avoid cropping the image yourself. The passport processing agency will handle the cropping to ensure it meets the precise head size requirements.
Need more clarification on passport applications? Visual examples are always helpful!
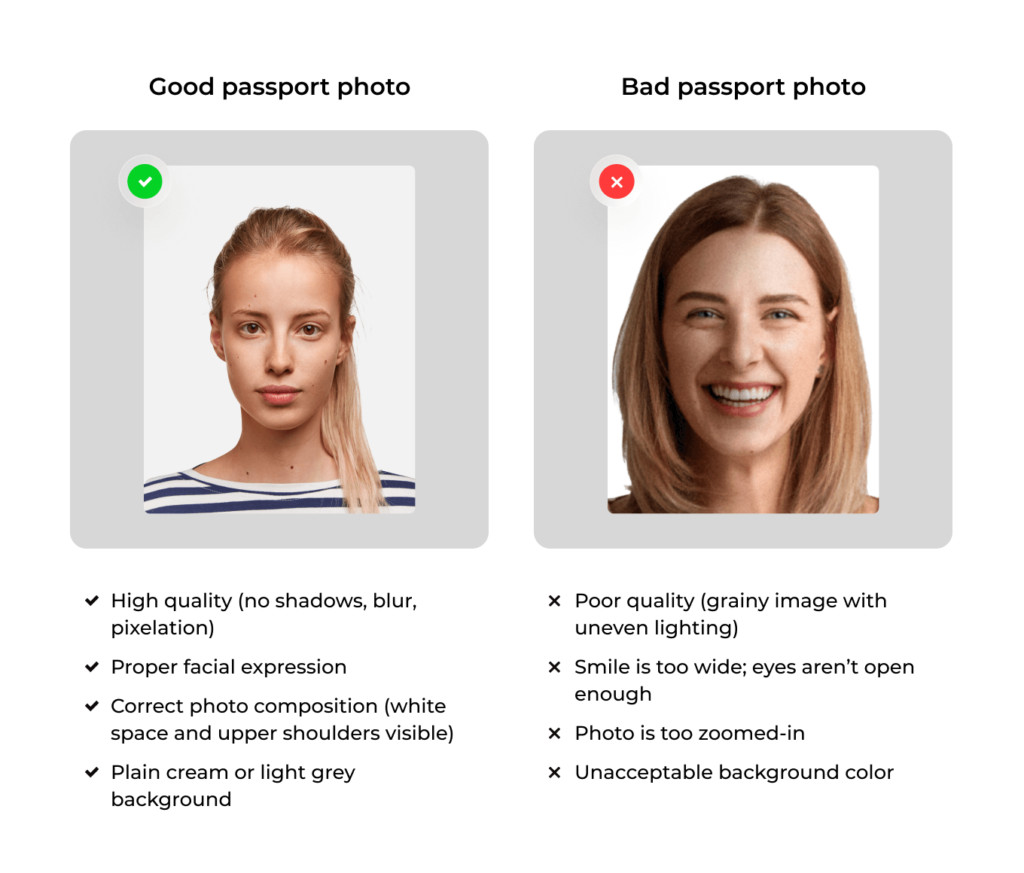 Examples illustrating acceptable and unacceptable UK passport photos, highlighting criteria like background, expression, and photo quality.
Step 2: Optimize Your iPhone Camera Settings for Passport Photos
Now, let’s configure your iPhone’s camera to ensure you capture the best possible passport photo. These adjustments will maximize image quality and resolution.
- Access Camera Settings: Open the ‘Settings’ app on your iPhone and scroll down until you find ‘Camera.’ Tap to enter the camera settings menu.
- Select Formats: Tap on ‘Formats’ within the Camera settings.
- Choose High Efficiency: Select ‘High Efficiency.’ This format is excellent for image quality while managing file size.
- Maximize Photo Resolution: Under ‘Photo Capture,’ tap ‘Photo Mode’ and choose the highest resolution option available. This setting primarily applies to your rear camera, which you should ideally use for passport photos.
These settings will help you capture high-resolution images suitable for passport photos. Next, let’s refine your composition settings:
- Return to Camera Settings: Go back to ‘Settings’ → ‘Camera’ to access the main camera settings menu again.
- Find Composition Section: Locate the ‘Composition’ section within the menu.
- Activate Grid and Level: Turn on the ‘Grid’ and ‘Level’ toggles (the sliders should turn green). These features are invaluable for aligning your shot and ensuring your photo is straight.
- Disable Mirror Front Camera: Deactivate the ‘Mirror Front Camera’ option. When using the front camera, you want the image to be as it is in reality, not mirrored.
For iPhone 15 and newer users, there’s an extra tip from professional photographer Dominic Bleijie:
“The iPhone 15 series boasts an upgraded in-camera sensor, significantly enhancing headshot quality, making it ideal for passport photos. To further improve image depth, adjust your iPhone’s aperture to f/4.0 and focus precisely on the face. This setting reduces the depth of field, ensuring sharpness and focus on the subject’s face.” – Dominic Bleijie, Professional Photographer & Videographer.
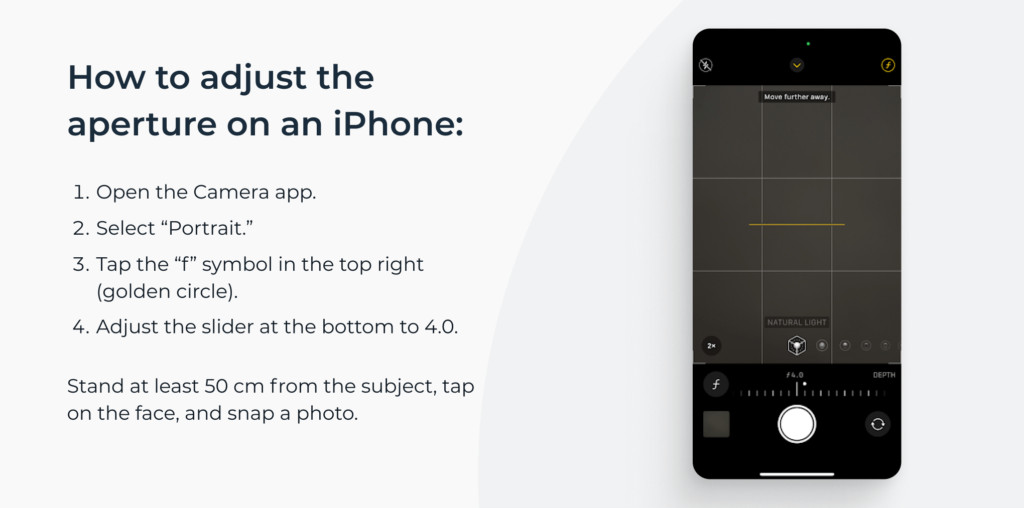 Visual guide showing how to adjust the aperture setting on an iPhone camera for optimal passport photo quality, demonstrating the steps within the Camera app interface.
Step 3: Find the Perfect Location with Ideal Lighting
The right location is crucial for a successful passport photo shoot at home. The key element here is lighting. You need even, neutral lighting to avoid shadows and ensure your features are clearly visible.
The best option is to position yourself facing a window in a well-lit room. Natural daylight is generally the most flattering and easiest to work with. Experiment with different angles relative to the window by taking a few test shots to pinpoint the spot that gives you the most even illumination.
There’s no rigid rule about the exact setting, as long as your face is uniformly lit without any harsh shadows.
Pro Tip for Enhanced Lighting: If you have access to professional lighting equipment like softbox lamps, position them on both your left and right sides, approximately at a 30-degree angle. This setup ensures balanced and soft illumination, mimicking natural daylight and eliminating harsh shadows.
Step 4: Prepare Yourself for the Passport Photo Session
With your iPhone ready and your photo location set, it’s time to prepare yourself for the photoshoot. While the official requirements might seem detailed, the key is to aim for a simple, clean, and natural look that avoids anything that could lead to photo rejection.
Here’s a checklist to get you ready:
- Clothing: Choose plain, darker-coloured clothing without patterns. Avoid very light colours that might blend with the background. Steer clear of low-cut tops and turtlenecks, opting for something simple and neat.
- Makeup: If you wear makeup, keep it minimal and natural. Heavy makeup, contouring, shimmers, and glossy products are best avoided as they can be deemed unsuitable. A natural, matte finish is ideal.
- Glasses and Headwear: Remove prescription glasses (unless medically necessary and documented) and any head coverings not worn for religious reasons. This includes hair accessories. If you have a fringe, pin it back so it’s not covering your forehead or eyes.
- Jewellery: Keep jewellery simple. Small stud earrings or a thin necklace are generally acceptable. Avoid large or sparkly jewellery that can reflect light and cause glare in the photo.
- Hair: Style your hair so that your face is fully visible. Tuck your hair behind your ears or tie it back to ensure your facial contours and eyebrows are clearly seen.
Pro Tip on Clothing Colours: While white, cream, and light grey are common background colours, they aren’t ideal for clothing as they can blend too much. If you prefer a white shirt, layer it with a darker jacket or cardigan to create contrast and ensure you stand out against the background.
Step 5: Capture Your Passport Photo with Your iPhone
Ready to take the photo? For a visual walkthrough, you can check out video tutorials on taking passport photos with an iPhone. Here’s a quick recap of the essential steps for capturing the perfect shot:
- Stabilize Your iPhone: Place your iPhone on a stable surface like a table or windowsill. Using a tripod is even better if you have one. If possible, ask someone else to take the photo for you.
- Position Yourself Correctly: Stand or sit about 50cm (approximately 20 inches) away from your iPhone.
- Maintain Posture and Eye Line: Straighten your shoulders and look directly at the camera lens. Pro Tip: Focus on the upper horizontal grid line on your iPhone screen. Your eyes should be level with or slightly above this line.
- Align Your Head: Use the vertical grid lines to centre your head in the frame. This ensures your face is perfectly positioned in the middle of the photo.
- Expression and Pose: Maintain a neutral facial expression with your mouth closed. You can slightly relax your lips, but avoid smiling widely. Ensure your eyes are wide open and clearly visible.
- Take Multiple Shots: Take several photos, experimenting slightly with your posture and expression. This gives you options and increases the chance of getting a perfect photo. Pro Tip: Use the self-timer function (set to 5 or 10 seconds) if you are taking the photo yourself. This gives you time to get into position and compose yourself.
Don’t hesitate to take plenty of photos – digital photos are free! Review them on your iPhone screen and select the one you feel is best before moving to the final step.
Step 6: Edit and Finalize Your Passport Photo
The final step is editing your chosen photo to ensure it meets all technical passport photo requirements. This primarily involves background adjustments, resizing, and cropping.
You could attempt to manually edit your photo using free online tools like background removers and photo croppers. However, unless you have photo editing experience and a detailed understanding of passport photo specifications, this can be risky. Ensuring correct composition, accurate head size, and sufficient white space, while meeting all other requirements, is complex.
This is where specialized passport photo services like PhotoAiD® become invaluable.
PhotoAiD® offers a comprehensive service that simplifies the process. You simply upload your iPhone photo, and their intelligent system and expert team handle the rest.
What makes such apps reliable? It’s the combination of AI-powered processing and human expert verification. Unlike purely automated systems, services like PhotoAiD® employ professional photo experts who manually review every submitted photo against the most stringent official guidelines. This dual-layer verification significantly increases the likelihood of your photo being accepted. Try a passport photo app for iPhone to experience the ease and assurance it provides.
 Illustration highlighting the benefits of using PhotoAiD for UK passport photos, emphasizing expert verification, guaranteed compliance, and customer satisfaction.
Read what users are saying about passport photo apps on review platforms like Trustpilot:
“Quick and easy to use with great guidance. So pleased I could do this at home and take as many photos as I like to get one I was happy with and could live with on my passport for the next 10 years rather than waste lots of money on getting photos taken in photo booths or shops. It was also reassuring to have someone there to check the photo before it is sent to you. Excellent service and value.” – Fiona S (GB)
“Just renewed two family passports, first when through with no problem. Second was initially rejected, emailed photoAid and received reply almost by return. Followed instructions and second application went through without any issues. Really helpful and great service.” – Hazel (GB)
“Quite easy to get your passport photos, just follow instructions and you can get photos in seconds or photos printed and sent to you. Also if a mistake is made you can make changes for free. Saved a trip to the photographer.” – Jeanette Young (GB)
Avoid Common Passport Photo Mistakes: Insights from Analyzing 10,000+ Photos
With extensive experience in passport photo verification, analyzing over 10,000 photos, here are key insights into common mistakes to avoid when taking your passport photo with an iPhone:
1. Correct Positioning is Key
Avoid close-up selfies that only show your face. Ensure the upper part of your torso is visible in the frame. Face the camera straight on, not in profile, and keep your head level. The camera should be at eye level, not positioned too high or too low.
2. Lighting Matters Significantly
Ensure your face is evenly and adequately lit. To prevent shadows, the light source should be directly in front of you. Avoid under- or overexposed photos. Natural daylight provides the best, most even lighting.
3. Maintain a Neutral Facial Expression
Relax your face and adopt a neutral expression. Avoid broad smiles or teeth-showing smiles. Keep your mouth closed. Also, make sure you are not squinting – your eyes must be fully open, visible, and level with the camera.
4. Aim for High Image Quality
Hold your iPhone steady to prevent blurry photos. Set your camera to its highest resolution setting and ensure good lighting to avoid grainy or pixelated images.
5. Appearance Details are Important
Remove non-essential prescription glasses to avoid glare. If medically required to wear glasses, ensure there are no reflections on the lenses. Pay attention to your hairstyle – keep hair away from your eyes, eyebrows, and facial contours.
Reviewing detailed guides and examples of common mistakes can further refine your approach and help you take a flawless passport photo with your iPhone.
iPhone Passport Photos: Final Thoughts
Taking your own passport photo with your iPhone is not only possible but also highly convenient and efficient. By adhering to the official passport photo requirements and following these step-by-step instructions, you can confidently create a compliant photo from the comfort of your home.
Here are the essential takeaways for taking passport photos at home with your iPhone:
- iPhones from iPhone 7 and newer models (released from 2016 onwards) have camera quality sufficient for passport photos.
- While having someone else take your photo is ideal, using the front camera is acceptable if you follow guidelines carefully.
- Selfies, in the casual sense, are not appropriate. Passport photos must meet stringent official criteria.
- While basic photo editing tools are available, using a dedicated passport photo service is recommended for guaranteed compliance.
For the most reliable way to take passport photos on your iPhone, consider using a passport photo checker and editor designed for compliance. This ensures your photo meets all requirements, saving you potential delays and complications in your passport application process.
FAQs
Can you take your own passport photo?
Yes, you absolutely can. With a smartphone and a little preparation, you can take a passport photo at home that meets all official requirements. This guide on taking passport photos with an iPhone provides detailed instructions.
Is there a free passport photo app for iPhone?
Many apps are advertised as “free,” but often, the free versions are limited. They might lack essential features like background removal or compliance verification. For a comprehensive passport photo app for iPhone that offers a compliance guarantee, consider exploring options like PhotoAiD®.
How do I crop a photo to passport size on an iPhone?
To crop your DIY passport photo to the correct size on your iPhone:
- Use a passport photo service for guaranteed manual checks and compliance.
- Use a free photo cropping tool, but be aware of no compliance guarantee.
- Utilize professional photo editing software like Photoshop or Gimp for manual adjustments.
Where can I get a passport photo taken?
Depending on your needs and budget, you have several options:
- Professional photography studios offer passport photo services.
- Photo booths are available in many pharmacies and retail locations.
- Passport acceptance facilities may offer photo services.
- Taking your passport photo at home using a guide or online tool is a convenient option.
How to take a passport photo with an iPhone for free?
To take a passport photo with your iPhone for free:
- Capture your photo following all official guidelines.
- Use a free background remover tool online to adjust the background.
- Use a free online photo cropper to resize and crop your photo to passport dimensions.
Remember that free tools may not guarantee compliance, so careful attention to detail is crucial.
How do I get a digital copy of my passport photo?
To obtain a compliant digital passport photo, utilize a passport photo service. Simply upload your photo, and they will provide you with a verified digital copy. If using your own photo and editing it yourself, ensure it meets these digital specifications:
- Minimum 600×750 pixels
- At least 300 DPI resolution
- File size between 50KB and 10MB.
How useful was this post?
Click on a star to give your rating!
Average rating 5 / 5. Number of votes: 1
No ratings yet! Be the first to rate this post.
Sources:
Sylwia Green
Sylwia is a skilled writer with a BA in English Studies and an active SPJ member. For nearly three years now, she’s been writing captivating articles for international companies, turning her lifelong passion into a career.